Amazon S3 (Edge)
On This Page
Edge Pipeline is currently available under Early Access. You can request access to evaluate and test its features.
Amazon Simple Storage Service (S3) is a durable, efficient, secure, and scalable cloud storage service provided by Amazon Web Services (AWS) that can be accessed from anywhere. S3 uses the concept of buckets to store data in multiple formats, such as images, videos, and documents, organize that data, and retrieve it at any time from the cloud. It also provides you access control, versioning, and integration with other AWS services.
You can configure Amazon S3 as an Edge Destination in your Pipeline to ingest data from your Source and load it using the Append mode into your S3 bucket. The data is stored in your S3 bucket as files compressed using one of the supported compression algorithms.
Note: Currently, Hevo Edge loads data into your S3 bucket as CSV files, which are compressed using Gzip.
Prerequisites
-
You have an active AWS account and an IAM user in the account with permission to:
-
Create an IAM role (to generate the IAM role-based credentials) or create an IAM user (to generate the access credentials).
-
An Amazon S3 bucket in one of the supported AWS regions is available. Refer to the Create an Amazon S3 bucket section for the steps if you do not have one.
-
The IAM role-based credentials or access credentials are available to enable Hevo to connect to your S3 bucket.
Create an Amazon S3 Bucket (Optional)
Note: The following steps must be performed by a Root user or a user with administrative access. In AWS, permissions and roles are managed through the IAM page.
-
Log in to the Amazon S3 console.
-
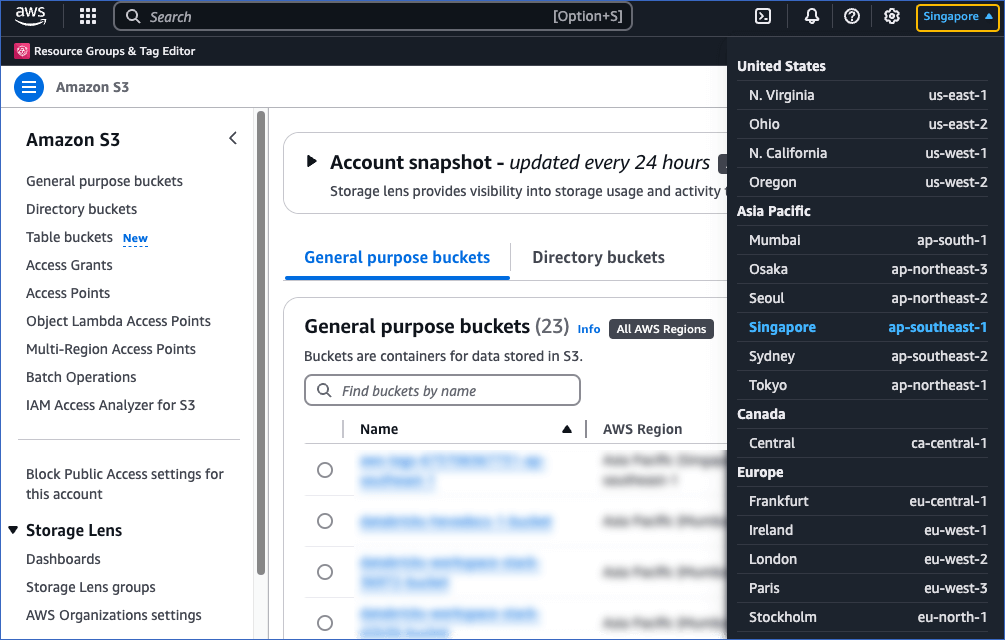
At the top right corner of the page, click your current AWS region, and from the drop-down list, select the region in which you want to create your S3 bucket. For example, Singapore. It is recommended that you co-locate your S3 bucket in the same region as your Hevo account for faster access.
-
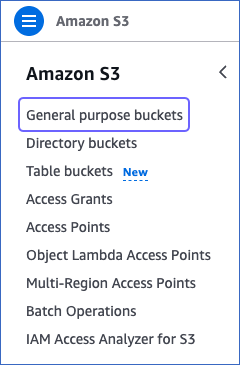
In the left navigation pane of your Amazon S3 dashboard, click General purpose buckets.
-
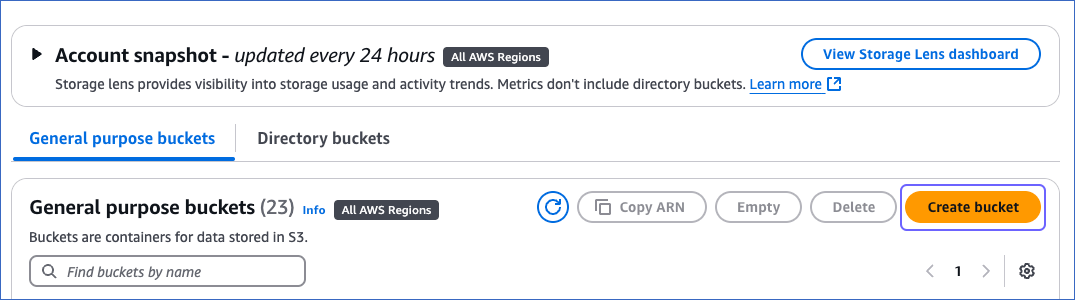
In the right pane, under the General purpose buckets tab, click Create bucket.
-
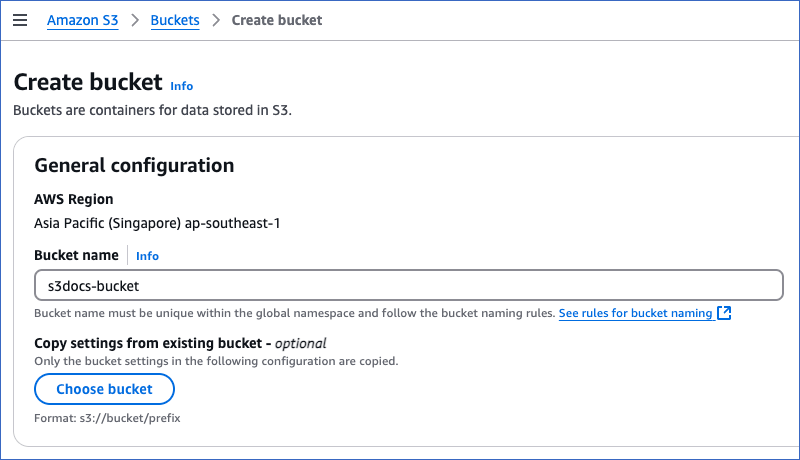
On the Create bucket page, in the General configuration section, do the following:
-
Ensure that the AWS Region in which you want to create your S3 bucket is the same as the one selected in Step 2.
Note: This field is non-editable.
-
Specify a unique Bucket name, not less than 3 characters and not exceeding 63 characters. Read Bucket naming rules for the conventions to follow while naming a bucket.
-
(Optional) Click Choose bucket under Copy settings from existing bucket - optional to select an existing bucket and copy its settings to your bucket.
-
-
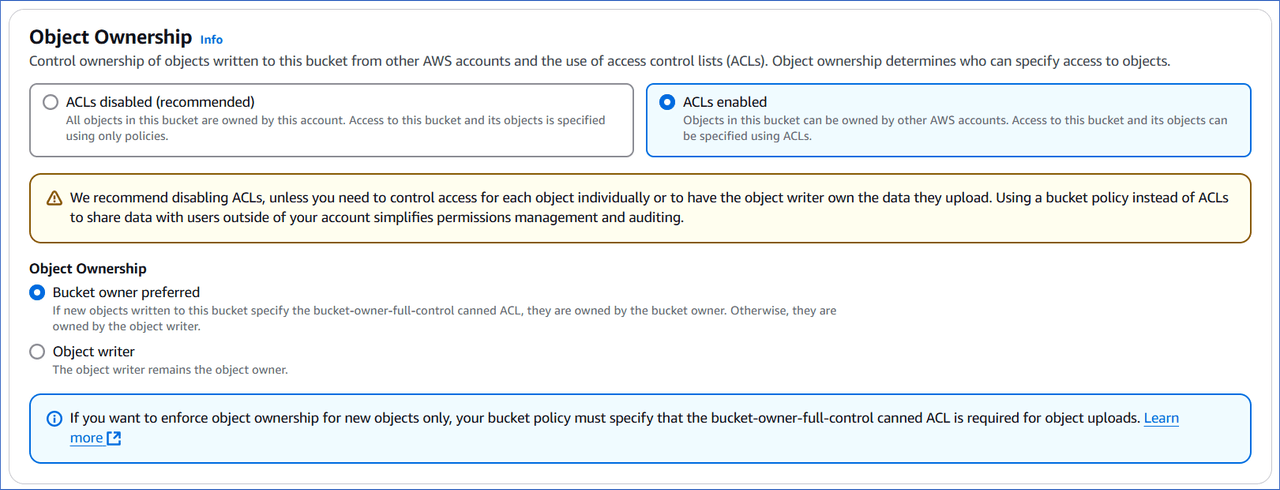
In the Object Ownership section, specify who can access the objects in your S3 bucket. Select one of the following:

-
ACLs disabled (recommended): The AWS account that creates the S3 bucket owns all the objects in it.
- Bucket owner enforced (Default): As the bucket owner, you have complete control over the objects created in the S3 bucket. You can grant other users access to the bucket and its objects through IAM user policies and S3 bucket policies.
-
ACLs enabled: The objects in the S3 bucket can be owned by other AWS accounts, and ownership is controlled through access control lists (ACLs). Based on how you want to enforce ownership, select one of the following:
-
Bucket owner preferred: As the bucket owner, you have complete control over new objects uploaded to the bucket with the bucket-owner-full-control canned ACL specified. The object writer, or the AWS account, remains the owner of new objects uploaded without this ACL. This setting does not affect the ownership of existing objects in the bucket. Read Access control list for information on the ACLs supported by Amazon S3.
-
Object writer: The AWS account that uploads objects to the bucket remains the owner of those objects. With this option, as the bucket owner, you cannot grant access through bucket policies to the objects owned by other AWS accounts.
-
-
-
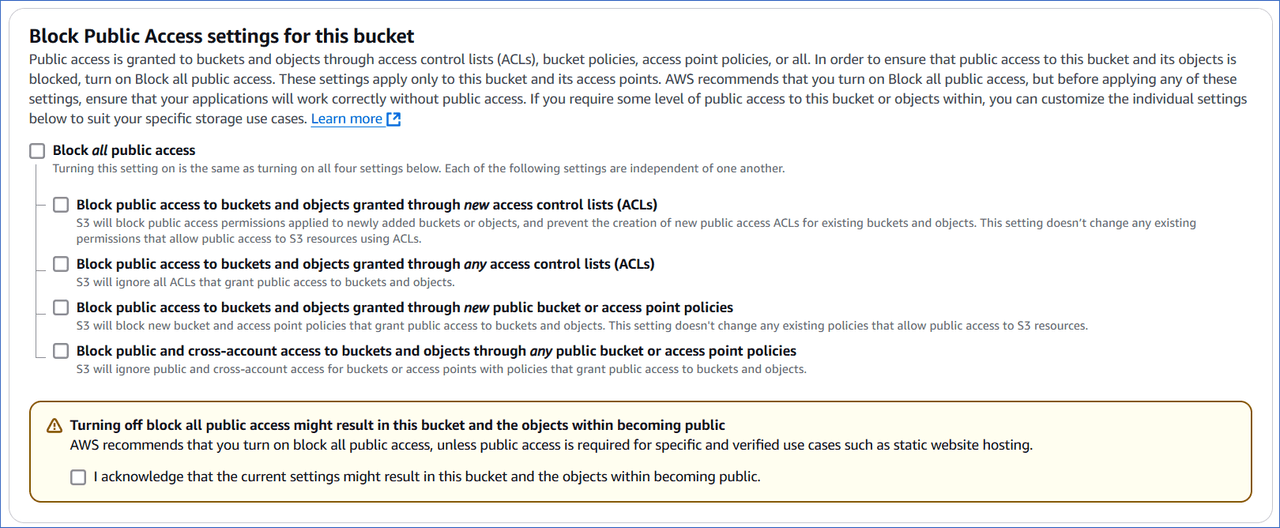
In the Block Public Access settings for this bucket section, do one of the following:
-
Select the Block_all_public access check box if you do not want the bucket and its objects to be publicly accessible. Default selection: Enabled.
-
Deselect the Block_all_public access check box to grant public access to the bucket and the objects within, or selectively block access to them. Read Blocking public access to your Amazon S3 storage to understand the individual options.
Note: If you turn off this setting, you must acknowledge the warning by selecting the I acknowledge that… check box.
-
-
(Optional) In the Bucket Versioning section, based on your requirements, specify one of the following:
-
Disable: Your bucket does not maintain multiple versions of an object, or is unversioned. This is the default selection.
-
Enable: Your bucket stores every version of an object, allowing you to recover objects in case they are accidentally deleted or overwritten.
Note: Once you enable versioning on a bucket, you cannot revert it; it can only be suspended. Read Using versioning in S3 buckets to understand the feature.
-
-
(Optional) In the Tags section, specify a key-value pair to categorize the data stored in your bucket by its purpose. For example, to consolidate all your billing data in the bucket, specify the key as Billing and its value as True.
-
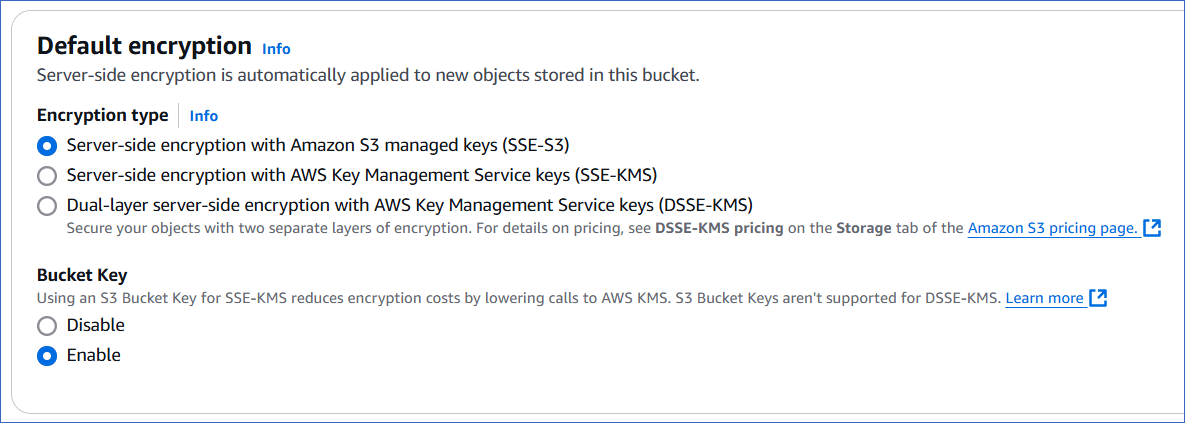
In the Default encryption section, specify the following:
-
Encryption type: The type of encoding you want Amazon S3 to apply on objects before storing them in the bucket. Server-side encryption is automatically applied to protect your stored data. Select from one of the following types:
-
Server-side encryption with Amazon S3 managed keys (SSE-S3) (Default): In this option, Amazon S3 manages the encryption and decryption process.
-
Server-side encryption with AWS Key Management Service keys (SSE-KMS): In this option, encryption is managed by AWS KMS. You can specify the default AWS managed key (aws/s3), select from one of the existing KMS keys, or create one at this time. Read Creating keys for the steps to add a new AWS KMS key.
-
Dual-layer server-side encryption with AWS Key Management Service keys (DSSE-KMS): In this option, two layers of encryption are applied to the objects by AWS KMS, which manages the encryption.
-
-
Bucket Key: A data key with a short lifespan generated by AWS from AWS KMS and kept in S3. Using a bucket key helps lower the encryption costs for SSE-KMS by reducing the traffic between S3 and AWS KMS. A bucket key is not required for SSE-S3 and is not supported by DSSE-KMS. For these encryption types, you must Disable bucket keys. Default selection: Enable.
-
-
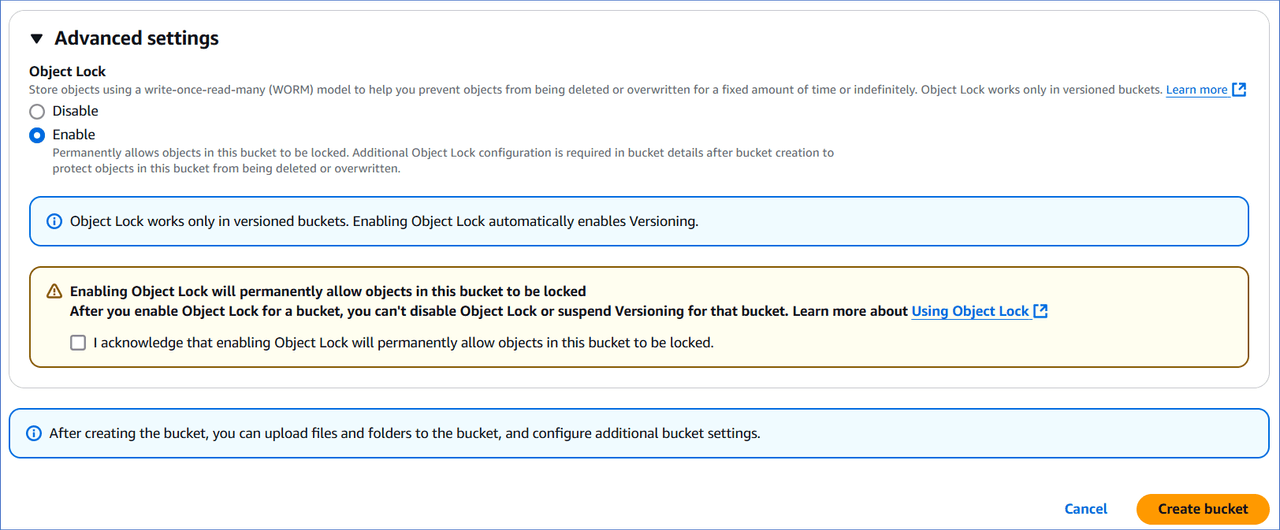
(Optional) In the Advanced settings, Object Lock section, specify one of the following:
-
Disable (Default): Objects uploaded to the bucket are not locked and can be deleted or overwritten.
-
Enable: Objects uploaded to the bucket are stored using the write-once-read-many (WORM) model, which prevents the objects from being deleted or overwritten. You must acknowledge the warning to enable object lock for your bucket.
Note: Object lock works only in versioned buckets. Thus, selecting this option automatically enables bucket versioning. Read Using S3 Object Lock to understand this feature.
-
-
Click Create bucket to create your Amazon S3 bucket. You can specify this bucket while configuring Amazon S3 as a Destination in Edge.
Create an IAM Policy for the S3 Bucket
To allow Hevo to access your S3 bucket and load data into it, you must create an IAM policy with the following permissions:
| Permission Name | Allows Hevo to |
|---|---|
| s3:ListBucket | Check if the S3 bucket: - Exists. - Can be accessed and the objects in the bucket listed. |
| s3:GetObject | Read the objects in the S3 bucket. |
| s3:PutObject | Write objects, such as files, to the S3 bucket. |
| s3: DeleteObject | Delete objects from S3 bucket. Hevo requires this permission to delete the file it creates in your S3 bucket while testing the connection. |
Perform the following steps to create the IAM policy:
-
Log in to the AWS IAM Console.
-
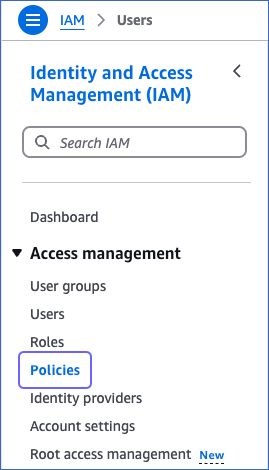
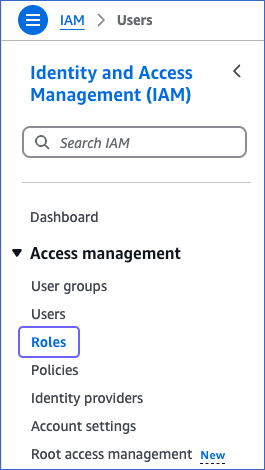
In the left navigation pane, under Access management, click Policies.
-
On the Policies page, click Create policy.

-
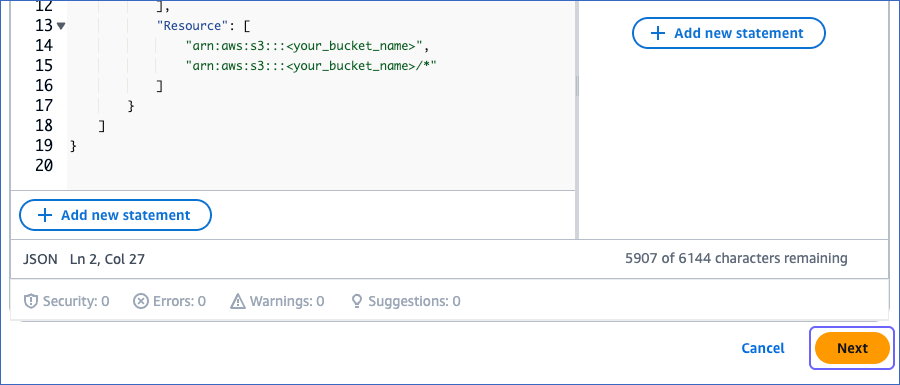
On the Specify permissions page, click JSON.

-
Paste the following JSON statements in the Policy editor:
{ "Version": "2012-10-17", "Statement": [ { "Sid": "VisualEditor0", "Effect": "Allow", "Action": [ "s3:ListBucket", "s3:GetObject", "s3:PutObject", "s3:DeleteObject" ], "Resource": [ "arn:aws:s3:::<your_bucket_name>", "arn:aws:s3:::<your_bucket_name>/*" ] } ] }Note: Replace the placeholder values in the commands above with your own. For example, <your_bucket_name> with s3-docs-20.
The JSON statements allow Hevo to access the bucket that you specify while configuring S3 as an Edge Destination and load data into it.
-
At the bottom of the page, click Next.
-
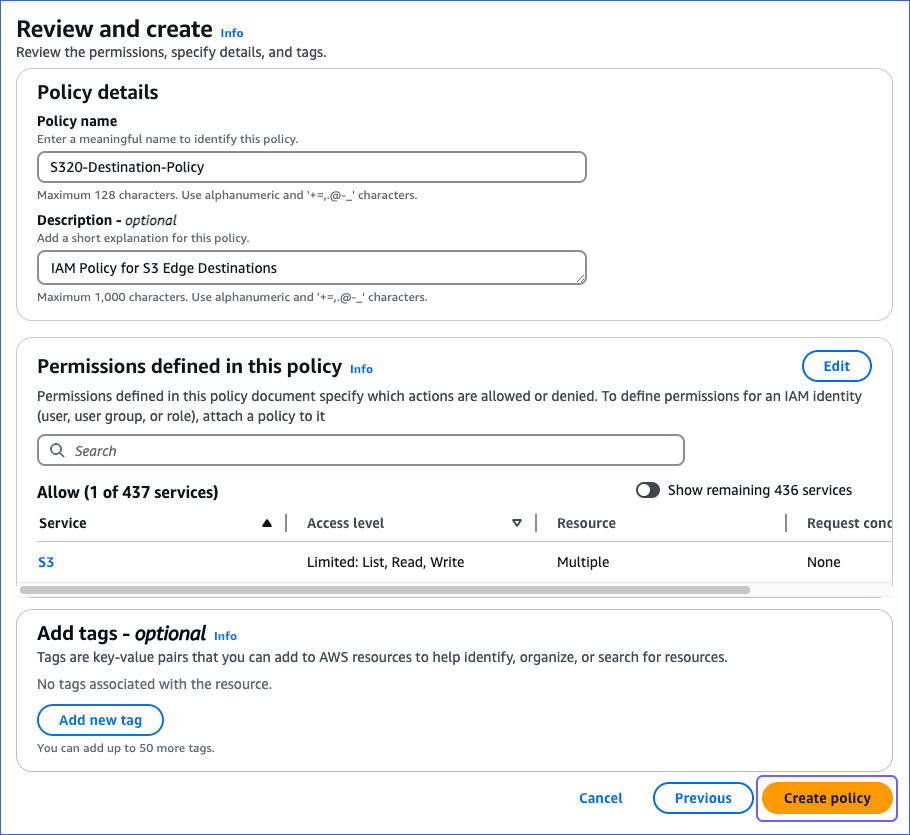
On the Review and create page, specify the Policy name and then click Create policy at the bottom of the page.
You must assign this policy to the IAM role or user that you create so that Hevo can access your S3 bucket.
Obtain the External ID for your S3 Destinations
Hevo Edge auto-assigns an external ID to the S3 Destination type for your team, which remains unchanged. You need to obtain the value for this ID from the S3 Destination configuration screen.
-
Log in to your Hevo account and select DESTINATIONS in the Navigation Bar.
-
Click the Edge tab in the Destinations List View and click + CREATE EDGE DESTINATION.
-
On the Create Destination page, click S3.
-
In the Connect to your S3 section of the displayed screen, select Identity and Access Management (IAM) from the Access type drop-down.
-
Click the copy (
 ) icon next to the value in the External ID field and save it securely.
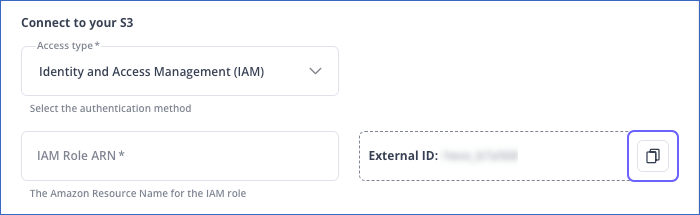
You must add this external ID to the trust policy of the IAM role that you create for Hevo.
Obtain the S3 Bucket Connection Settings
Hevo connects to your S3 bucket in one of the following ways:
Connect using the IAM role
To connect using an IAM role, you must generate IAM role-based credentials. For this, you need to add an IAM role for Hevo and assign to it the IAM policy created in Step 2. You also require the Amazon Resource Name (ARN) and the external ID obtained in Step 3 to grant Hevo access to your S3 bucket.
1. Create an IAM role and assign the IAM policy
-
Log in to the AWS IAM Console.
-
In the left navigation pane, under Access management, click Roles.
-
On the Roles page, click Create role.

-
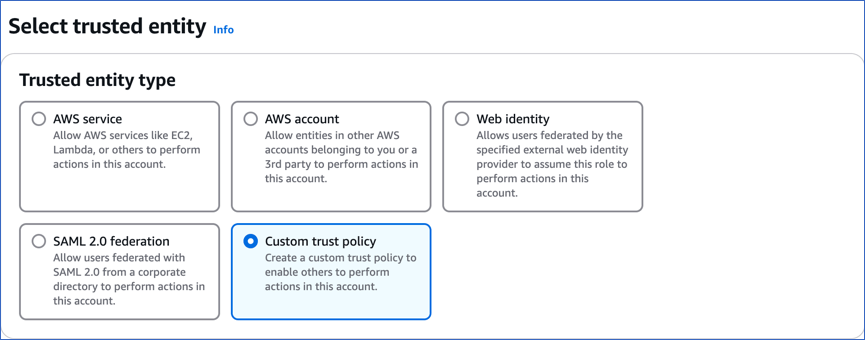
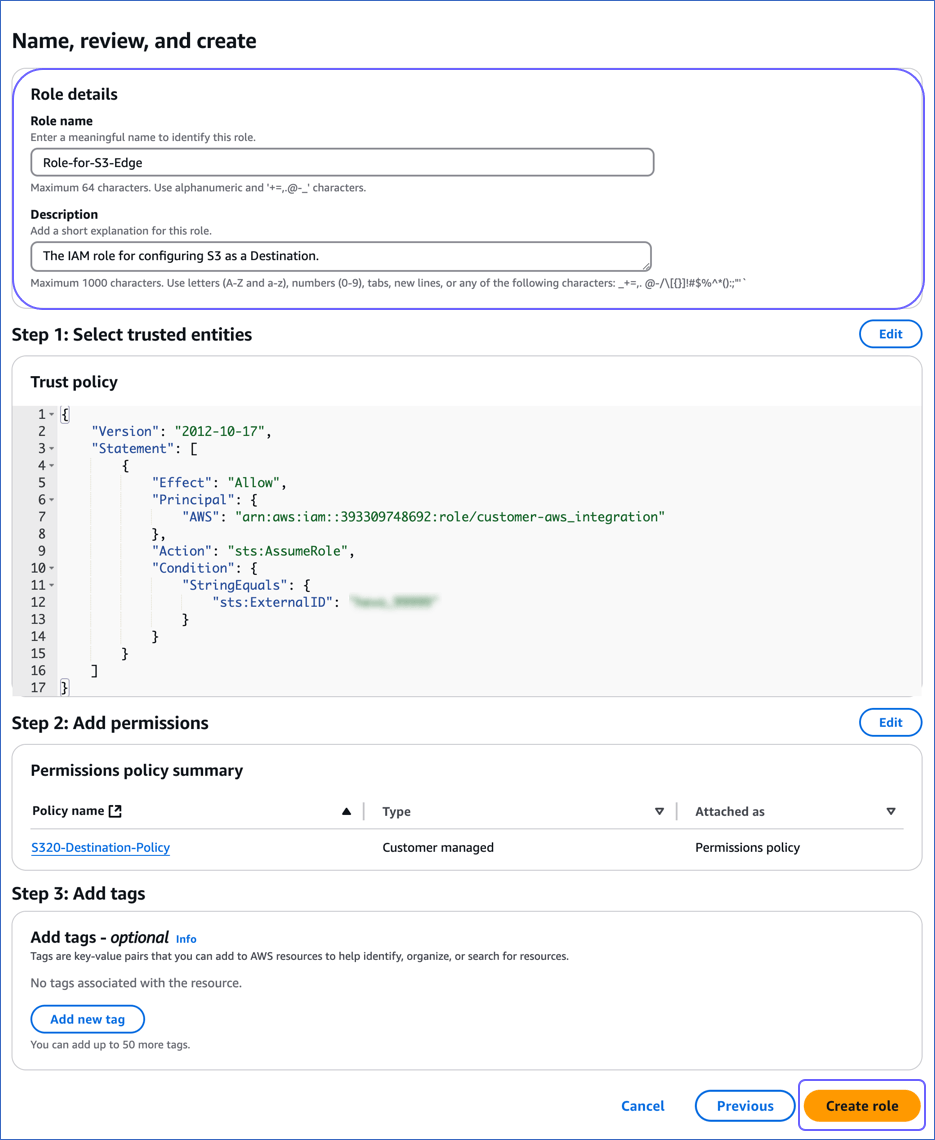
On the Select trusted entity page, do the following:
-
In the Trusted entity type section, select Custom trust policy.
-
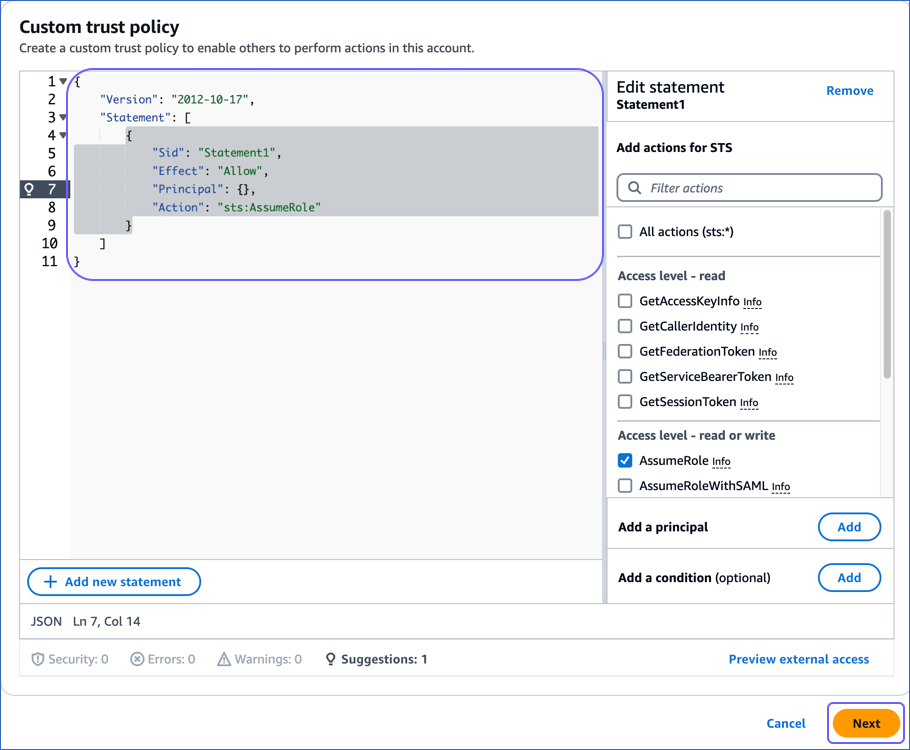
In the Custom trust policy section:
-
Copy the following JSON statements and paste them into the editor window:
{ "Version": "2012-10-17", "Statement": [ { "Effect": "Allow", "Principal": { "AWS": "arn:aws:iam::Hevo's AWS account ID:role/customer-aws_integration" }, "Action": "sts:AssumeRole", "Condition": { "StringEquals": { "sts:ExternalID": "External ID assigned by Hevo" } } } ] } -
Replace Hevo’s AWS account ID in line 7 with 393309748692 and the External ID assigned by Hevo in line 12 with the value that you obtained in Step 3.
-
At the bottom of the page, click Next.
-
-
-
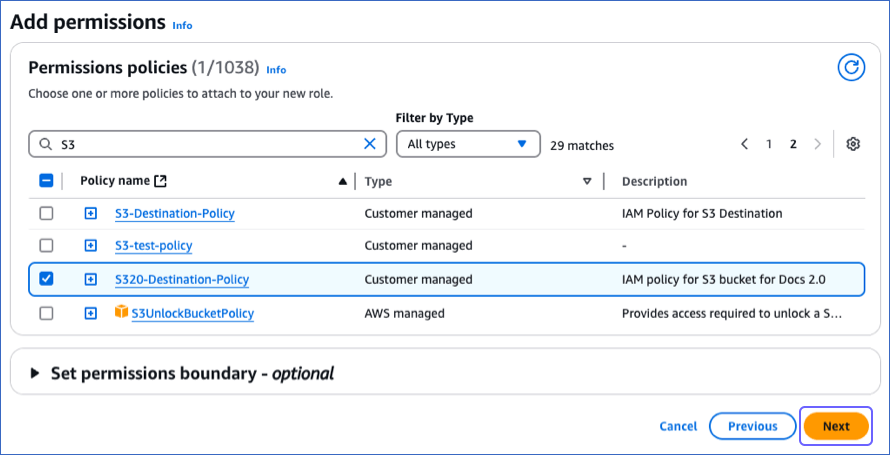
On the Add Permissions page, in the Permissions policies section, select the policy you created in Step 2 and click Next at the bottom of the page.
-
On the Name, review, and create page, specify a Role name and a Description and then click Create role at the bottom of the page.
Once the role is created, you are redirected to the Roles page.
2. Obtain the ARN
-
On the Roles page of your IAM console, search for and click the role that you created above.
-
On the <Role name> page, in the Summary section, click the copy icon below the ARN field and save it securely like any other password.
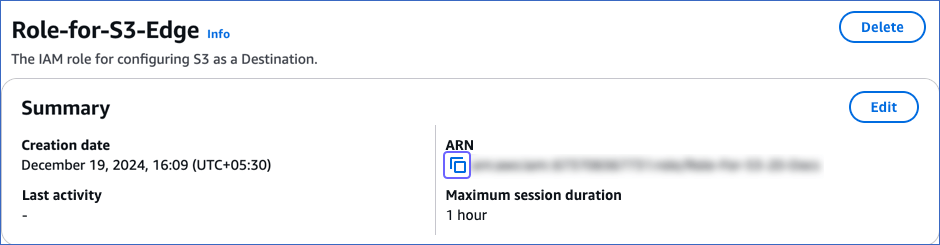
You can specify this ARN while configuring S3 as a Destination in Edge.
Connect using access credentials
To connect using access credentials, you need to add an IAM user for Hevo and assign the policy created in Step 3 to it. You require the access key and the secret access key generated for this user to grant Hevo access to your S3 bucket.
Note: The secret key is associated with an access key and is visible only once. Therefore, you must save it or download the key file for later use.
1. Create an IAM user and assign the IAM policy
-
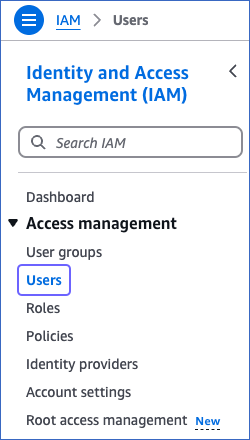
Log in to the AWS IAM Console.
-
In the left navigation pane, under Access management, click Users.
-
On the Users page, click Create user.

-
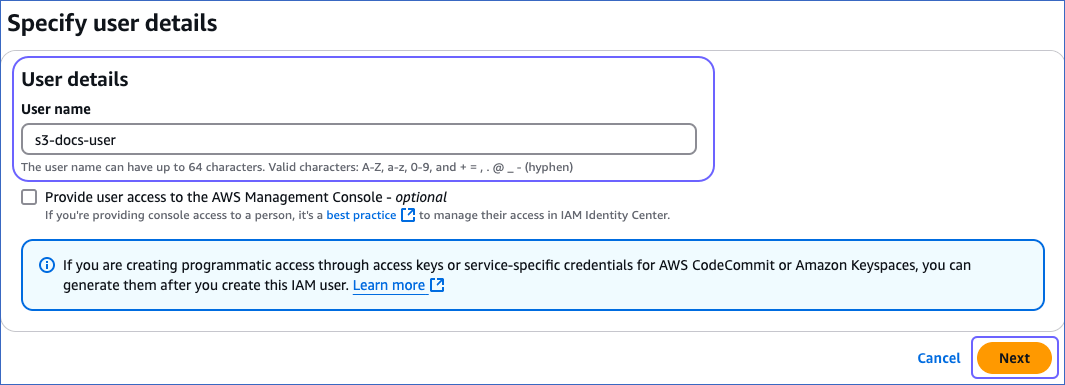
On the Specify user details page, specify the User name and click Next.
-
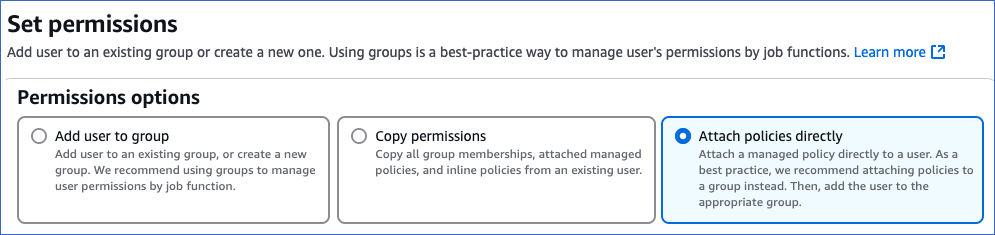
On the Set permissions page, in the Permissions options section, click Attach policies directly.
-
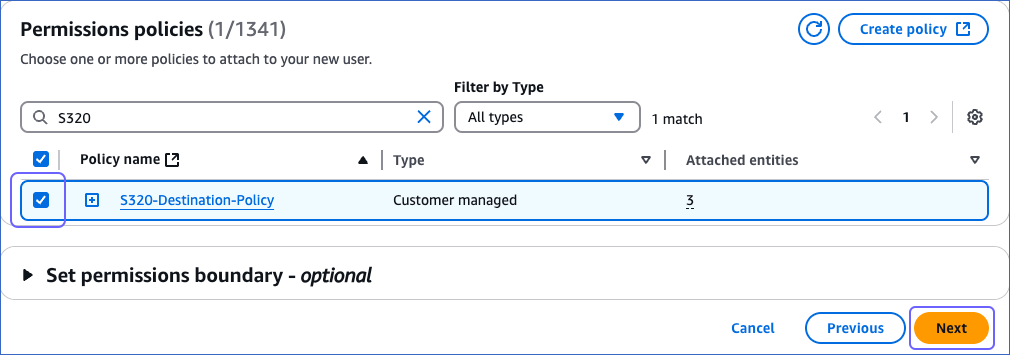
In the Search bar of the Permissions policies section, type the name of the policy you created in Step 3.
-
Select the check box next to the policy and then click Next at the bottom of the page.
-
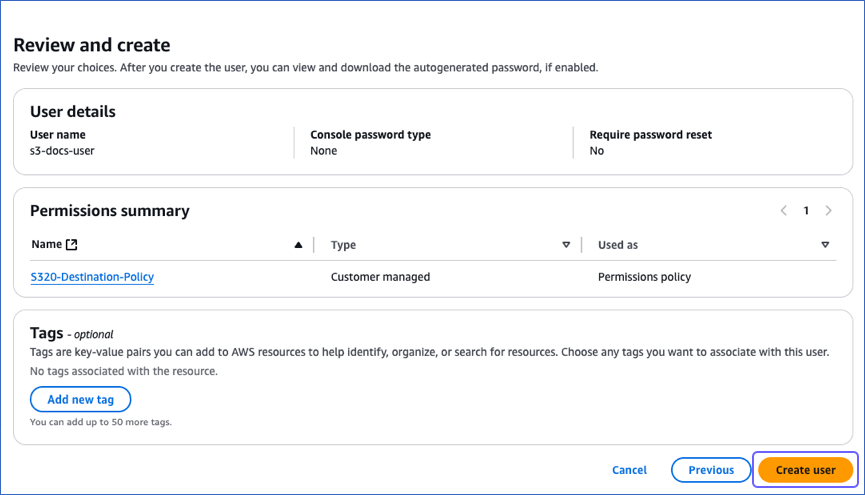
At the bottom of the Review and create page, click Create user.
2. Generate the access keys
-
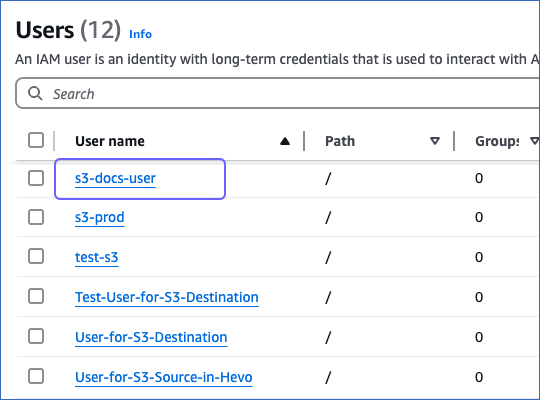
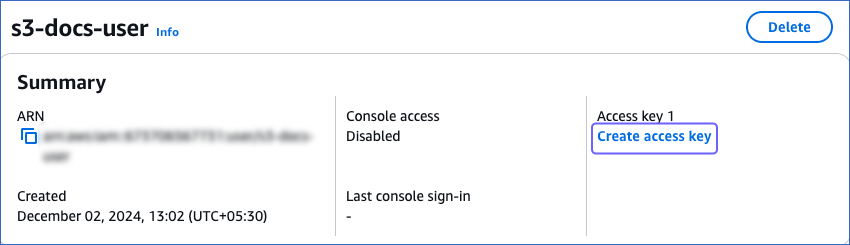
On the Users page of your IAM console, click the user that you created above.
-
On the <User name> page, in the Summary section, click Create access key.
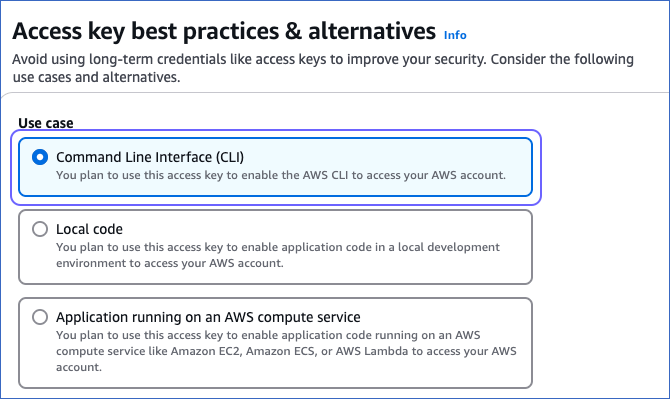
-
On the Access key best practices & alternatives page, select Command Line Interface (CLI).
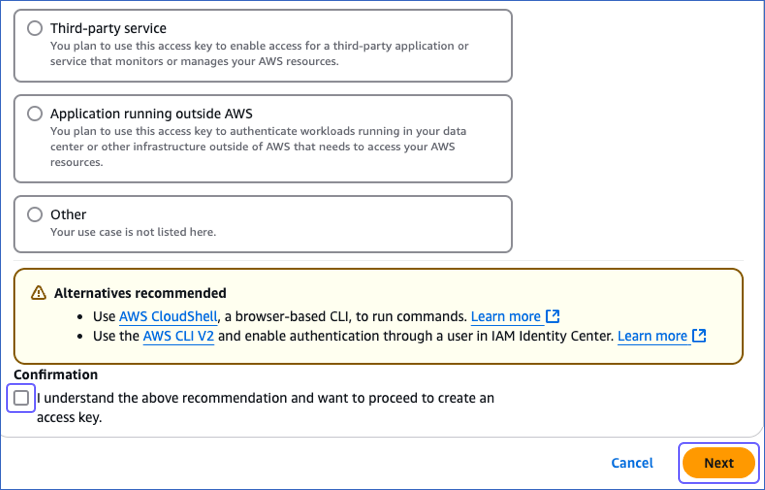
-
At the bottom of the page, select the I understand the above… check box and click Next.
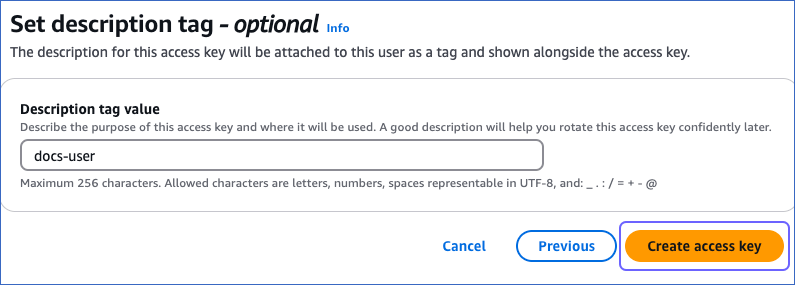
-
(Optional) Specify a description tag for the access key to help you identify it.
-
Click Create access key.
-
On the Retrieve access keys page, in the Access key section, click the copy icon in the Access key and Secret access key fields and save the keys securely like any other password. Optionally, click Download .csv file to save the keys on your local machine.
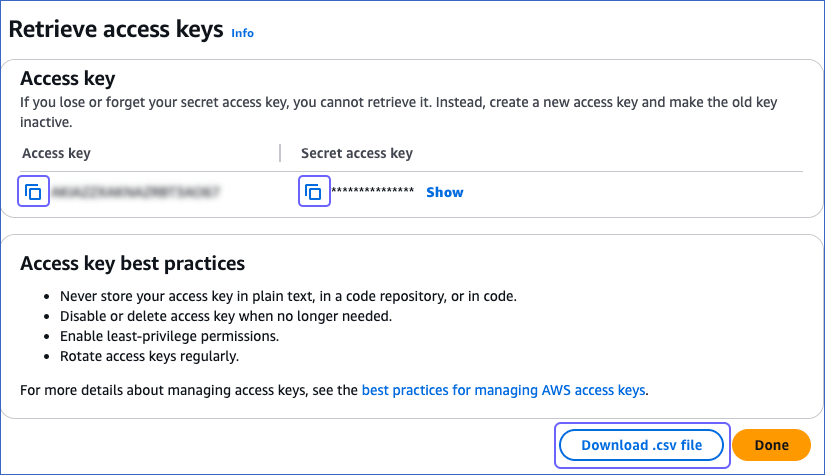
-
Click Done.
You can use these access keys when configuring S3 as a Destination in Edge.
Configure Amazon S3 as a Destination in Edge
Perform the following steps to configure Amazon S3 as a Destination in Edge:
-
Select DESTINATIONS in the Navigation Bar.
-
Click the Edge tab in the Destinations List View and click + CREATE EDGE DESTINATION.
-
On the Create Destination page, click S3.
-
In the screen that appears, specify the following:
-
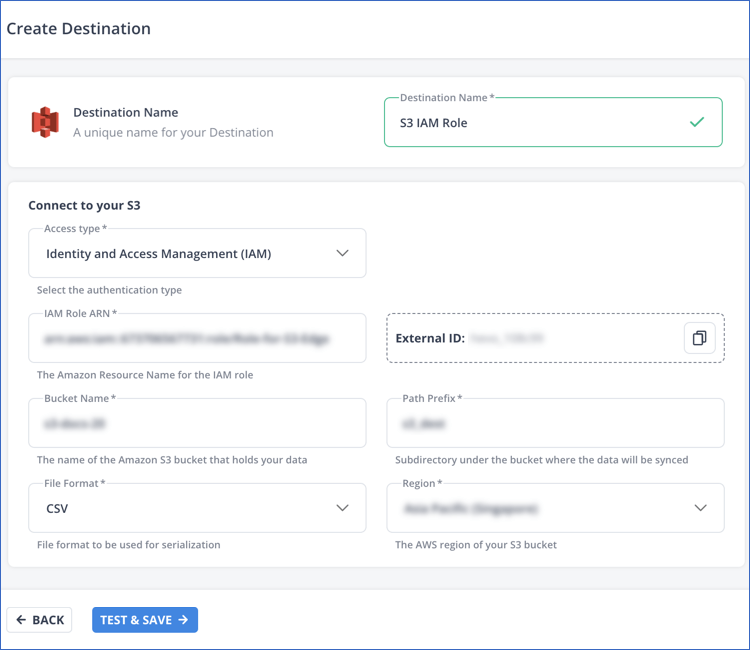
Destination Name: A unique name for your Destination, not exceeding 255 characters.
-
In the Connect to your S3 section:
-
From the Access type drop-down, select one of the following connection methods:
-
Identity and Access Management (IAM): Connect to your S3 bucket using the IAM role that you created for Hevo.
-
IAM Role ARN: The globally unique identifier assigned by AWS to the IAM role you created for Hevo. For example, arn:aws:iam::393309748692:role/Role-for-Hevo-Edge.
-
External ID: The unique identifier auto-assigned by Hevo for the S3 Destination type. You must add the displayed value to the trust policy of your IAM role.
Note: This field is non-editable.
-
Bucket Name: The name of the bucket where data is to be loaded. For example, s3-docs-20.
-
Path Prefix: A string added at the beginning of the directory path to help you organize your data files in the S3 bucket. Refer to Configuring Edge Pipeline Settings for S3 Destination for information on the directory path.
-
File Format: The format in which you want to store your data files. Currently, Edge supports only the CSV format.
-
Region: The AWS region where your S3 bucket is located. For example, Asia Pacific (Singapore).
-
-
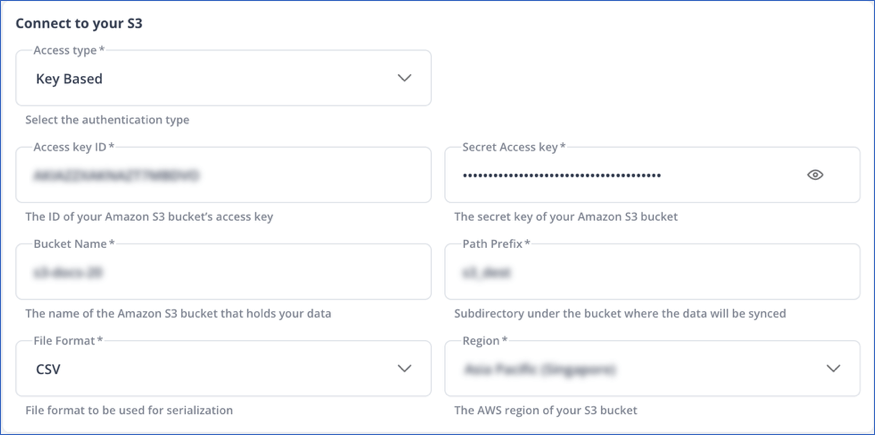
Key Based: Connect using the access credentials of the IAM user created for Hevo.
-
Access Key ID: The publicly shareable unique identifier associated with the access key pair created for your IAM user in the section above. For example, AKIAIOSFODNN7EAAMMBB.
-
Secret Access Key: The cryptographic key associated with the access key ID generated for your IAM user in the section above.
-
Bucket Name: The name of the bucket where data is to be loaded. For example, s3-docs-20.
-
Path Prefix: A string added at the beginning of the directory path to help you organize your data files in the S3 bucket. Refer to Configuring Edge Pipeline Settings for S3 Destination for information on the directory path.
-
File Format: The format in which you want to store your data files. Currently, Edge supports only the CSV format.
-
Region: The AWS region where your S3 bucket is located. For example, Asia Pacific (Singapore).
-
-
-
-
-
Click TEST & SAVE to test the connection to your S3 bucket.
Once the test is successful, Hevo creates your S3 Edge Destination. You can use this Destination while creating your Edge Pipeline.
Configuring Edge Pipeline Settings for S3 Destination
When you create an Edge Pipeline with your S3 Destination, you need to specify a Destination Partition Key.
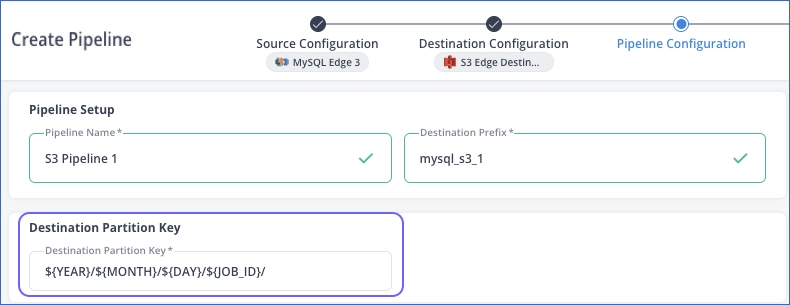
The default partition key is:
${YEAR}/${MONTH}/${DAY}/${JOB_ID}
The parameters are replaced as follows:
-
${YEAR}: The year when the data load task ran.
-
${MONTH}: The month when the data load task ran.
-
${DAY}: The day when the data load task ran.
-
${JOB_ID}: The alphanumeric ID of the sync job that ran to ingest and load data.
Hevo Edge provides a few additional time-based parameters that you can specify in the Destination partition key. These parameters are:
-
${DATE}: The date when the data was loaded to your S3 bucket.
-
${HOUR}: The hour of the day when the data load task ran.
You must specify one or more of the above parameters to create a folder structure in your S3 bucket. For example, the Destination partition key ${DATE}/${JOB_ID} organizes the data loaded to your S3 bucket based on the date and job ID.
Creating the Directory Path in your S3 Bucket
Hevo organizes your data files in a directory path or folder structure in the S3 bucket configured as your Edge Destination. The directory path for a Pipeline configured with any database Source is created using the following inputs:
-
Path Prefix: The string provided while configuring your S3 Destination. For example,
-
Destination Prefix: The string provided while configuring your Edge Pipeline with the S3 Destination.
-
Database Name: The name of the database specified in the Source configuration.
-
Schema Name: The name of the schema specified in the Source configuration, if applicable.
-
Object Name: The name of the Source object from which data was ingested.
-
Destination Partition Key: The parameters that you provided while configuring your Edge Pipeline with the S3 Destination.
The directory path created is: <path_prefix>/<destination_prefix>_<database_name>_<schema_name>_<object_name>/<destination_partition_key>/
Your data is stored as gzip files in the folder structure created by the directory path.
Example
Suppose you created an Edge Pipeline with the following configuration:
-
Path Prefix: s3-dest
-
Destination Prefix: s3_1
-
Database Name: db1
-
Schema Name: public
-
Object Name: table_1
-
Destination Partition Key: ${YEAR}/${MONTH}/${DAY}/${JOB_ID}
The directory path created based on the above inputs is:
s3-dest/s3_1_db1_public_table_1/year=2024/month=11/day=27/job_id=d12d74f4-d647-4929-a5a6-d329afd916f4/
Your data is stored in the folder structure created by the above directory path.