- Introduction
-
Getting Started
- Creating an Account in Hevo
- Subscribing to Hevo via AWS Marketplace
- Subscribing to Hevo via Snowflake Marketplace
- Connection Options
- Familiarizing with the UI
- Creating your First Pipeline
- Data Loss Prevention and Recovery
-
Data Ingestion
- Types of Data Synchronization
- Ingestion Modes and Query Modes for Database Sources
- Ingestion and Loading Frequency
- Data Ingestion Statuses
- Deferred Data Ingestion
- Handling of Primary Keys
- Handling of Updates
- Handling of Deletes
- Hevo-generated Metadata
- Best Practices to Avoid Reaching Source API Rate Limits
-
Edge
- Getting Started
- Data Ingestion
- Core Concepts
-
Pipelines
- Familiarizing with the Pipelines UI (Edge)
- Creating an Edge Pipeline
- Working with Edge Pipelines
- Object and Schema Management
- Pipeline Job History
- Sources
- Destinations
- Alerts
- Custom Connectors
-
Releases
- Edge Release Notes - February 18, 2026
- Edge Release Notes - February 10, 2026
- Edge Release Notes - February 03, 2026
- Edge Release Notes - January 20, 2026
- Edge Release Notes - December 08, 2025
- Edge Release Notes - December 01, 2025
- Edge Release Notes - November 05, 2025
- Edge Release Notes - October 30, 2025
- Edge Release Notes - September 22, 2025
- Edge Release Notes - August 11, 2025
- Edge Release Notes - July 09, 2025
- Edge Release Notes - November 21, 2024
-
Data Loading
- Loading Data in a Database Destination
- Loading Data to a Data Warehouse
- Optimizing Data Loading for a Destination Warehouse
- Deduplicating Data in a Data Warehouse Destination
- Manually Triggering the Loading of Events
- Scheduling Data Load for a Destination
- Loading Events in Batches
- Data Loading Statuses
- Data Spike Alerts
- Name Sanitization
- Table and Column Name Compression
- Parsing Nested JSON Fields in Events
-
Pipelines
- Data Flow in a Pipeline
- Familiarizing with the Pipelines UI
- Working with Pipelines
- Managing Objects in Pipelines
- Pipeline Jobs
-
Transformations
-
Python Code-Based Transformations
- Supported Python Modules and Functions
-
Transformation Methods in the Event Class
- Create an Event
- Retrieve the Event Name
- Rename an Event
- Retrieve the Properties of an Event
- Modify the Properties for an Event
- Fetch the Primary Keys of an Event
- Modify the Primary Keys of an Event
- Fetch the Data Type of a Field
- Check if the Field is a String
- Check if the Field is a Number
- Check if the Field is Boolean
- Check if the Field is a Date
- Check if the Field is a Time Value
- Check if the Field is a Timestamp
-
TimeUtils
- Convert Date String to Required Format
- Convert Date to Required Format
- Convert Datetime String to Required Format
- Convert Epoch Time to a Date
- Convert Epoch Time to a Datetime
- Convert Epoch to Required Format
- Convert Epoch to a Time
- Get Time Difference
- Parse Date String to Date
- Parse Date String to Datetime Format
- Parse Date String to Time
- Utils
- Examples of Python Code-based Transformations
-
Drag and Drop Transformations
- Special Keywords
-
Transformation Blocks and Properties
- Add a Field
- Change Datetime Field Values
- Change Field Values
- Drop Events
- Drop Fields
- Find & Replace
- Flatten JSON
- Format Date to String
- Format Number to String
- Hash Fields
- If-Else
- Mask Fields
- Modify Text Casing
- Parse Date from String
- Parse JSON from String
- Parse Number from String
- Rename Events
- Rename Fields
- Round-off Decimal Fields
- Split Fields
- Examples of Drag and Drop Transformations
- Effect of Transformations on the Destination Table Structure
- Transformation Reference
- Transformation FAQs
-
Python Code-Based Transformations
-
Schema Mapper
- Using Schema Mapper
- Mapping Statuses
- Auto Mapping Event Types
- Manually Mapping Event Types
- Modifying Schema Mapping for Event Types
- Schema Mapper Actions
- Fixing Unmapped Fields
- Resolving Incompatible Schema Mappings
- Resizing String Columns in the Destination
- Changing the Data Type of a Destination Table Column
- Schema Mapper Compatibility Table
- Limits on the Number of Destination Columns
- File Log
- Troubleshooting Failed Events in a Pipeline
- Mismatch in Events Count in Source and Destination
- Audit Tables
- Activity Log
-
Pipeline FAQs
- Can multiple Sources connect to one Destination?
- What happens if I re-create a deleted Pipeline?
- Why is there a delay in my Pipeline?
- Can I change the Destination post-Pipeline creation?
- Why is my billable Events high with Delta Timestamp mode?
- Can I drop multiple Destination tables in a Pipeline at once?
- How does Run Now affect scheduled ingestion frequency?
- Will pausing some objects increase the ingestion speed?
- Can I see the historical load progress?
- Why is my Historical Load Progress still at 0%?
- Why is historical data not getting ingested?
- How do I set a field as a primary key?
- How do I ensure that records are loaded only once?
- Events Usage
-
Sources
- Free Sources
-
Databases and File Systems
- Data Warehouses
-
Databases
- Connecting to a Local Database
- Amazon DocumentDB
- Amazon DynamoDB
- Elasticsearch
-
MongoDB
- Generic MongoDB
- MongoDB Atlas
- Support for Multiple Data Types for the _id Field
- Example - Merge Collections Feature
-
Troubleshooting MongoDB
-
Errors During Pipeline Creation
- Error 1001 - Incorrect credentials
- Error 1005 - Connection timeout
- Error 1006 - Invalid database hostname
- Error 1007 - SSH connection failed
- Error 1008 - Database unreachable
- Error 1011 - Insufficient access
- Error 1028 - Primary/Master host needed for OpLog
- Error 1029 - Version not supported for Change Streams
- SSL 1009 - SSL Connection Failure
- Troubleshooting MongoDB Change Streams Connection
- Troubleshooting MongoDB OpLog Connection
-
Errors During Pipeline Creation
- SQL Server
-
MySQL
- Amazon Aurora MySQL
- Amazon RDS MySQL
- Azure MySQL
- Generic MySQL
- Google Cloud MySQL
- MariaDB MySQL
-
Troubleshooting MySQL
-
Errors During Pipeline Creation
- Error 1003 - Connection to host failed
- Error 1006 - Connection to host failed
- Error 1007 - SSH connection failed
- Error 1011 - Access denied
- Error 1012 - Replication access denied
- Error 1017 - Connection to host failed
- Error 1026 - Failed to connect to database
- Error 1027 - Unsupported BinLog format
- Failed to determine binlog filename/position
- Schema 'xyz' is not tracked via bin logs
- Errors Post-Pipeline Creation
-
Errors During Pipeline Creation
- MySQL FAQs
- Oracle
-
PostgreSQL
- Amazon Aurora PostgreSQL
- Amazon RDS PostgreSQL
- Azure PostgreSQL
- Generic PostgreSQL
- Google Cloud PostgreSQL
- Heroku PostgreSQL
-
Troubleshooting PostgreSQL
-
Errors during Pipeline creation
- Error 1003 - Authentication failure
- Error 1006 - Connection settings errors
- Error 1011 - Access role issue for logical replication
- Error 1012 - Access role issue for logical replication
- Error 1014 - Database does not exist
- Error 1017 - Connection settings errors
- Error 1023 - No pg_hba.conf entry
- Error 1024 - Number of requested standby connections
- Errors Post-Pipeline Creation
-
Errors during Pipeline creation
-
PostgreSQL FAQs
- Can I track updates to existing records in PostgreSQL?
- How can I migrate a Pipeline created with one PostgreSQL Source variant to another variant?
- How can I prevent data loss when migrating or upgrading my PostgreSQL database?
- Why do FLOAT4 and FLOAT8 values in PostgreSQL show additional decimal places when loaded to BigQuery?
- Why is data not being ingested from PostgreSQL Source objects?
- Troubleshooting Database Sources
- Database Source FAQs
- File Storage
- Engineering Analytics
- Finance & Accounting Analytics
-
Marketing Analytics
- ActiveCampaign
- AdRoll
- Amazon Ads
- Apple Search Ads
- AppsFlyer
- CleverTap
- Criteo
- Drip
- Facebook Ads
- Facebook Page Insights
- Firebase Analytics
- Freshsales
- Google Ads
- Google Analytics 4
- Google Analytics 360
- Google Play Console
- Google Search Console
- HubSpot
- Instagram Business
- Klaviyo v2
- Lemlist
- LinkedIn Ads
- Mailchimp
- Mailshake
- Marketo
- Microsoft Ads
- Onfleet
- Outbrain
- Pardot
- Pinterest Ads
- Pipedrive
- Recharge
- Segment
- SendGrid Webhook
- SendGrid
- Salesforce Marketing Cloud
- Snapchat Ads
- SurveyMonkey
- Taboola
- TikTok Ads
- Twitter Ads
- Typeform
- YouTube Analytics
- Product Analytics
- Sales & Support Analytics
- Source FAQs
-
Destinations
- Familiarizing with the Destinations UI
- Cloud Storage-Based
- Databases
-
Data Warehouses
- Amazon Redshift
- Amazon Redshift Serverless
- Azure Synapse Analytics
- Databricks
- Google BigQuery
- Hevo Managed Google BigQuery
- Snowflake
- Troubleshooting Data Warehouse Destinations
-
Destination FAQs
- Can I change the primary key in my Destination table?
- Can I change the Destination table name after creating the Pipeline?
- How can I change or delete the Destination table prefix?
- Why does my Destination have deleted Source records?
- How do I filter deleted Events from the Destination?
- Does a data load regenerate deleted Hevo metadata columns?
- How do I filter out specific fields before loading data?
- Transform
- Alerts
- Account Management
- Activate
- Glossary
-
Releases- Release 2.45.2 (Feb 16-23, 2026)
- Release 2.45.1 (Feb 09-16, 2026)
- Release 2.45 (Jan 12-Feb 09, 2026)
-
2025 Releases
- Release 2.44 (Dec 01, 2025-Jan 12, 2026)
- Release 2.43 (Nov 03-Dec 01, 2025)
- Release 2.42 (Oct 06-Nov 03, 2025)
- Release 2.41 (Sep 08-Oct 06, 2025)
- Release 2.40 (Aug 11-Sep 08, 2025)
- Release 2.39 (Jul 07-Aug 11, 2025)
- Release 2.38 (Jun 09-Jul 07, 2025)
- Release 2.37 (May 12-Jun 09, 2025)
- Release 2.36 (Apr 14-May 12, 2025)
- Release 2.35 (Mar 17-Apr 14, 2025)
- Release 2.34 (Feb 17-Mar 17, 2025)
- Release 2.33 (Jan 20-Feb 17, 2025)
-
2024 Releases
- Release 2.32 (Dec 16 2024-Jan 20, 2025)
- Release 2.31 (Nov 18-Dec 16, 2024)
- Release 2.30 (Oct 21-Nov 18, 2024)
- Release 2.29 (Sep 30-Oct 22, 2024)
- Release 2.28 (Sep 02-30, 2024)
- Release 2.27 (Aug 05-Sep 02, 2024)
- Release 2.26 (Jul 08-Aug 05, 2024)
- Release 2.25 (Jun 10-Jul 08, 2024)
- Release 2.24 (May 06-Jun 10, 2024)
- Release 2.23 (Apr 08-May 06, 2024)
- Release 2.22 (Mar 11-Apr 08, 2024)
- Release 2.21 (Feb 12-Mar 11, 2024)
- Release 2.20 (Jan 15-Feb 12, 2024)
-
2023 Releases
- Release 2.19 (Dec 04, 2023-Jan 15, 2024)
- Release Version 2.18
- Release Version 2.17
- Release Version 2.16 (with breaking changes)
- Release Version 2.15 (with breaking changes)
- Release Version 2.14
- Release Version 2.13
- Release Version 2.12
- Release Version 2.11
- Release Version 2.10
- Release Version 2.09
- Release Version 2.08
- Release Version 2.07
- Release Version 2.06
-
2022 Releases
- Release Version 2.05
- Release Version 2.04
- Release Version 2.03
- Release Version 2.02
- Release Version 2.01
- Release Version 2.00
- Release Version 1.99
- Release Version 1.98
- Release Version 1.97
- Release Version 1.96
- Release Version 1.95
- Release Version 1.93 & 1.94
- Release Version 1.92
- Release Version 1.91
- Release Version 1.90
- Release Version 1.89
- Release Version 1.88
- Release Version 1.87
- Release Version 1.86
- Release Version 1.84 & 1.85
- Release Version 1.83
- Release Version 1.82
- Release Version 1.81
- Release Version 1.80 (Jan-24-2022)
- Release Version 1.79 (Jan-03-2022)
-
2021 Releases
- Release Version 1.78 (Dec-20-2021)
- Release Version 1.77 (Dec-06-2021)
- Release Version 1.76 (Nov-22-2021)
- Release Version 1.75 (Nov-09-2021)
- Release Version 1.74 (Oct-25-2021)
- Release Version 1.73 (Oct-04-2021)
- Release Version 1.72 (Sep-20-2021)
- Release Version 1.71 (Sep-09-2021)
- Release Version 1.70 (Aug-23-2021)
- Release Version 1.69 (Aug-09-2021)
- Release Version 1.68 (Jul-26-2021)
- Release Version 1.67 (Jul-12-2021)
- Release Version 1.66 (Jun-28-2021)
- Release Version 1.65 (Jun-14-2021)
- Release Version 1.64 (Jun-01-2021)
- Release Version 1.63 (May-19-2021)
- Release Version 1.62 (May-05-2021)
- Release Version 1.61 (Apr-20-2021)
- Release Version 1.60 (Apr-06-2021)
- Release Version 1.59 (Mar-23-2021)
- Release Version 1.58 (Mar-09-2021)
- Release Version 1.57 (Feb-22-2021)
- Release Version 1.56 (Feb-09-2021)
- Release Version 1.55 (Jan-25-2021)
- Release Version 1.54 (Jan-12-2021)
-
2020 Releases
- Release Version 1.53 (Dec-22-2020)
- Release Version 1.52 (Dec-03-2020)
- Release Version 1.51 (Nov-10-2020)
- Release Version 1.50 (Oct-19-2020)
- Release Version 1.49 (Sep-28-2020)
- Release Version 1.48 (Sep-01-2020)
- Release Version 1.47 (Aug-06-2020)
- Release Version 1.46 (Jul-21-2020)
- Release Version 1.45 (Jul-02-2020)
- Release Version 1.44 (Jun-11-2020)
- Release Version 1.43 (May-15-2020)
- Release Version 1.42 (Apr-30-2020)
- Release Version 1.41 (Apr-2020)
- Release Version 1.40 (Mar-2020)
- Release Version 1.39 (Feb-2020)
- Release Version 1.38 (Jan-2020)
- Early Access New
On This Page
- Prerequisites
- (Optional) Create a Snowflake Account
- Create and Configure your Snowflake Warehouse
- Create a Snowflake User and Grant Permissions
- Obtain a Private and Public Key Pair (Recommended Method)
- Obtain your Snowflake Account URL
- Configure Snowflake as a Destination in Edge
- Modifying Snowflake Destination Configuration in Edge
- Data Type Evolution in Snowflake Destinations
- Destination Considerations
- Limitations
- Revision History
Edge Pipeline is now available for Public Review. You can explore and evaluate its features and share your feedback.
Snowflake offers a cloud-based data storage and analytics service, generally termed as data warehouse-as-a-service. Companies can use it to store and analyze data using cloud-based hardware and software.
Snowflake automatically provides you with one data warehouse when you create an account. Further, each data warehouse can have one or more databases, although this is not mandatory.
The data from your Pipeline is staged in Hevo’s S3 bucket before finally being loaded to your Snowflake warehouse.
The Snowflake data warehouse may be hosted on any of the following cloud providers:
-
Amazon Web Services (AWS)
-
Google Cloud Platform (GCP)
-
Microsoft Azure (Azure)
To connect your Snowflake instance to Hevo, you can either use a private link that directly connects to your cloud provider through a Virtual Private Cloud (VPC) or connect via a public network using the Snowflake account URL.
A private link enables communication and network traffic to remain exclusively within the cloud provider’s private network while maintaining direct and secure access across VPCs. It allows you to transfer data to Snowflake without going through the public internet or using proxies to connect Snowflake to your network. Note that even with a private link, the public endpoint is still accessible, and Hevo uses that to connect to your database cluster.
Please reach out to Hevo Support to retrieve the private link for your cloud provider.
Prerequisites
-
An active Snowflake account is available.
-
You have either the ACCOUNTADMIN or SECURITYADMIN role in Snowflake to create a new role for Hevo.
-
You have either the ACCOUNTADMIN or SYSADMIN role in Snowflake to create a warehouse.
-
Hevo is assigned the USAGE permission on data warehouses.
-
Hevo is assigned the USAGE and CREATE SCHEMA permissions on databases.
-
Hevo is assigned the USAGE, MONITOR, CREATE TABLE, CREATE EXTERNAL TABLE, and MODIFY permissions on the current and future schemas.
Refer to the section Create and Configure your Snowflake Warehouse to create a Snowflake warehouse with adequate permissions for Hevo to access your data.
Perform the following steps to configure your Snowflake Destination in Edge:
(Optional) Create a Snowflake Account
When you sign up for a Snowflake account, you get 30 days of free access with $400 credits. Beyond this limit, usage of the account is chargeable. The free trial starts from the day you activate the account. If you consume the credits before 30 days, the free trial ends and subsequent usage becomes chargeable. You can still log in to your account, however, you cannot use any features, such as running a virtual warehouse, loading data, or performing queries, until you upgrade your account or add more credits.
Perform the following steps to create a Snowflake account:
-
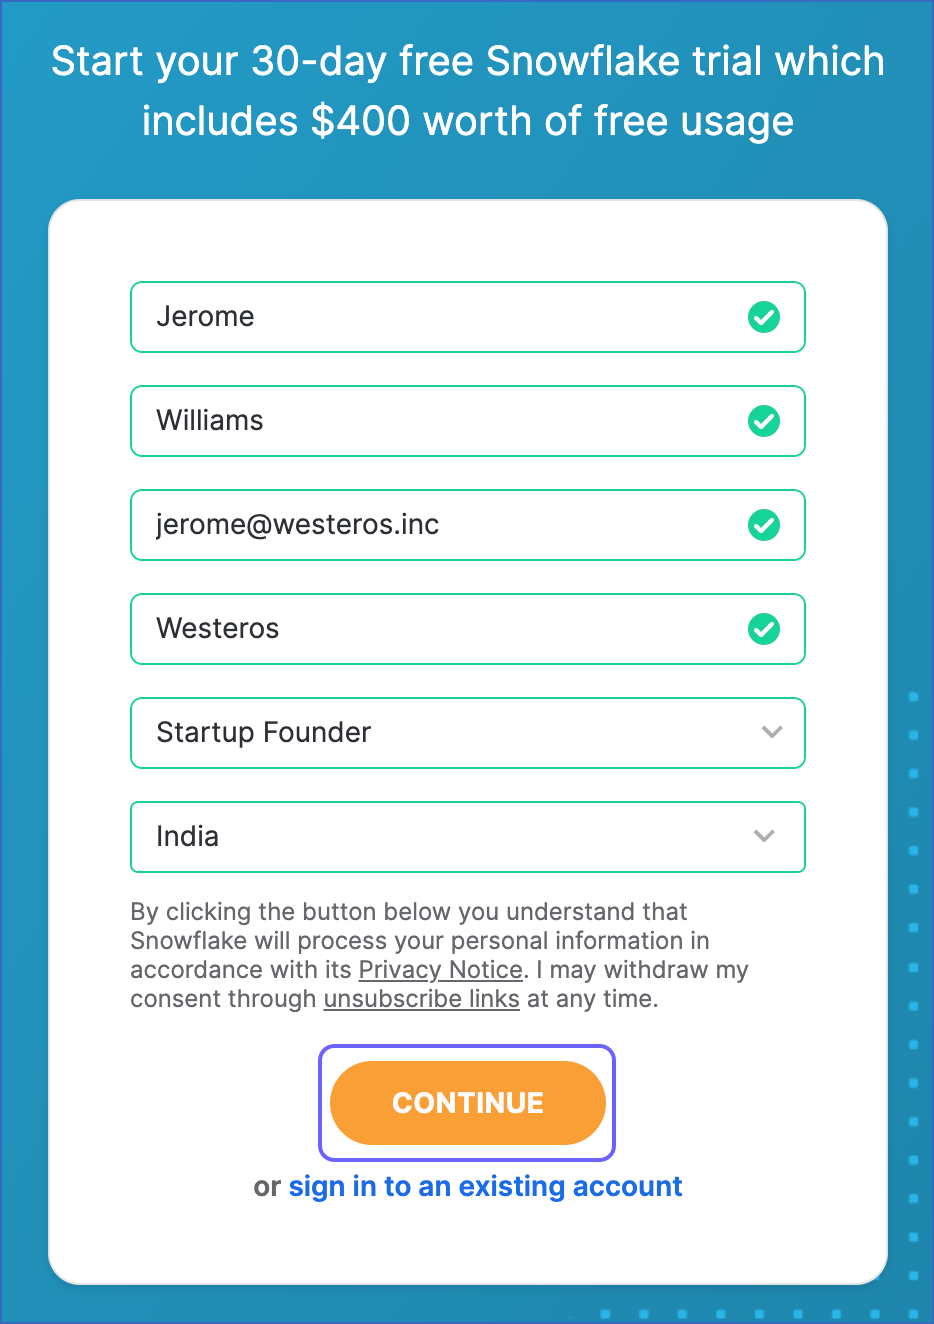
On the Sign up page, specify the following and click CONTINUE:
-
First Name and Last Name: The first and last name of the account user.
-
Company Email: A valid email address that can be used to manage the Snowflake account.
-
Company Name: The name of your organization.
-
Role: The account user’s role in the organization.
-
Country: Your organization’s country or region.
-
-
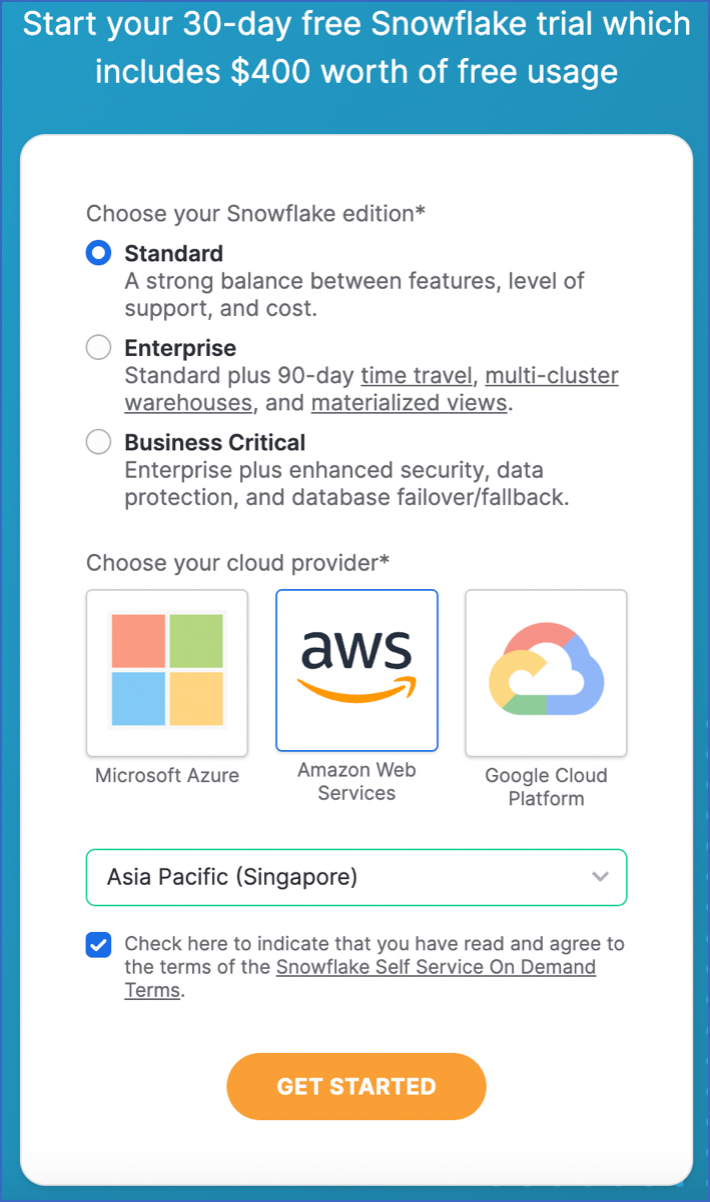
Select the Snowflake edition you want to use.
Note: You can choose the edition that meets your organization’s needs. Read Snowflake Editions to know more about the different editions available.
-
Select one of the following cloud platforms to host your Snowflake account:
- Amazon Web Services (AWS)
- Google Cloud Platform (GCP)
- Microsoft Azure (Azure)
Read Supported Cloud Platforms to know more about the details and pricing of each cloud platform.
-
Select the region for your cloud platform. In each platform, Snowflake provides one or more regions where the account can be provisioned.
-
Click GET STARTED.
An email to activate your account is sent to your registered email address. Click the link in the email to activate and sign in to your Snowflake account.
Create and Configure your Snowflake Warehouse
Hevo provides you with a ready-to-use script to create the resources needed to configure your Snowflake Edge Destination.
Follow these steps to run the script:
-
Log in to your Snowflake account.
-
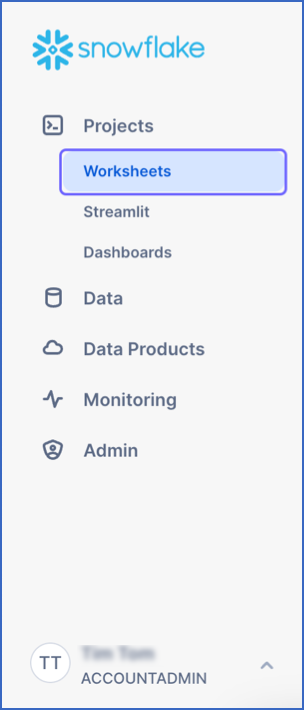
In the left navigation pane, under Projects, click Worksheets.
-
In the top right corner of the Worksheets tab, click the + icon and select SQL Worksheet from the drop-down to create a worksheet.

-
Copy the following script and paste it into the SQL Worksheet. Replace the sample values provided for
warehouse_nameanddatabase_name(in lines 2-3 of the script) with your own. You can specify new warehouse and database names to create them now or use the names of pre-existing resources.-- Create variables for warehouse/database (needs to be uppercase for objects) set warehouse_name = 'HOGWARTS'; -- Replace "HOGWARTS" with the name of your warehouse set database_name = 'RON'; -- Replace "RON" with the name of your database begin; -- Change role to sysadmin for the warehouse/database steps use role sysadmin; -- Create a warehouse for Hevo only if it does not exist create warehouse if not exists identifier($warehouse_name) warehouse_size = xsmall warehouse_type = standard auto_suspend = 60 auto_resume = true initially_suspended = true; -- Create a database for Hevo only if it does not exist create database if not exists identifier($database_name); commit;Note: The values for
warehouse_nameanddatabase_namemust be in uppercase. -
Press CMD + A (Mac) or CTRL + A (Windows) inside the worksheet area to select the script.
-
Press CMD + return (Mac) or CTRL + Enter (Windows) to run the script.
-
Once the script runs successfully, you can specify the warehouse and database names (from lines 2-3 of the script) to connect your warehouse to Hevo while creating a Snowflake Destination in Edge.
Create a Snowflake User and Grant Permissions
Hevo does not need a user with the ACCOUNTADMIN role to connect to your Snowflake warehouse. You can create a non-administrative user and assign a custom role to it or use one of the admin roles. Hevo provides you with a ready-to-use script to create the user and grant it only the essential permissions required by Hevo to load data into your Snowflake warehouse.
Perform the following steps to run the script:
-
Follow steps 1-3 from the Create and Configure your Snowflake Warehouse section.
-
Copy the following script and paste it into the SQL Worksheet. Replace the sample values provided for
role_name,user_name, anduser_password(in lines 7-9 of the script) with your own. Also, substitute those forexisting_warehouse_nameandexisting_database_name(in lines 2-3 of the script) with the names of pre-existing resources or those created by the script above.Note: The following script creates the role and user; it does not create the warehouse, database, or schema.
-- Create variables for the resources created by the script in the Create and Configure your Snowflake Warehouse section set existing_warehouse_name = 'HOGWARTS'; -- Replace "HOGWARTS" with the name of the warehouse created earlier for Hevo set existing_database_name = 'RON'; -- Replace "RON" with the name of the database created earlier for Hevo -- Create variables for user/password/role/warehouse/database/schema set role_name = 'HEVO'; -- Replace "HEVO" with your role name set user_name = 'HARRY_POTTER'; -- Replace "HARRY_POTTER" with your username set user_password = 'Gryffindor'; -- Replace "Gryffindor" with the user password begin; -- Change the role to securityadmin for user/role steps use role securityadmin; -- Create a role for Hevo create role if not exists identifier($role_name); grant role identifier($role_name) to role SYSADMIN; -- Create a user for Hevo create user if not exists identifier($user_name) password = $user_password default_role = $role_name default_warehouse = $existing_warehouse_name; -- Grant access to the user grant role identifier($role_name) to user identifier($user_name); -- Grant the Hevo role access to the warehouse use role sysadmin; grant USAGE on warehouse identifier($existing_warehouse_name) to role identifier($role_name); -- Grant the Hevo role access to the database and existing schemas use role accountadmin; grant CREATE SCHEMA, MONITOR, USAGE on database identifier($existing_database_name) to role identifier($role_name); -- Grant the Hevo role access to future schemas and tables use role accountadmin; grant SELECT on future tables in database identifier($existing_database_name) to role identifier($role_name); grant MONITOR, USAGE, MODIFY on future schemas in database identifier($existing_database_name) to role identifier($role_name); commit;Note: The values for all the variables, such as
role_nameanduser_name, must be in uppercase. -
Press CMD + A (Mac) or CTRL + A (Windows) inside the worksheet area to select the script.
-
Press CMD + return (Mac) or CTRL + Enter (Windows) to run the script.
-
Once the script runs successfully, you can specify the values of
user_nameanduser_password(from lines 8-9 of the script) when connecting to your Snowflake warehouse using access credentials.Note: Hevo recommends connecting to the Snowflake warehouse using key pair authentication.
If you are a user in a Snowflake account created after the BCR Bundle 2024_08, Snowflake recommends connecting to ETL applications, such as Hevo, through a service user. For this, run the following command:
ALTER USER <your_snowflake_user> SET TYPE = SERVICE;
Replace the placeholder value in the command above with your own. For example, <your_snowflake_user> with HARRY_POTTER.
Note: New service users will not be able to connect to Hevo via password authentication; they must connect with a key pair. Read Obtain a Private and Public Key Pair for the steps to create a key pair.
Obtain a Private and Public Key Pair (Recommended Method)
You can authenticate Hevo’s connection to your Snowflake data warehouse using a public-private key pair. For this, you need to:
-
Generate the public key for your private key.
1. Generate a private key
You can connect to Hevo using an encrypted or unencrypted private key.
Note: Hevo supports only private keys encrypted using the Public-Key Cryptography Standards (PKCS) #8-based triple DES algorithm.
Open a terminal window, and on the command line, do one of the following:
-
To generate an unencrypted private key, run the command:
openssl genrsa 2048 | openssl pkcs8 -topk8 -inform PEM -out <unencrypted_key_name> -nocrypt -
To generate an encrypted private key, run the command:
openssl genrsa 2048 | openssl pkcs8 -topk8 -v2 des3 -inform PEM -out <encrypted_key_name>You will be prompted to set an encryption password. This is the passphrase that you need to provide while connecting to your Snowflake Edge Destination using key pair authentication.
Note: Replace the placeholder values in the commands above with your own. For example, <encrypted_key_name> with encrypted_rsa_key.p8.
The private key is generated in the PEM format.
-----BEGIN ENCRYPTED PRIVATE KEY-----
MIIFJDBWBg...
----END ENCRYPTED PRIVATE KEY-----
Open the private key file and remove the extra blank space or empty line at the bottom of the file. Save the private key file in a secure location and provide it while connecting to your Snowflake Edge Destination using key pair authentication.
2. Generate a public key
To use a key pair for authentication, you must generate a public key for the private key created in the step above. For this:
Open a terminal window, and on the command line, run the following command:
openssl rsa -in <private_key_file> -pubout -out <public_key_file>
Note:
-
Replace the placeholder values in the command above with your own. For example, <private_key_file> with encrypted_rsa_key.p8.
-
If you are generating a public key for an encrypted private key, you will need to provide the encryption password used to create the private key.
The public key is generated in the PEM format.
-----BEGIN PUBLIC KEY-----
MIIBIjANBgk...
-----END PUBLIC KEY-----
Save the public key file in a secure location. You must associate this public key with the Snowflake user that you created for Hevo.
3. Assign the public key to a Snowflake user
To authenticate Hevo’s connection to your Snowflake warehouse using a key pair, you must associate the public key generated in the step above with the user that you created for Hevo. To do this:
-
Log in to your Snowflake account as a user with the SECURITYADMIN role or a higher role.
-
In the left navigation bar, click Projects, and then click Worksheets.
-
In the top right corner of the Worksheets tab, click the + icon to create a SQL worksheet.

-
Run the following command in the SQL worksheet:
ALTER USER <your_snowflake_user> SET RSA_PUBLIC_KEY='<public_key>'; // Example ALTER USER HARRY_POTTER set RSA_PUBLIC_KEY='MIIBIjANBgk...';Note:
-
Replace the placeholder values in the command above with your own. For example, <your_snowflake_user> with HARRY_POTTER.
-
Set the public key value to the content between
-----BEGIN PUBLIC KEY-----and-----END PUBLIC KEY-----.
-
To check whether the public key is configured correctly, you can follow the steps provided in the verify the user’s public key fingerprint section.
Obtain your Snowflake Account URL
The organization name and account name are visible in your Snowflake web interface URL.
For most accounts, the URL looks like https://<orgname>-<account_name>.snowflakecomputing.com.
For example, https://hevo-westeros.snowflakecomputing.com. Here, hevo is the organization name and westeros is your account name.
Perform the following steps to obtain your Snowflake account URL:
-
Log in to your Snowflake instance.
-
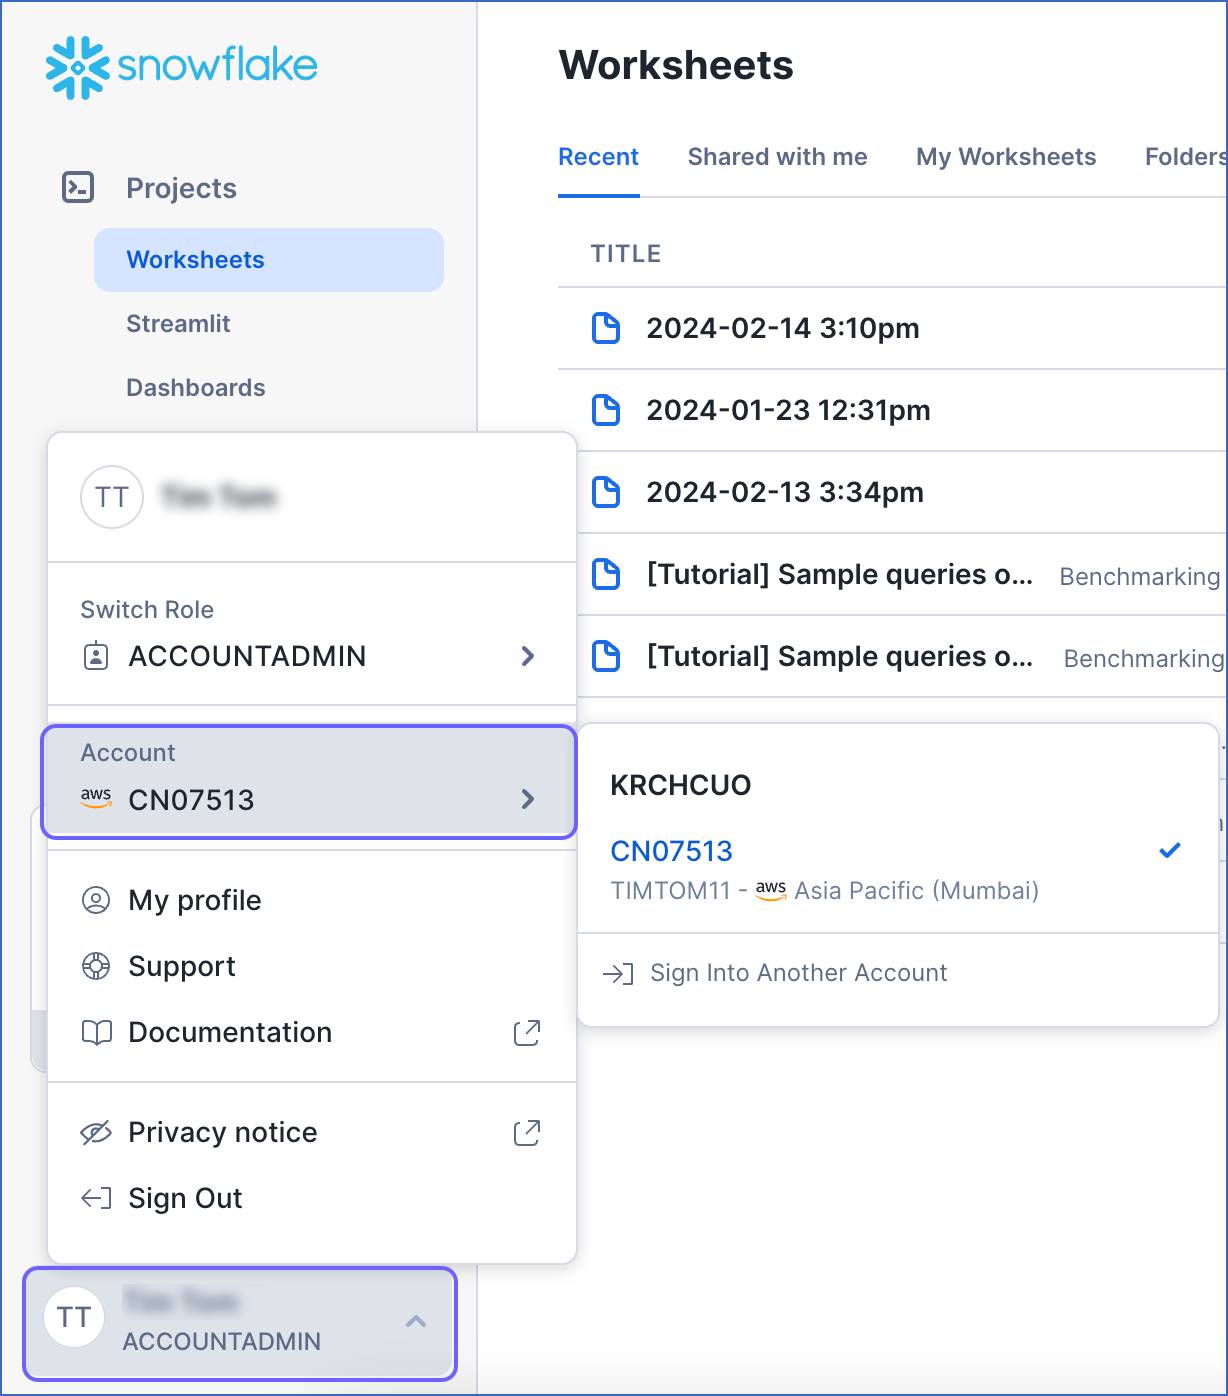
Navigate to the bottom of the left navigation pane, click the account selector, and then hover over the Account section.
-
In the pop-up, locate the account whose URL you want to obtain and hover over it.
-
In the account details pop-up dialog, click the Copy icon to copy the account identifier, and save it securely.
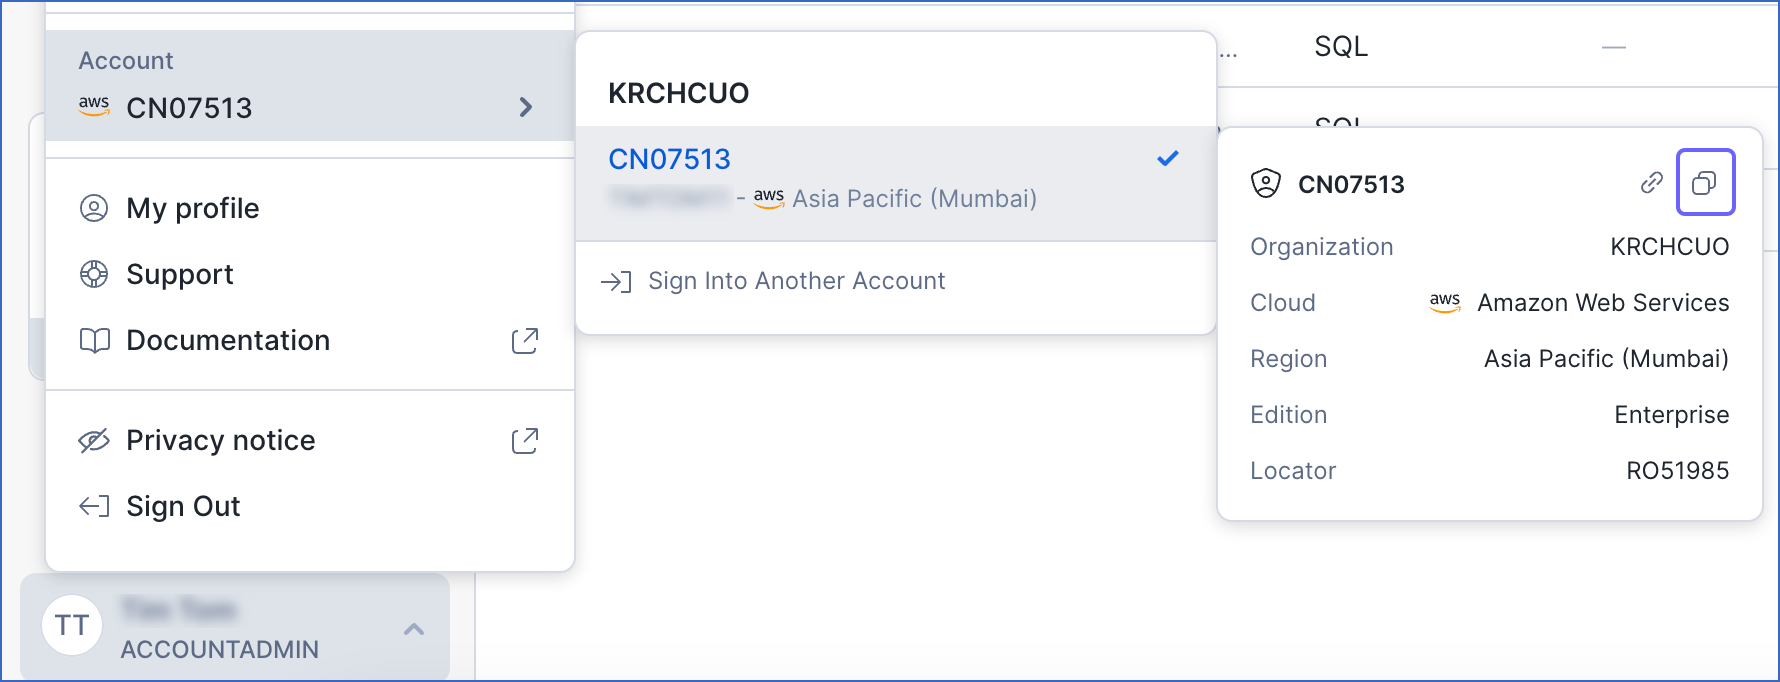
The account identifier is provided in the format <orgname>.<account_name>. To convert it to the account URL, substitute the values of orgname and account_name in the format https://<orgname>-<account_name>.snowflakecomputing.com.
For example, if the account identifier is KRCHCUO.CN07513, the account URL is https://krchcuo-cn07513.snowflakecomputing.com.
Use this URL while configuring your Destination.
Configure Snowflake as a Destination in Edge
Perform the following steps to configure Snowflake as a Destination in Edge:
-
Click DESTINATIONS in the Navigation Bar.
-
Click the Edge tab in the Destinations List View and click + Create Edge Destination.
-
On the Create Destination page, click Snowflake.
-
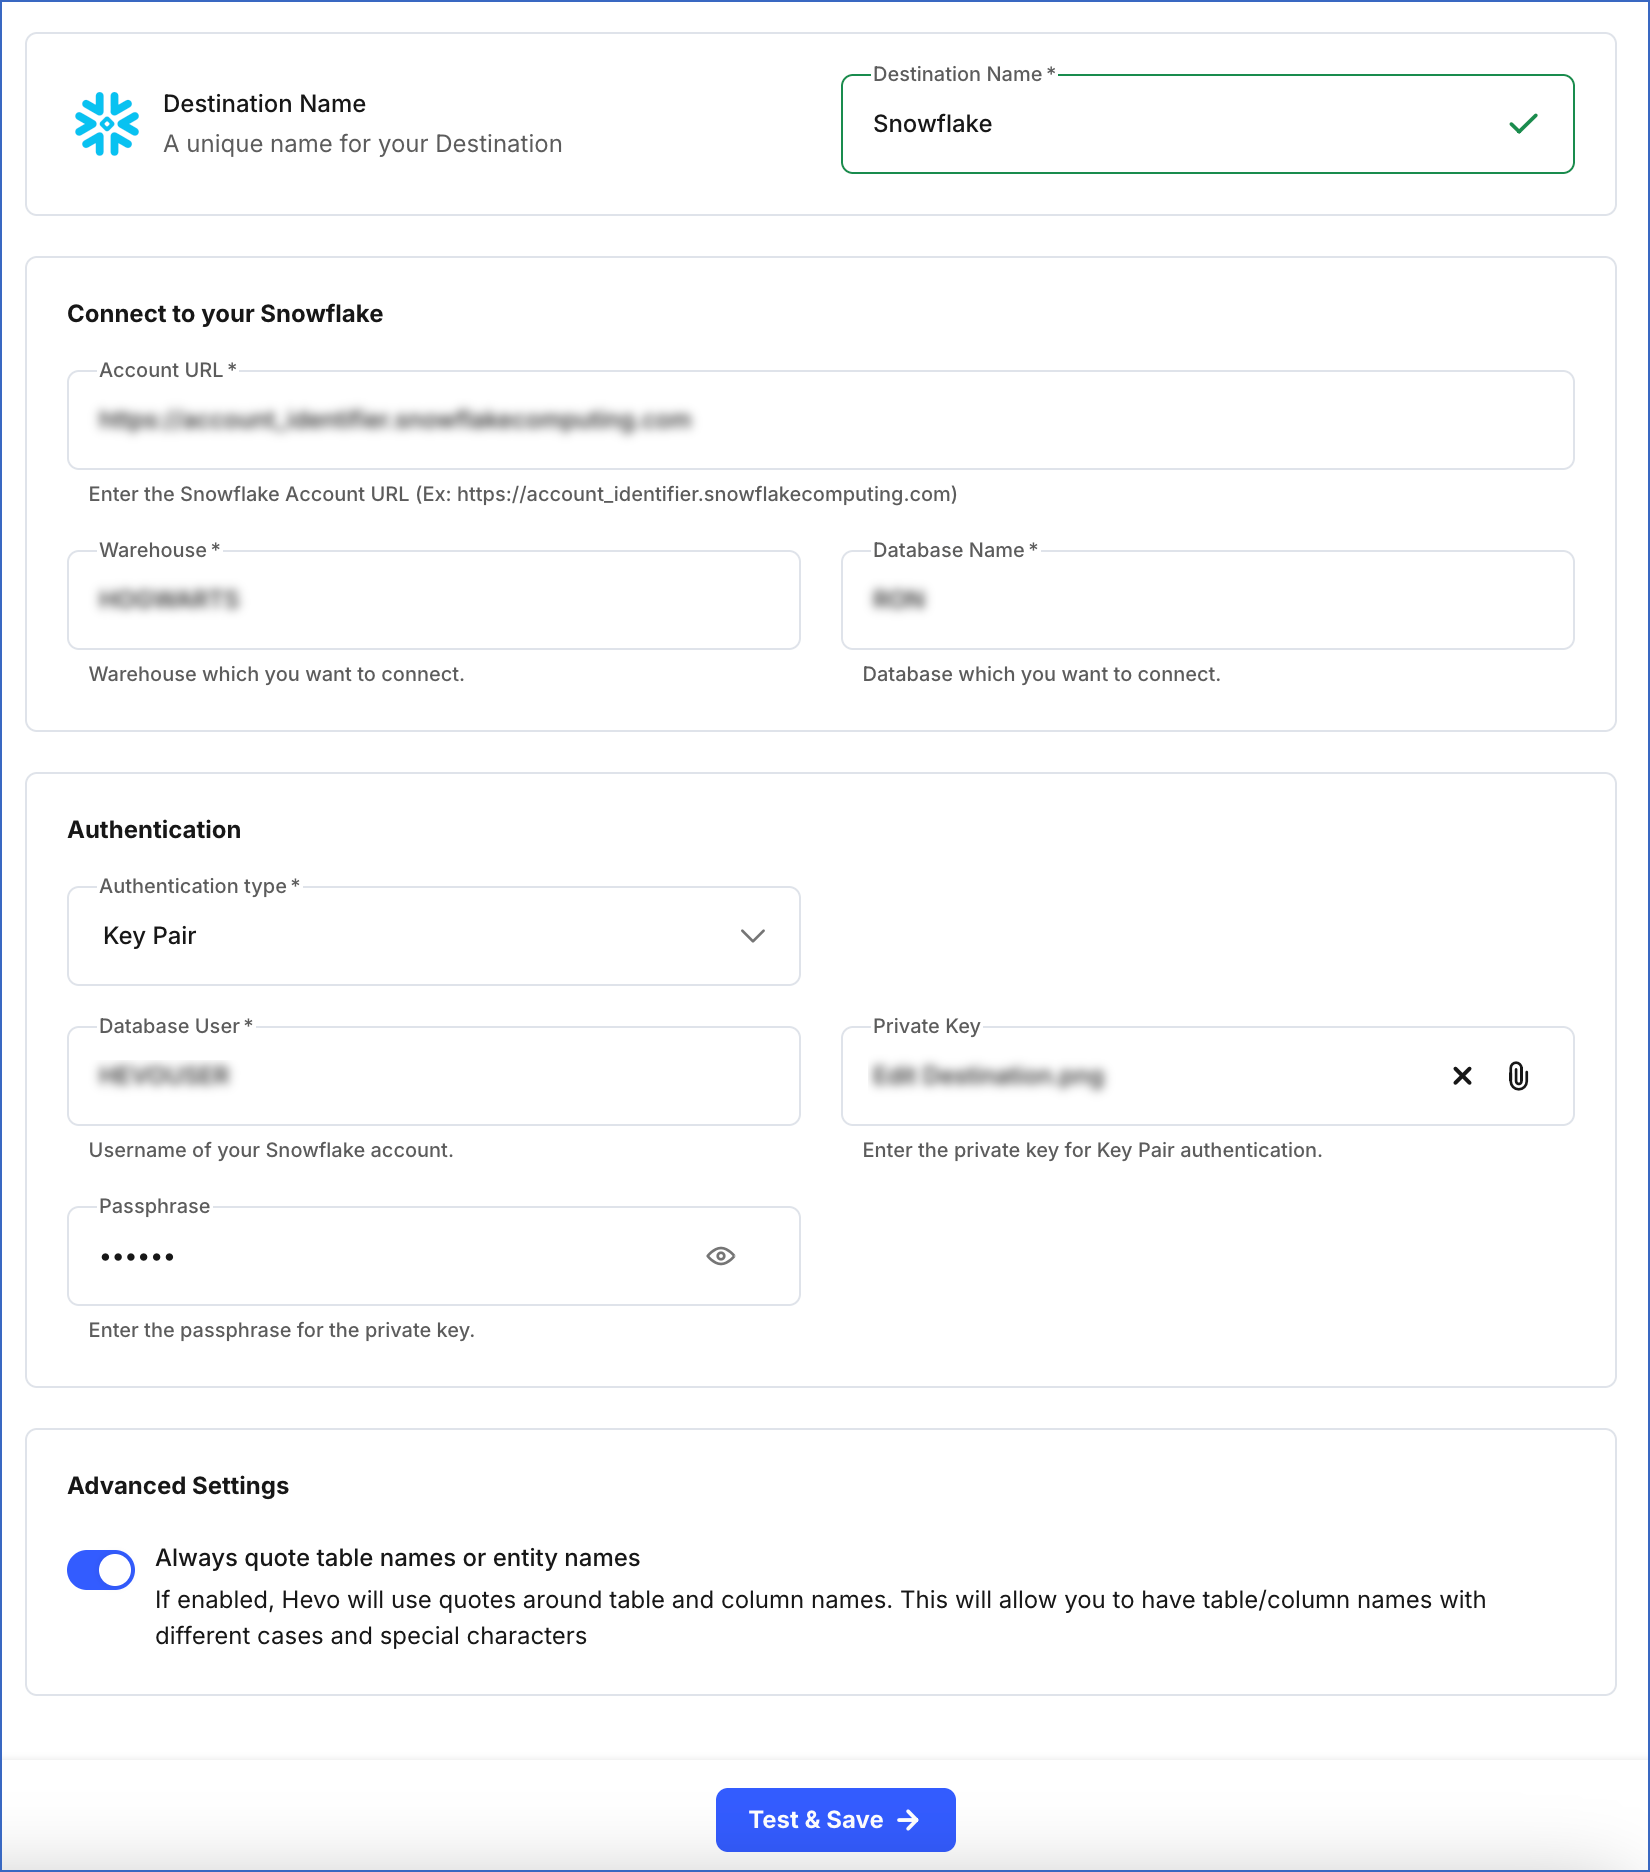
In the screen that appears, specify the following:
-
Destination Name: A unique name for your Destination, not exceeding 255 characters.
-
In the Connect to your Snowflake section:
-
Account URL: The Snowflake account URL that you retrieved in Step 5 above.
-
Warehouse: The Snowflake warehouse associated with your database where the data is managed. This warehouse can be the one you created above or an existing one.
-
Database Name: The name of the database where the data is to be loaded. This database can be the one you created above or an existing one.
Note: All the field values are case-sensitive.
-
-
In the Authentication section, from the drop-down, select the Authentication type for authenticating Hevo’s connection to your Snowflake warehouse:
-
Key Pair: Connect to your Snowflake warehouse using a public and private key pair.
-
Database User: A user with a non-administrative role created in the Snowflake database. This user must be the one to whom the public key is assigned.
-
Private Key: A cryptographic password used along with a public key to generate digital signatures. Click the attach (
 ) icon to upload the private key file that you generated in Step 4.
 -
Passphrase: The password given while generating the encrypted private key. Leave this field blank if you have attached a non-encrypted private key.
-
-
Access Credentials: Connect to your Snowflake warehouse using a password.

-
Database User: A user with a non-administrative role created in the Snowflake database. This user can be the one you created in Step 3 or an existing one.
-
Database Password: The password of the database user specified above.
-
Note: All the field values are case-sensitive.
-
-
Advanced Settings:
-
Always quote table names or entity names:
If enabled, Hevo puts double quotes around the Source table and column names while creating them in your Snowflake Destination. This setting preserves the case of your table and or column names. Further, if the names contain any special characters, these are retained as well. You need to use quotes while accessing your tables and columns in Snowflake.
For example,
SELECT "Column 1", "name" from RON.DARK_ARTS."test1_Table namE 05";If disabled, Hevo sanitizes your Source table and column names, replacing each non-alphanumeric (special) character with an underscore and removing trailing underscores. Hence, you are not required to use quotes while accessing them. Read Destination Considerations for more information about unquoted identifiers in Snowflake.
For example,
SELECT COLUMN_1, NAME from RON.DARK_ARTS.TEST1_TABLE_NAME_05;
-
-
-
Click Test & Save to test the connection to your Snowflake warehouse.
Once the test is successful, Hevo creates your Snowflake Edge Destination. You can use this Destination while creating your Edge Pipeline.
Additional Information
Read the detailed Hevo documentation for the following related topics:
Modifying Snowflake Destination Configuration in Edge
You can modify some settings of your Snowflake Edge Destination after its creation. However, any configuration changes will affect all the Pipelines using that Destination.
To modify the configuration of your Snowflake Destination in Edge:
-
In the detailed view of your Destination, do one of the following:
-
Click the More (
 ) icon to access the Destination Actions menu, and then click Edit Destination.
-
In the Destination Configuration section, click Edit.

-
-
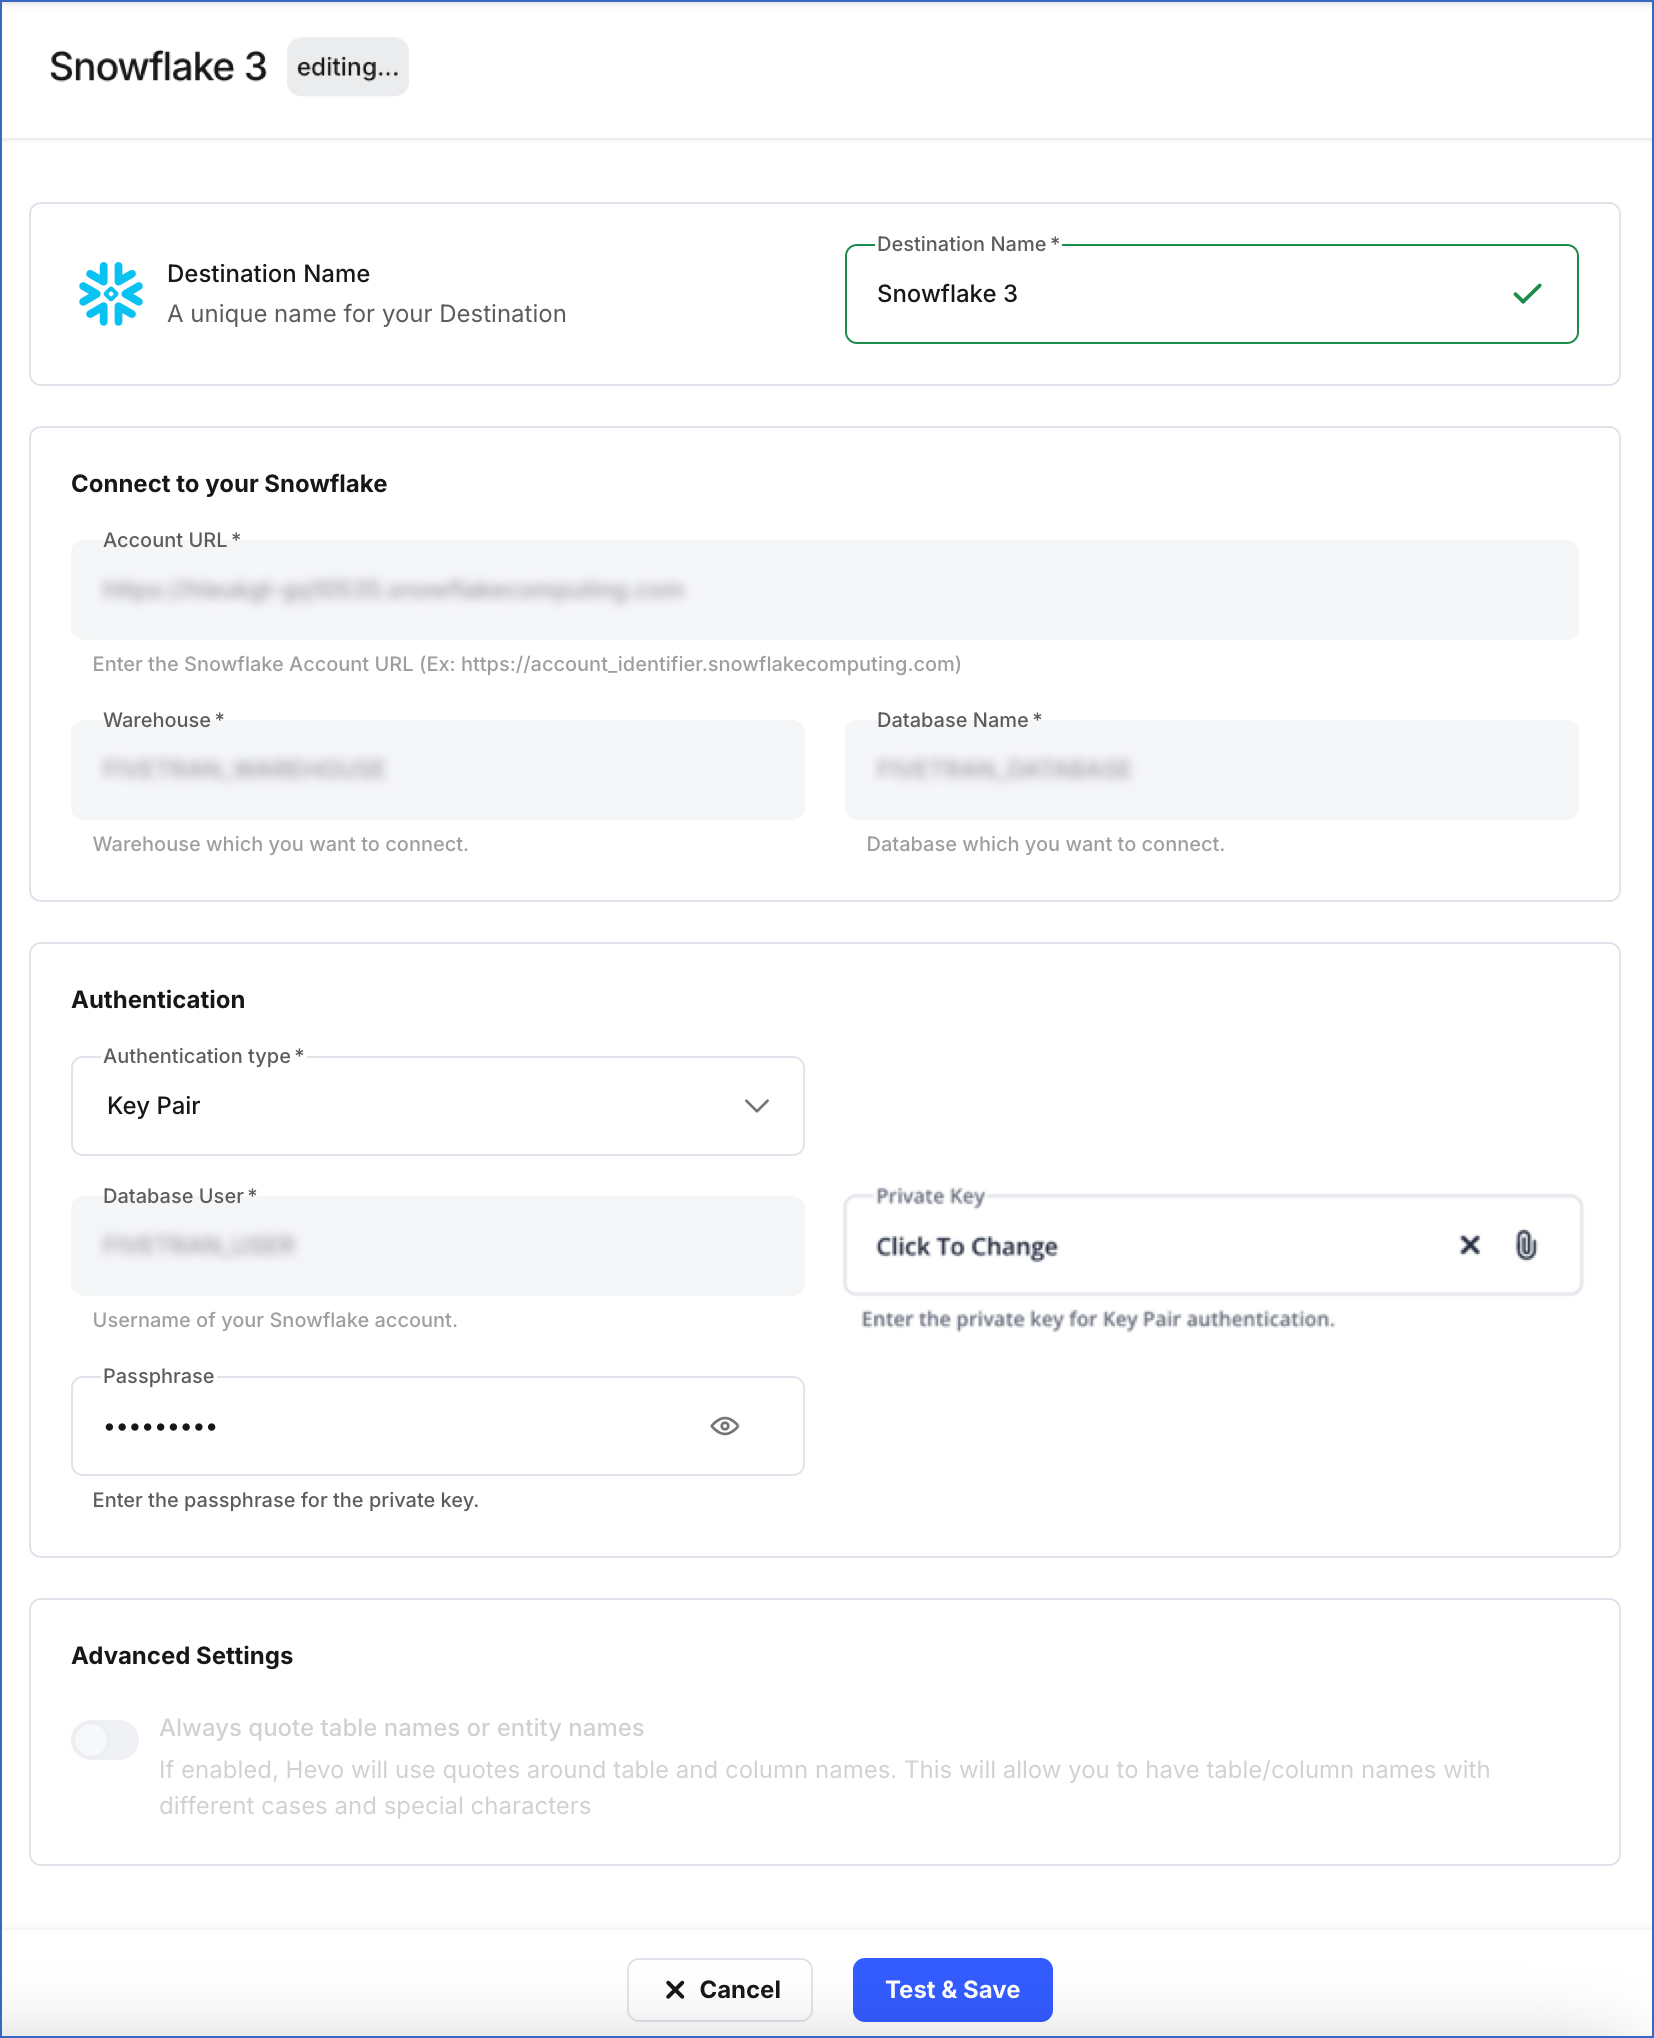
On the <Your Destination Name> editing page:
-
You can specify a new name for your Destination, not exceeding 255 characters.
-
In the Authentication section, you can modify your Authentication type and update the necessary fields based on the selected type:
-
Key Pair:
-
Private Key: Click the attach (
 ) icon to upload your encrypted or non-encrypted private key file. As the database user configured in your Destination cannot be changed, ensure that the public key corresponding to the uploaded private key is assigned to it.
 -
Passphrase: Click Change to clear the field. If you uploaded an encrypted private key, provide the password used to generate it; otherwise, leave the field blank.
-
-
Access Credentials:

- Database Password: Click Change to update the password for the user configured in your Destination.
-
-
-
Click Test & Save to check the connection to your Snowflake Destination and then save the modified configuration.
Data Type Evolution in Snowflake Destinations
Hevo has a standardized data system that defines unified internal data types, referred to as Hevo data types. During the data ingestion phase, the Source data types are mapped to the Hevo data types, which are then transformed into the Destination-specific data types during the data loading phase. A mapping is then generated to evolve the schema of the Destination tables.
The following image illustrates the data type hierarchy applied to Snowflake Destination tables:

Data Type Mapping
The following table shows the mapping between Hevo data types and Snowflake data types:
| Hevo Data Type | Snowflake Data Type |
|---|---|
| BOOLEAN | BOOLEAN |
| BYTEARRAY | BINARY |
| - BYTE - SHORT - INTEGER - LONG |
NUMBER(38,0) |
| DATE | DATE |
| DATETIME | TIMESTAMP_NTZ |
| DATETIME_TZ | TIMESTAMP_TZ |
| DECIMAL | - NUMBER - VARCHAR |
| - FLOAT - DOUBLE |
FLOAT |
| VARCHAR | VARCHAR |
| - JSON - XML |
VARIANT |
| TIME | TIME |
| TIMETZ | VARCHAR |
Handling the Decimal data type
For Snowflake Destinations, Hevo maps DECIMAL data values with a fixed precision (P) and scale (S) to the NUMBER (NUMERIC) or VARCHAR data types. This mapping is decided based on the number of significant digits (P) in the numeric value and the number of digits in the numeric value to the right of the decimal point (S). Refer to the table below to understand the mapping:
| Precision and Scale of the Decimal Data Value | Snowflake Data Type |
|---|---|
| Precision: >0 and <= 38 Scale: > 0 and <= 37 |
NUMBER |
For precision and scale values other than those mentioned in the table above, Hevo maps the DECIMAL data type to a VARCHAR data type.
Read Numeric Types to know more about the data types, their range, and the literal representation Snowflake uses to represent various numeric values.
Handling Time and Timestamp data types
Snowflake supports fractional seconds up to 9 digits of precision (nanoseconds) for both TIME and TIMESTAMP data types. Hevo truncates any digits beyond this limit. For example, a Source value 12:00:00.1234567890 will be stored as 12:00:00.123456789.
Handling of Unsupported Data Types
Hevo does not allow the direct mapping of a Source data type to any of the following Snowflake data types:
-
ARRAY
-
STRUCT
-
Any other data type not listed in the table above.
Hence, if the Source object is mapped to an existing Snowflake table with columns of unsupported data types, it may become inconsistent. To prevent any inconsistencies during schema evolution, Hevo maps all unsupported data types to the VARCHAR data type in Snowflake.
Destination Considerations
-
Snowflake converts any unquoted Source table and column names to uppercase while mapping to the Destination table. For example, the Source table, Table namE 05, is converted to TABLE_NAME_05. The same conventions apply to column names.
However, if you have enabled the Always quote table names or entity names option while configuring your Snowflake Destination, your Source table and column names are preserved. For example, the Source table, ‘Table namE 05’ is created as “Table namE 05” in Snowflake.
Limitations
-
Hevo replicates a maximum of 4096 columns to each Snowflake table, of which six are Hevo-reserved metadata columns used during data replication. Therefore, your Pipeline can replicate up to 4090 (4096-6) columns for each table.
-
If a Source object has a column value exceeding 16 MB, Hevo marks the Events as failed during ingestion, as Snowflake allows a maximum column value size of 16 MB.
Revision History
Refer to the following table for the list of key updates made to this page:
| Date | Release | Description of Change |
|---|---|---|
| Feb-13-2026 | NA | Updated section, Create a Snowflake User and Grant Permissions to remove the MODIFY permission on the database from the script. |