Creating an Edge Pipeline
On This Page
Edge Pipeline is now available for Public Review. You can explore and evaluate its features and share your feedback.
You can create a Pipeline in Hevo to synchronize data from your Source with a Destination. To get started with creating a Pipeline, you need:
-
An active Hevo account. You can start with a 14-day full-feature, free trial account.
-
Access to the Source system where your data resides.
-
Access to a Destination system in which the Source data is replicated.
The following diagram illustrates the process to set up an Edge Pipeline.

Refer to the sections below for the detailed steps.
Perform the following steps to create an Edge Pipeline:
-
Log in to your Hevo account. By default, PIPELINES is selected in the Navigation Bar.
-
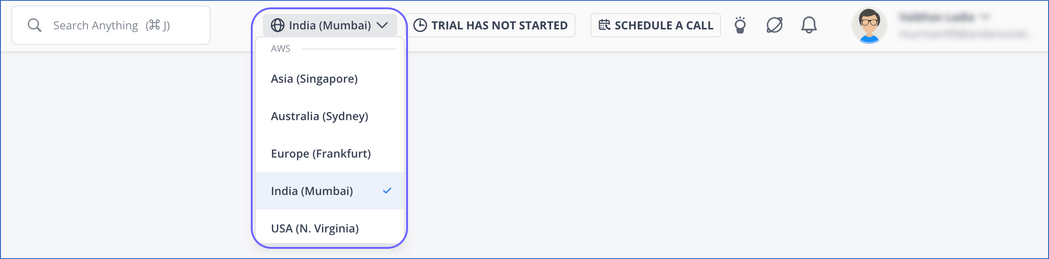
(Optional) In the User Information bar at the top of the page, select the region in which you want to create your Edge Pipeline, if this is different from the default region of your workspace.
-
On the Pipelines page, click + Create Pipeline, and then do the following:
-
Set up your Source from which you want to ingest data.
-
Configure your Destination into which you want to replicate your Source data.
-
Select the Source objects from which you want to ingest data.
-
Once you have created your Edge Pipeline, you are automatically redirected to the Job History tab, which displays the jobs running in your Pipeline. You can click on a job to view its details.
Set up the Source
Perform the following steps to set up your Source in the Edge Pipeline:
-
On the Select Source Type page, select your Source. Here, we are selecting Amazon RDS PostgreSQL.
-
On the Select Destination Type page, select the type of Destination you want to use.
-
On the page that appears, do the following:
-
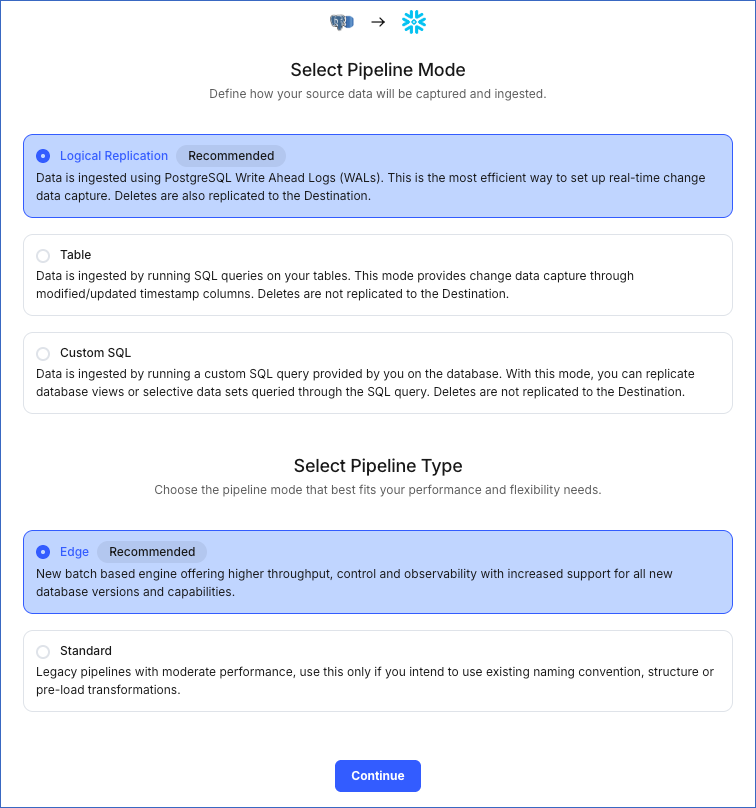
Select Pipeline Mode: Choose Logical Replication. Hevo supports only this mode for Edge Pipelines created with PostgreSQL Source. If you choose any other mode, you can proceed to create a Standard Pipeline.
-
Select Pipeline Type: Choose the type of Pipeline you want to create based on your requirements, and then click Continue.
-
If you select Edge, skip to step 4 below.
-
If you select Standard, read the corresponding Standard Source documentation to configure your Standard Pipeline.
This section is displayed only if all the following conditions are met:
-
The selected Destination type is supported in Edge.
-
The Pipeline mode is set to Logical Replication.
-
Your Team was created before September 15, 2025, and has an existing Pipeline created with the same Destination type and Pipeline mode.
For Teams that do not meet the above criteria, if the selected Destination type is supported in Edge and the Pipeline mode is set to Logical Replication, you can proceed to create an Edge Pipeline. Otherwise, you can proceed to create a Standard Pipeline.
-
-
-
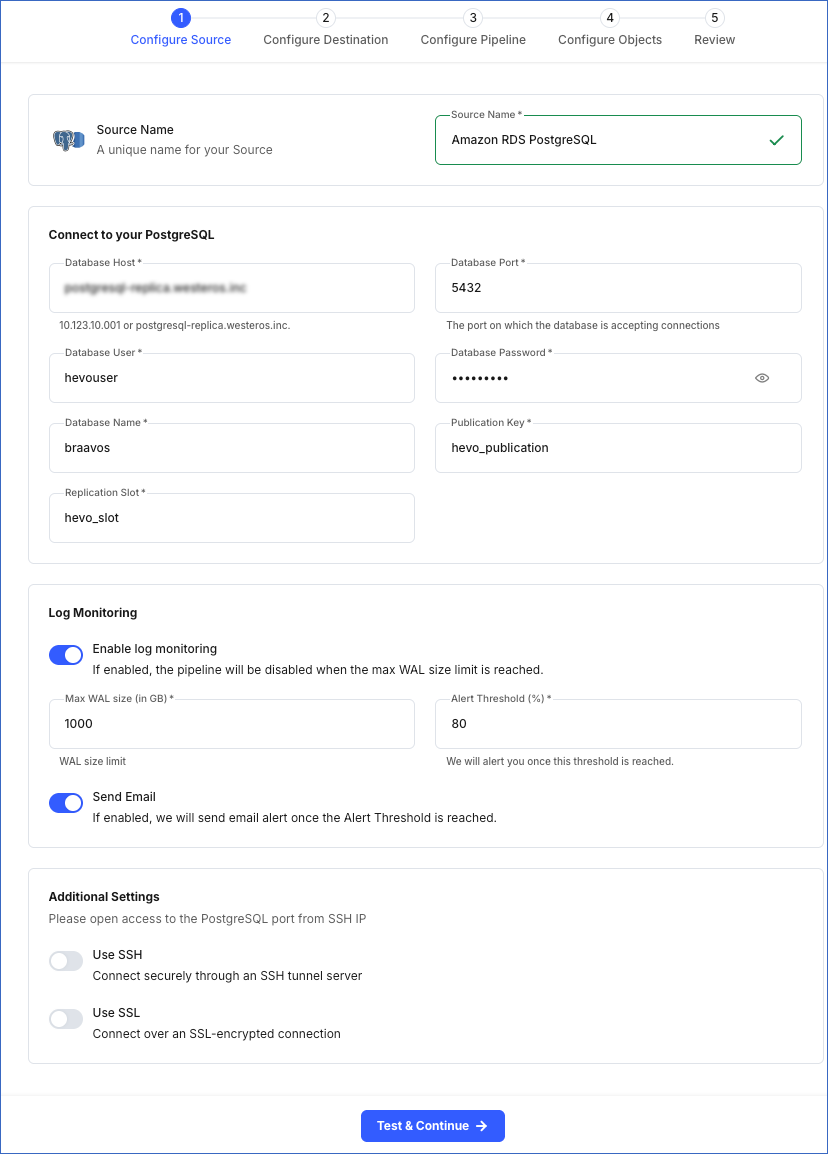
In the Configure Source screen, specify the following:
-
Source Name: A unique name for your Source, not exceeding 255 characters. For example, Amazon RDS PostgreSQL.
-
In the Connect to your PostgreSQL section:
Note: In Edge Pipelines, Hevo replicates data using the database logs.
-
Database Host: The PostgreSQL host’s IP address or DNS. For example, 10.123.10.001 or postgresql.westeros.inc.
Note: For URL-based hostnames, exclude the http:// or https:// part. For example, if the hostname URL is https://postgres.database.com, enter postgres.database.com.
-
Database Port: The port on which your PostgreSQL server listens for connections. Default value: 5432.
-
Database User: The user who has read-only permission on your database. For example, hevouser.
-
Database Password: The password for your database user.
-
Database Name: The database from which you want to replicate data. For example, dvdrental.
-
Publication Key: The name of the publication added in your Source database to track changes in the database tables. Read publications to understand them and learn how to create them.
-
Replication Slot: The name of the replication slot created for your Source database to stream changes from the Write-Ahead Logs (WALs) to Hevo for incremental ingestion. Refer to the Create a replication slot section in the respective Source documentation for the steps to create it.
-
-
Log Monitoring: Enable this option if you want Hevo to disable your Pipeline when the size of the WAL being monitored reaches the set maximum value. Specify the following:
-
Max WAL Size (in GB): The maximum allowable size of the Write-Ahead Logs that you want Hevo to monitor. Specify a number greater than 1.
-
Alert Threshold (%): The percentage limit for the WAL, whose size Hevo is monitoring. An alert is sent when this threshold is reached. Specify a value between 50 to 80. For example, if you set the Alert Threshold to 80, Hevo sends a notification when the WAL size is at 80% of the Max WAL Size specified above.
-
Send Email: Enable this option to send an email when the WAL size has reached the specified Alert Threshold percentage.
If this option is turned off, Hevo does not send an email alert.
-
-
Additional Settings
-
Connect through SSH: Enable this option to connect to Hevo using an SSH tunnel instead of directly connecting your PostgreSQL database host to Hevo. This provides an additional level of security to your database by not exposing your PostgreSQL setup to the public.
If this option is turned off, you must configure your Source to accept connections from Hevo’s IP addresses. You can do this by adding Hevo’s IP addresses to the database IP allowlist. Refer to the content of your PostgreSQL variant for steps to do this.
-
Use SSL: Enable this option to use an SSL-encrypted connection. Specify the following:
-
CA File: The file containing the SSL server certificate authority (CA).
-
Client Certificate: The client’s public key certificate file.
-
Client Key: The client’s private key file.
-
-
-
-
Click Test & Continue to test the connection to your PostgreSQL Source. Once the test is successful, you can set up your Destination.
Select and Configure your Destination
You must configure your Destination after you have set up the Source. To do this:
-
On the Create Pipeline page, in the Selection screen under Configure Destination, do one of the following:

-
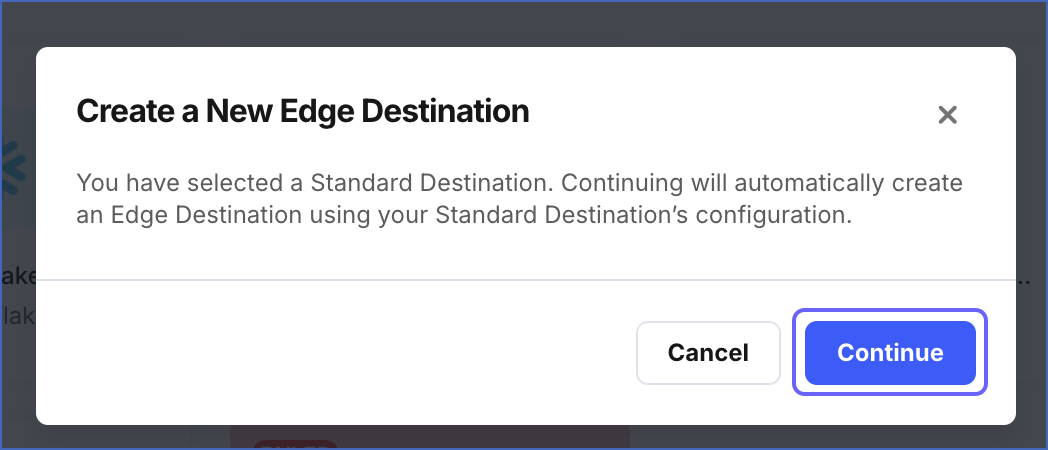
On the Select Destination page, you can select an existing Edge Destination or copy a Standard Destination to reuse its configuration and field values. To copy a Standard Destination:
-
Click the Destination you want to copy.
-
In the Create a New Edge Destination pop-up dialog, click Continue.
-
On the Add Destination page, review and specify values for any fields that were not available in the Standard Destination.
-
-
Click Add Destination to configure a new Destination, and then follow these steps:
Note: You must select Create New Destination if you are creating your first Edge Pipeline or have not created any Edge Destinations.
-
Select your Destination type. Here, we are selecting Snowflake.
-
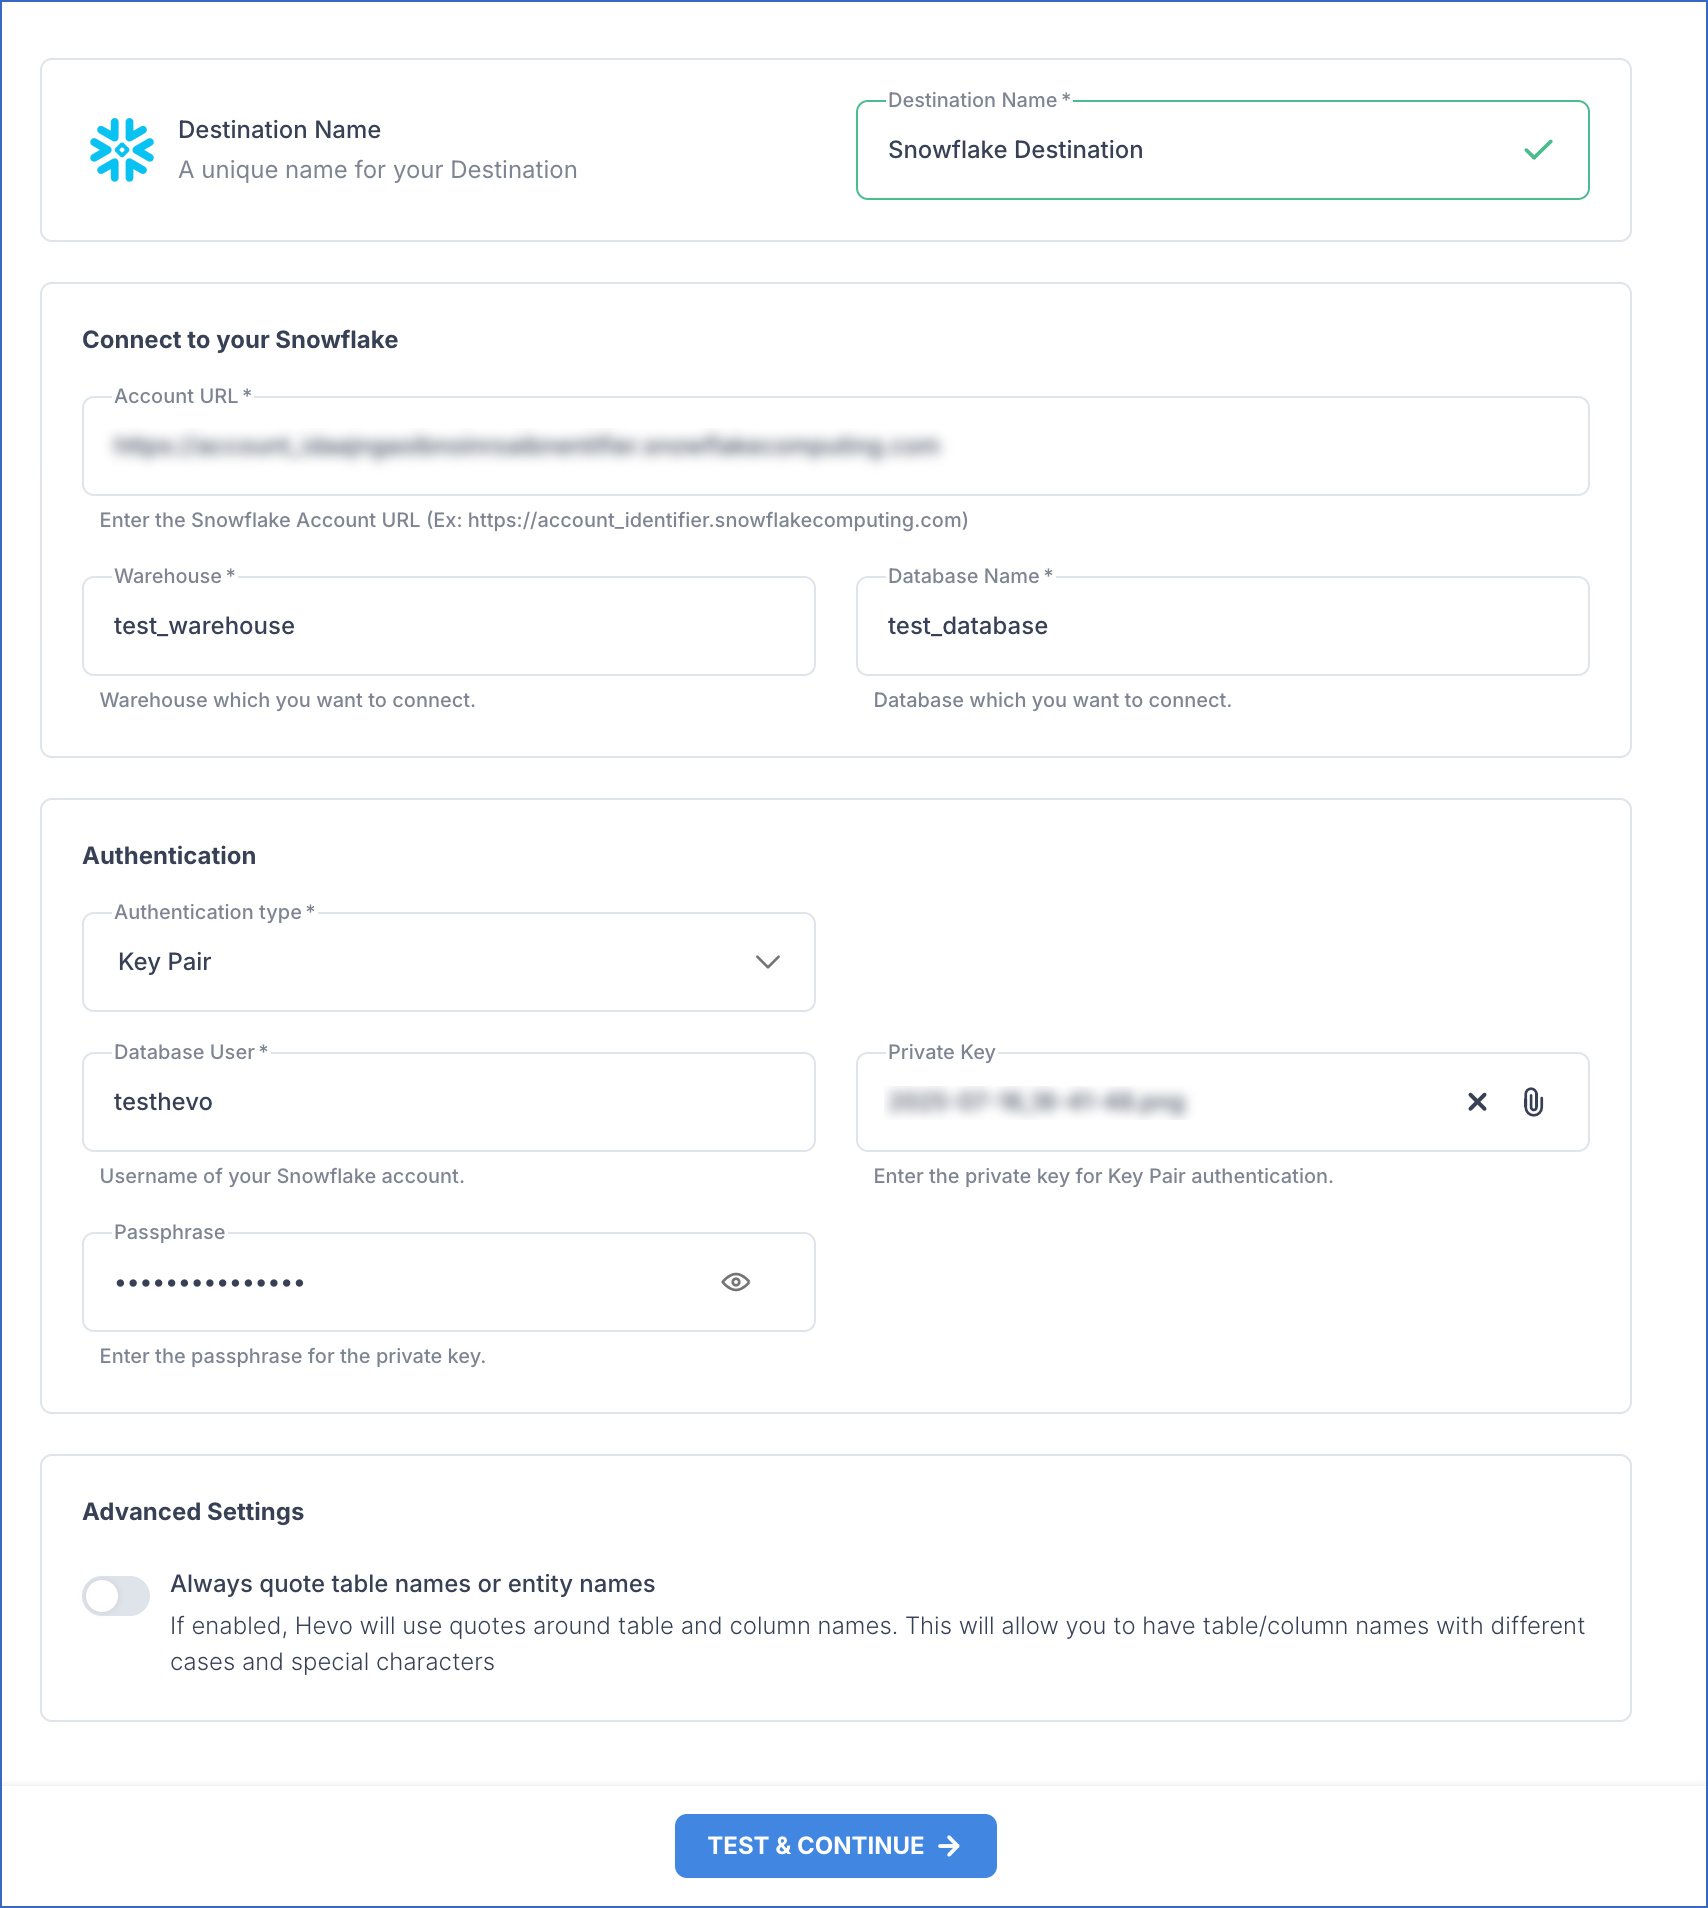
In the Snowflake screen, specify the following:
-
Destination Name: A unique name for your Destination, not exceeding 255 characters. For example, Snowflake Destination.
-
In the Connect to your Snowflake section:
-
Account URL: The URL for connecting to the Snowflake data warehouse. For example, https://xy12345.ap-southeast-1.snowflakecomputing.com.
-
Warehouse: The name of the Snowflake warehouse where Hevo will run the SQL queries and perform DML operations for data replication. For example, SNOWFLAKE20.
-
Database Name: The name of the database in the Destination warehouse where the data is to be loaded. For example, HEVO_20.
Note: All the field values are case-sensitive.
-
In the Authentication section, select an Authentication type from the drop-down menu. Here, we have chosen Key Pair.
-
Key Pair: Connect to your Snowflake warehouse using a public and private key pair.
-
Database User: A user with a non-administrative role created in the Snowflake. This user must be the one to whom you have assigned the public key associated with your private key.
-
Private Key: A cryptographic password used along with a public key to generate digital signatures. Click the attach (
 ) icon to upload your private key file.
 -
Passphrase: The password given while generating the encrypted private key. Leave this field blank if you have attached a non-encrypted private key.
-
-
-
Advanced Settings:
- Always quote table names or entity names: Enable this option to preserve the case of your Source table and column names in the Snowflake Destination.
-
-
-
-
-
Click TEST & CONTINUE to test the connection to your Snowflake Destination. Once the test is successful, you can provide your Pipeline-specific settings.
Configure the Pipeline Settings
You can specify your Pipeline settings after configuring your Destination. To do this, perform the following steps on the Configure Pipeline page:
-
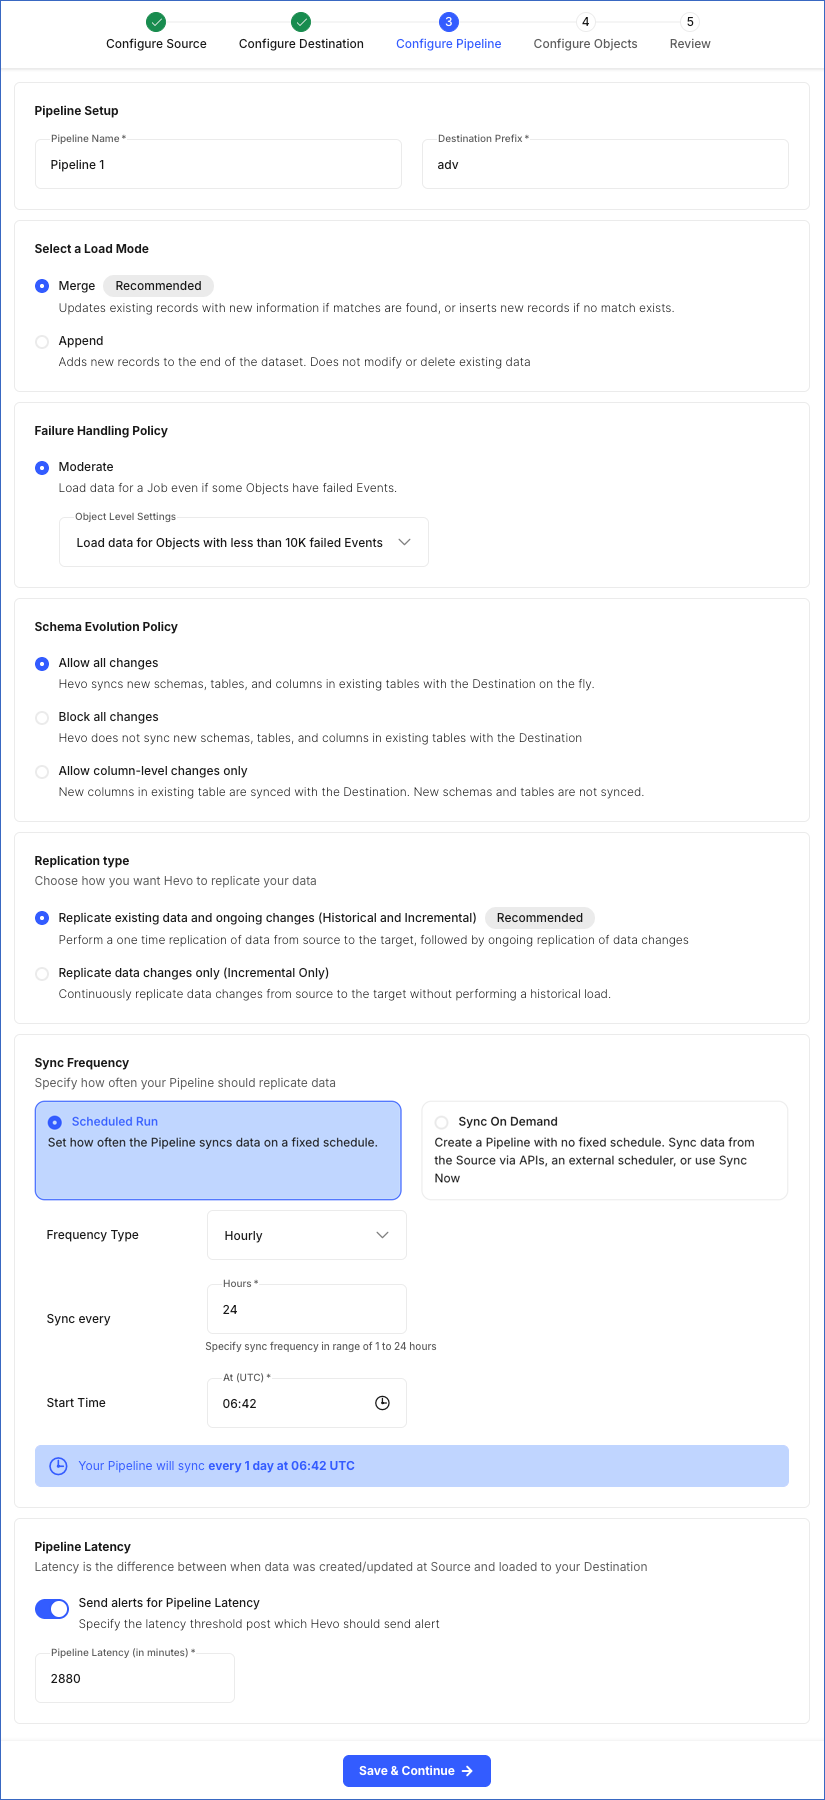
In the Pipeline Setup section, specify the following:
-
Pipeline Name: A unique name for your Pipeline, not exceeding 255 characters.
-
Destination Prefix: A string value, not exceeding 32 characters, that you want to add at the beginning of your Destination table names. The string can have alphanumeric characters and underscores. As Hevo automatically adds a trailing underscore, you do not need to provide one at the end of the specified prefix string. For example, pp_1 but not pp_1_.
Note:
-
In Google BigQuery, a dataset whose name begins with an underscore is treated as a hidden dataset. As a result, for Pipelines that use BigQuery as the Destination, the Destination prefix cannot start with an underscore.
-
Hevo creates the tables following the conventions defined by the Destination for naming identifiers. Read your Destination documentation for the rules.
-
-
-
In the Select a Load Mode section, specify one of the following:
Note: This section is not displayed for Pipelines created with Ordergroove as the Source, as Hevo supports only the Merge load mode for this Source.
-
Merge (Recommended): In this mode, existing data records are updated based on the matching criteria, such as primary keys, and new records are added to your Destination table if they do not match the criteria. This is the default selection.
Note: You must define a primary key for the Source object if it does not have one.
-
Append: In this mode, new data records are added at the end of your Destination table without modifying or deleting any existing data.
Note: This option may result in duplicate data in your Destination tables.
If you select Merge mode, only Source objects that have a defined primary key are displayed in this mode on the Configure Objects page. For objects without a primary key, Hevo changes the load mode to Append.
Note: Hevo does not automatically revert these objects to Merge mode later. However, if required, you can manually change the load mode for any Source object from the Configure Objects page.
-
-
In the Failure Handling Policy section, specify the policy for handling object-level failures:
-
Moderate: In this mode, data from all successfully processed objects in the job is ingested and loaded into your Destination tables. Select an action from the drop-down to be performed in case of failures:
-
Don’t load data for Objects with failed Events: In this case, Hevo loads data from only those objects in a job that are processed successfully.
-
Load data for Objects with less than 10K failed Events: In this case, Hevo marks the entire job as failed if the number of failed Events across all objects in it exceeds the pre-defined threshold value of 10K.
-
-
-
In the Schema Evolution Policy section, specify the option to sync the Source schema changes with the Destination schema:
-
Allow all changes: In this option, Hevo replicates any changes in the Source schema, such as the addition of new columns, schemas, tables, and or updates to existing ones, to the Destination schema. This is the default selection.
-
Block all changes: In this option, Hevo does not replicate any changes in the Source schema to the Destination schema. This means that any modifications in the Source schema, such as the addition of new columns, tables, schemas, and or updates to existing ones, are not synced with the Destination schema.
-
Allow column-level changes only: In this option, Hevo replicates any changes only in the columns of the selected Source object(s) to the Destination. This means that any modifications to the Source columns, such as adding, deleting, and renaming, are synced with the Destination schema.
Note: Any tables or schemas created in the Source post-Pipeline creation are not synced.
-
-
In the Replication type section, specify the kind of data that you want Hevo to replicate:
Note: This section is not displayed for Pipelines created with SaaS Sources. Hevo always replicates both historical and incremental data for these Pipelines.
-
Replicate existing data and ongoing changes (Historical and Incremental): In this option, Hevo first replicates all existing data from the selected Source tables and thereafter captures only data changes. Hevo recommends this method to ensure integrity between your Source and Destination data.
-
Replicate data changes only (Incremental only): In this option, Hevo replicates only the new and changed data from your Source table.
-
-
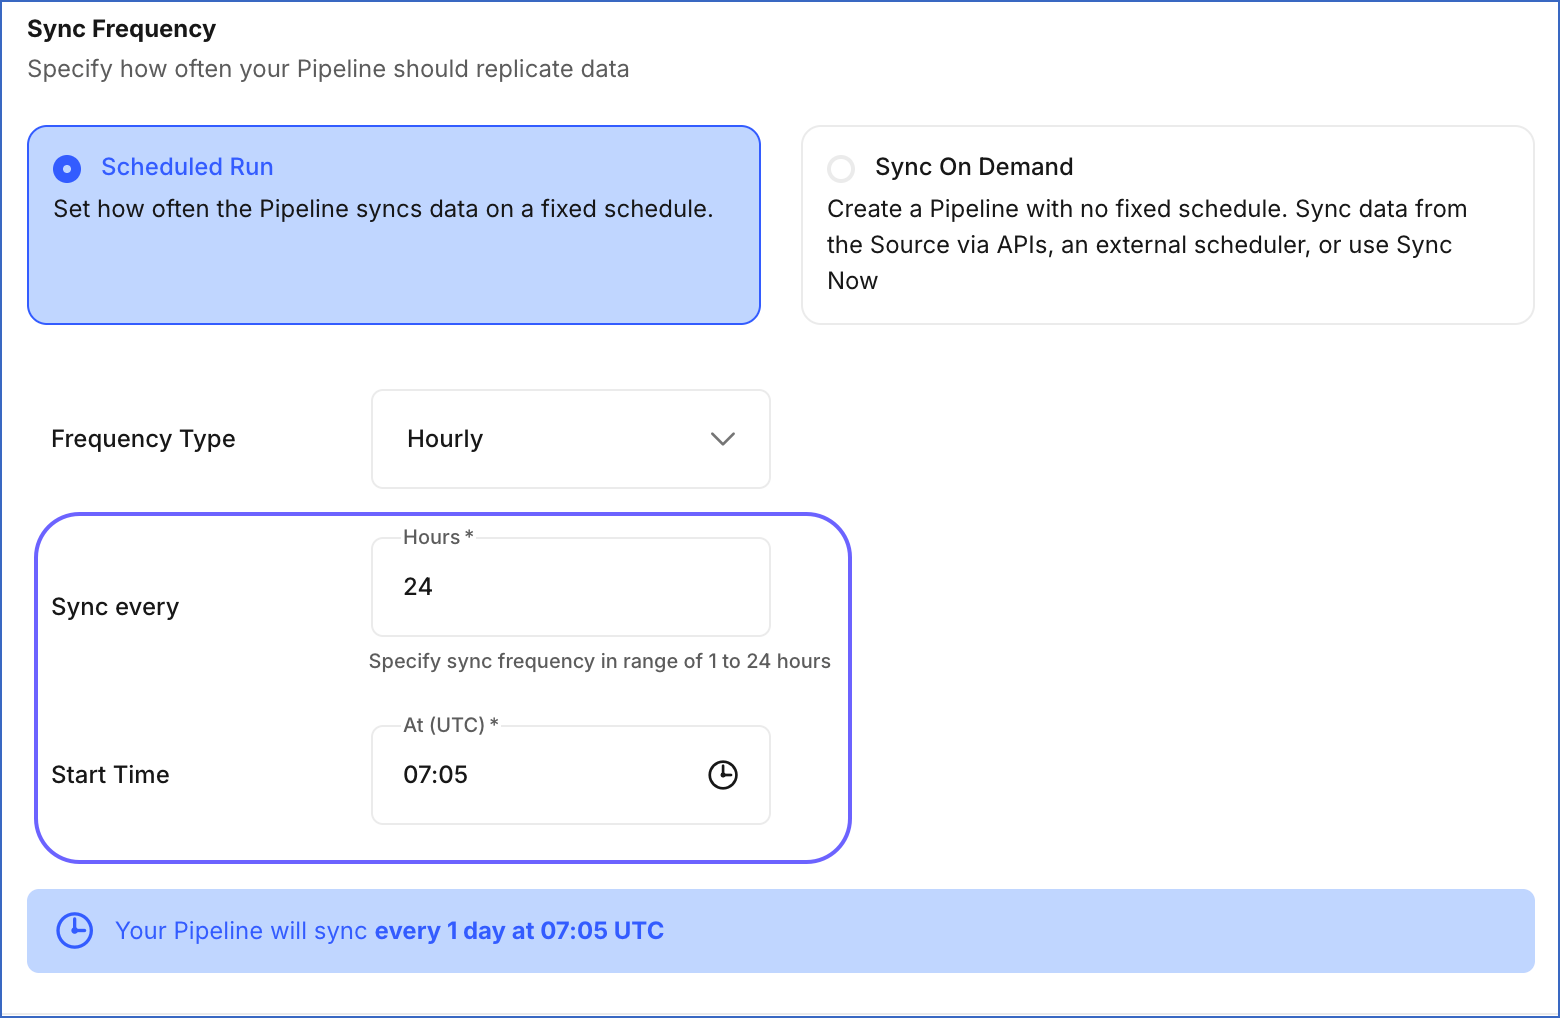
In the Sync Frequency section, specify the sync type for the Pipeline. Select one of the following:
-
Scheduled Run: In this mode, the Pipeline syncs data from the Source on a fixed schedule. Specify the following:
-
Frequency Type: The interval type in hours or minutes. Select Hourly or Every n minutes.
-
Sync every: The interval at which the Pipeline runs jobs to process data. Set an interval based on the selected Frequency Type:
-
Hourly: Specify an integer value between 1 and 24. Default value: 6.
If the interval is set to 24 hours, the following field is displayed:
-
Start Time: Enter a value in hh:mm (UTC) format to sync data at a fixed time every day. For example, specify 07:00 (UTC) if you want to sync the Pipeline at 00:00 (MST). By default, the field displays the current local time in UTC. For example, 07:51 UTC if the time is 00:51 MST.
Note: The start time must be between 00:00 and 23:59.
-
-
Every n minutes: Select the desired frequency from the drop-down. Default value: 30 minutes.
Note: If you need to sync data more frequently, contact Hevo Support.
-
-
-
Sync On Demand: In this mode, the Pipeline does not run on a fixed schedule and must be triggered using Hevo APIs, an external scheduler, such as Airflow, or the Sync Now option.
Note: For log-based Pipelines, ensure the Pipeline run frequency is higher than the database log retention period to avoid log expiry and subsequent data loss. For example, if the log retention period is 24 hours, the Pipeline must run more frequently than every 24 hours.
-
-
In the Pipeline Latency section:
-
Send alerts for Pipeline Latency: Enable this option to receive alerts when your Pipeline latency exceeds the set value. If enabled, Hevo displays the following field:
- Pipeline Latency (in minutes): The latency threshold value for your Pipeline. Hevo sends an alert when this threshold is exceeded. Latency is the difference between when the data was created or updated at the Source and when it was loaded to your Destination. Set a value to at least twice the specified sync frequency (in minutes).
-
-
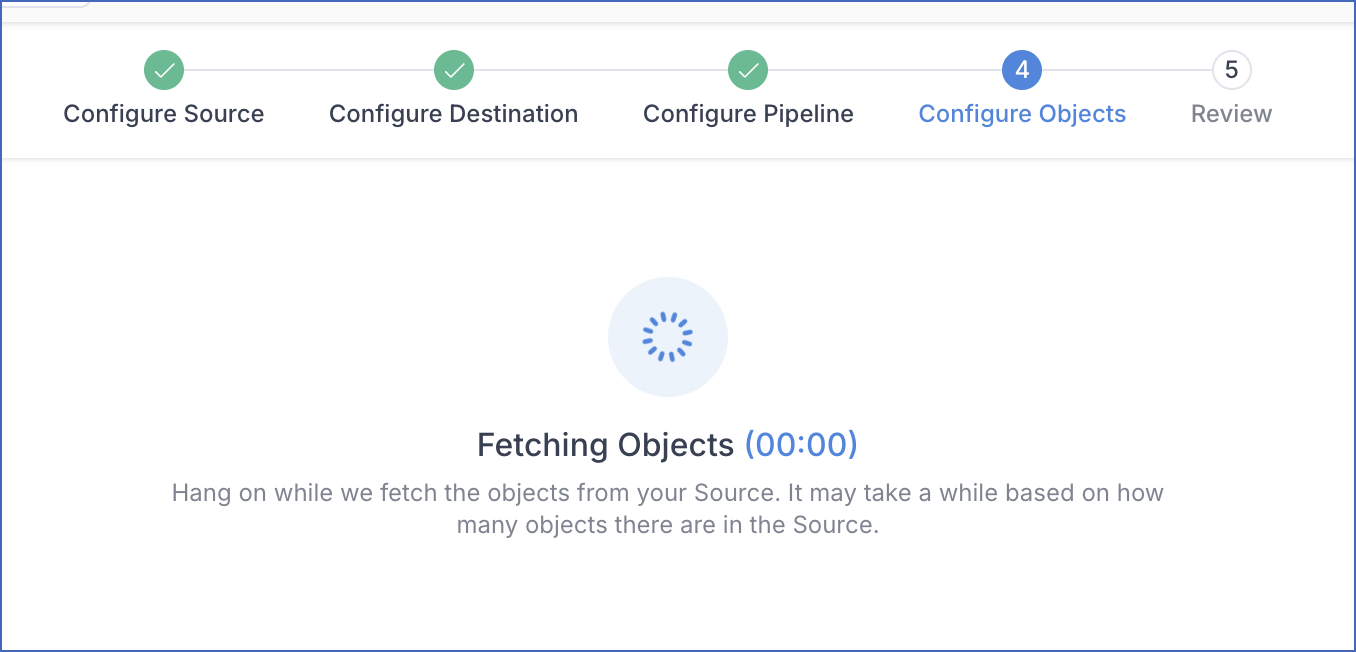
Click Save & Continue. Once the Pipeline settings are saved, Hevo fetches all the objects from the database specified while configuring the Source.
Select and Configure the Source Objects
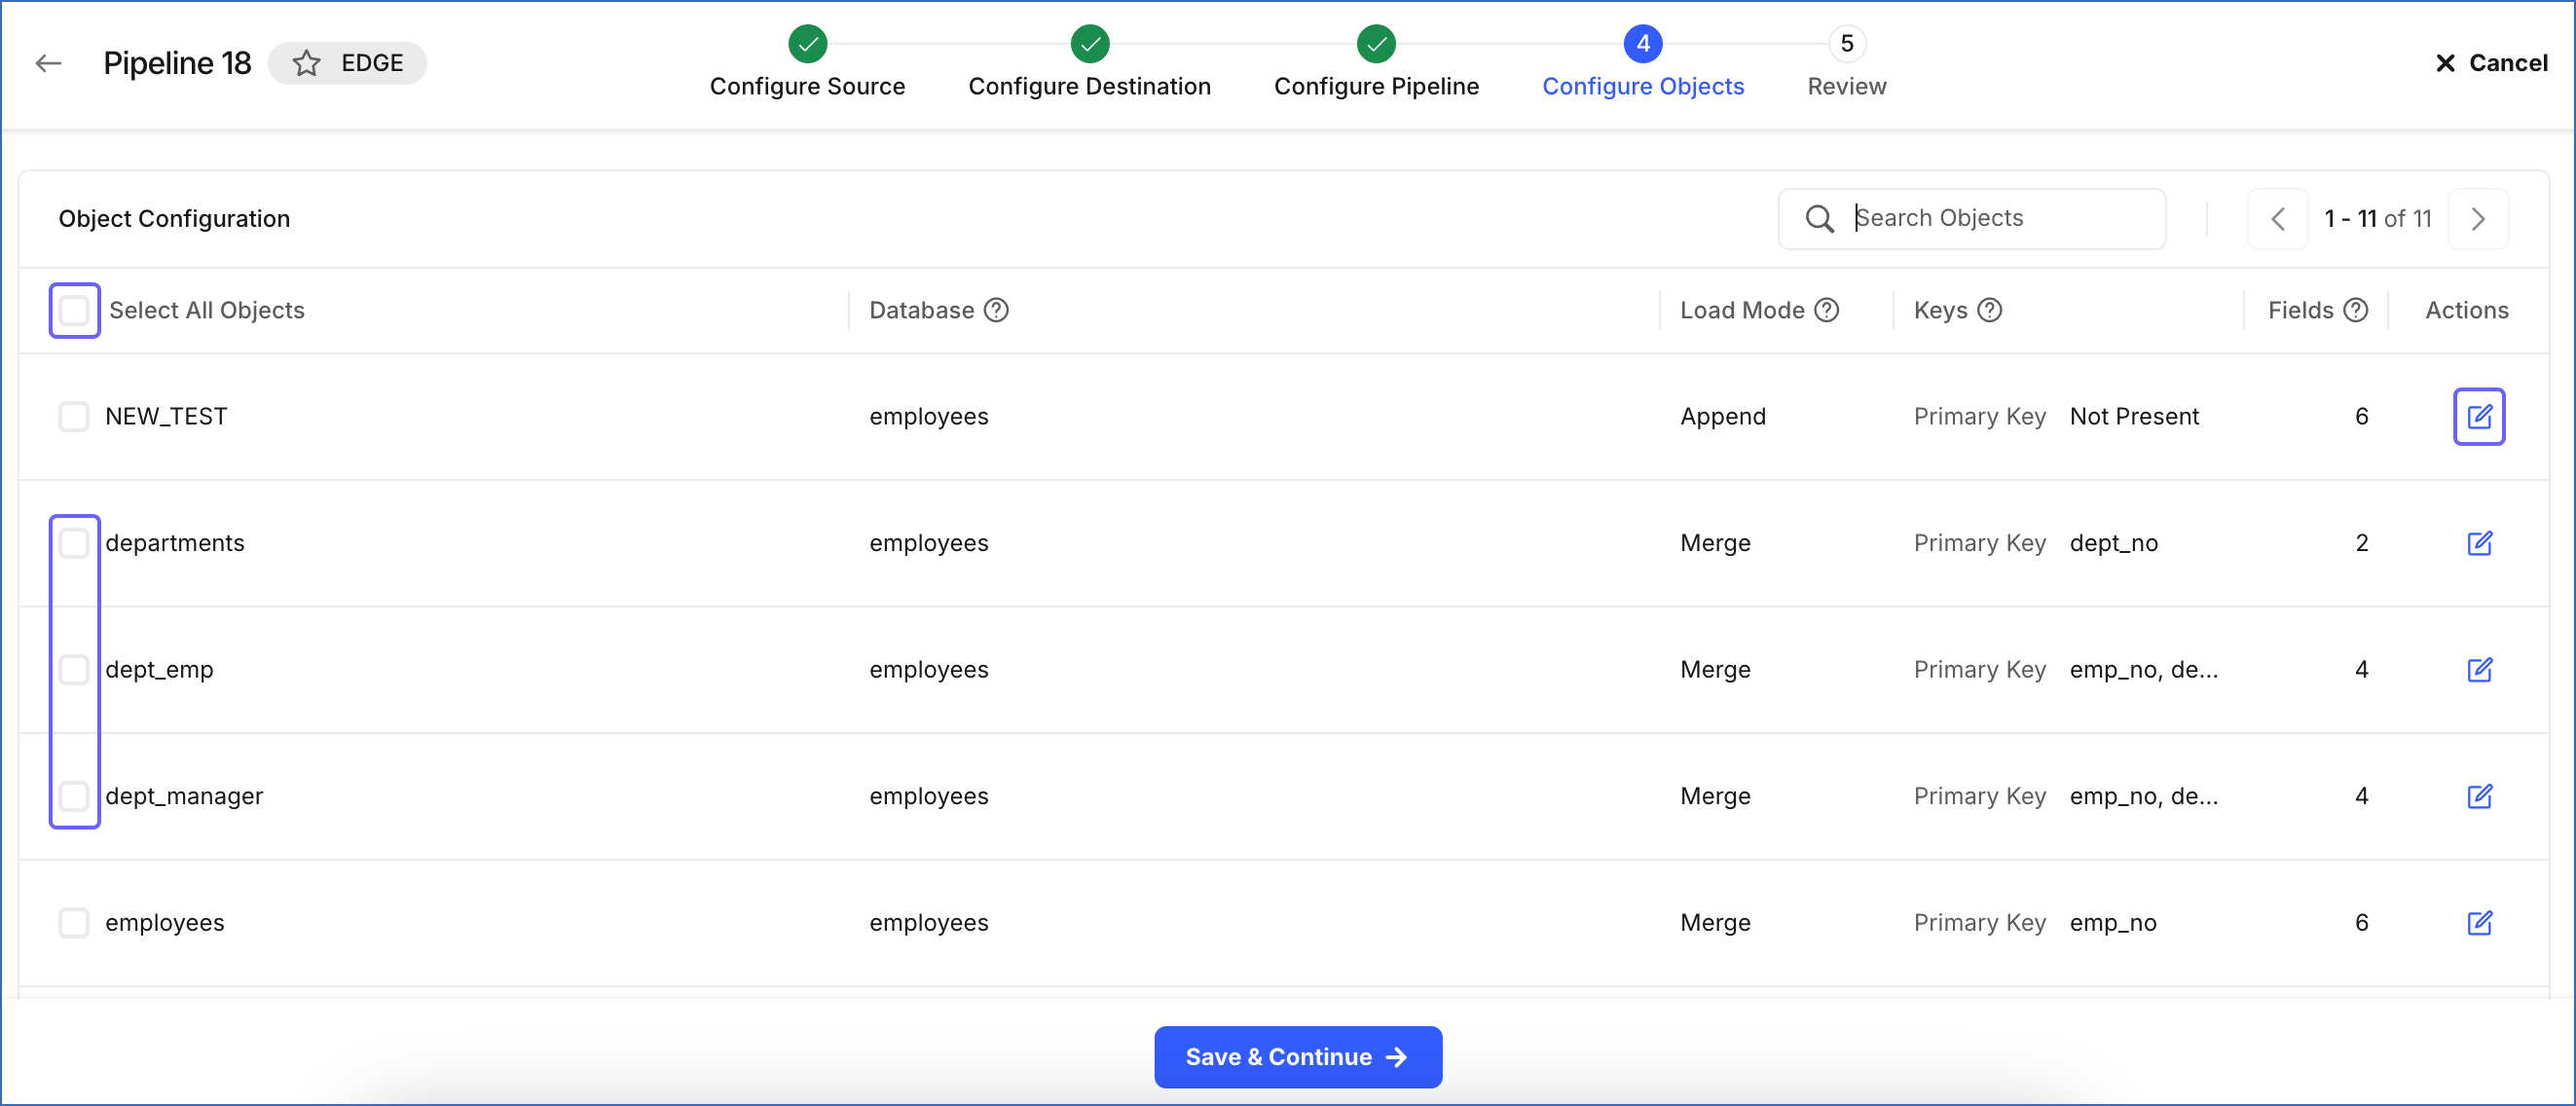
Once Hevo fetches all the Source objects, you are directed to the Configure Objects page of your Pipeline. On this page, all the objects from the Source database are displayed.
Note: Hevo marks the Source object as Inaccessible if the publication key specified while configuring the PostgreSQL Source does not include the object, or if the publication is defined without any of the insert, update, or delete operations.
On the Configure Objects page, perform the following steps to configure the Source objects for data ingestion:
-
In the Object Configuration section, do one of the following:
-
Click the check box next to Select All Objects to ingest data from all objects included in the publication key.
-
Select the check box next to each object whose data you want to replicate.
-
-
(Optional) Click the Edit (
 ) icon under Actions to do the following:
-
Select or deselect the Source object fields.
Note: If data is to be loaded in the Merge mode, you cannot deselect a field that is the primary key of a Source object.
-
Define the primary keys for the selected Source objects if you want to load data to the Destination table in the Merge mode. This step is not required for the Append mode.
-
-
Click Save & Continue. To proceed to the Review page, you must select at least one object for data ingestion.
-
In the Summary screen, review all the configurations defined for the Pipeline.
-
Click Save Pipeline.
You are automatically redirected to the Job History tab, which displays the jobs running in your Pipeline. You can click on a job to view its details.
Revision History
Refer to the following table for the list of key updates made to this page:
| Date | Release | Description of Change |
|---|---|---|
| Mar-16-2026 | NA | Updated section, Select and Configure the Source Objects to clarify that objects are inaccessible if the publication lacks the required operations. |
| Feb-20-2026 | NA | Updated section, Configure the Pipeline Settings to include content for syncing via External Orchestration. |
| Feb-18-2026 | NA | Updated section, Configure the Pipeline Settings to mention the updated default sync frequency. |
| Feb-04-2026 | NA | Updated section, Configure the Pipeline Settings to add content for syncing data at a specific start time in 24-hour-frequency Pipelines. |
| Jan-23-2026 | NA | Updated section, Configure the Pipeline Settings to clarify that the Destination prefix limitation applies only to Pipelines created with the BigQuery Destination. |
| Jan-20-2026 | NA | Updated section, Configure the Pipeline Settings to add notes for sections that are not displayed for Pipelines created with SaaS Sources. |
| Nov-21-2025 | NA | Added a process flow diagram. |