Partitioning in BigQuery
On This Page
BigQuery is a fully-managed, petabyte-scale data warehouse from Google. It offers a serverless way to manage and analyze large datasets using SQL queries. At times, though, you may want to study only a subset of the data, such as the sales transactions for July. In such a case, you can use partitioned tables. In these tables, data is segregated based on values in a specific column. Partitions can improve query performance and control costs by reducing the number of bytes read by a query.
Hevo supports the following types of table partitioning in BigQuery Destinations:
-
Ingestion time-based: In this type, BigQuery divides the data based on the date when it is received.
-
Field-based (date or time): In this type, you can divide the data based on a time-unit column, such as a date or a timestamp.
Ingestion time-based partitioned tables
Ingestion time-based partitioning is done based on the date when the data is received in BigQuery. The partitions are assigned to the data using the specified granularity, which could be hourly, daily, monthly, or yearly. Partition boundaries are in UTC.
These partitioned tables have a pseudo-column called _PARTITIONTIME. It contains the date-based ingestion timestamp for each data record. This value is truncated based on the partition granularity, such as hourly or daily. In the case of daily granularity, the tables also contain a pseudo-column called _PARTITIONDATE. It contains the UTC date of the _PARTITIONTIME value.
For example, suppose you partition a table to put data in hour-based segments. The ingestion times for the data in the table are shown below. The value in the _PARTITIONTIME column of this table is truncated to the hour. This value is then used by BigQuery to organize the incoming data. In the sample data below, the records received at 14:22:00 and 14:40:00 are both placed in the partition, 2023050114, as they have the same hourly boundary.
| Time (in UTC) when Data is received in BigQuery | Truncated Value in _PARTITIONTIME |
Hourly Partitioning Boundary |
|---|---|---|
| 2023-05-01 14:22:00 | 2023-05-01 14:00:00 | 2023050114 |
| 2023-05-01 14:40:00 | 2023-05-01 14:00:00 | 2023050114 |
| 2023-05-01 15:31:00 | 2023-05-01 15:00:00 | 2023050115 |
Note: Pseudo-columns are not real columns. They are not a part of the table schema. However, you can fetch their data with SQL queries by assigning an alias to them.
For example, the following query uses the alias, ptime to select the _PARTITIONTIME column:
SELECT
  _PARTITIONTIME as ptime, transaction_id
FROM
  hevodataset.newtable;
By using pseudo-columns in your query, you can restrict the number of partitions scanned. Read Better performance with pseudo-columns to know how you can use them to improve query performance.
Field-based partitioned tables
Field-based partitioning is done based on a time-unit column, such as a date or a timestamp. You can create partitions with a daily, monthly, or yearly granularity. For a timestamp data type, you can also segregate data by the hour. When you write data to the table, it is placed in the correct partition based on the values (UTC) in the time-unit column and the granularity.
For example, suppose you partition a table on a timestamp column with daily granularity. As a result, the partitions are created based on the value truncated to the day. This value is then used by BigQuery to determine the partition for the data.
The following table shows some sample timestamp values and the partition they are placed into:
| Partitioning Column Timestamp Value (in UTC) | Daily Partitioning Boundary |
|---|---|
| 2023-03-14 07:10:49.000000 UTC | 20230314 |
| 2023-03-14 07:43:06.000000 UTC | 20230314 |
| 2023-03-15 06:33:25.000000 UTC | 20230315 |
| 2023-03-15 07:44:32.000000 UTC | 20230315 |
In field-based partitioned tables, apart from the data partitions, two special partitions are created:
-
__NULL__: Contains rows which have a NULL value in the partitioning column. -
__UNPARTITIONED__: Contains rows with partitioning column values outside the range of dates allowed by BigQuery. That is, when the date is earlier than 1960-01-01 or later than 2159-12-31.
Creating BigQuery Partitioned Tables
You can partition tables only while creating them. BigQuery does not allow adding partition keys to existing tables. Hence, you will need to recreate an existing table to add a partition key for it.
You can create a partitioned table in one of the following ways:
Note: Except for ingestion time-based partitioning, you must use a relevant field from your Source table as the partition key.
-
In BigQuery, from the BigQuery console: Create an empty table partitioned by the ingestion time or a time-unit column. In this case, you must map your Source table to this partitioned table in the Schema Mapper during Pipeline creation. Read Changing the Destination table for the steps to do this.
-
In Hevo, from the Schema Mapper: Create an empty table partitioned by the ingestion time or a time-unit column. To do this, you need to:
The following image illustrates this process. The steps are also described in detail in the sections below.
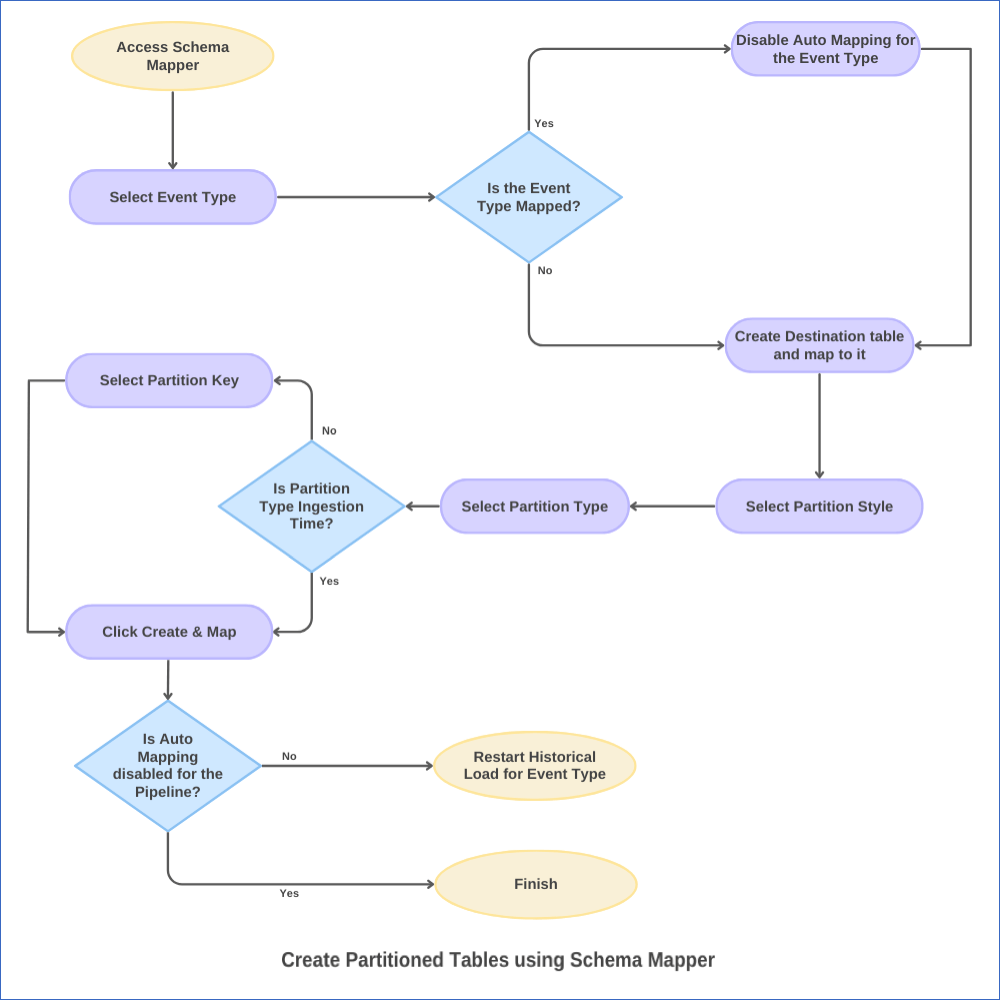
1. Disable Auto Mapping for the Event Type
-
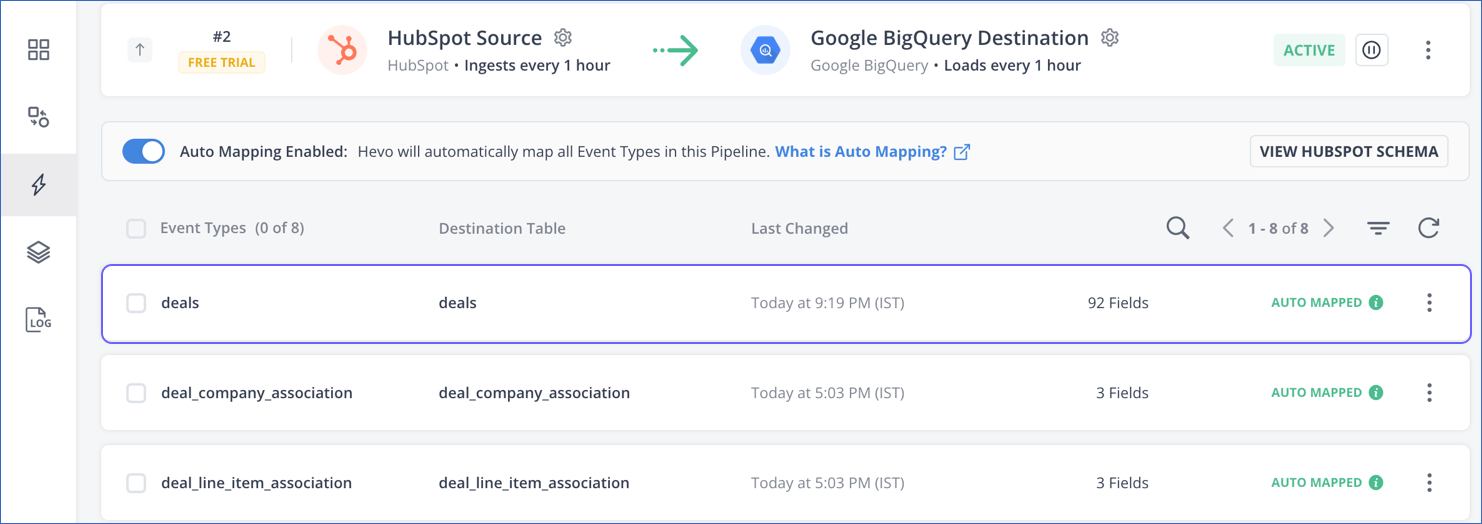
In the Pipeline List View, click on the Pipeline you want to modify.
-
In the Tools Bar, click the Schema Mapper icon.
-
In the Schema Mapper page, click on the Event Type for which you want to create a partitioned table.
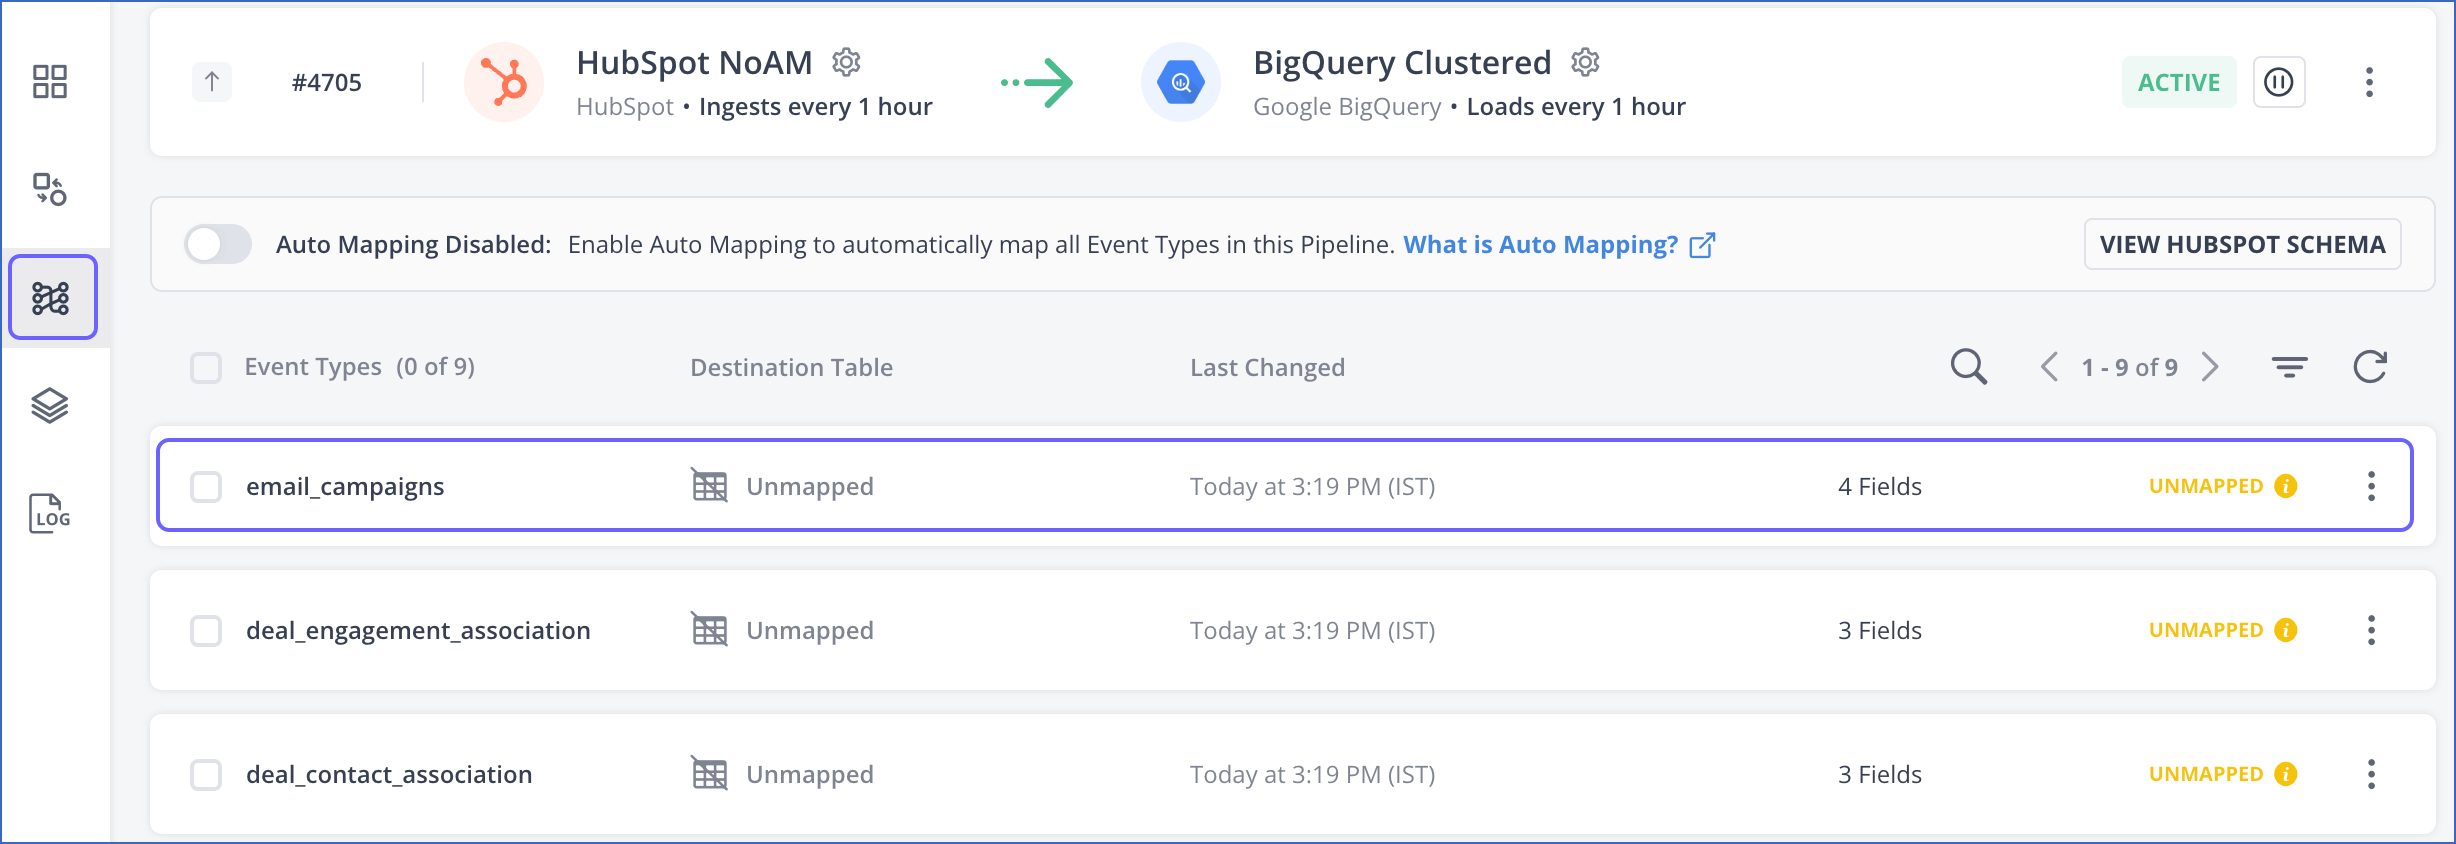
-
If Auto Mapping was disabled during Pipeline creation, as the Event Types are UNMAPPED, skip to the Create a partitioned table for the Event Type step. Else, go to the next step.
-
Click the More (
 ) icon in the Event Types section and disable Auto Mapping for your Event Type.
If Auto Mapping was enabled earlier, and you turn it off now, the existing mapping is not affected. The Event Type still carries the MAPPED status.
2. Create a partitioned table for the Event Type
-
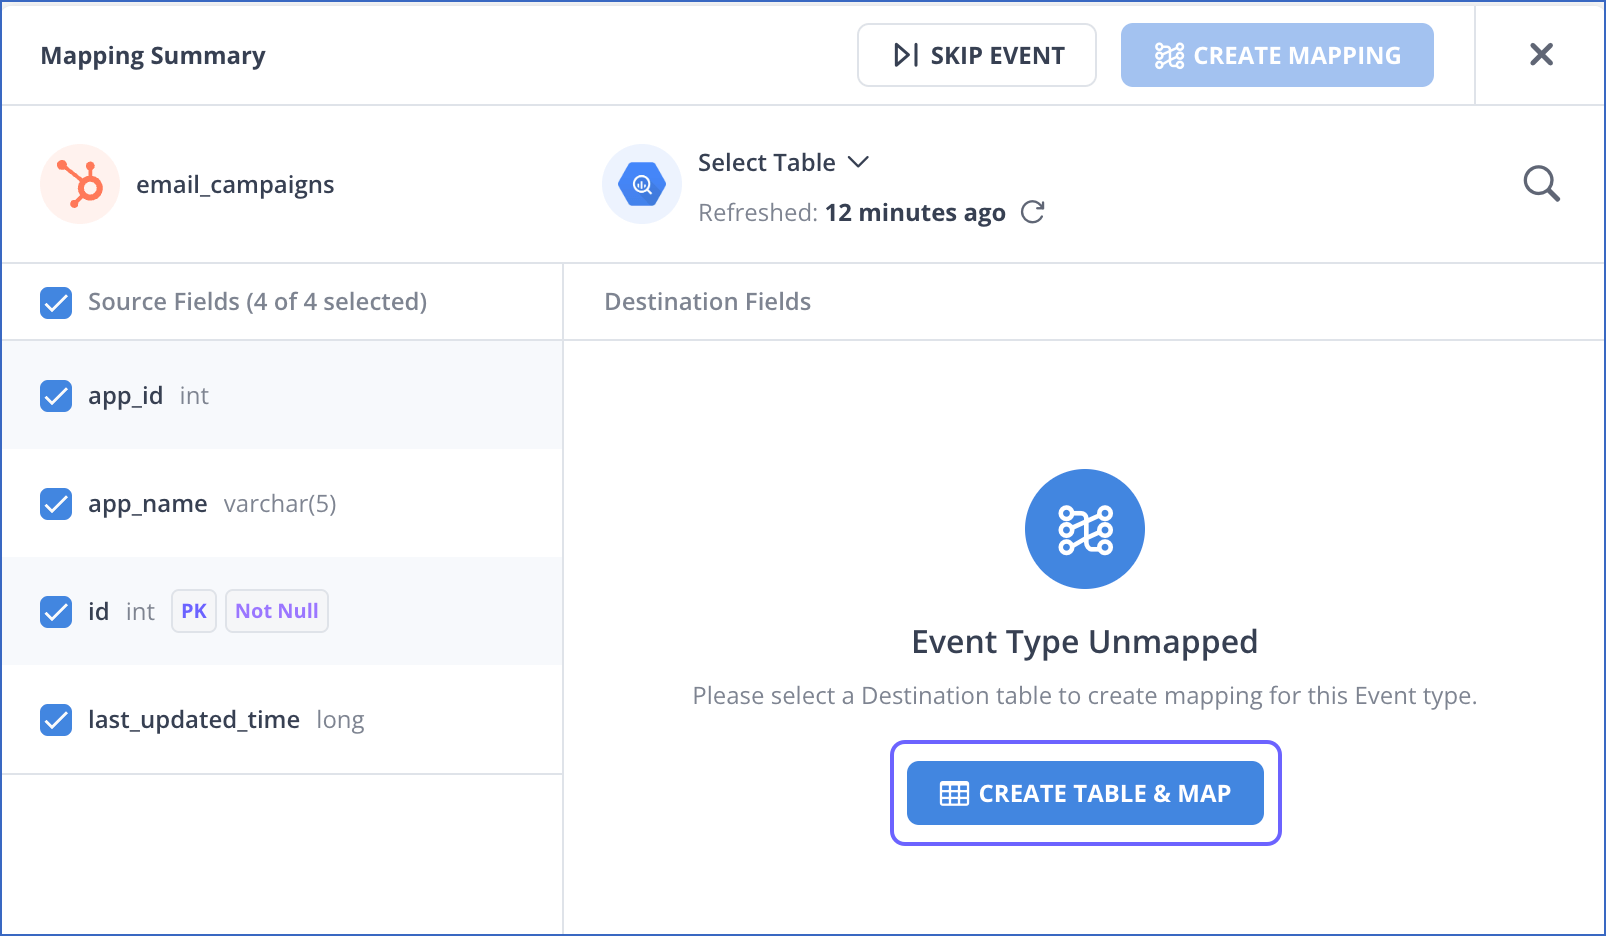
In the Mapping Summary section of the Schema Mapper page, do one of the following:
-
If you disabled Auto Mapping during Pipeline creation, click CREATE TABLE & MAP and skip to the next step.
-
If you disabled Auto Mapping for an existing Event Type:
-
Click the arrow next to the Destination table name and select Modify Destination Table.
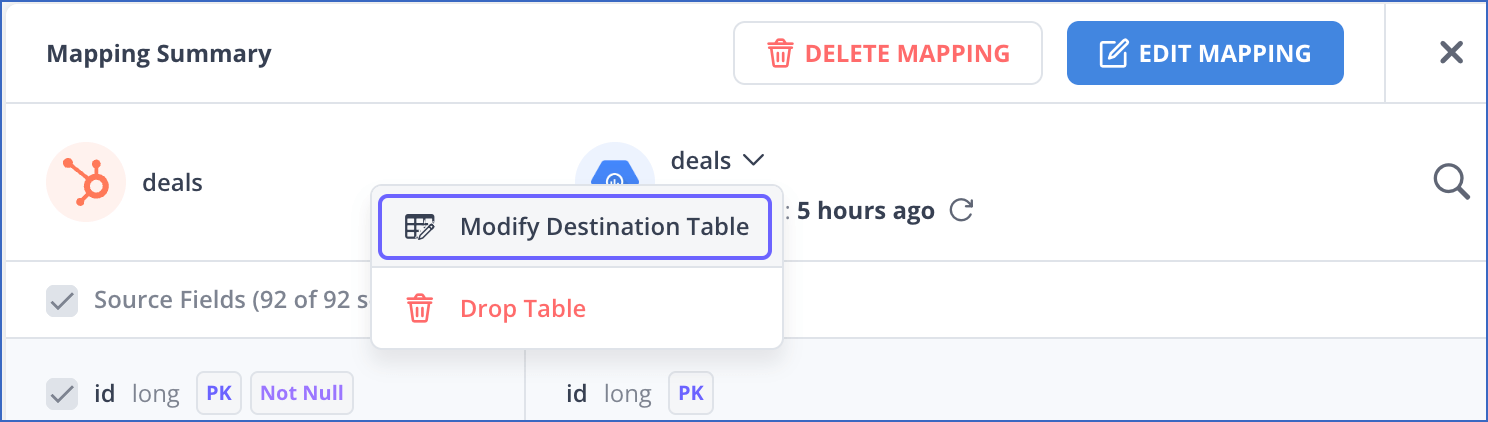
-
In the Destination Table drop-down, click + Create Table & Map.

-
-
-
In the mapping page that appears, do the following:

-
Specify a unique Destination Table Name.
-
Select a Partition Style from the drop-down. This can be:
-
No Partition: Tables are not partitioned.
-
Ingestion Time Based: Tables are partitioned based on when the data is received in BigQuery.
-
Field Based: Tables are partitioned based on a field of date or timestamp data type.
-
-
Select a Partition Type from the drop-down. The available types are DAY, HOUR, MONTH, and YEAR. Default type: DAY.
-
For each Source Field, provide an appropriate Destination Field Name. If you do not want to map a particular Source field, deselect the check box next to its name.
-
Select the data type for the Destination field from the Data Type drop-down.
Note: Only data types compatible with the Source field are available for selection in the drop-down.
-
Optionally, in the Primary Key column, select the check box next to the field you want to mark as a primary key.
-
In the Partition Key column, select the Source field by which you want to partition your data. You can select only one partition key from the available fields.
Note:
-
The Partition Key column is disabled for Ingestion Time Based partitioning style.
-
The HOUR partitioning type is not applicable if the selected partition key is a date type field.
-
Only date and timestamp Source fields are available for selection in the Field Based partitioning style.
-
-
Optionally, in the Cluster Key column, select the Source fields by which you want to cluster your data. You can select up to four fields as your cluster keys. Read Create a clustered table for the Event Type if you want to combine partitioning with clustering.
-
-
Click CREATE TABLE & MAP to create a partitioned table mapped to your Event Type.
3. Restart Historical Load for the Event Type
Note: Skip this step if Auto Mapping was disabled for the Pipeline and you mapped the Event Type manually. Hevo ingests historical data for such Event Types in the first run of the Pipeline.
You need to copy the data already ingested for your Event Type to the new partitioned table, as only new and updated data will be loaded into it. For this, you must restart the historical load for it.
To do this:
-
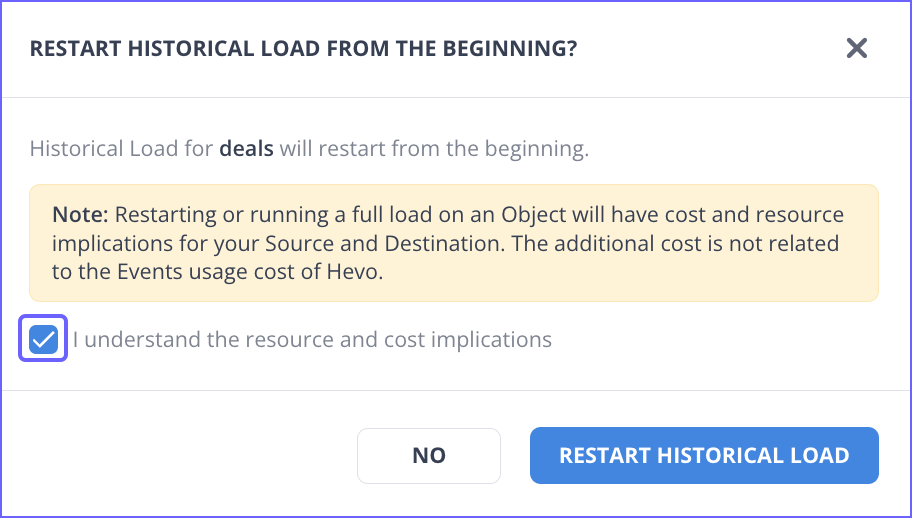
In the Pipeline Objects list, click the More (
) icon for your Event Type and select Restart Historical Load.
-
In the popup dialog, select the check box to agree to the cost implications and then click RESTART HISTORICAL LOAD. The object is queued for ingestion.
Considerations while Creating Partitioned Tables
-
BigQuery allows you to create a maximum of 4000 partitions per table. Read Quotas and limits: Partitioned Tables for the entire set.
-
You cannot use more than one column to partition a table. To optimize your SQL queries further, combine partitioning with clustering.
Read Limitations for the restrictions imposed by BigQuery.
Limitations
-
If the Source field used as the partition key is not mapped, Hevo loads NULL values to the partitioning column in the Destination table, and BigQuery places the data in the
__NULL__partition. Now, if the Source field contains a non-null value, it is placed in another partition too, based on the granularity. As a result, you may see duplicate Events in your Destination table. To avoid this situation, you must map your partition key. Also, as Hevo does not allow updating the partition key values, you must ensure that your partition key is a non-nullable Source field. -
Hevo does not capture any change to the partitioning that is caused due to the partition key having changing values. As the values in the partitioning column change, so do the partitions in which BigQuery places the updated data. This can result in duplicate Events in your Destination table.
For example, suppose you use the Last Updated Timestamp field as your partition key. As the timestamp value changes, so does the partition into which the updated data is placed. Now, as Hevo cannot capture this location change, deduplication may not occur, leading to duplicate Events in your Destination table.
Revision History
Refer to the following table for the list of key updates made to this page:
| Date | Release | Description of Change |
|---|---|---|
| Jan-09-2024 | NA | Removed information about converting an existing non-partitioned table into a partitioned table. |
| Oct-03-2023 | NA | Modified the Limitations section to: - Update the limitation about null values in the partitioning column, - Add the limitation about a partition key with changing values. |
| Aug-28-2023 | NA | Added information about recreating partitioned tables from the BigQuery console. |
| Jul-18-2023 | NA | - Updated the content for more clarity and coherence, - Added steps to create partitioned tables using the Schema Mapper, - Removed the section, Using BigQuery Partitioning in Hevo, - Renamed the section, Destination Considerations to Considerations while Creating Partitioned Tables. |
| Aug-09-2021 | 1.67 | Updated the section, Using BigQuery Partitioning in Hevo. |
| May-19-2021 | NA | Added section, Destination Considerations. |