Clustering in BigQuery
On This Page
Google BigQuery is a fully-managed, petabyte-scale data warehouse that allows businesses to analyze massive datasets. However, at times, you may want to access only a subset of the data, such as the data for July. You can retrieve this data efficiently by structuring it based on common access patterns with clustered tables.
Clustered tables organize and sort your data into blocks based on the contents of the column(s) in a table’s schema. These clustering columns, known as cluster keys, are used to collocate related data. The order in which you specify these keys determines the sort order of data. Clustering helps you narrow down searches, thus enhancing the performance of your queries and reducing their costs. For example, queries that aggregate data by cluster keys do not scan the entire table or partition. They only search for data in the blocks identified by the cluster keys.
Creating BigQuery Clustered Tables
BigQuery allows the clustering of both non-partitioned and partitioned tables. However, you can add cluster keys only while creating tables. Hence, you will need to recreate an existing table and add cluster keys by which you want to group and sort its data. You can select up to four fields from your Source tables as cluster keys.
You can create a clustered table in one of the following ways:
-
In BigQuery from the BigQuery console. In this case, you must map your Source table to this clustered table. Read Changing the Destination table for the steps to do this.
-
In Hevo, from the Schema Mapper, using fields from your Source table as cluster keys. To do this, you need to:
The following image illustrates this process. The steps are also described in detail in the sections below.
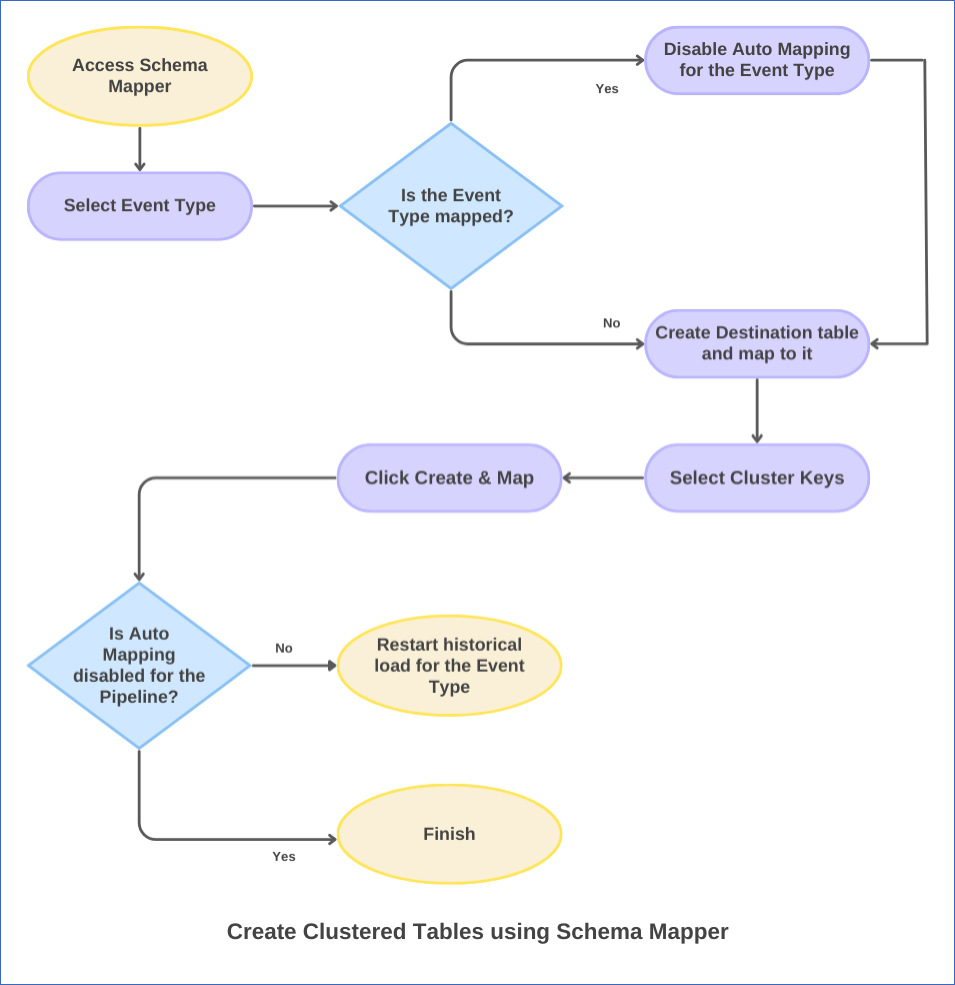
1. Disable Auto Mapping for the Event Type
-
In the Pipeline List View, click on the Pipeline you want to modify.
-
In the Tools Bar, click the Schema Mapper icon.
-
In the Schema Mapper page, click on the Event Type for which you want to create a clustered Destination table.

-
If Auto Mapping was disabled during Pipeline creation, as the Event Types are UNMAPPED, skip to the Create a clustered table for your Event Type step. Else, go to the next step.

-
Click the More (
 ) icon in the Event Types section and disable Auto Mapping for your Event Type.
If Auto Mapping was enabled earlier, and you turn it off now, the existing mapping is not affected. The Event Type still carries the MAPPED status.
2. Create a clustered table for the Event Type
-
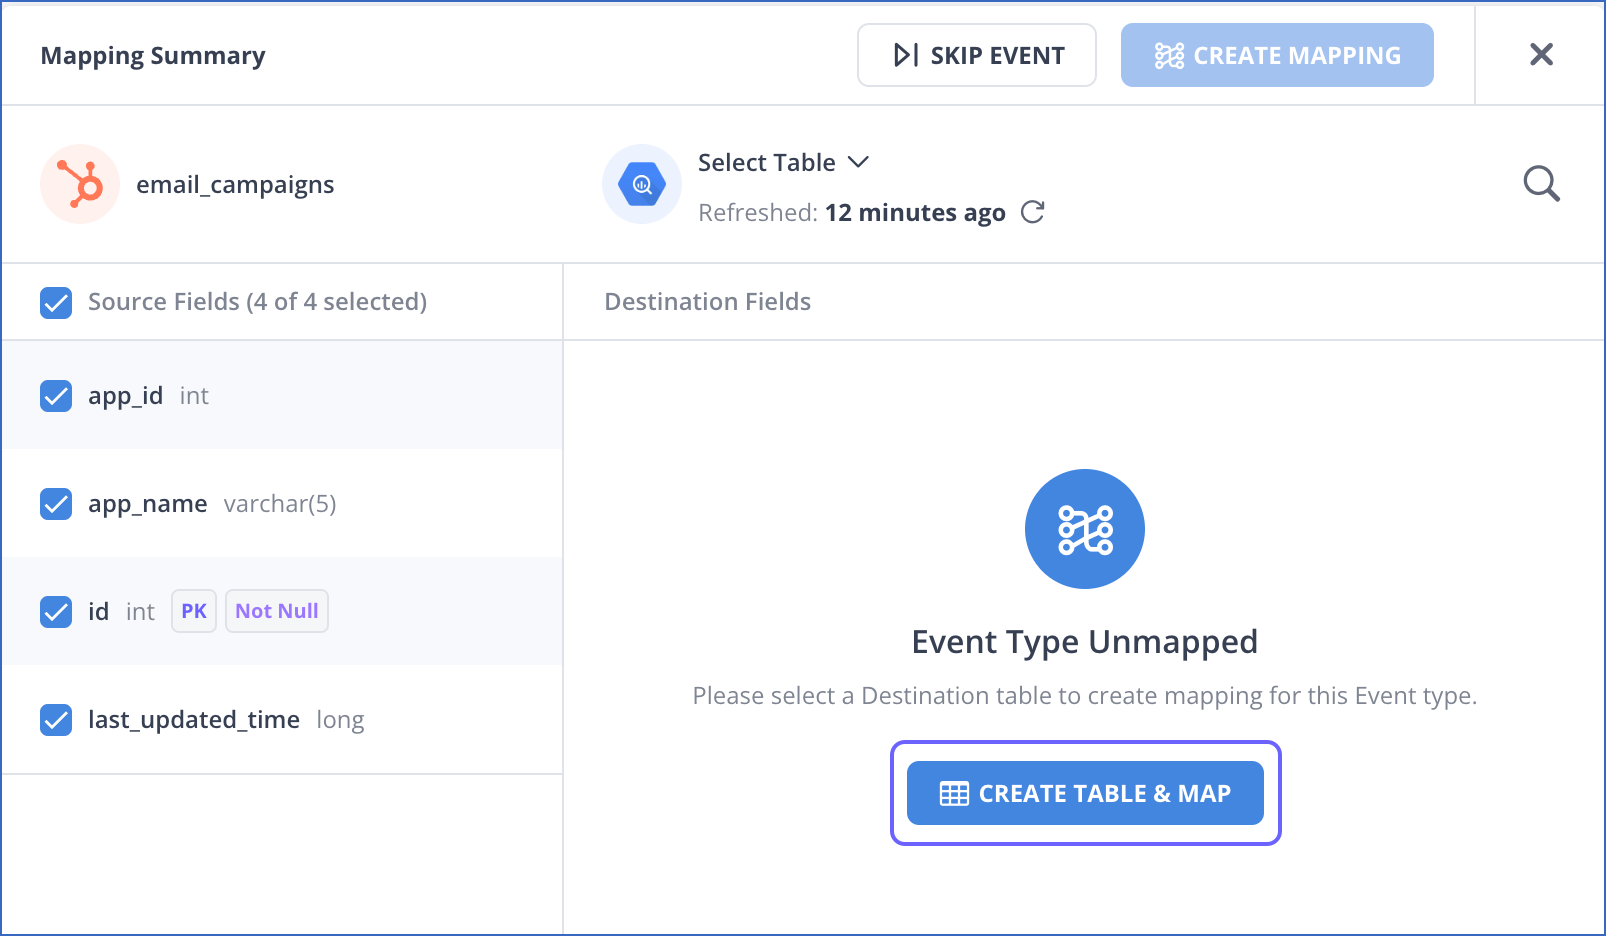
In the Mapping Summary section of the Schema Mapper page, do one of the following:
-
If you disabled Auto Mapping during Pipeline creation, click CREATE TABLE & MAP and skip to the next step.
-
If you disabled Auto Mapping for an existing Event Type:
-
Click the arrow next to the Destination table name and select Modify Destination Table.

-
In the Destination Table drop-down, click + Create Table & Map.

-
-
-
In the mapping page that appears, do the following:

-
Specify a unique Destination Table Name.
-
Select the No Partition Partition Style from the drop-down to create a non-partitioned table. Read Create a partitioned table for the Event Type if you want to combine clustering with partitioning.
-
For each Source Field, specify the corresponding Destination Field Name. If you do not want to map a particular Source field, deselect the check box next to its name.
-
Select a data type for the Destination field from the Data Type drop-down.
Note: Only data types compatible with the Source field are available for selection in the drop-down.
-
Optionally, in the Primary Key column, select the check box next to the field you want to mark as a primary key.
-
In the Cluster Key column, select the Source fields by which you want to cluster your data. The order in which you specify the fields determines the order in which your data is clustered in the Destination table. Use the Up or Down arrow next to each Source Field name to change its placement in the list.
Note:
-
You can select the same Source field as the cluster and primary keys.
-
You can select up to four fields as your cluster keys.
-
-
-
Click CREATE TABLE & MAP to create a clustered table mapped to your Event Type.
3. Restart Historical Load for the Event Type
Note: Skip this step if Auto Mapping was disabled for the Pipeline and you mapped the Event Type manually. Hevo ingests historical data for such Event Types in the first run of the Pipeline.
You need to copy the data already ingested for your Event Type to the new clustered table, as Hevo loads only the new and updated data to it. For this, you must restart the historical load for it.
To do this:
-
In the Pipeline Objects list, click the More (
) icon for your Event Type and select Restart Historical Load.
-
In the popup dialog, select the check box to agree to the cost implications and then click RESTART HISTORICAL LOAD. The object is queued for ingestion.

Considerations while Creating Clustered Tables
-
BigQuery allows up to four clustering keys for a table. You can combine clustering with partitioning to further classify your data.
-
You cannot change the cluster keys for a table. If you want to use a different set of Source fields as cluster keys, you must create a new table.
-
The cluster key column in the Destination table contains NULL values if the column is deleted from the Source table.
-
Source fields of array and struct data types cannot be specified as cluster keys.
Revision History
Refer to the following table for the list of key updates made to this page:
| Date | Release | Description of Change |
|---|---|---|
| Jul-14-2023 | NA | - Updated the content for more clarity and coherence, - Added steps to create clustered tables using the Schema Mapper, - Renamed the section, Destination Considerations to Considerations while Creating Clustered Tables. |
| Apr-06-2021 | 1.60 | New document. |