- Introduction
- Getting Started
- Creating an Account in Hevo
- Subscribing to Hevo via AWS Marketplace
- Connection Options
- Familiarizing with the UI
- Creating your First Pipeline
- Data Loss Prevention and Recovery
- Data Ingestion
- Data Loading
- Loading Data in a Database Destination
- Loading Data to a Data Warehouse
- Optimizing Data Loading for a Destination Warehouse
- Deduplicating Data in a Data Warehouse Destination
- Manually Triggering the Loading of Events
- Scheduling Data Load for a Destination
- Loading Events in Batches
- Data Loading Statuses
- Data Spike Alerts
- Name Sanitization
- Table and Column Name Compression
- Parsing Nested JSON Fields in Events
- Pipelines
- Data Flow in a Pipeline
- Familiarizing with the Pipelines UI
- Working with Pipelines
- Managing Objects in Pipelines
- Pipeline Jobs
-
Transformations
-
Python Code-Based Transformations
- Supported Python Modules and Functions
-
Transformation Methods in the Event Class
- Create an Event
- Retrieve the Event Name
- Rename an Event
- Retrieve the Properties of an Event
- Modify the Properties for an Event
- Fetch the Primary Keys of an Event
- Modify the Primary Keys of an Event
- Fetch the Data Type of a Field
- Check if the Field is a String
- Check if the Field is a Number
- Check if the Field is Boolean
- Check if the Field is a Date
- Check if the Field is a Time Value
- Check if the Field is a Timestamp
-
TimeUtils
- Convert Date String to Required Format
- Convert Date to Required Format
- Convert Datetime String to Required Format
- Convert Epoch Time to a Date
- Convert Epoch Time to a Datetime
- Convert Epoch to Required Format
- Convert Epoch to a Time
- Get Time Difference
- Parse Date String to Date
- Parse Date String to Datetime Format
- Parse Date String to Time
- Utils
- Examples of Python Code-based Transformations
-
Drag and Drop Transformations
- Special Keywords
-
Transformation Blocks and Properties
- Add a Field
- Change Datetime Field Values
- Change Field Values
- Drop Events
- Drop Fields
- Find & Replace
- Flatten JSON
- Format Date to String
- Format Number to String
- Hash Fields
- If-Else
- Mask Fields
- Modify Text Casing
- Parse Date from String
- Parse JSON from String
- Parse Number from String
- Rename Events
- Rename Fields
- Round-off Decimal Fields
- Split Fields
- Examples of Drag and Drop Transformations
- Effect of Transformations on the Destination Table Structure
- Transformation Reference
- Transformation FAQs
-
Python Code-Based Transformations
-
Schema Mapper
- Using Schema Mapper
- Mapping Statuses
- Auto Mapping Event Types
- Manually Mapping Event Types
- Modifying Schema Mapping for Event Types
- Schema Mapper Actions
- Fixing Unmapped Fields
- Resolving Incompatible Schema Mappings
- Resizing String Columns in the Destination
- Changing the Data Type of a Destination Table Column
- Schema Mapper Compatibility Table
- Limits on the Number of Destination Columns
- File Log
- Troubleshooting Failed Events in a Pipeline
- Mismatch in Events Count in Source and Destination
- Audit Tables
- Activity Log
-
Pipeline FAQs
- Can multiple Sources connect to one Destination?
- What happens if I re-create a deleted Pipeline?
- Why is there a delay in my Pipeline?
- Can I change the Destination post-Pipeline creation?
- Why is my billable Events high with Delta Timestamp mode?
- Can I drop multiple Destination tables in a Pipeline at once?
- How does Run Now affect scheduled ingestion frequency?
- Will pausing some objects increase the ingestion speed?
- Can I see the historical load progress?
- Why is my Historical Load Progress still at 0%?
- Why is historical data not getting ingested?
- How do I set a field as a primary key?
- How do I ensure that records are loaded only once?
- Events Usage
- Sources
- Free Sources
-
Databases and File Systems
- Data Warehouses
-
Databases
- Connecting to a Local Database
- Amazon DocumentDB
- Amazon DynamoDB
- Elasticsearch
-
MongoDB
- Generic MongoDB
- MongoDB Atlas
- Support for Multiple Data Types for the _id Field
- Example - Merge Collections Feature
-
Troubleshooting MongoDB
-
Errors During Pipeline Creation
- Error 1001 - Incorrect credentials
- Error 1005 - Connection timeout
- Error 1006 - Invalid database hostname
- Error 1007 - SSH connection failed
- Error 1008 - Database unreachable
- Error 1011 - Insufficient access
- Error 1028 - Primary/Master host needed for OpLog
- Error 1029 - Version not supported for Change Streams
- SSL 1009 - SSL Connection Failure
- Troubleshooting MongoDB Change Streams Connection
- Troubleshooting MongoDB OpLog Connection
-
Errors During Pipeline Creation
- SQL Server
-
MySQL
- Amazon Aurora MySQL
- Amazon RDS MySQL
- Azure MySQL
- Generic MySQL
- Google Cloud MySQL
- MariaDB MySQL
-
Troubleshooting MySQL
-
Errors During Pipeline Creation
- Error 1003 - Connection to host failed
- Error 1006 - Connection to host failed
- Error 1007 - SSH connection failed
- Error 1011 - Access denied
- Error 1012 - Replication access denied
- Error 1017 - Connection to host failed
- Error 1026 - Failed to connect to database
- Error 1027 - Unsupported BinLog format
- Failed to determine binlog filename/position
- Schema 'xyz' is not tracked via bin logs
- Errors Post-Pipeline Creation
-
Errors During Pipeline Creation
- MySQL FAQs
- Oracle
-
PostgreSQL
- Amazon Aurora PostgreSQL
- Amazon RDS PostgreSQL
- Azure PostgreSQL
- Generic PostgreSQL
- Google Cloud PostgreSQL
- Heroku PostgreSQL
-
Troubleshooting PostgreSQL
-
Errors during Pipeline creation
- Error 1003 - Authentication failure
- Error 1006 - Connection settings errors
- Error 1011 - Access role issue for logical replication
- Error 1012 - Access role issue for logical replication
- Error 1014 - Database does not exist
- Error 1017 - Connection settings errors
- Error 1023 - No pg_hba.conf entry
- Error 1024 - Number of requested standby connections
- Errors Post-Pipeline Creation
-
Errors during Pipeline creation
- PostgreSQL FAQs
- Troubleshooting Database Sources
- File Storage
- Engineering Analytics
- Finance & Accounting Analytics
-
Marketing Analytics
- ActiveCampaign
- AdRoll
- Amazon Ads
- Apple Search Ads
- AppsFlyer
- CleverTap
- Criteo
- Drip
- Facebook Ads
- Facebook Page Insights
- Firebase Analytics
- Freshsales
- Google Ads
- Google Analytics
- Google Analytics 4
- Google Analytics 360
- Google Play Console
- Google Search Console
- HubSpot
- Instagram Business
- Klaviyo v2
- Lemlist
- LinkedIn Ads
- Mailchimp
- Mailshake
- Marketo
- Microsoft Ads
- Onfleet
- Outbrain
- Pardot
- Pinterest Ads
- Pipedrive
- Recharge
- Segment
- SendGrid Webhook
- SendGrid
- Salesforce Marketing Cloud
- Snapchat Ads
- SurveyMonkey
- Taboola
- TikTok Ads
- Twitter Ads
- Typeform
- YouTube Analytics
- Product Analytics
- Sales & Support Analytics
- Source FAQs
- Destinations
- Familiarizing with the Destinations UI
- Cloud Storage-Based
- Databases
-
Data Warehouses
- Amazon Redshift
- Amazon Redshift Serverless
- Azure Synapse Analytics
- Databricks
- Google BigQuery
- Hevo Managed Google BigQuery
- Snowflake
-
Destination FAQs
- Can I change the primary key in my Destination table?
- Can I change the Destination table name after creating the Pipeline?
- How can I change or delete the Destination table prefix?
- Why does my Destination have deleted Source records?
- How do I filter deleted Events from the Destination?
- Does a data load regenerate deleted Hevo metadata columns?
- How do I filter out specific fields before loading data?
- Transform
- Alerts
- Account Management
- Activate
- Glossary
Releases- Release 2.37.3 (Jun 23-30, 2025)
- Release 2.37.2 (Jun 16-23, 2025)
- Release 2.37.1 (Jun 09-16, 2025)
- Release 2.37 (May 12-Jun 09, 2025)
- 2025 Releases
-
2024 Releases
- Release 2.32 (Dec 16 2024-Jan 20, 2025)
- Release 2.31 (Nov 18-Dec 16, 2024)
- Release 2.30 (Oct 21-Nov 18, 2024)
- Release 2.29 (Sep 30-Oct 22, 2024)
- Release 2.28 (Sep 02-30, 2024)
- Release 2.27 (Aug 05-Sep 02, 2024)
- Release 2.26 (Jul 08-Aug 05, 2024)
- Release 2.25 (Jun 10-Jul 08, 2024)
- Release 2.24 (May 06-Jun 10, 2024)
- Release 2.23 (Apr 08-May 06, 2024)
- Release 2.22 (Mar 11-Apr 08, 2024)
- Release 2.21 (Feb 12-Mar 11, 2024)
- Release 2.20 (Jan 15-Feb 12, 2024)
-
2023 Releases
- Release 2.19 (Dec 04, 2023-Jan 15, 2024)
- Release Version 2.18
- Release Version 2.17
- Release Version 2.16 (with breaking changes)
- Release Version 2.15 (with breaking changes)
- Release Version 2.14
- Release Version 2.13
- Release Version 2.12
- Release Version 2.11
- Release Version 2.10
- Release Version 2.09
- Release Version 2.08
- Release Version 2.07
- Release Version 2.06
-
2022 Releases
- Release Version 2.05
- Release Version 2.04
- Release Version 2.03
- Release Version 2.02
- Release Version 2.01
- Release Version 2.00
- Release Version 1.99
- Release Version 1.98
- Release Version 1.97
- Release Version 1.96
- Release Version 1.95
- Release Version 1.93 & 1.94
- Release Version 1.92
- Release Version 1.91
- Release Version 1.90
- Release Version 1.89
- Release Version 1.88
- Release Version 1.87
- Release Version 1.86
- Release Version 1.84 & 1.85
- Release Version 1.83
- Release Version 1.82
- Release Version 1.81
- Release Version 1.80 (Jan-24-2022)
- Release Version 1.79 (Jan-03-2022)
-
2021 Releases
- Release Version 1.78 (Dec-20-2021)
- Release Version 1.77 (Dec-06-2021)
- Release Version 1.76 (Nov-22-2021)
- Release Version 1.75 (Nov-09-2021)
- Release Version 1.74 (Oct-25-2021)
- Release Version 1.73 (Oct-04-2021)
- Release Version 1.72 (Sep-20-2021)
- Release Version 1.71 (Sep-09-2021)
- Release Version 1.70 (Aug-23-2021)
- Release Version 1.69 (Aug-09-2021)
- Release Version 1.68 (Jul-26-2021)
- Release Version 1.67 (Jul-12-2021)
- Release Version 1.66 (Jun-28-2021)
- Release Version 1.65 (Jun-14-2021)
- Release Version 1.64 (Jun-01-2021)
- Release Version 1.63 (May-19-2021)
- Release Version 1.62 (May-05-2021)
- Release Version 1.61 (Apr-20-2021)
- Release Version 1.60 (Apr-06-2021)
- Release Version 1.59 (Mar-23-2021)
- Release Version 1.58 (Mar-09-2021)
- Release Version 1.57 (Feb-22-2021)
- Release Version 1.56 (Feb-09-2021)
- Release Version 1.55 (Jan-25-2021)
- Release Version 1.54 (Jan-12-2021)
-
2020 Releases
- Release Version 1.53 (Dec-22-2020)
- Release Version 1.52 (Dec-03-2020)
- Release Version 1.51 (Nov-10-2020)
- Release Version 1.50 (Oct-19-2020)
- Release Version 1.49 (Sep-28-2020)
- Release Version 1.48 (Sep-01-2020)
- Release Version 1.47 (Aug-06-2020)
- Release Version 1.46 (Jul-21-2020)
- Release Version 1.45 (Jul-02-2020)
- Release Version 1.44 (Jun-11-2020)
- Release Version 1.43 (May-15-2020)
- Release Version 1.42 (Apr-30-2020)
- Release Version 1.41 (Apr-2020)
- Release Version 1.40 (Mar-2020)
- Release Version 1.39 (Feb-2020)
- Release Version 1.38 (Jan-2020)
- Early Access New
Creating a Webhook Pipeline
A Webhook Pipeline is one that you create with any Source which offers webhook connectivity. For example, a Webhook Pipeline you create to ingest data from Mailchimp. Read Webhook.
Let us see an example of moving the data using a Webhook Source to an Amazon Redshift Destination.
Prerequisite
-
You are assigned the Team Administrator, Team Collaborator, or Pipeline Administrator role in Hevo to create the Pipeline.
-
Access to the Sources and the Destinations systems.
Configure the Source
-
Log in to your Hevo account. By default, PIPELINES is selected in the Navigation Bar.
-
(Optional) Select the region in which you want to create your Pipeline, if this is different from the default region of your workspace.
Note: This is applicable for customers signing up after October 31, 2022.
-
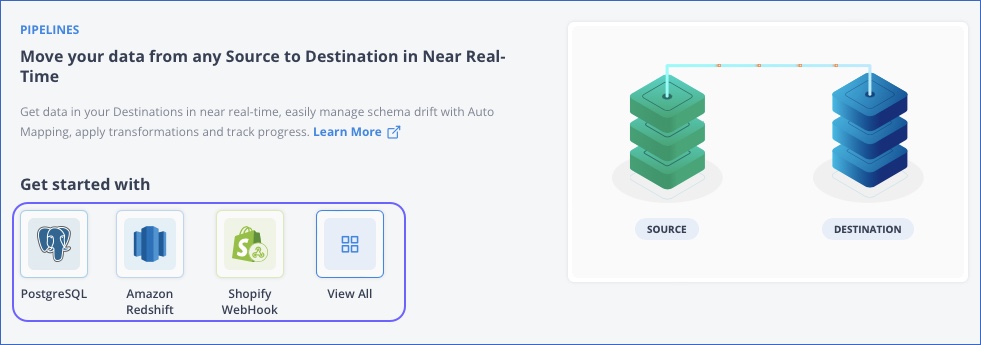
Select Webhook from the list of Sources. The list is displayed based on the Sources you select while setting up your account with Hevo.

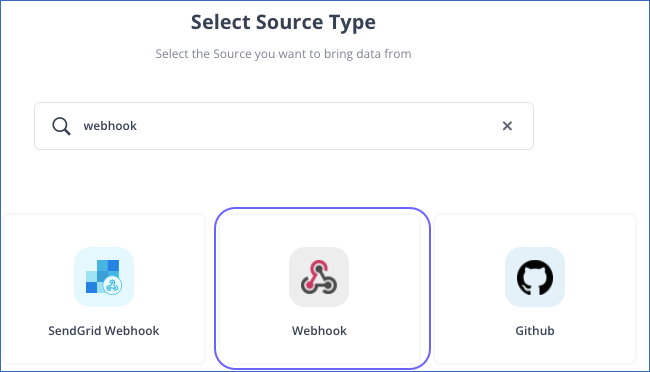
If Webhook is not available in the displayed list, click View All, search for Webhook, and then select it in the Select Source Type page.

-
In the Configure your Webhook Source page, specify the JSON path to the root of the Event name and root of the fields present in your payload. Read Writing JSONPath Expressions.
Note: The fields may vary depending on the Destination type. Read Sources.

-
Click CONTINUE.
Select and Configure Destination
-
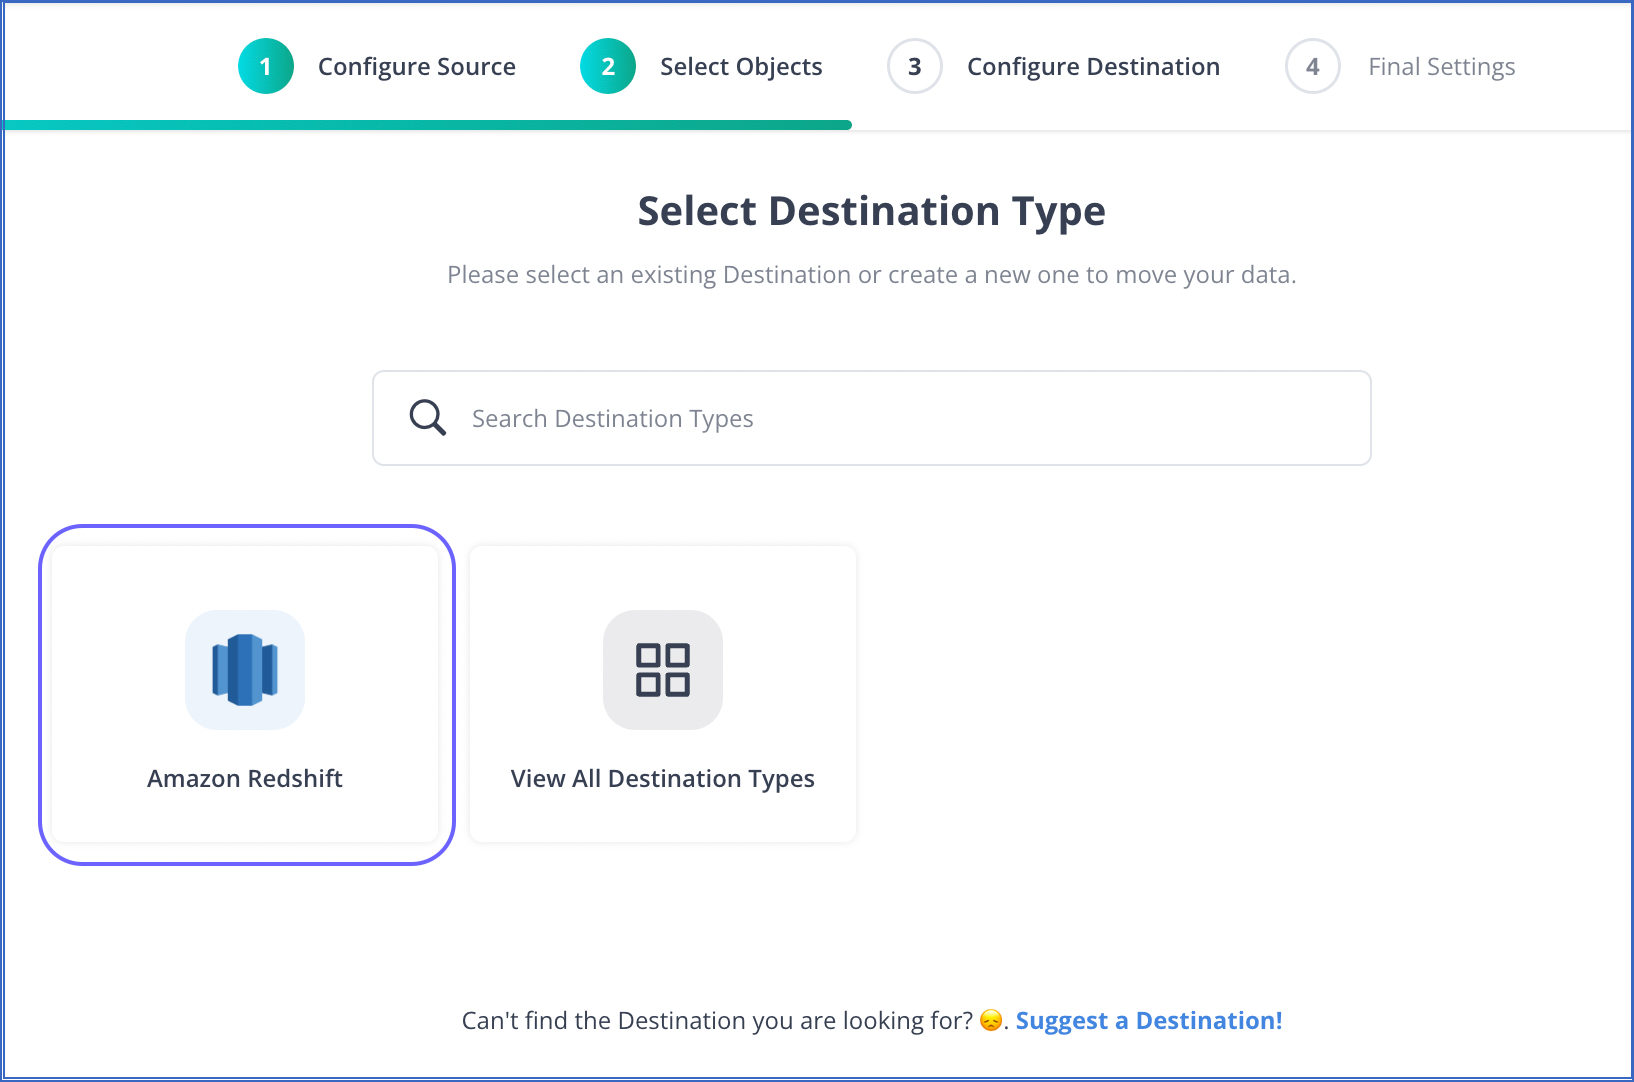
In the Select Destination Type page, select your Destination. You can see the Destination type that you selected at the time of setting up your account with Hevo. Here, we are selecting Amazon Redshift.
Note: You can click View All Destination Types to select another Destination type.

-
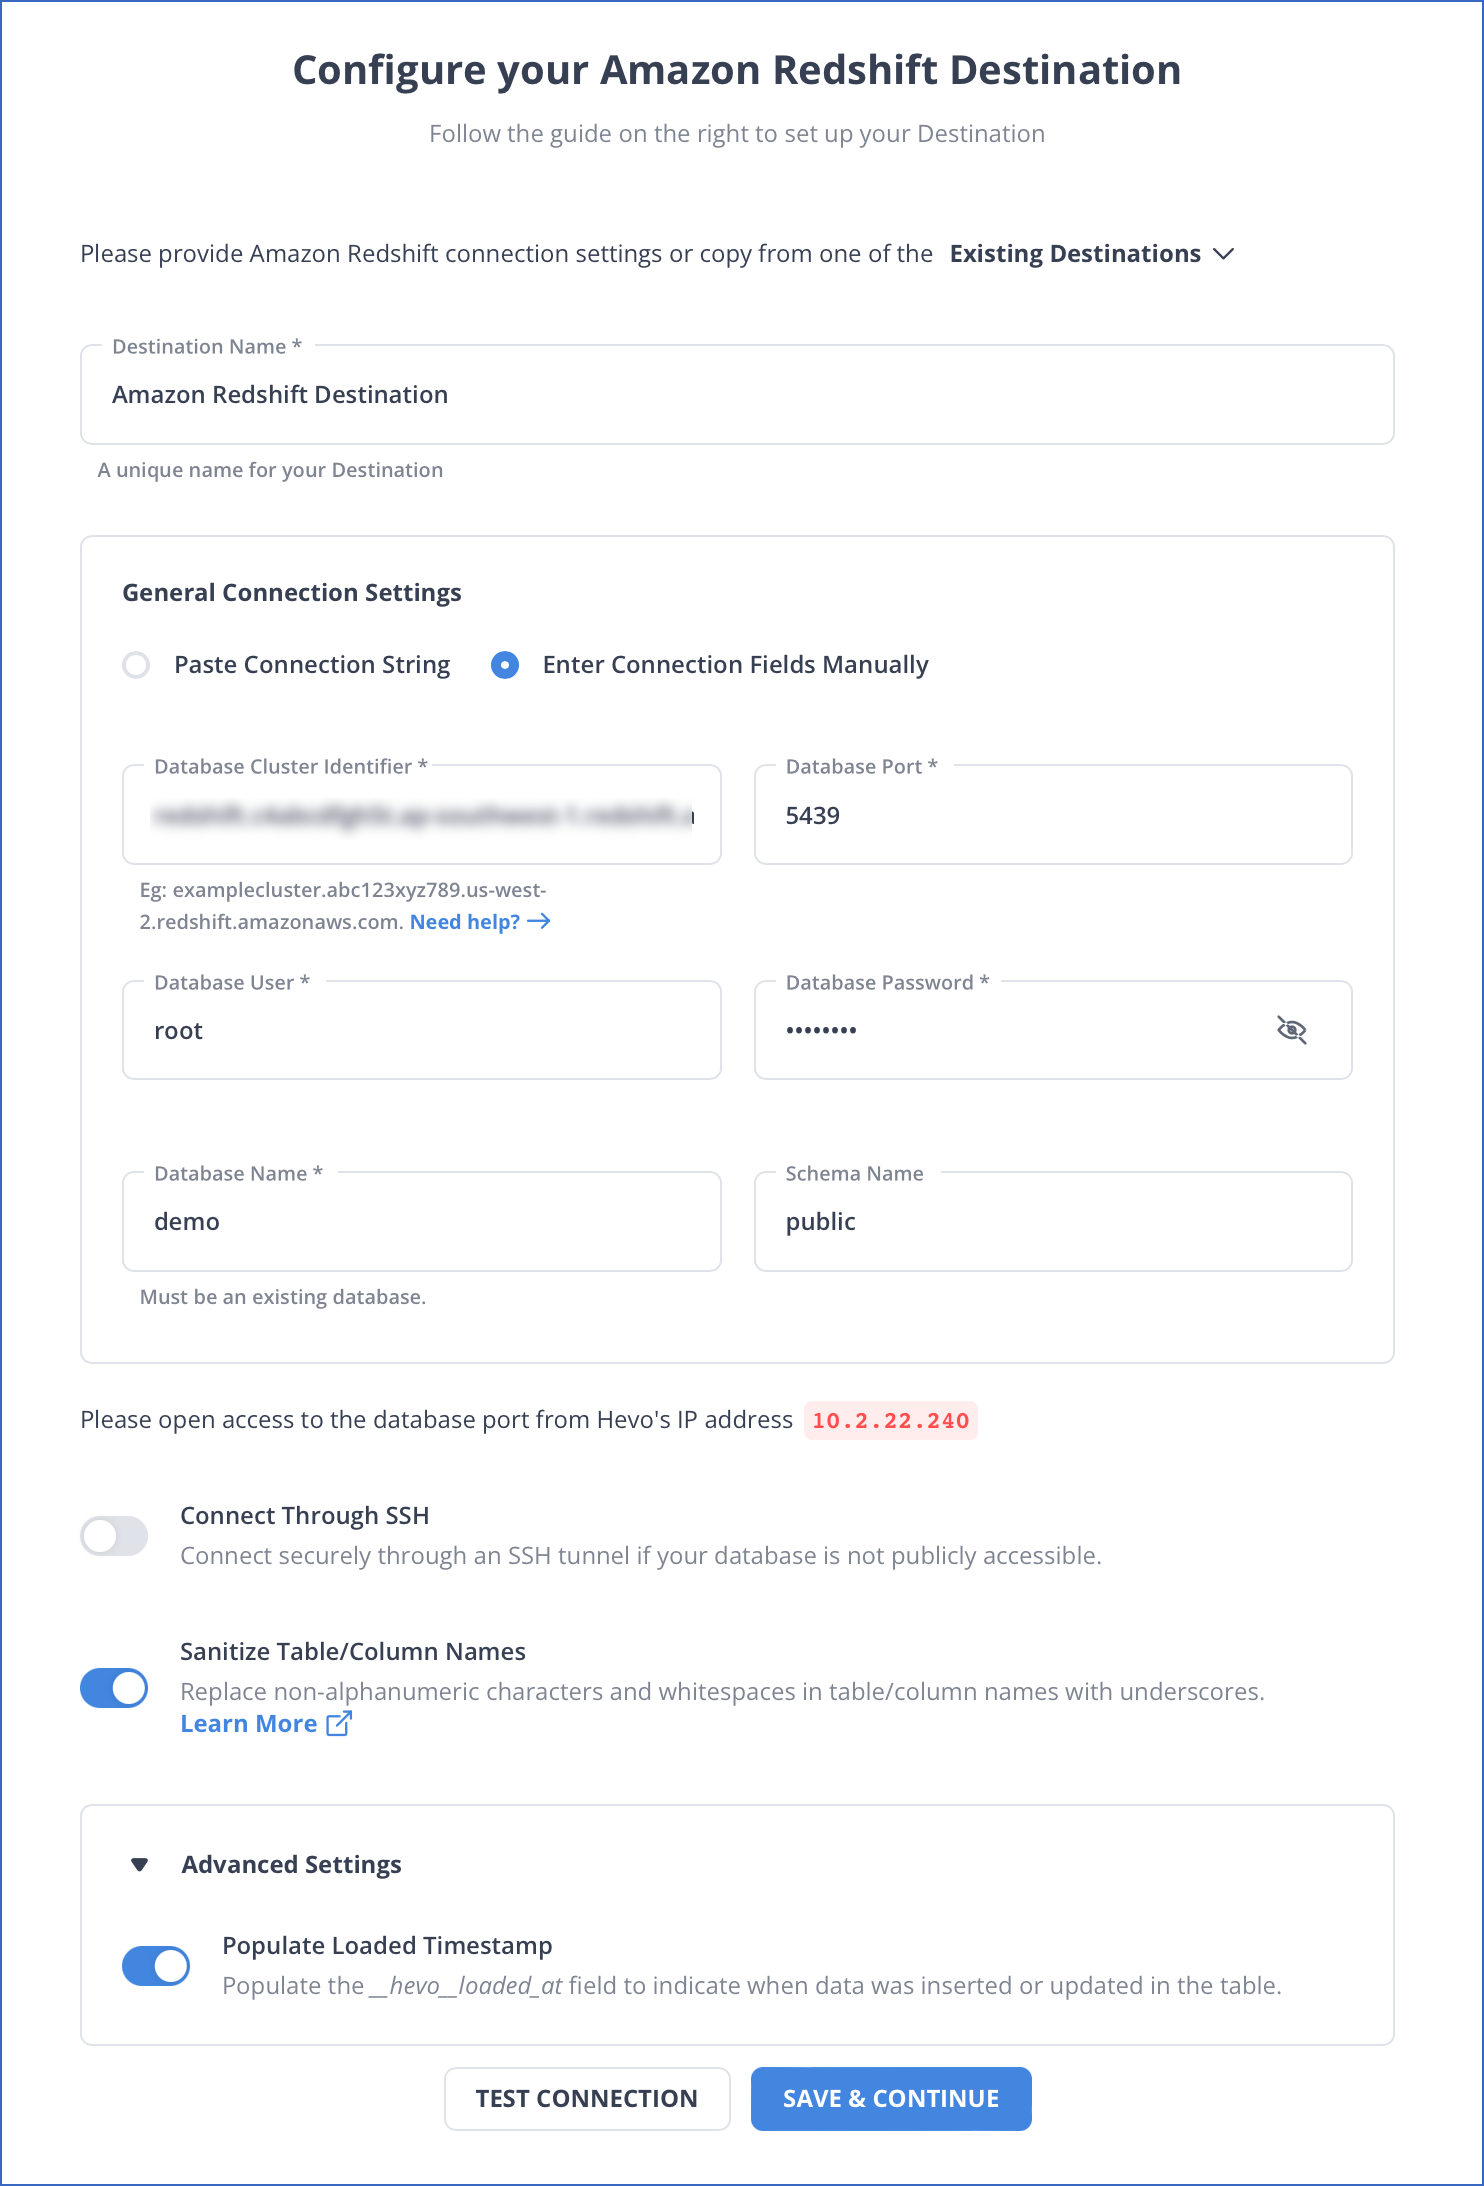
In the Configure your Amazon Redshift Destination page, specify the Amazon Redshift database settings. Read Amazon Redshift to know how to configure your Amazon Redshift Destination.
Note: The fields may vary depending on the type of the Destination you want to configure. Read Destinations.

-
Click SAVE & CONTINUE.
-
In the Destination Table Prefix field, provide a prefix if you want to modify the Destination table or partition name, else, you can leave the field blank.
-
Click CONTINUE.
A webhook URL gets generated along with the sample payload. Read Webhook.
Set up Webhook
-
Copy and paste the generated webhook URL in Step 2 above, in the application from which you want to push Events to Hevo. You can use the sample snippets to check the webhook URL connectivity to Hevo.

Final Settings
-
Optionally, as part of the final settings, you can set up Transformations to cleanse the Source data or enrich it in any other way. You can also view the Source to Destination field mappings via the Schema Mapper and edit these, if needed.
Your first Pipeline with the Webhook Source is created and the data ingestion starts.
Revision History
Refer to the following table for the list of key updates made to this page:
| Date | Release | Description of Change |
|---|---|---|
| Oct-31-2022 | 2.00 | Updated section, Configure the Source to add step regarding selecting region before creating a Pipeline. |
| Jul-27-2022 | 1.93 & 1.94 | Updated the screenshot in the Select and Configure Destination section to reflect the latest UI. |
| Mar-21-2022 | NA | New document. |