Connecting Through SSH
On This Page
Hevo provides you the option of connecting to your database host via an SSH tunnel. This SSH tunnel provides an additional layer of security to your connection. You should use an SSH connection when:
-
You are trying to connect with the local IP address of your database.
-
The database(s) you want to connect to is(are) not publicly available.
-
You cannot provide direct access to your database host.
You can configure multiple Sources in Hevo using the same SSH tunnel, but this might cause a delay in the replication of data from your Pipelines.
Hevo does not recommend configuring a log-based Pipeline for database Sources that receive connection requests through a network load balancer (NLB). This is because the database endpoint that Hevo connects to for ingesting data from the logs varies depending on the network node. As a result, Hevo may fetch data from different logs in each Pipeline run, causing the Pipeline to break.
Establishing an SSH connection involves specifying the SSH server details and the SSH host key to be used for data encryption. Hevo supports both Rivest-Shamir-Adleman (RSA) and Elliptic Curve Digital Signature Algorithm (ECDSA) encryption algorithms. However, we recommend ECDSA encryption, as these keys are generated using modern cryptographic operations and are more secure. The corresponding SSH client keys (private keys) are maintained by Hevo on its servers and are used to decrypt the data for loading.
Before connecting through SSH, you must whitelist the Hevo IP addresses for your region on the SSH server.
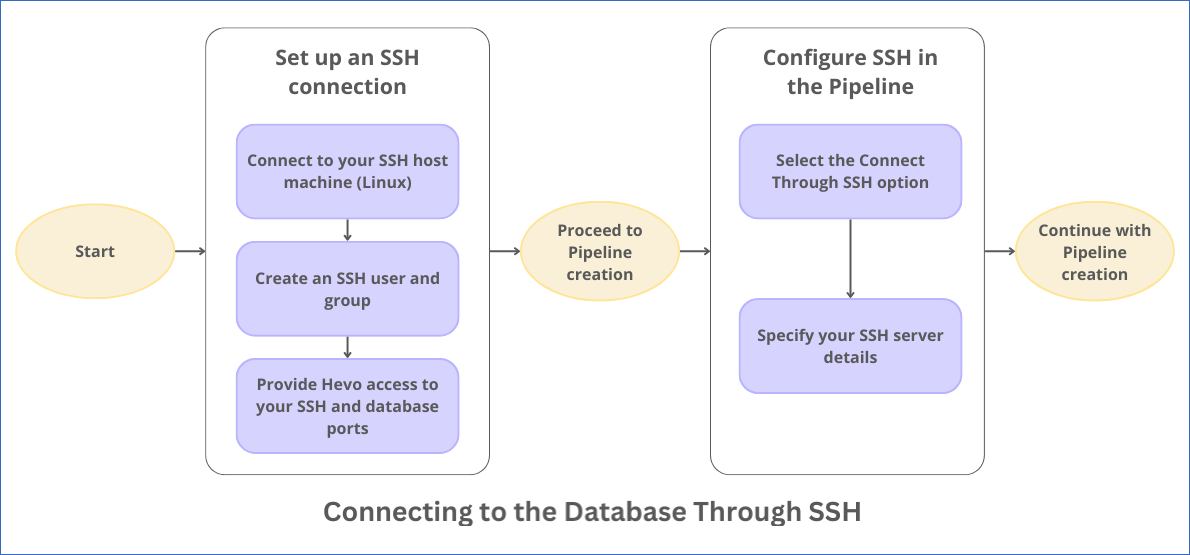
The following diagram illustrates the steps to connect your Source database through SSH in Hevo. The steps are also described in detail in the sections below.
Select the SSH Option
While configuring the respective Source or Destination in your Hevo Pipeline, select the Connect through SSH option. Hevo displays its ECDSA and RSA public host keys in the UI. You need to specify one of these host keys while setting up the SSH connection.

Set up an SSH Connection
Perform the following steps to connect to Hevo through an SSH server running on a Linux system:
Note: Read Unable to Verify SSH Details if you are using Hevo’s RSA public key and your SSH server runs on a newer Linux version, such as Ubuntu 22 or Amazon Linux 2023.
1. Connect to your SSH server
Perform the following steps to connect to your EC2 instance (SSH server) through an SSH client:
-
Open the EC2 Management Console in your AWS account.
-
On the EC2 dashboard, from the Instances menu, select Instances, and locate your EC2 instance (SSH Server).
-
Select the check box for your Instance ID which you want to connect through SSH client, and then click Connect.

-
On the Connect to instance page, click the SSH client tab and perform the steps displayed on the screen.

You are now connected to your EC2 instance (SSH server).
2. Create an SSH user and group
Run the following commands in the SSH client connected to your SSH server:
-
Create a Hevo group:
sudo groupadd Hevo -
Create a Hevo user:
sudo useradd -m -g Hevo Hevo -
Switch to the Hevo user:
sudo su - Hevo -
Create the .ssh directory:
mkdir ~/.ssh -
Set the ssh permissions:
chmod 700 ~/.ssh -
Switch to the .ssh directory:
cd ~/.ssh -
Create the authorized_keys file:
touch authorized_keys -
Set the permissions:
chmod 600 authorized_keys -
Add the public SSH host key visible in the Hevo UI to the authorized_keys file using a text editor of your choice.
3. Allow port access
You must ensure that Hevo is allowed port access from:
-
Hevo’s IP address of your region to your tunnel server’s SSH port.
-
Your SSH tunnel server to your Source database port.
By default, Azure and Google Cloud Platform (GCP) allow port access for SSH connections on port 22. However, in AWS, you must allow port access on this port by performing the following steps:
Note: To set up an SSH connection on a different port, you must contact Hevo Support.
-
Navigate to the AWS EC2 console.
-
In the Resources section, click Instances (running).
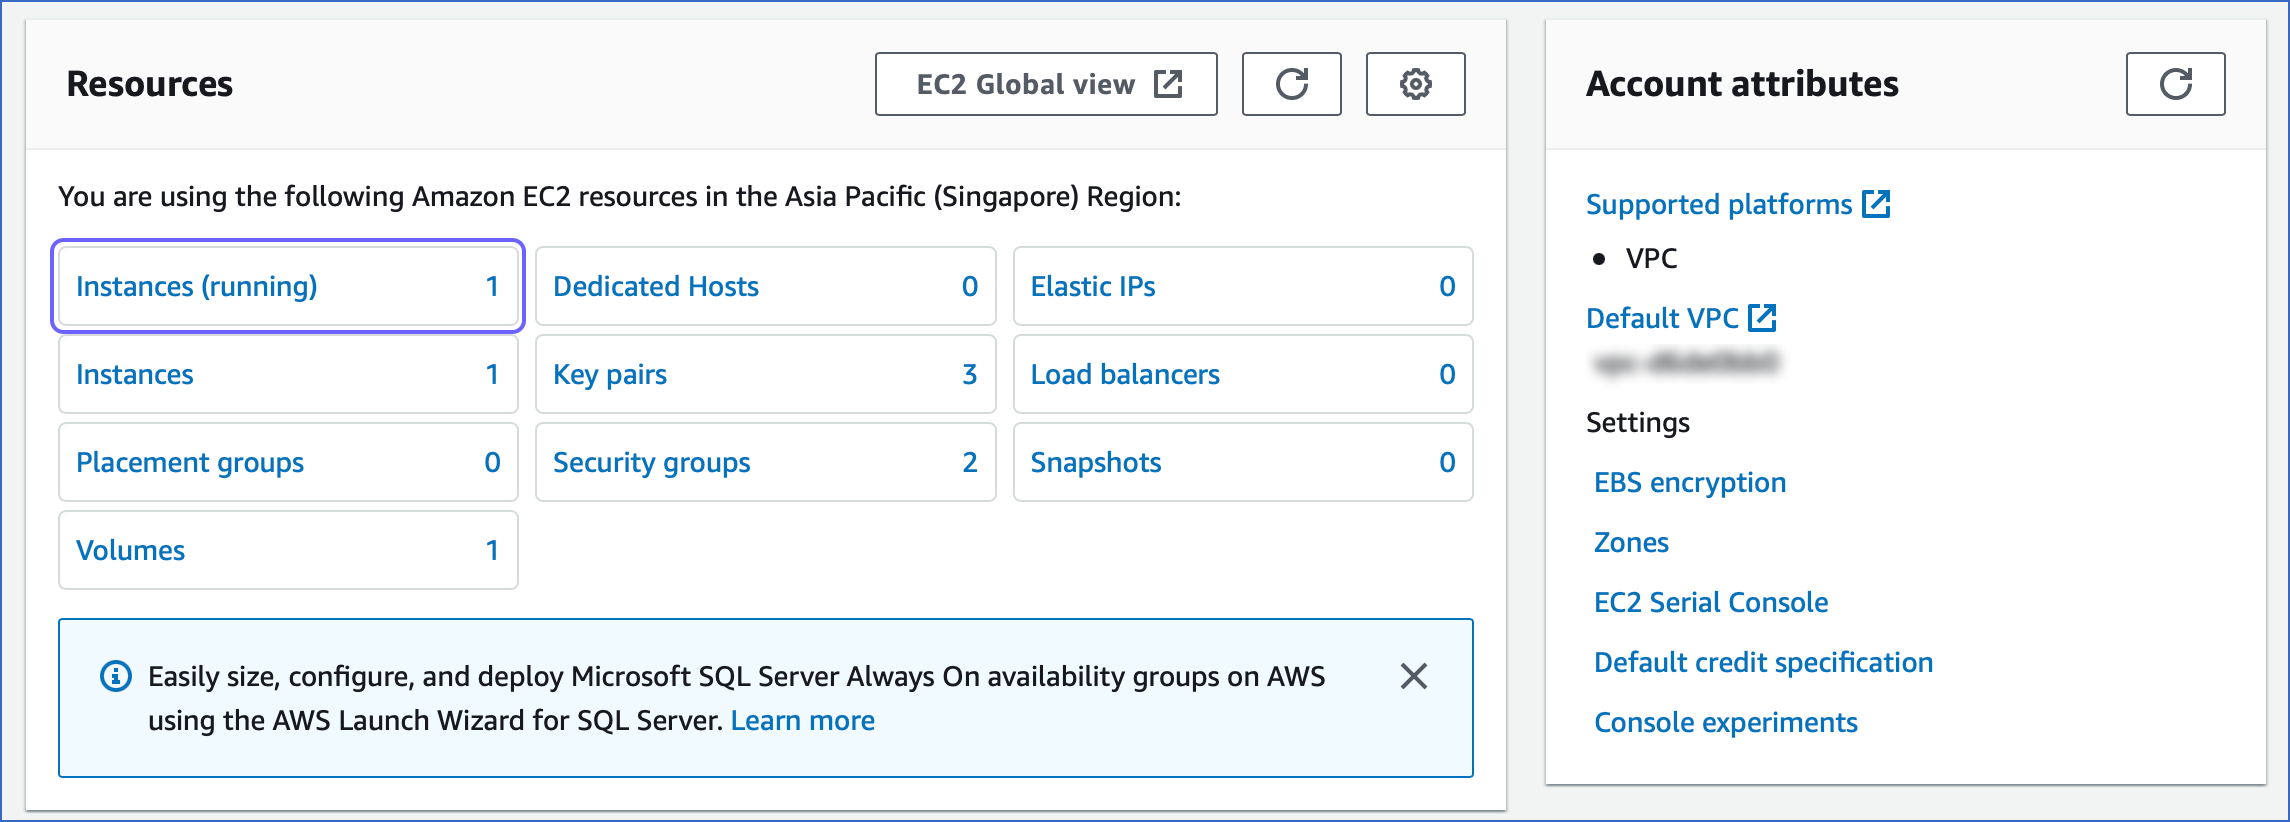
-
In the Instances page, select the instance you want to use as an SSH tunnel.
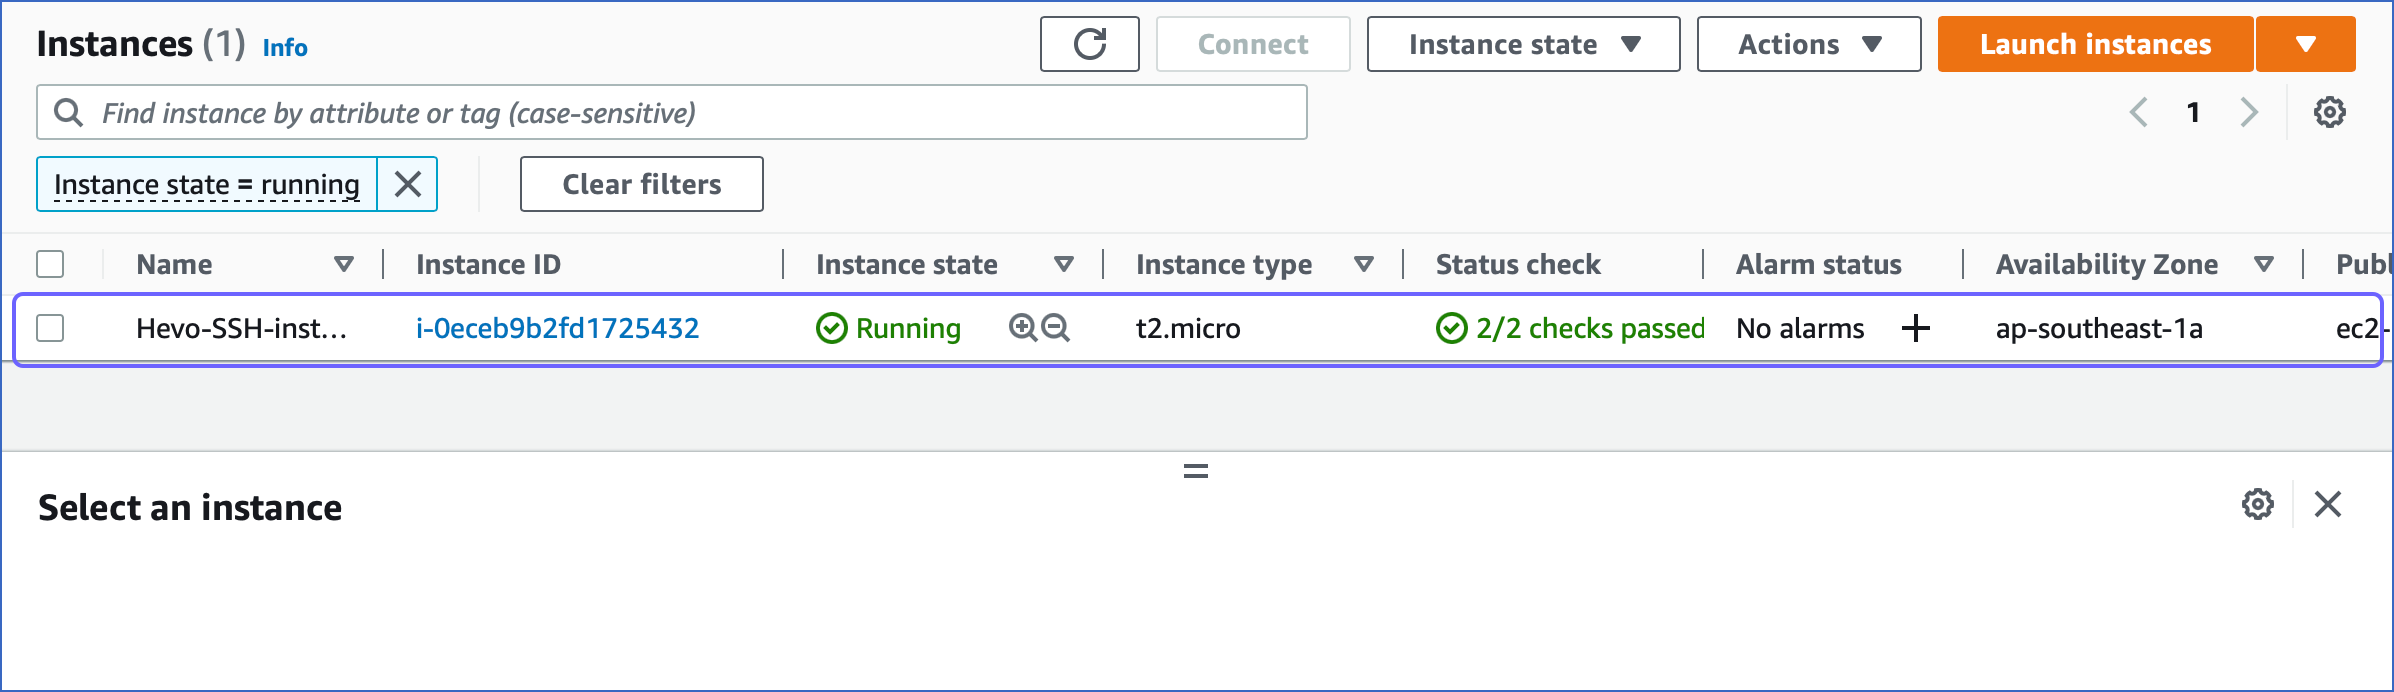
-
In the instance description, click the Security tab.

-
Under Security groups, select the default security group.

-
In the security group page, Inbound rules section, click Edit Inbound rules.
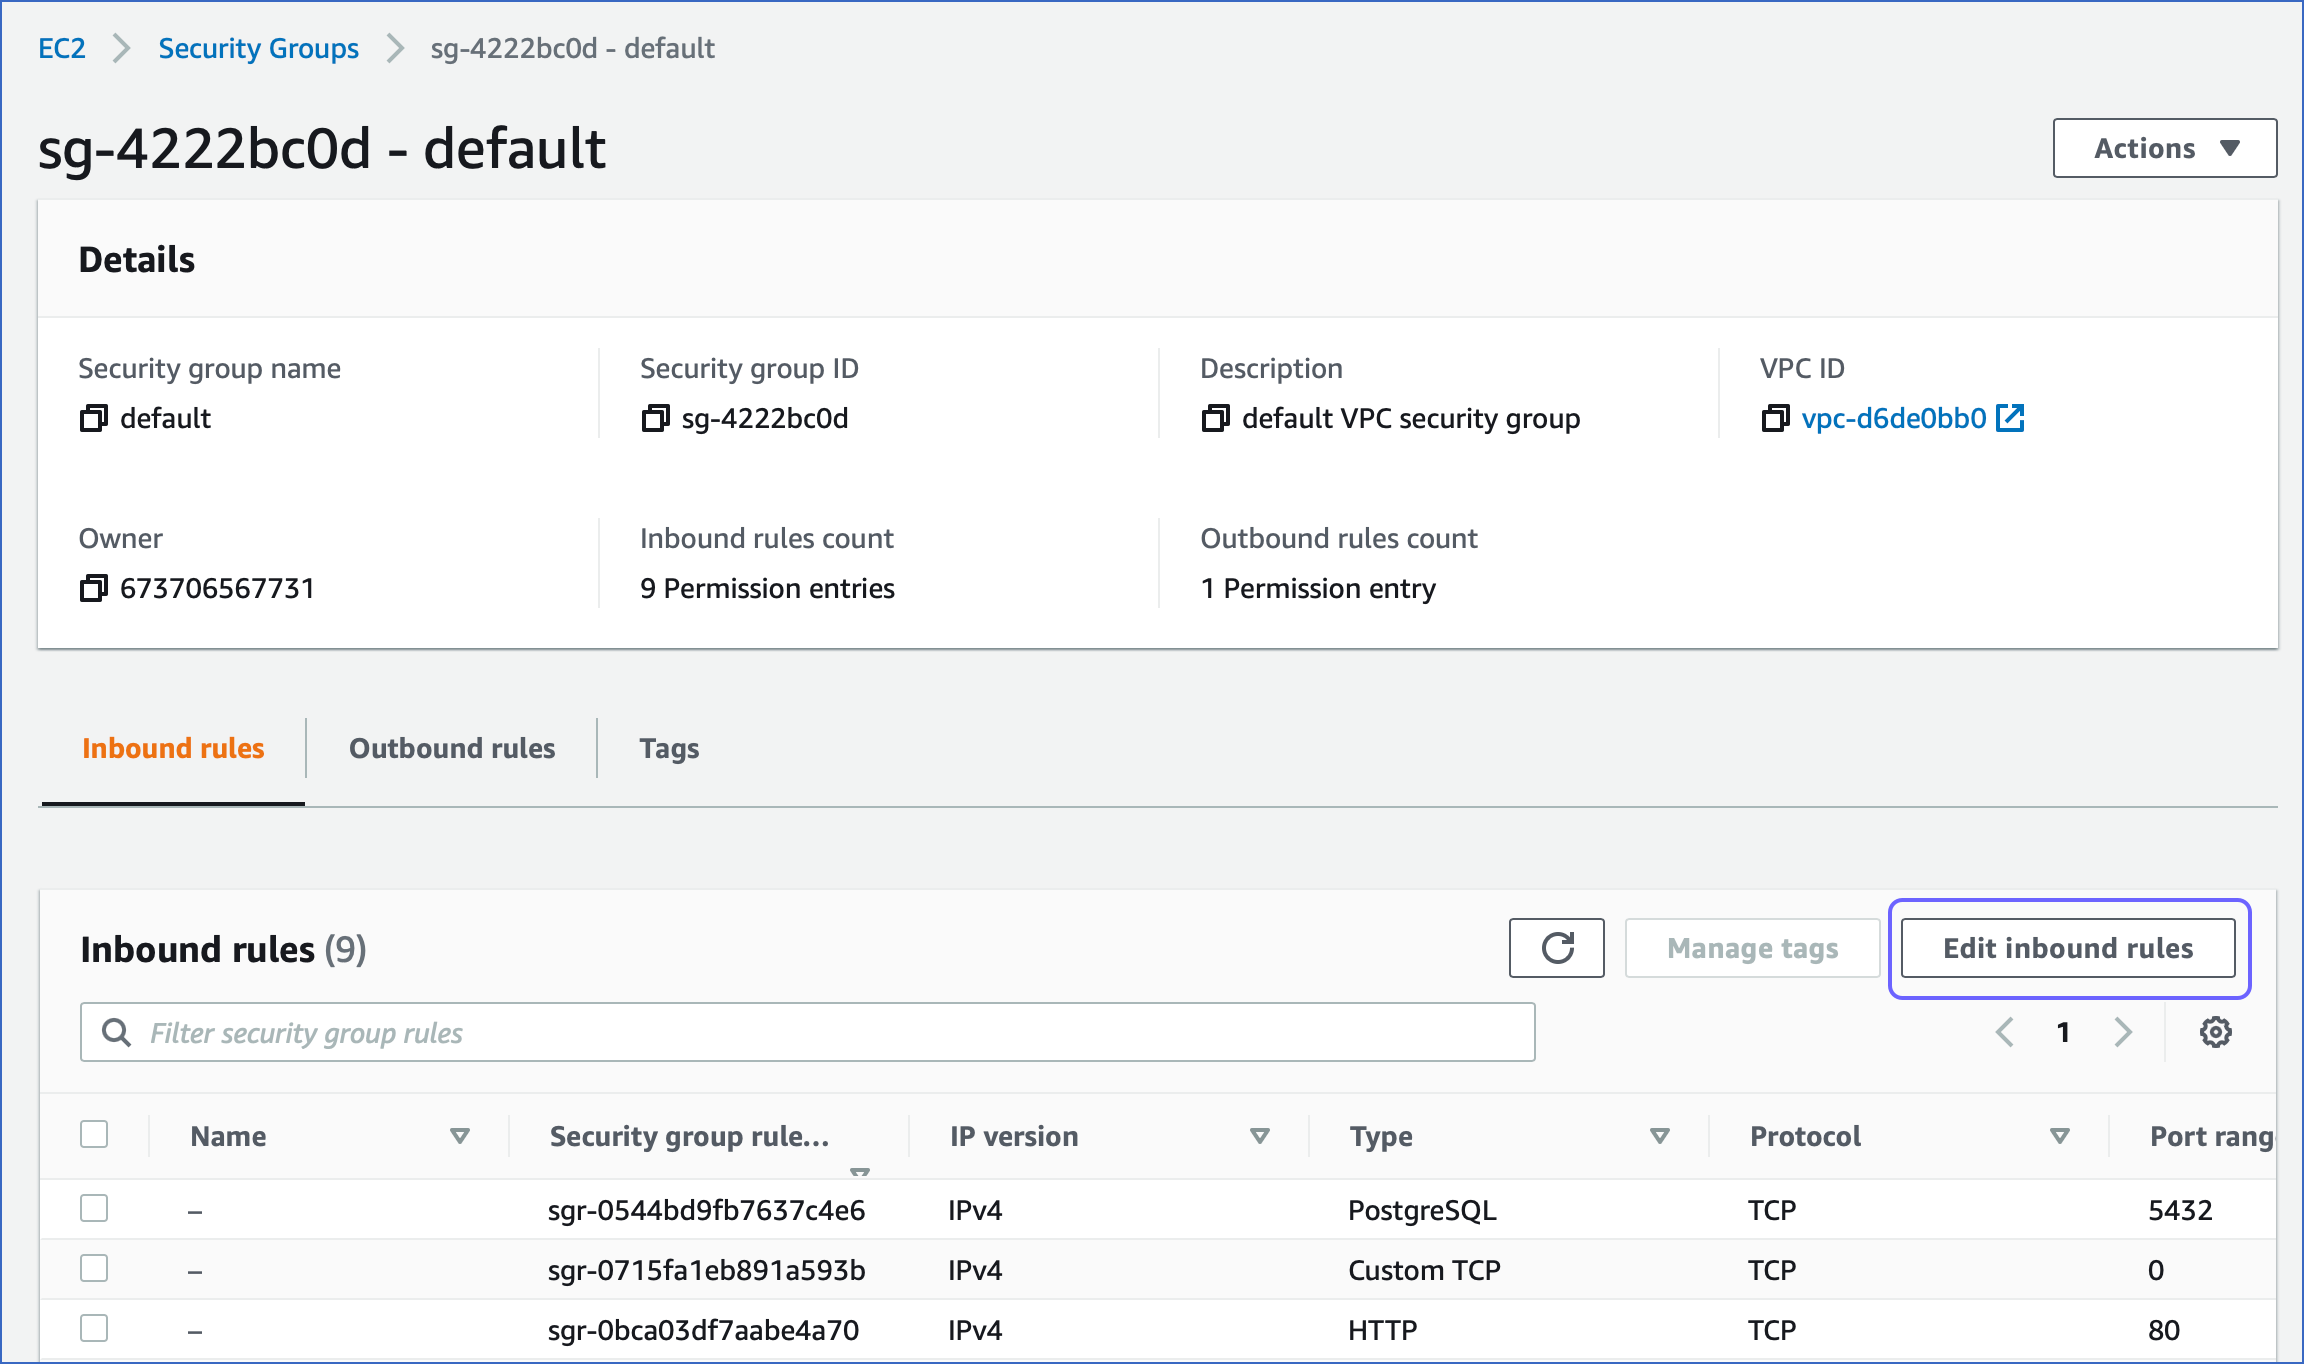
-
In the Edit inbound rules page, click Add rule.

-
To add the rule, do the following:

-
Under the Type column, select SSH for your rule.
-
Under the Source column, select Custom, and specify Hevo’s IP address for your region.
-
Click Save.
-
-
To complete setting up your Source configuration, refer to the section, Specify your SSH Server Details.
Specify your SSH Server Details
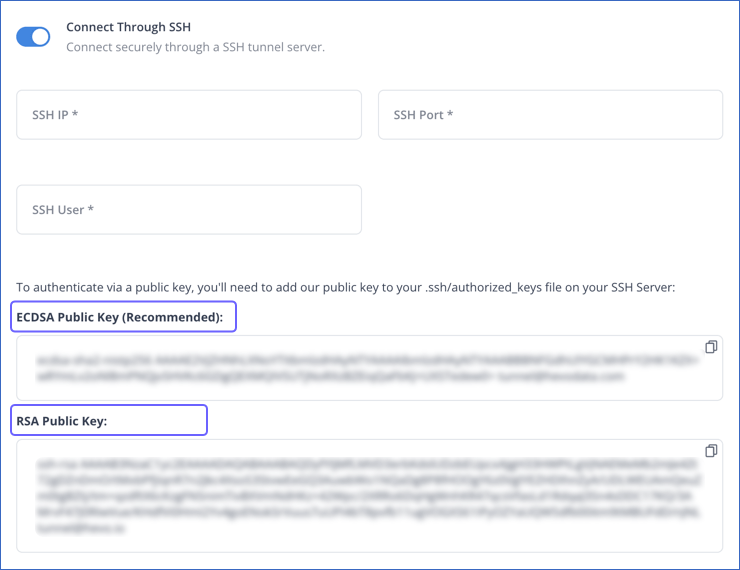
Specify the following details while configuring the Source or Destination in your Hevo Pipeline:
-
SSH IP: The IP address or DNS of the SSH server.
-
SSH Port: The port of the SSH server as seen from the public internet. Default value: 22
-
SSH User: The username on the SSH server that you created in Step 2.
To connect to your SSH server, add one of the Hevo public keys in the authorized_keys file on your SSH server:
-
ECDSA Public Key (Recommended): This public key is generated using the Elliptic Curve Digital Signature Algorithm (ECDSA), which is a newer asymmetric encryption algorithm. This algorithm generates a key pair by performing mathematical operations on elliptic curves. ECDSA keys are faster due to their smaller sizes (256 or 348 bits) and are also more secure.
-
RSA Public Key: This public key is generated using Rivest-Shamir-Adleman (RSA), which is an older asymmetric encryption algorithm. This algorithm generates a key pair by factorizing large numbers. RSA keys provide a high level of security if the key size is at least 2048 bits.
Refer to your respective Source page to complete the remaining Source configurations for creating the Pipeline.
Revision History
Refer to the following table for the list of key updates made to this page:
| Date | Release | Description of Change |
|---|---|---|
| May-19-2025 | NA | Added information about connecting to your SSH Server. |
| Apr-30-2024 | NA | Updated the process flow diagram and removed section Set up an SSH connection on a Windows server to reflect the supported functionality. |
| Jan-22-2024 | NA | Added information about not using NLB for log-based Pipelines. |
| Aug-16-2023 | 2.15.3 | Added information about support for ECDSA-generated public keys. |
| Mar-09-2023 | NA | Updated section, Allow port access to add information about allowing port access on Azure and GCP. |
| Jan-10-2023 | NA | Updated the page to add information about setting up an SSH connection on Linux and Windows. |