On This Page
Microsoft SQL (MS SQL) Server is a popular Relational Database Management System (RDBMS) used by small and large businesses. It can store and retrieve data as requested by software applications.
You can ingest data from your MS SQL Server using Hevo Pipelines and replicate it to a warehouse of your choice.
Prerequisites
-
The SQL Server is running.
-
SQL Server version is 12 or higher.
-
TCP/IP Protocol is enabled with TCP port as 1433.
-
VIEW CHANGE TRACKING, and ALTER DATABASE privileges are granted to the database user, if Pipeline Mode is Change Tracking or Table, and Query mode is Change Tracking.
-
SELECT privileges are granted to the database user.
Note: We recommend that you create a database user for configuring your SQL Server Source in Hevo. However, if you already have one, refer to section Grant privileges to the user.
-
You are assigned the Team Administrator, Team Collaborator, or Pipeline Administrator role in Hevo, to create the Pipeline.
Perform the following steps to configure your Generic SQL Server Source:
Enable TCP/IP Protocol
You need to configure the SQL Server instance with TCP port value 1433 to enable Hevo to connect to your MS SQL Server.
Follow these steps to enable TCP/IP protocol for your SQL Server:
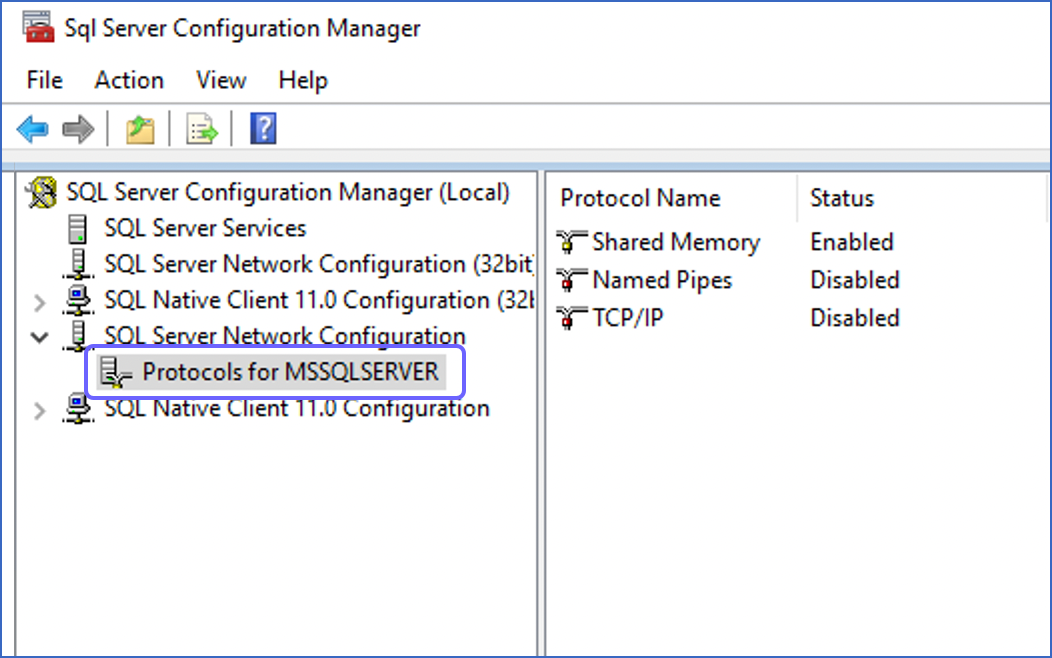
1. Enable the TCP/IP port
-
Open the SQL Server Configuration Manager.
-
In the left navigation pane under SQL Server Network Configuration, click Protocols for <MS SQL Server Instance Name>. The default instance name is MSSQLSERVER.
-
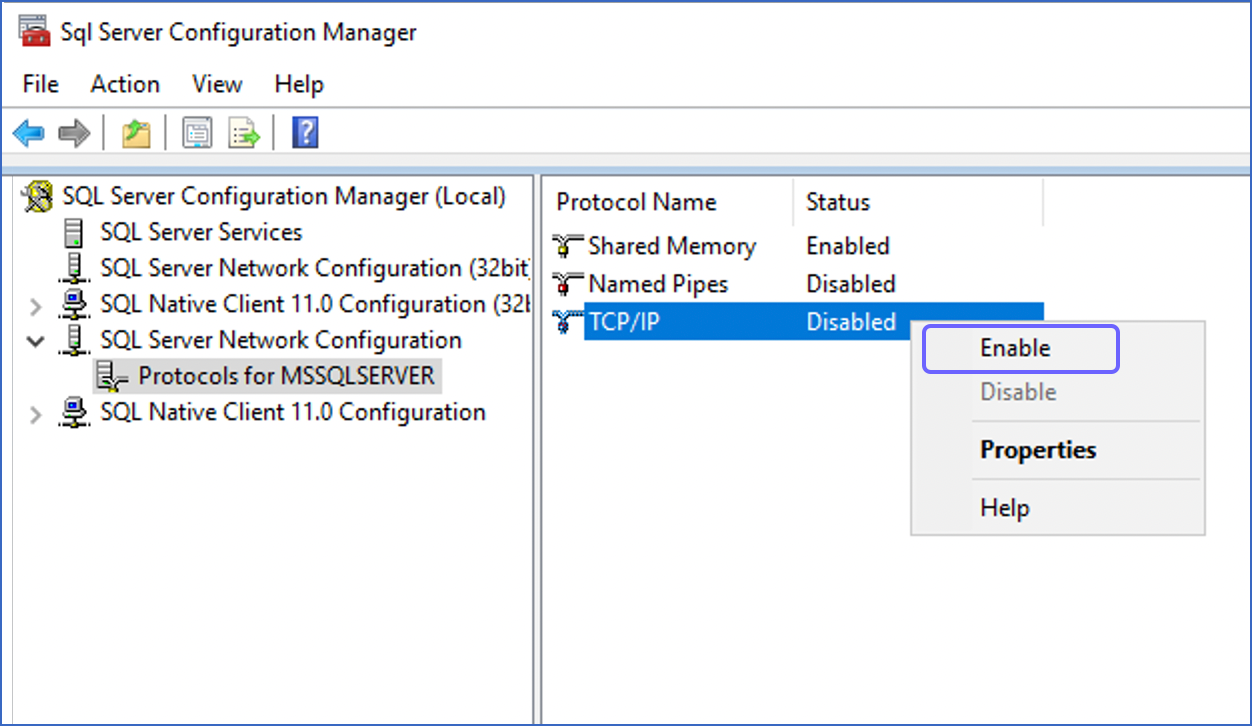
In the right pane, right click the TCP/IP Protocol Name, and select Enable (if not enabled already) in the Status field.
-
Click OK to acknowledge the dialogue box that warns you to restart the services for the changes to take effect.
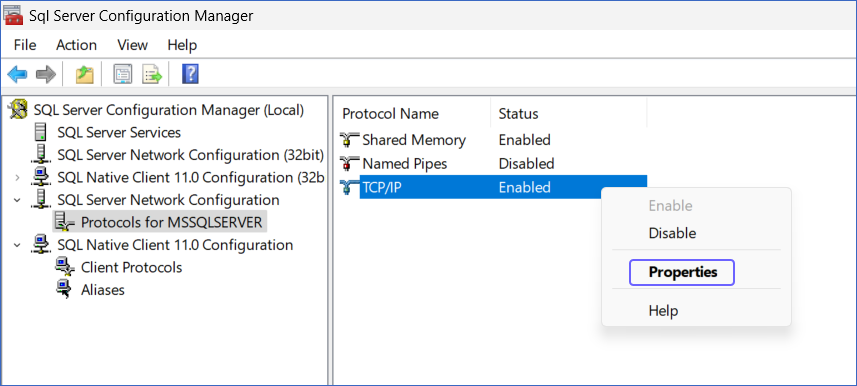
2. Verify the TCP/IP port
Follow these steps to check the port where TCP/IP is enabled:
-
Right-click the TCP/IP Protocol Name, and select Properties.
-
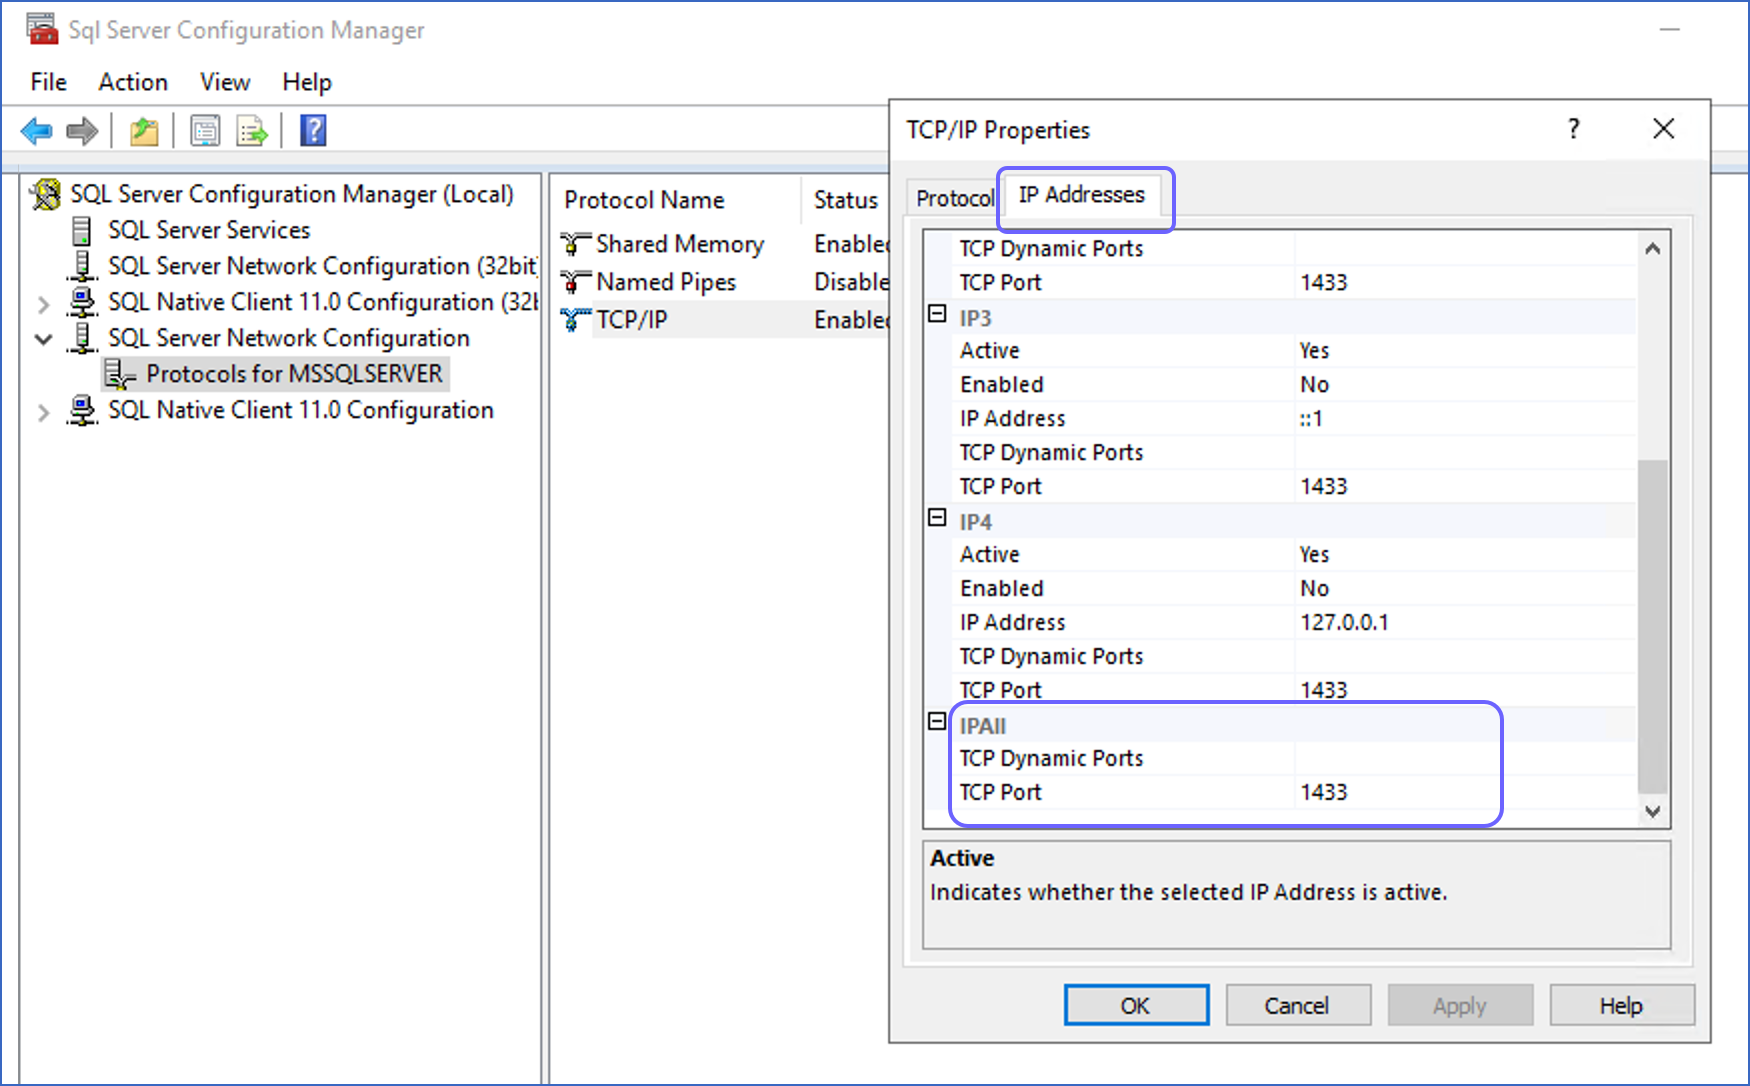
In the TCP/IP Properties window, click the IP Addresses tab.
-
In the IPAII section, ensure the TCP Port value is 1433, which is the default port for MS SQL Server.
-
Click OK to acknowledge the dialogue box that warns you to restart the services for the changes to take effect.
-
Click OK, and exit the TCP/IP Properties window.
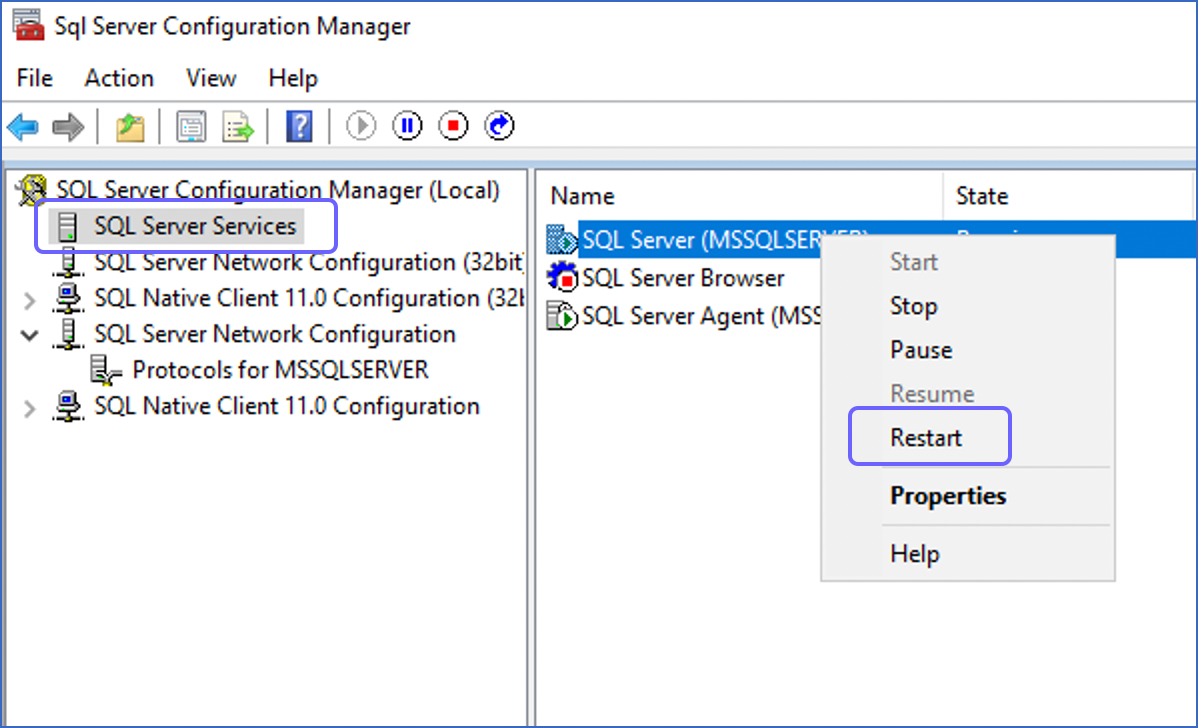
3. Restart the MS SQL Server instance
-
In the left navigation pane, click SQL Server Services.
-
In the right pane, right-click your < MS SQL Server Instance Name >, and select Restart.
Enable Change Tracking
Note: This step is valid only for Pipelines with Change Tracking as their ingestion mode.
The Change Tracking mechanism captures the database changes. To enable or disable change tracking, the database user must have the ALTER DATABASE privilege.
To enable change tracking, connect your SQL Server database to your SQL Client tool and enter these commands:
-
Enable change tracking at the database level:
ALTER DATABASE <database_name> SET CHANGE_TRACKING = ON
(CHANGE_RETENTION = 3 DAYS, AUTO_CLEANUP = ON)
The
CHANGE_RETENTIONvalue specifies the duration for which change tracking information is retained. You can useAUTO_CLEANUPto enable or disable the cleanup task that removes old change tracking information. Read Enable Change Tracking for a Database.Note: Hevo recommends that you set the CHANGE_RETENTION value to 3 DAYS. This reduces the risk of log expiry in the case of Pipelines having a low ingestion frequency, for example, 24 hours.
-
Enable change tracking at the table level:
ALTER TABLE <schema_name>.<table> ENABLE CHANGE_TRACKINGRepeat this step for each table you want to replicate using Change Tracking. Read Enable Change Tracking for a Table.
Note: Hevo does not support Change Data Capture (CDC) for SQL Server.
Create a Database User and Grant Privileges
1. Create a database user (Optional)
Note: Skip this step if you are using an existing database user.
Perform the following steps to create a user in your SQL Server database:
Note: Replace the placeholder values in the commands below with your own. For example, <username> with hevo.
-
Connect to your SQL Server database as an admin user with an SQL client tool, such as sqlcmd.
-
Select the database:
USE <database>; -
Create a login and a database user:
 CREATE LOGIN <username> WITH PASSWORD = '<password>';
 CREATE USER <username> FOR LOGIN <username>;
2. Grant privileges to the user
The database user specified in the Hevo Pipeline must have the following global privileges:
-
SELECT -
VIEW CHANGE TRACKING(If ingestion mode is Change Tracking)
To set up these privileges, connect your MS SQL Server in your SQL Client tool, and enter these commands:
Note: Replace the placeholder values in the commands below with your own. For example, <username> with hevo.
-
Grant
SELECTprivilege at the database level:GRANT SELECT ON DATABASE::<database> TO <username>; -
Grant
SELECTprivilege at the schema level:GRANT SELECT ON SCHEMA::<schema_name> TO <username>; -
If the ingestion mode is Change Tracking, grant the
VIEW CHANGE TRACKINGprivilege at the schema or table level:-
For schema level:
GRANT VIEW CHANGE TRACKING ON SCHEMA::<schema_name> TO <username>; -
For table level:
GRANT VIEW CHANGE TRACKING ON OBJECT::<schema_name>.<table_name> TO <username>;
-
Specify Generic SQL Server Connection Settings
Perform the following steps to configure SQL Server as a Source in Hevo:
-
Click PIPELINES in the Navigation Bar.
-
Click + Create Pipeline in the Pipelines List View.
-
On the Select Source Type page, select SQL Server.
-
On the Select Destination Type page, select the type of Destination you want to use.
-
On the page that appears, do the following:

-
Select Pipeline Mode: Choose the mode for ingesting data from the Source. Default value: Change Tracking. The available modes are Change Tracking, Table, and Custom SQL.
Depending on the Pipeline mode you select, you must configure the objects to be replicated. Refer to section, Object and Query Mode Settings for the steps to do this.
Note: For Custom SQL Pipeline mode, all Events loaded to the Destination are billable.
-
Select Pipeline Type: Choose the type of Pipeline you want to create based on your requirements, and then click Continue.
-
If you select Edge, read Generic SQL Server to configure your Edge Pipeline.
-
If you select Standard, skip to step 6 below.
This section is displayed only if all the following conditions are met:
-
The selected Destination type is supported in Edge.
-
The Pipeline mode is set to Change Tracking.
-
Your Team was created before September 15, 2025, and has an existing Pipeline created with the same Destination type and Pipeline mode.
For Teams that do not meet the above criteria, if the selected Destination type is supported in Edge and the Pipeline mode is set to Change Tracking, you can proceed to create an Edge Pipeline. Read Generic SQL Server to configure your Edge Pipeline. Otherwise, you can proceed to create a Standard Pipeline.
-
-
-
On the Configure your SQL Server Source page, specify the following:

-
Pipeline Name: A unique name for the Pipeline, not exceeding 255 characters.
-
Database Host: SQL Server host’s IP address or DNS.
The following table lists a few examples of SQL Server hosts:
Variant Host Amazon RDS SQL Server ms-sql-server-1.xxxxx.rds.amazonaws.com Azure SQL Server mssql.database.windows.net Generic SQL Server 10.123.10.001 or mssql.westeros.inc Google Cloud SQL Server 35.220.150.0 Note: For URL-based hostnames, exclude the http:// or https:// part. For example, if the hostname URL is https://mssql.database.windows.net, enter mssql.database.windows.net.
-
Database Port: The port on which your SQL Server is listening for connections. Default value: 1433.
-
Database User: The read-only user who has the permissions to read tables in your database.
-
Database Password: The password for the read-only user.
-
Database Name: The database that you wish to replicate.
-
Schema Name: The schema that holds the tables to be replicated. Default value: dbo.
Note: When you replicate tables from a schema other than dbo, the schema name is prefixed to the table name and displayed as schemaname.tablename in the Objects list of the Pipeline Detailed View. The corresponding Destination table is created as destinationprefix_schemaname_tablename.
-
Connect through SSH: Enable this option to connect to Hevo using an SSH tunnel, instead of directly connecting your SQL Server database host to Hevo. This provides an additional level of security to your database by not exposing your SQL Server setup to the public. Read Connecting Through SSH.
If this option is disabled, you must whitelist Hevo’s IP addresses. Refer to the content for your SQL Server variant for steps to do this.
-
Advanced Settings:
-
Load Historical Data: Applicable for Pipelines created with Change Tracking or Table mode. If this option is enabled, the entire table data is fetched during the first run of the Pipeline. If disabled, Hevo loads only the records written to your database after the Pipeline was created.
-
Include New Tables in the Pipeline: Applicable for all ingestion modes except Custom SQL.
If enabled, Hevo automatically ingests data from tables created in the Source after the Pipeline has been built. These may include completely new tables or previously deleted tables that have been re-created in the Source. All data for these tables is ingested using database logs, making it incremental.
If disabled, new and re-created tables are not ingested automatically. They are added in SKIPPED state in the objects list, on the Pipeline Overview page. You can update their status to INCLUDED to ingest data.
You can change this setting later.
-
-
-
Click Test Connection. This button is enabled once you specify all the mandatory fields. Hevo’s underlying connectivity checker validates the connection settings you provide.
-
Click Test & Continue to proceed for setting up the Destination. This button is enabled once you specify all the mandatory fields.
Object and Query Mode Settings
Once you have specified the Source connection settings in Step 4 above, do one of the following:
-
For Pipelines configured with the Change Tracking ingestion mode:
-
On the Select Objects page, select the objects you want to replicate.
-
Click Continue. This button is enabled once you select at least one object for which Change Tracking is enabled.

Note:
-
Each object represents a table in your database.
-
You must enable Change Tracking for the objects you want to ingest data from. If disabled, Hevo adds these objects to your Pipeline in the SKIPPED state.
-
For customers signing up after Release 2.19, Hevo automatically uses the Unique Incrementing Append Only (UIAO) query mode for the objects that contain a unique column. For the others, it ingests data using the Full Load query mode.
-
-
-
For Pipelines configured with the Table ingestion mode:
-
On the Select Objects page, select the objects you want to replicate and click Continue.

Note: Each object represents a table in your database.
-
On the Configure Objects page, specify the query mode you want to use for each selected object.

-
-
For Pipelines configured with the Custom SQL ingestion mode:
-
On the Provide Query Settings page, enter the custom SQL query to fetch data from the Source.
-
In the Query Mode drop-down, select the query mode, and click Continue.

-
Data Replication
| For Teams Created | Default Ingestion Frequency | Minimum Ingestion Frequency | Maximum Ingestion Frequency | Custom Frequency Range (in Hrs) |
|---|---|---|---|---|
| Before Release 2.21 | 15 Mins | 5 Mins | 24 Hrs | 1-24 |
| After Release 2.21 | 6 Hrs | 30 Mins | 24 Hrs | 1-24 |
Note: The custom frequency must be set in hours as an integer value. For example, 1, 2, or 3 but not 1.5 or 1.75.
- Historical Data: In the first run of the Pipeline, Hevo ingests all available data for the selected objects from your Source database.
- Incremental Data: Once the historical load is complete, data is ingested as per the ingestion frequency.
Additional Information
Read the detailed Hevo documentation for the following related topics:
Connecting to a Local Database (Optional)
Refer to this section for steps to connect to your local database. For detailed information and troubleshooting help, read Connecting to a LocalHost Database.
Prerequisites
-
MY-SQL/MS-SQL service is running on your local machine.
-
Data to be loaded to the Destination is available in your MY-SQL/MS-SQL database.
-
You have an account on ngrok and an installed ngrok utility on your local machine. To run ngrok on your local machine, follow these one-time steps:
-
Extract the ngrok utility:
-
On Linux or MacOS, unzip ngrok from a terminal:
unzip /path/to/ngrok.zip -
On Windows, double-click ngrok.zip to extract it.
-
-
Authenticate ngrok in your local machine:
./ngrok authtoken <your_auth_token>You can get the auth token from your ngrok dashboard. For example, in the image below, the auth_token starts with
2ig3VXv3v2ZX4LDg.
-
Connect to the local database
Perform the following steps to connect to the local database:
-
Log in to your database server.
-
Start a TCP tunnel forwarding to your database port.
./ngrok tcp <your_database_port>For example, the port address for MySQL is 3306. Therefore, the command would be:
./ngrok tcp 3306 -
Copy the public IP address (hostname and port number) for your local database and port. For example, in the image below,
8.tcp.ngrok.iois the database hostname and19789is the port number.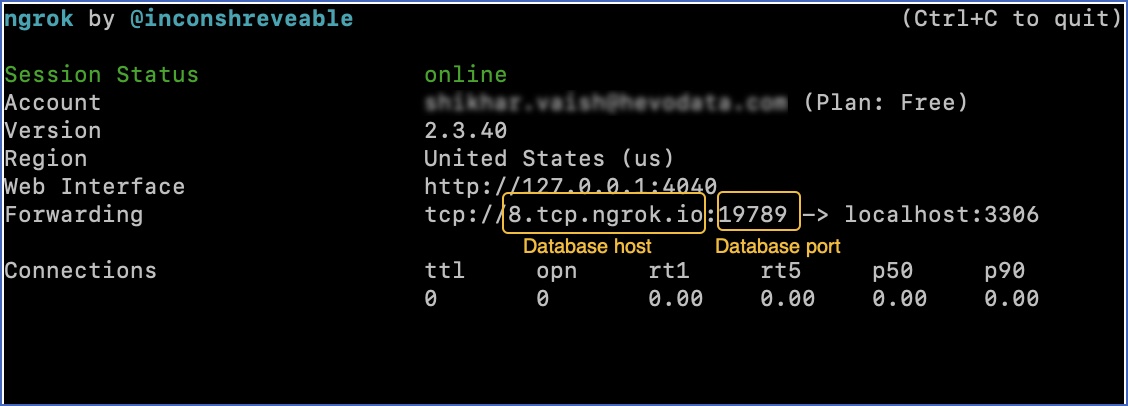
-
Paste the hostname and port number into the Database Host and Database Port fields respectively.

-
Specify all other settings and click Test & Continue.
Limitations
-
Hevo does not support data replication from temporary tables and views.
-
Hevo does not load data from a column into the Destination table if its size exceeds 16 MB, and skips the Event if it exceeds 40 MB. If the Event contains a column larger than 16 MB, Hevo attempts to load the Event after dropping that column’s data. However, if the Event size still exceeds 40 MB, then the Event is also dropped. As a result, you may see discrepancies between your Source and Destination data. To avoid such a scenario, ensure that each Event contains less than 40 MB of data.
-
When using the Unique Incrementing Append Only query mode, selecting a Globally Unique Identifier (GUID or UUID) field as the auto-incrementing column can lead to data ingestion issues. UUIDs do not follow a sequential numeric or alphabetical order. This can cause incorrect offset calculations, which might result in valid Events being skipped during ingestion and lead to data mismatches. If your Source object uses a UUID as the incrementing field and you observe missing records in your Destination, contact Hevo Support.
See Also
Revision History
Refer to the following table for the list of key updates made to this page:
| Date | Release | Description of Change |
|---|---|---|
| Nov-05-2025 | NA | Updated the document as per the latest Hevo UI. |
| Oct-13-2025 | NA | Updated section, Specify SQL Server Connection Settings to clarify when the Select Pipeline Type section is displayed during Pipeline configuration. |
| Oct-09-2025 | NA | Updated section, Specify SQL Server Connection Settings to add description for the Load Historical Data option. |
| Sep-18-2025 | NA | Updated section, Specify Generic SQL Server Connection Settings as per the latest UI. |
| Aug-08-2025 | NA | Added a note in the Specify Generic SQL Server Connection Settings section to mention that the schema name is prefixed to the table name if a schema name other than the default schema is specified. |
| Aug-1-2025 | NA | Added clarification that data ingested from new and re-created tables is billable. |
| Jul-14-2025 | NA | Updated section, Limitations to add a point about UUID columns not recommended for UIAO. |
| Jul-07-2025 | NA | Updated the Limitations section to inform about the max record and column size in an Event. |
| Jan-07-2025 | NA | Updated the Limitations section to add information on Event size. |
| Apr-29-2024 | NA | Updated section, Specify Generic SQL Server Connection Settings to include more detailed steps. |
| Mar-05-2024 | 2.21 | Added the Data Replication section. |
| Feb-27-2024 | NA | Updated sections, Enable Change Tracking, Create a database user, and Grant privileges to the user as per the latest Hevo functionality. |
| Jan-15-2024 | NA | Updated section, Limitations to add information about Hevo not supporting data replication from certain tables. |
| Jan-10-2024 | 2.19 | Updated section, Object and Query Mode Settings as per the latest Hevo functionality. |
| Nov-03-2023 | NA | Added section, Object and Query Mode Settings. |
| Oct-27-2023 | NA | Added subsection, Create a database user. |
| Apr-21-2023 | NA | Updated section, Specify Generic SQL Server Connection Settings to add a note to inform users that all loaded Events are billable for Custom SQL mode-based Pipelines. |
| Mar-09-2023 | 2.09 | Updated section, Specify Generic SQL Server Connection Settings to mention about SEE MORE in the Select an Ingestion Mode section. |
| Dec-19-2022 | 2.04 | Updated section, Specify Generic SQL Server Connection Settings to add information that you must specify all fields to create a Pipeline. |
| Dec-07-2022 | 2.03 | Updated section, Specify Generic SQL Server Connection Settings to mention about including skipped objects post-Pipeline creation. |
| Dec-07-2022 | 2.03 | Updated section, Specify Generic SQL Server Connection Settings to mention about the connectivity checker. |
| Apr-21-2022 | 1.86 | Updated section, Specify Generic SQL Server Connection Settings. |
| Sep-08-2021 | NA | - Updated the fourth list item under Prerequisites - Updated sub-section Grant privileges to the user. |
| Jul-26-2021 | 1.68 | Added a note for the SQL Server Host field. |
| Jul-12-2021 | 1.67 | Added sections: - Specify Generic SQL Server Connection Settings - Connecting to a Local Database. |
| Mar-09-2021 | 1.58 | Replaced references to Logical Replication with Change Tracking as Change Tracking is a distinct Pipeline mode for SQL Server Source types. |