Starting Release 2.20, Hevo has stopped supporting the streaming inserts feature in Google BigQuery Destinations. As a result, you will not be able to configure a new Google BigQuery Destination with streaming inserts enabled. Any existing Destinations created with this feature will continue to load data in near real-time. Additionally, you can create new Pipelines to load data to your existing Destination.
Google BigQuery is a fully-managed, serverless data warehouse that supports Structured Query Language (SQL) to derive meaningful insights from the data. With Hevo Pipelines, you can ingest data from any Source system and load it to a Google BigQuery Destination.
Hevo Pipelines stage the Source data in Google Cloud Storage (GCS) buckets before loading it to your BigQuery Destination. Hevo can transfer data to the GCS buckets only if they are in the same location as the dataset, except when the datasets are in the US multi-region. Read Location considerations for further details about the requirements to transfer data from GCS buckets to BigQuery tables. Buckets are basic units of storage in GCS, and they hold your data until the time Hevo loads it into your BigQuery tables.
Note: For a select range of Sources, Hevo provides a pre-configured and fully managed Google BigQuery data warehouse Destination. Read Hevo Managed Google BigQuery.
Roles and permissions
Hevo requires that the following predefined roles are assigned to the connecting Google account for the configured GCP project, to enable Hevo to read and write data from and to BigQuery and the GCS buckets.
| Roles |
Description |
| BigQuery |
|
| BigQuery Data Editor |
Grants Hevo permission to:
- Create new datasets in the project.
- Read a dataset’s metadata and list the tables in the dataset.
- Create, update, get, and delete tables and views from a dataset.
- Read and update data and metadata for the tables and views in a dataset. |
| BigQuery Job User |
Grants Hevo permission to perform actions such as loading data, exporting data, copying data, and querying data in a project. |
| Google Cloud Storage |
|
| Storage Admin |
Grants Hevo permission to list, create, view, and delete:
- Objects in GCS buckets.
- GCS buckets. |
If you do not want to assign the Storage Admin role, you can create a custom role at the project or organization level, add the following permissions, and assign this role to the connecting Google account, to grant Hevo access to GCS resources:
-
resourcemanager.projects.get
-
storage.buckets.create
-
storage.buckets.delete
-
storage.buckets.get
-
storage.buckets.list
-
storage.buckets.update
-
storage.multipartUploads.abort
-
storage.multipartUploads.create
-
storage.multipartUploads.list
-
storage.multipartUploads.listParts
-
storage.objects.create
-
storage.objects.delete
-
storage.objects.get
-
storage.objects.list
-
storage.objects.update
Note: Hevo uses its GCS bucket if the connecting Google account is not assigned the Storage Admin role or a custom role.
Google account authentication
You can connect to your BigQuery Destination with a user account (OAuth) or a service account. One service account can be mapped to your entire team. You must provide the required roles to both types of accounts for accessing GCP-hosted services such as BigQuery and the GCS buckets. Read Authentication for GCP-hosted Services to know how to assign these roles to your user account and service account.
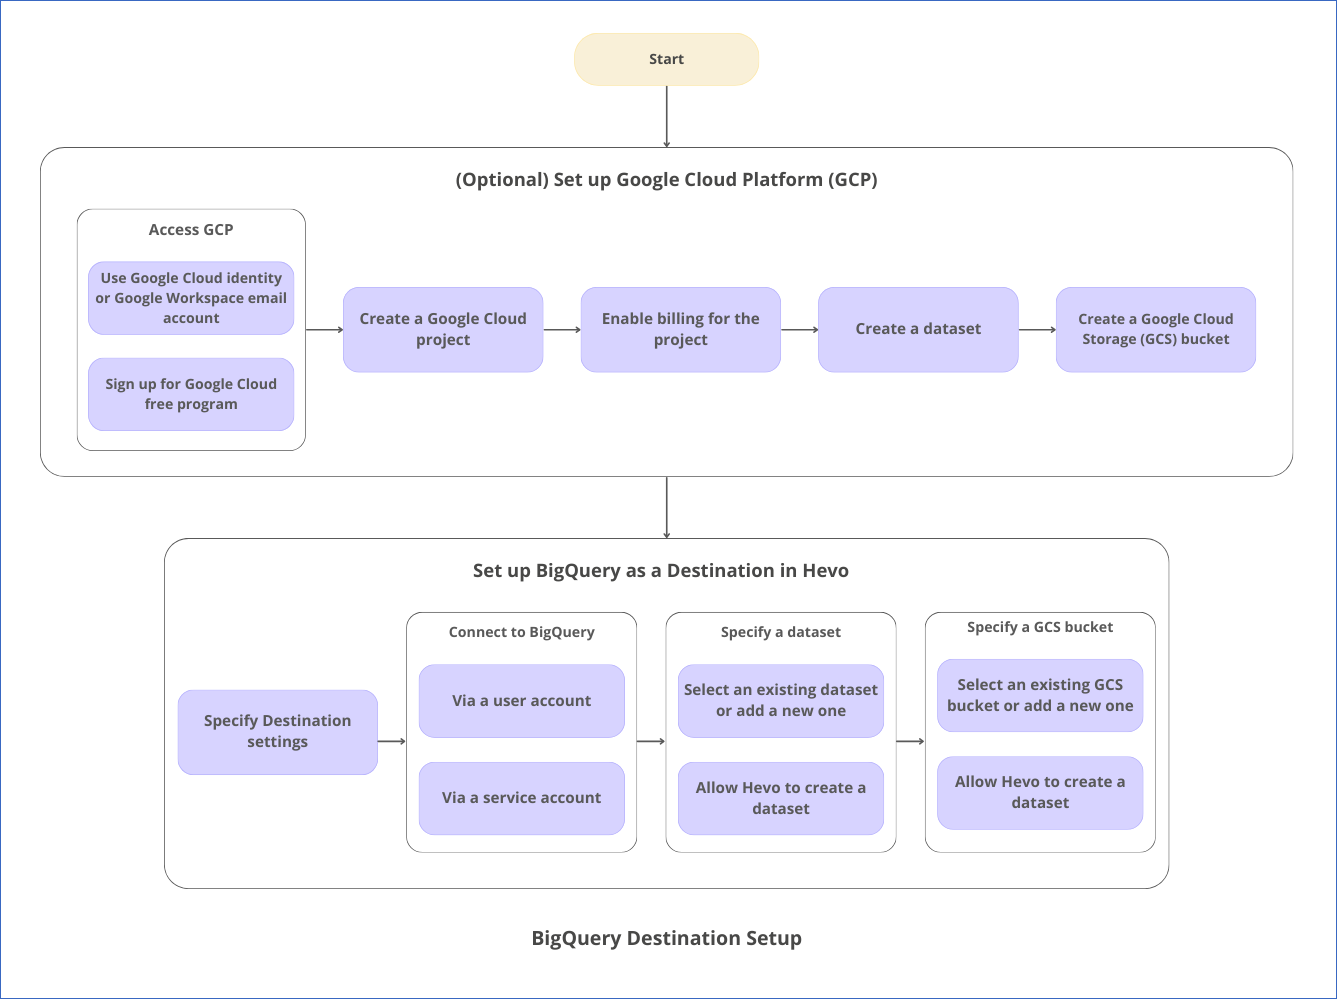
The following image illustrates the key steps that you need to complete to configure Google BigQuery as a Destination in Hevo:
Prerequisites
-
A GCP project is available. Refer to the section, Create a Google Cloud project for the steps, if you do not have one.
-
The essential roles for the GCP project are assigned to the connecting Google account. These roles are irrespective of having Owner or Admin roles within the project.
-
An active billing account is associated with your GCP project.
-
You are assigned the Team Collaborator, or any administrator role except the Billing Administrator role in Hevo to create the Destination.
Perform the following steps to configure your BigQuery Destination:
-
Sign in using your work email address if your organization has a Google Workspace or Cloud Identity account.
-
Sign up for the Google Cloud Free Program, which offers a 90-day, $300 Free Trial.
Note: A free trial allows you to evaluate Google Cloud products, such as BigQuery and Cloud Storage. However, to continue using Google Cloud, you must upgrade to a paid Cloud Billing account.
-
Go to cloud.google.com, and click Get started for free.
-
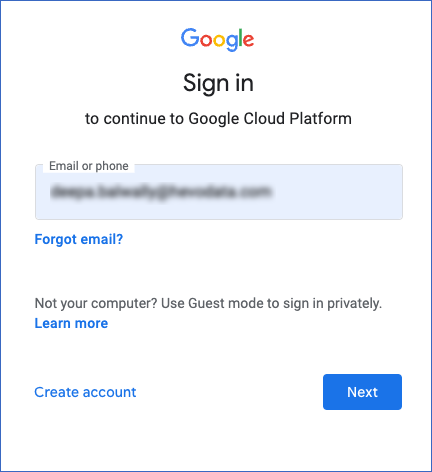
On the Sign in page, do one of the following:
-
Sign in using an existing Google account.

Note: You should not have signed up for a free trial with this Google account earlier.
-
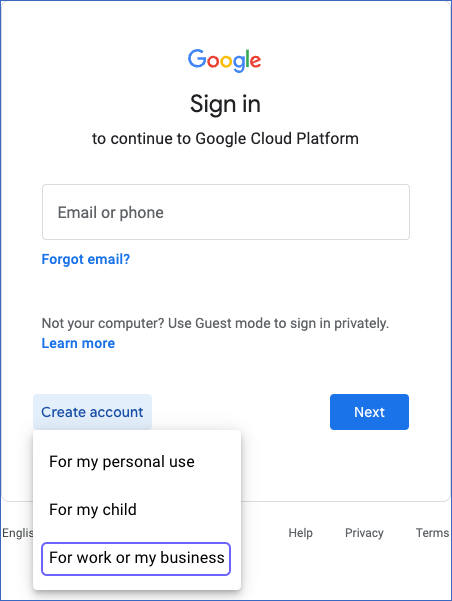
Click Create account, select a reason from the drop-down, and click Next. Here, we shall select For work or my business.
Click Get a Gmail address and complete the required steps.
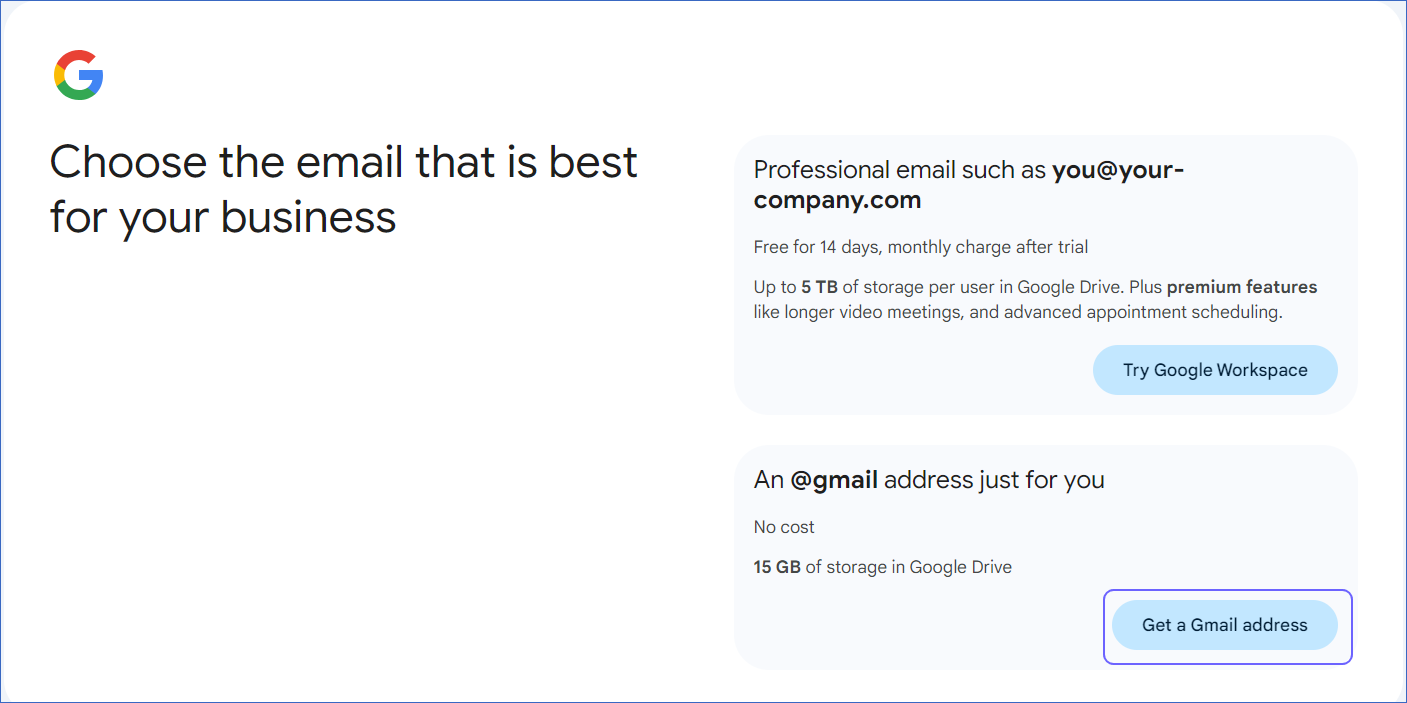
You can specify an existing email address or set up a new one at this time.
Note: You should not have signed up for a Google account with this email address.
-
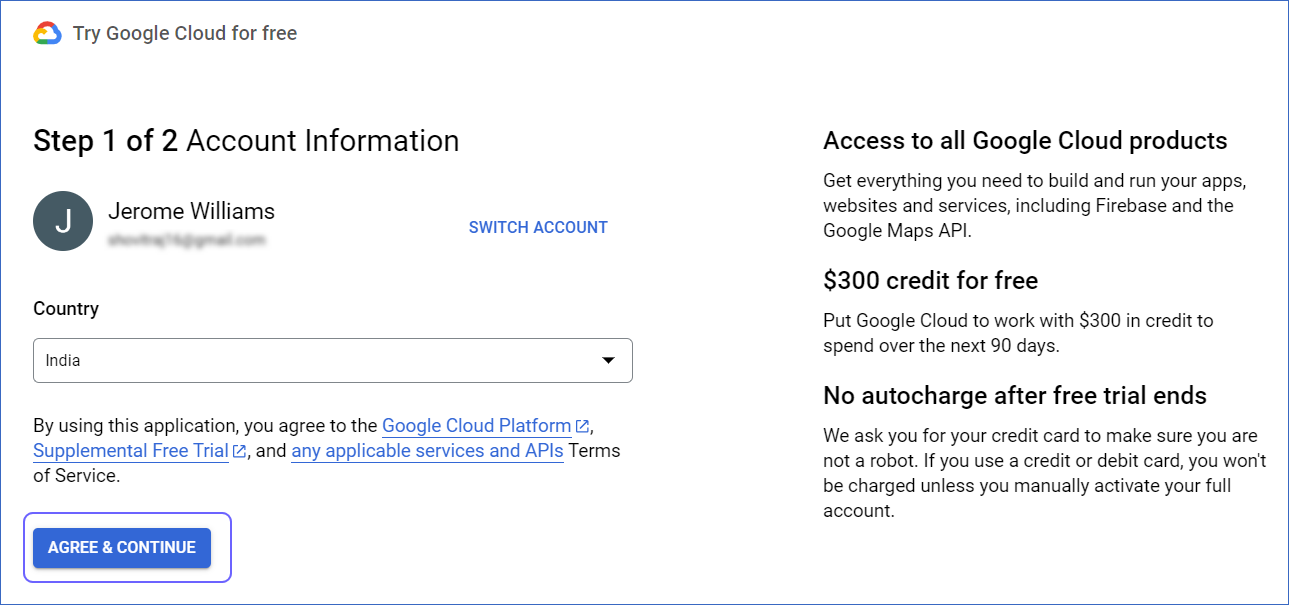
On the Account Information page, complete the form, and then click AGREE & CONTINUE.
-
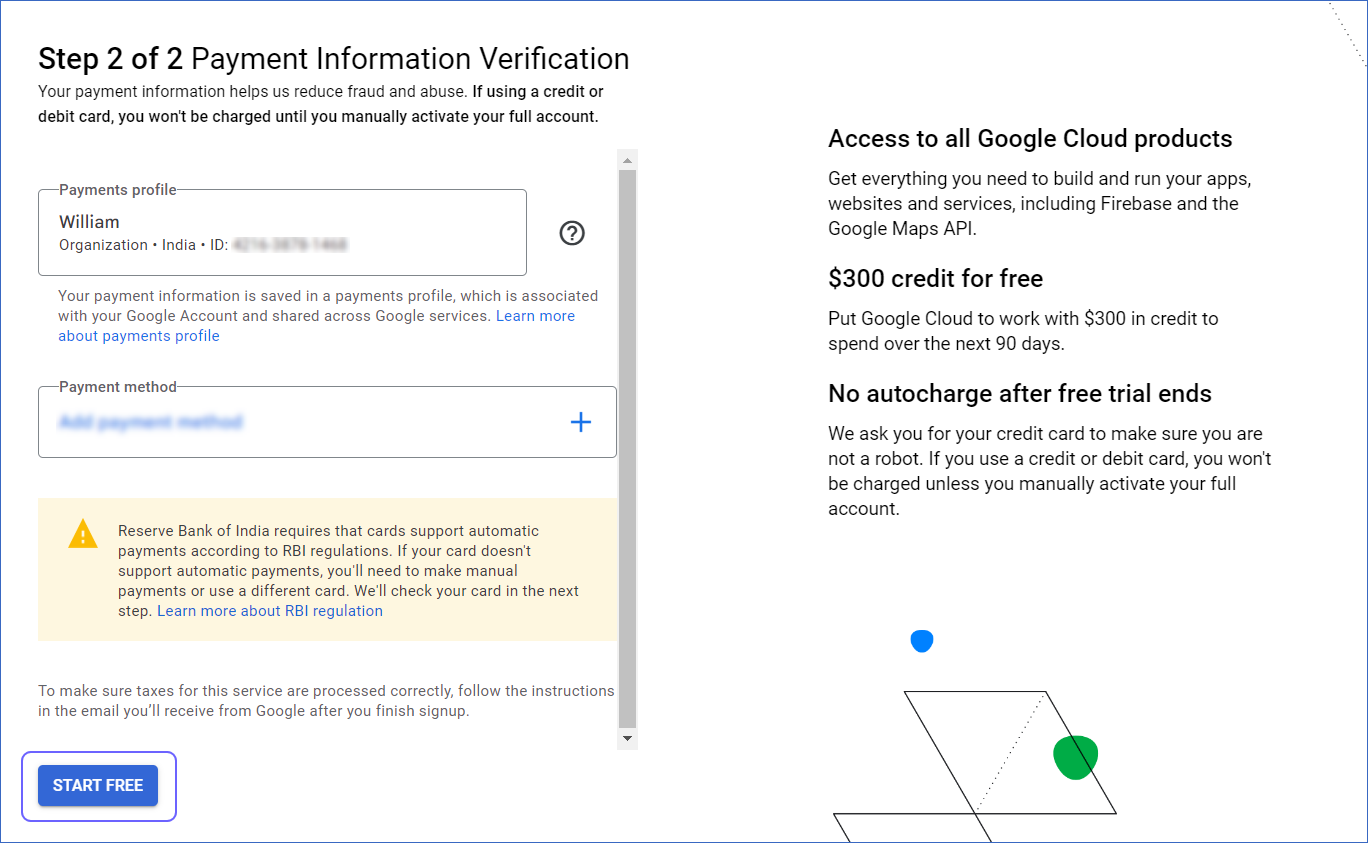
On the Payment Information Verification page, create your payment profile and click START FREE.
Google verifies the payment method through a one-time transaction to it. You should create a profile with the Organization account type if you want to allow multiple users to log in.
2. Create a Google Cloud project
Note: To create a project, you must have the resourcemanager.projects.create permission. By default, all organization resource users and free trial users are granted this permission.
-
Sign in to the Google Cloud console. You can also use the account you created in Step 1.
-
Go to the Manage Resources page, and click on + CREATE PROJECT.

-
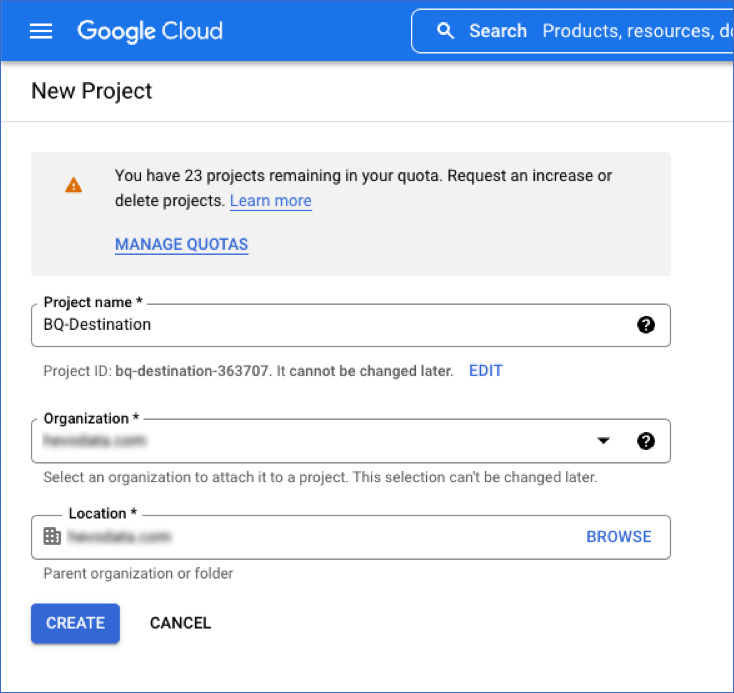
In the New Project page, specify the following, and click CREATE:
-
Project Name: A name for your project that helps you identify it.
-
Project ID: A string that uniquely identifies your project. You can keep the identifier assigned by Google Cloud or click EDIT to change it.
Note: You cannot change the project ID once the project is created.
-
Organization: Select the name of the organization resource in which you want to create the project from the drop-down list.
Note: This field is not visible if you are a free trial user.
-
Location: The parent organization or folder resource where you want to create the project. Click BROWSE to view and then select a value from the list.
You can select the created project from the drop-down while configuring BigQuery as a Source, a Destination, or an Activate Warehouse.
Note: You must enable billing on the project if you want to use this project in a Destination with streaming inserts enabled.
3. Enable billing for your Google Cloud project
Note: You can link a billing account to a Google Cloud project if you have the Organization Administrator or the Billing Account Administrator role. Skip this step if you are a free trial user as billing is enabled during the sign-up process itself.
-
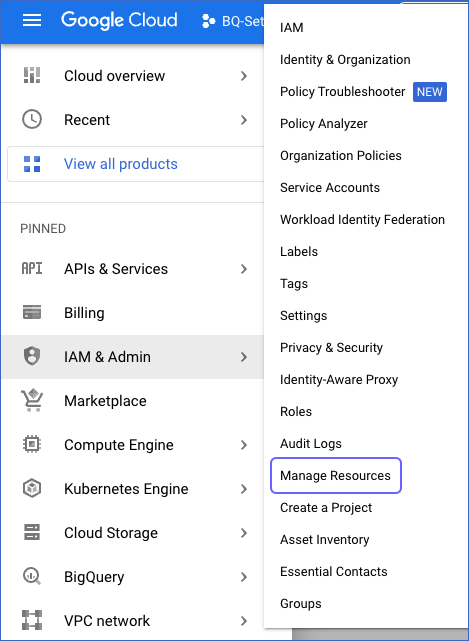
Sign in to the Google Cloud console and go to the Manage Resources page.
-
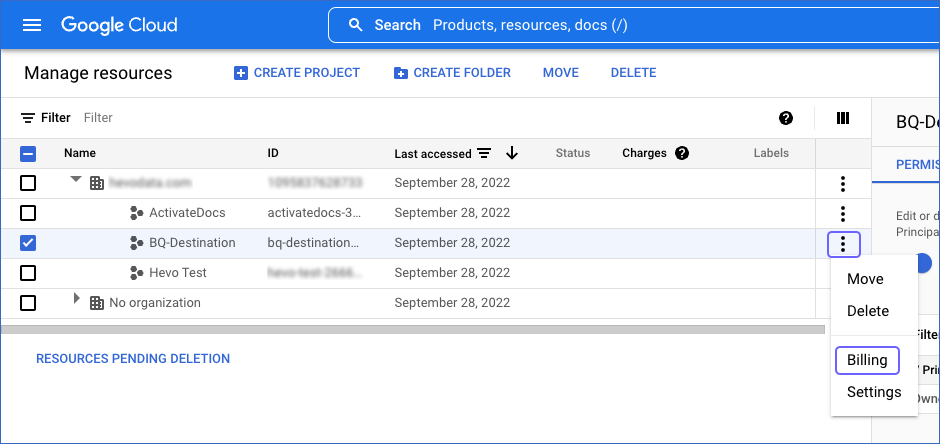
In the Manage Resources page, click the More ( ) icon next to the project, and select Billing.
-
In the Billing page, click on LINK A BILLING ACCOUNT. If there are no active billing accounts associated with your organization, you need to create one. Read Create a new Cloud Billing account for the steps.

-
In the displayed pop-up window, select a billing account from the drop-down, and click SET ACCOUNT.
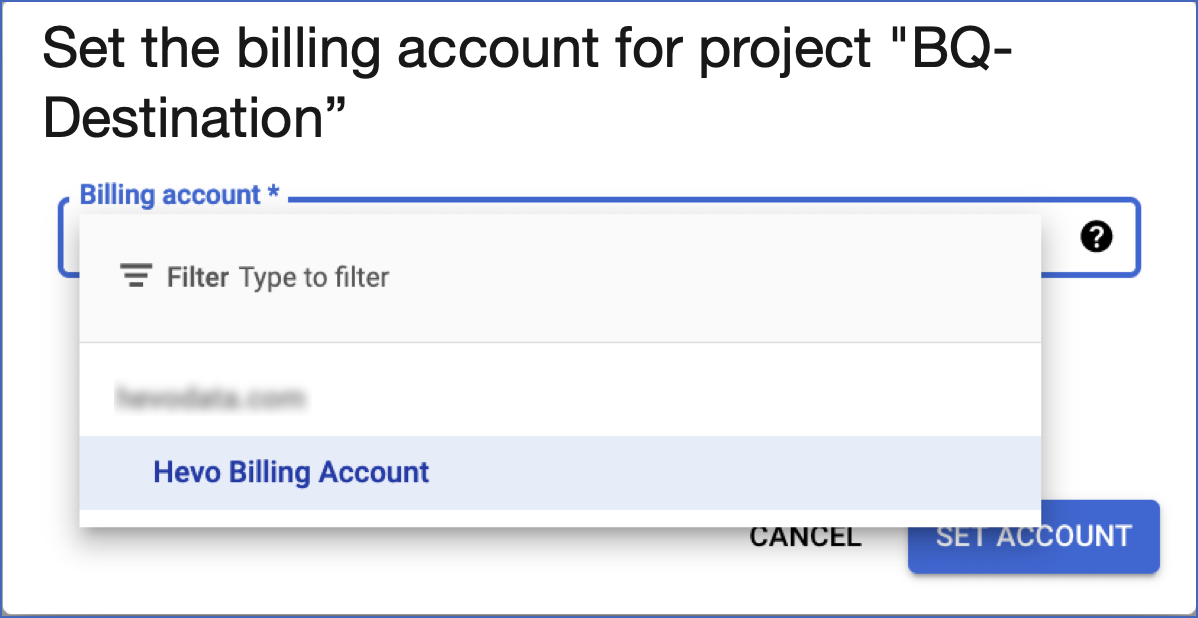
You now have an active billing account associated with your GCP project.
4. Create a dataset in your GCP project (Optional)
Note: You must have the BigQuery Admin role to create a dataset. You can create the dataset now or have Hevo create it for you while configuring BigQuery as a Destination. Hevo creates a dataset in the location of your existing GCS bucket or the region of your Hevo account if a GCS bucket does not exist.
-
Sign in to the Google Cloud console and go to the BigQuery page.
-
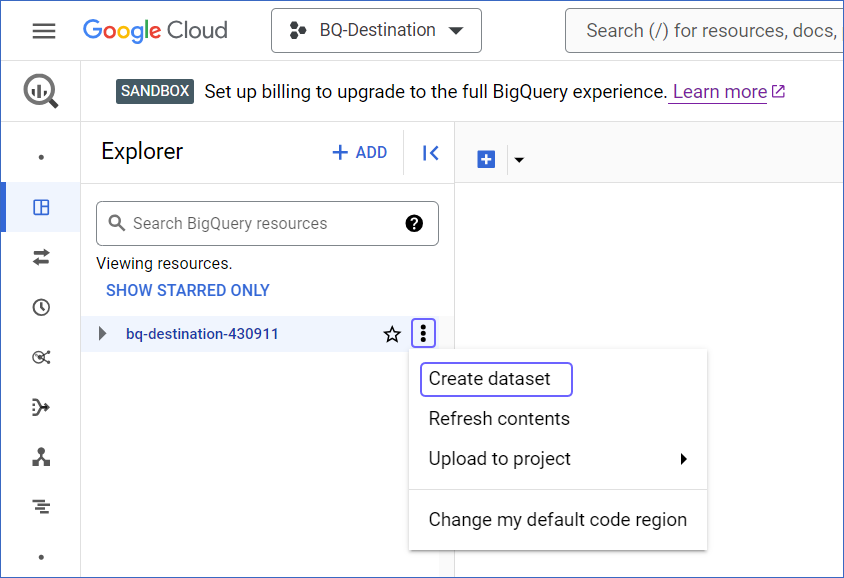
In the Explorer pane, select the project where you want to create the dataset.
-
Click the More ( ) icon, and click Create dataset.
-
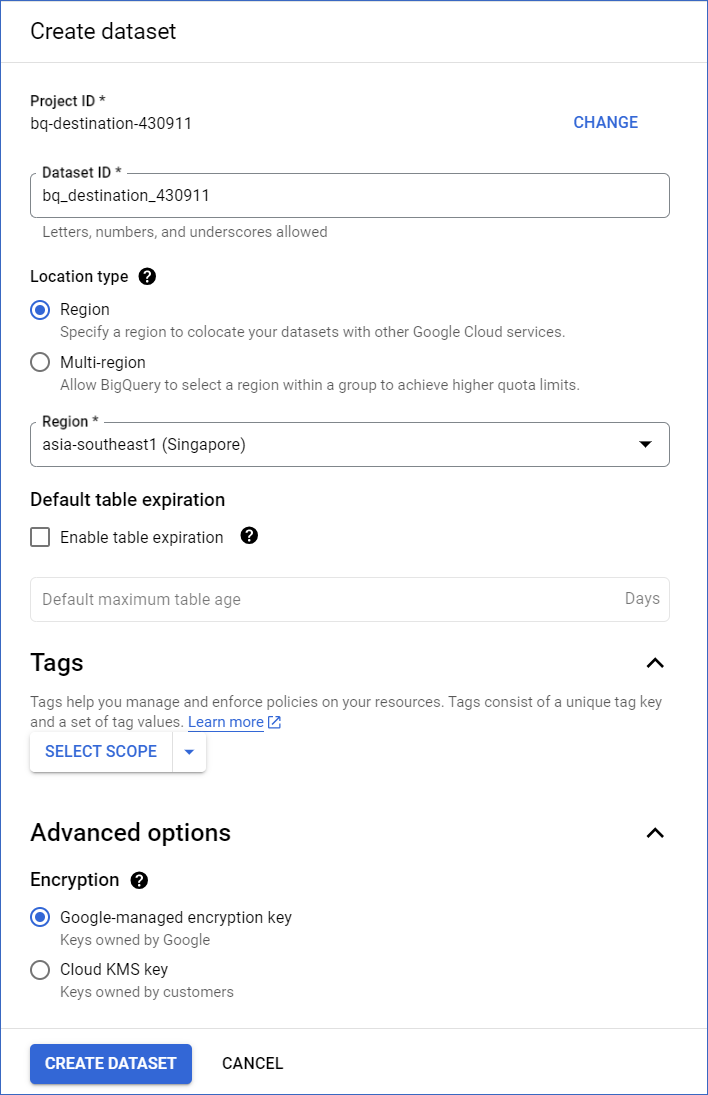
On the Create dataset page, specify the following:
-
Project ID: This field is pre-filled with the ID of the project that you selected earlier. Click CHANGE if you want to select a different project.
-
Dataset ID: A unique name for your dataset containing letters (uppercase or lowercase), numbers, and underscores, not exceeding 1024 characters. For example, bq_destination_363 in the image above.
-
Data location: The geographical location where you want to create the dataset to store your BigQuery data. For example, asia-southeast1 (Singapore) in the image above.
Note: You cannot change the dataset’s location once the dataset is created.
-
Default table expiration: The number of days after which BigQuery deletes any table created in the dataset if you select the Enable table expiration check box. Default value: Never.
Note: If the project containing the dataset is not associated with a billing account, BigQuery sets this value to 60 days.
You can select the created dataset from the drop-down while configuring BigQuery as a Source, a Destination, or an Activate Warehouse.
5. Create a Google Cloud Storage bucket (Optional)
Note: You can perform the following steps only if you have the Storage Admin role and your GCP project is associated with a billing account. You can create a GCS bucket now or have Hevo create it for you while configuring BigQuery as a Destination. Hevo creates a GCS bucket in the location of your existing dataset or the region of your Hevo account if a dataset does not exist.
-
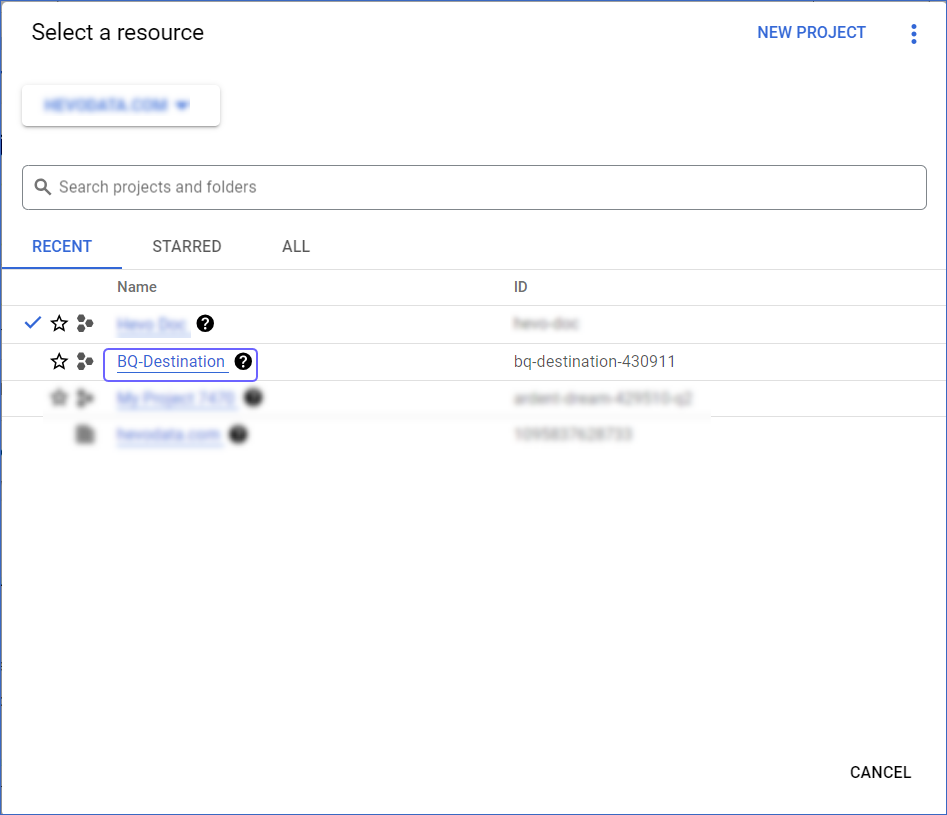
Sign in to the Google Cloud console, go to the Dashboard page, and click the Select from ( ) icon at the top of the page.

-
In the window that appears, select the project for which you want to create the storage bucket.
-
Go to the Cloud Storage Buckets page and click on + CREATE.

-
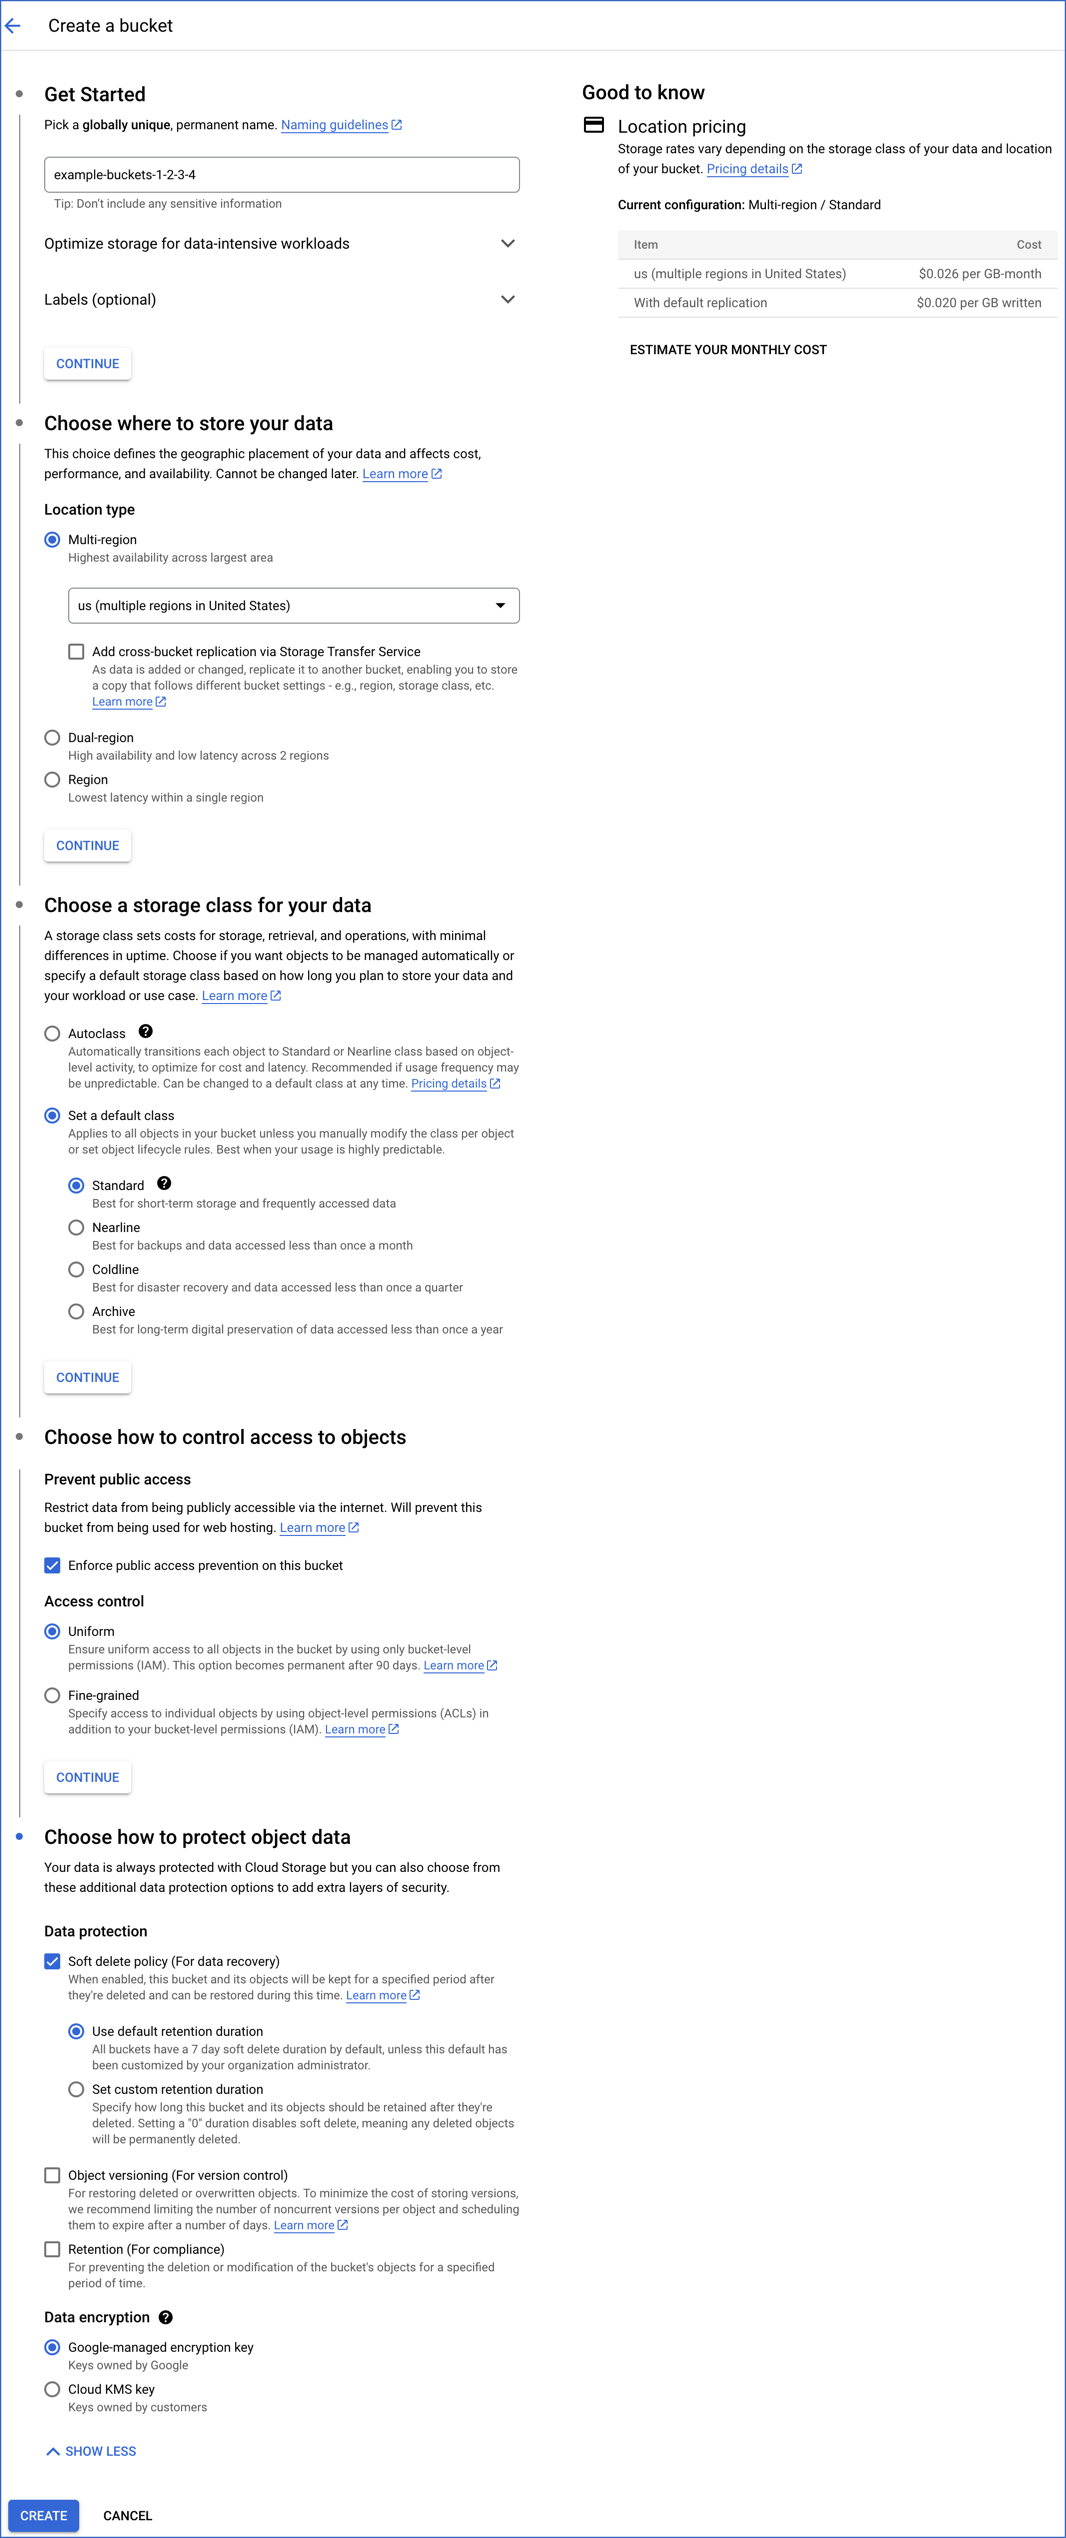
On the Create a bucket page, specify the details in each section and click CONTINUE to move to the next step:
-
Name your bucket: A globally unique name for your bucket, which follows Google’s Bucket naming guidelines.
-
Choose where to store your data: The location type and the geographical location in which the bucket’s data is stored.
-
Multi-region: A geographical area containing more than two regions, such as the United States or Asia. You should select this location type when you need higher availability of data, lower downtime because of geo-redundancy, or when your customers are spread over a large geographical area.
-
Dual-region: A geographical area containing a specific pair of regions, such as Singapore and Taiwan in Asia. You should select this location type for higher availability of data than a regional location. The charges incurred to store data are the highest for this location type.
-
Region: A specific geographical location, such as Mumbai. You should select this location type for storing data that needs to be available faster in your BigQuery Destination.
Select the geographical location from the drop-down list displayed for your location type. This location must be the same as the data location of your dataset. Read Location considerations for further details on the requirements.
Note: You cannot change the bucket’s location once the bucket is created.
-
Choose a default storage class for your data: A parameter that affects the bucket’s data availability. The storage class is assigned by default to all objects uploaded to the bucket and also affects the bucket’s monthly costs for data storage and retrieval. Read Data storage pricing for a comparison of the storage costs.
-
Standard: This storage class is most suitable for storing data that must be highly available and/or is stored for only short periods of time. For example, data accessed around the world, streaming videos, or data used in data-intensive computations.
-
Nearline: This storage class is suitable for storing data read or modified once a month or less. For example, data accumulated over a month and accessed once to generate monthly reports.
-
Coldline: This storage class is ideal for storing data accessed at least once in 90 days. For example, a backup of an organization’s essential data taken every quarter for disaster recovery.
-
Archive: This storage class is appropriate for storing data accessed once a year or less. For example, the digitalization of data stored in physical files or data stored for legal or regulatory reasons.
-
Choose how to control access to objects: An option to restrict the visibility and accessibility of your data:
-
Prevent public access: Select the Enforce public access prevention check box if you want to restrict public access to your data via the internet.
-
Access control: Controls the access and access level to your bucket and its data:
-
Uniform: This option ensures the same level of access to all the objects in the bucket. If you want to change this setting to fine-grained, you should do it within 90 days.
-
Fine-grained: This option enables access control on individual objects (object-level) in addition to bucket-level permissions. This option is disabled for all Cloud Storage resources in the bucket if you grant Uniform access control.
-
Choose how to protect object data: An option to provide additional protection and encryption to prevent the loss of data in your bucket. You can choose a Protection tool from one of the following:
-
Soft delete policy (For data recovery): This option allows you to retain deleted objects for a default duration of 7 days, during which you can restore them. You can customize this retention period or disable soft delete by setting the duration to 0. When disabled, deleted objects are permanently removed.
Note: Hevo uses GCS buckets only to temporarily stage data before loading it into your BigQuery Destination, and enabling or disabling soft delete does not affect this action.
-
Object versioning (For version control): This option allows you to retain multiple versions of an object, enabling recovery of previous versions if needed. However, as BigQuery does not support Cloud Storage object versioning, do not select this option while creating a bucket for Hevo.
-
Retention (For compliance): This option allows you to set a retention period on the bucket, which does not allow an object to be deleted or replaced until the time specified by the retention period elapses. If this value is set too low, the data in the bucket may get deleted before it is loaded to the BigQuery Destination.
-
Click CREATE.
You can select the created GCS bucket from the drop-down while configuring BigQuery as a Destination.
You can modify only some of the settings that you provide here once the Destination is created. Refer to section Modifying BigQuery Destination Configuration.
-
Click DESTINATIONS in the Navigation Bar.
-
Click + CREATE DESTINATION in the Destinations List View.
-
On the Add Destination page select Google BigQuery as the Destination type.
-
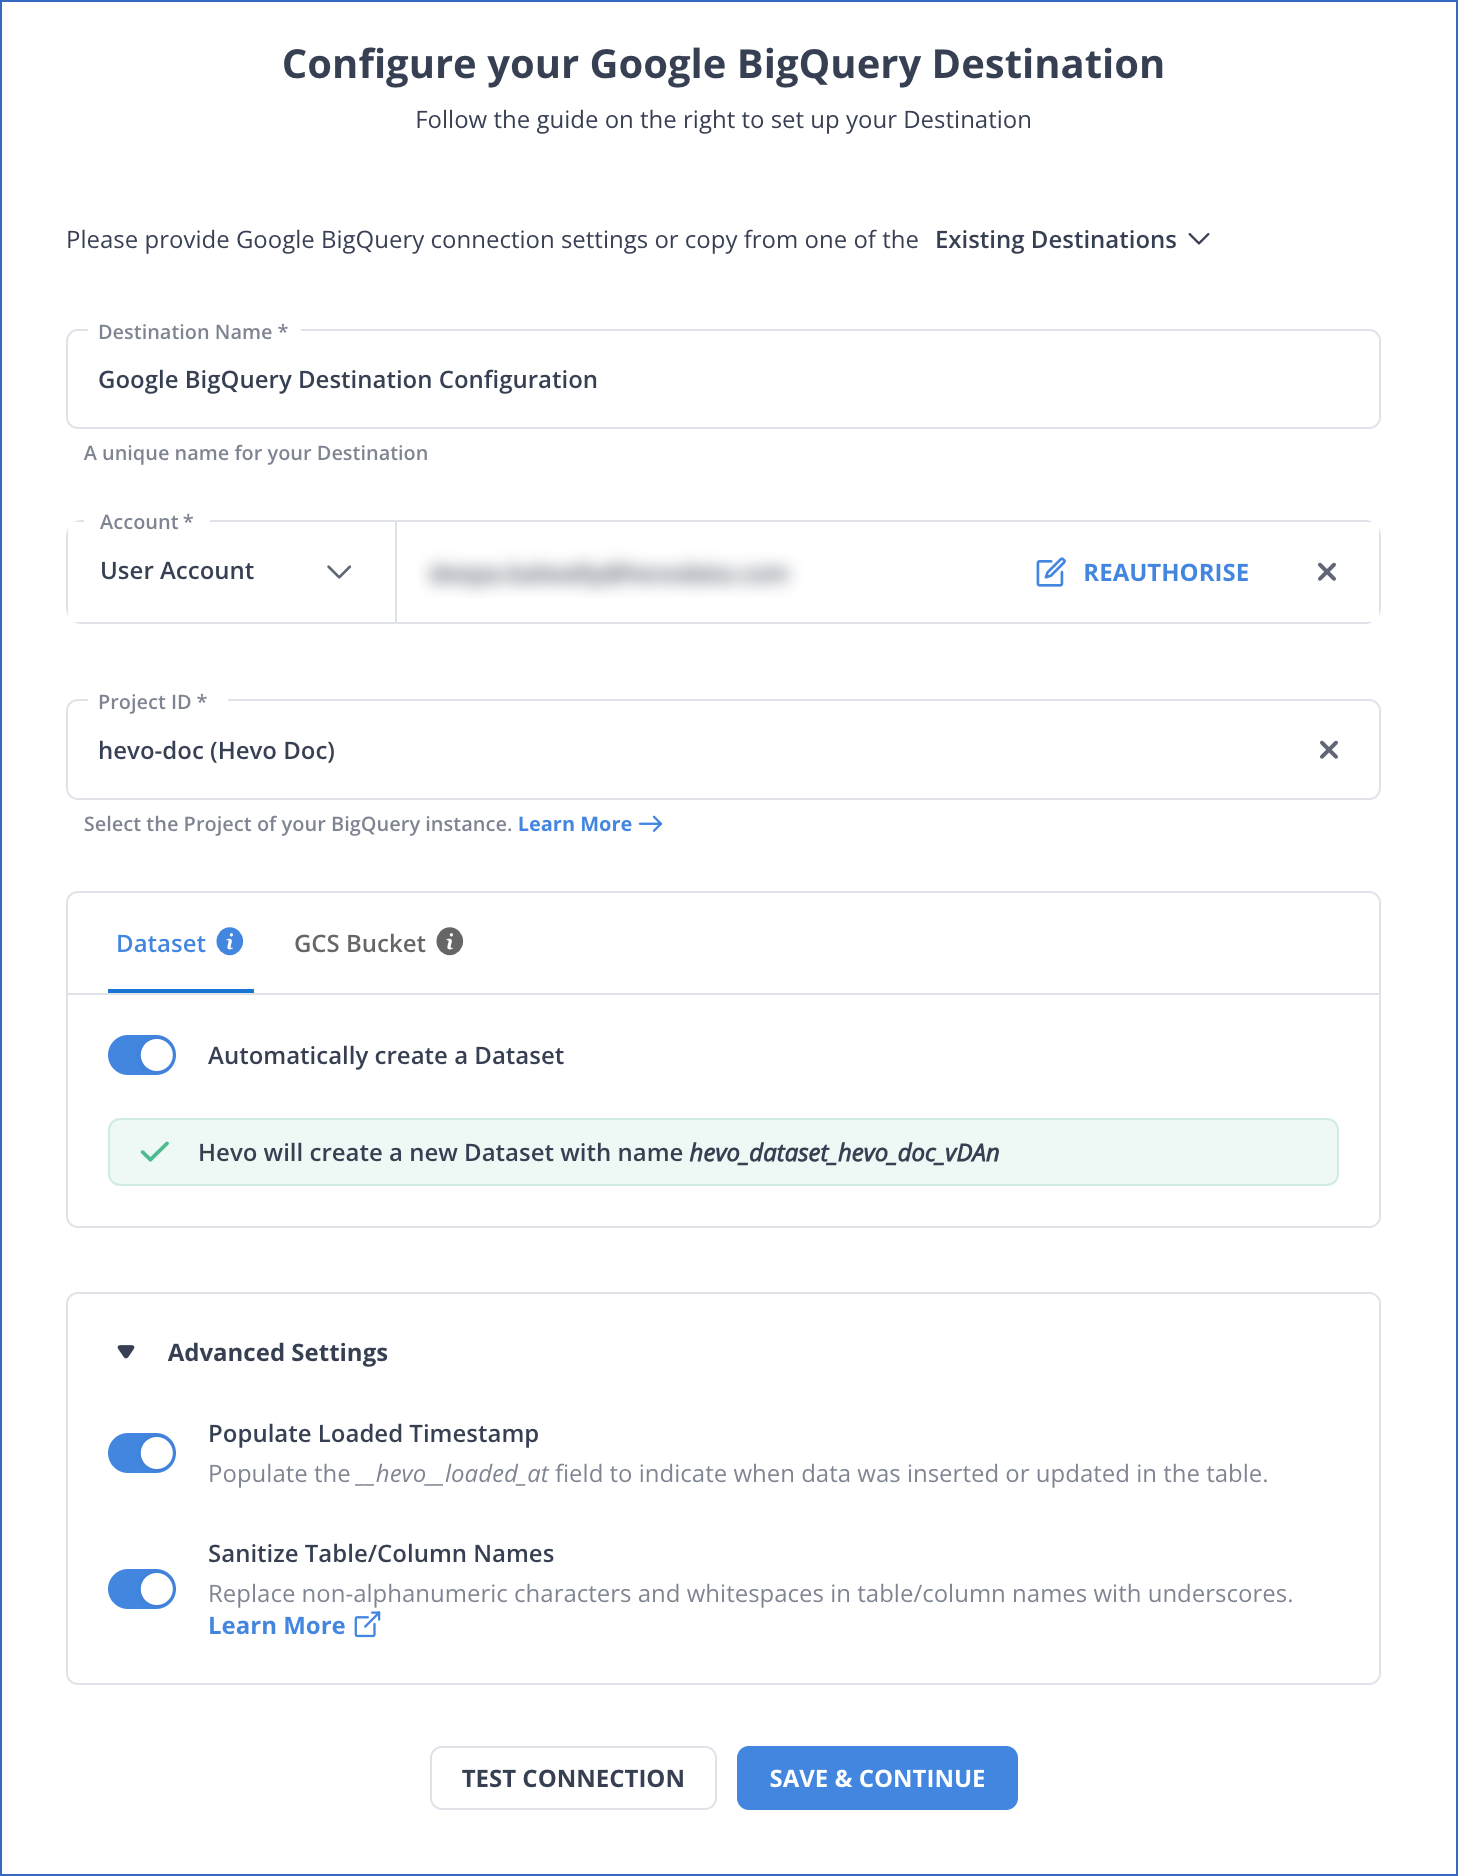
On the Configure your Google BigQuery Destination page, specify the following details:
-
Destination Name: A unique name for your Destination, not exceeding 255 characters.
-
Account: The type of account for authenticating and connecting to BigQuery.
Note: You cannot switch between account types once you have created the Pipeline.
-
To connect with a service account, attach the Service Account Key JSON file that you created in GCP.
-
To connect with a user account:
-
Click + ADD GOOGLE BIGQUERY ACCOUNT.
-
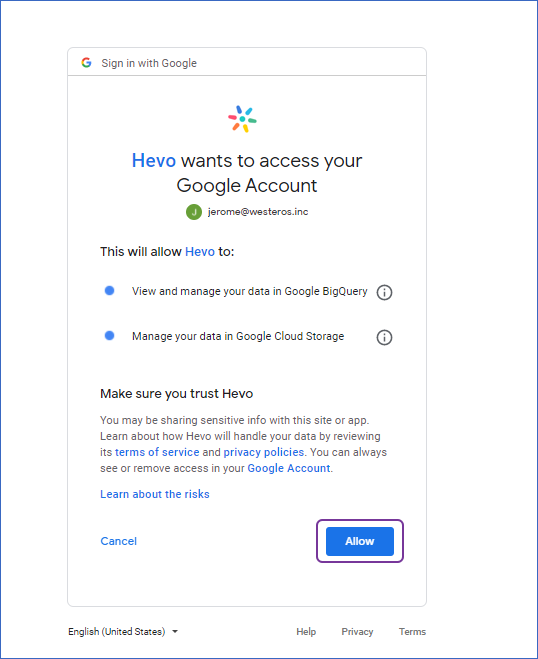
Sign in to your account, and click Allow to authorize Hevo to access your data.
-
Project ID: Select the project ID of your BigQuery instance.
-
Dataset:
You can allow Hevo to create a dataset for you, or manually choose from the list of available datasets for your project ID.
-
Automatically Create a Dataset:

If enabled, Hevo checks if you have the required permissions to create a dataset.
On a successful check, Hevo automatically creates a dataset with the name hevo_dataset_<Project_ID>. For example, let us suppose that you have a Project with its ID as westeros-153019. Then, Hevo creates a dataset with the name hevo_dataset_westeros_153019.
On an unsuccessful check, Hevo warns you about the insufficient permissions. At that time, you must grant the required permissions from the GCP console. Read Modifying roles for an existing user account or Assigning roles to a Google service account for steps to do this. After granting the permissions, click Check Again on the Hevo UI.

If disabled, you can select your desired dataset from the Dataset drop-down or choose to create one by clicking + New Dataset. Specify a name for your dataset and click ( ). Hevo creates the dataset for you.

-
GCS Bucket:
You can allow Hevo to create a bucket for you, or manually choose from the list of available buckets for your project ID.
-
Automatically create GCS Bucket:

If enabled, Hevo checks if you have the required permissions to create a GCS bucket.
On a successful check, Hevo automatically creates a bucket with the name hevo_bucket_<Project_ID>. For example, let us suppose that you have Project ID as westeros-153019. Then, Hevo creates a bucket with the name hevo_bucket_westeros_153019.
On an unsuccessful check, Hevo warns you about the insufficient permissions. At that time, you must grant the required permissions from the GCP Console. Read Modifying roles for an existing user account or Assigning roles to a Google service account for steps to do this. After granting the permissions, click Check Again on the Hevo UI.
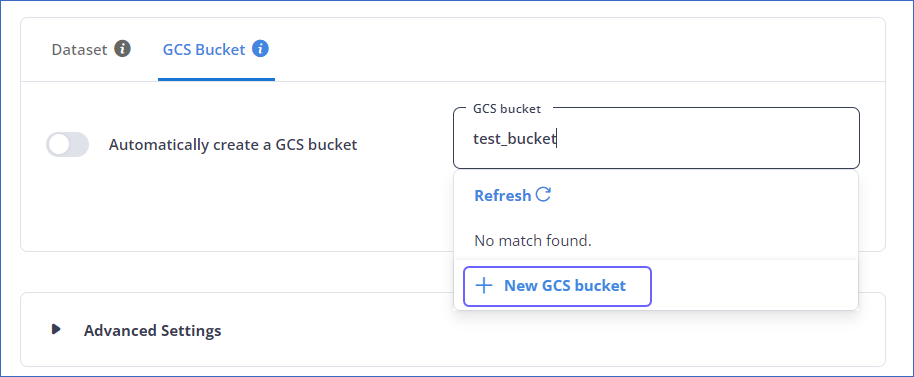
If disabled, you can select your desired bucket from the GCS Bucket drop-down or choose to create one by clicking + New GCS Bucket. Specify a name for the GCS Bucket and click ( ). Hevo creates the bucket for you.
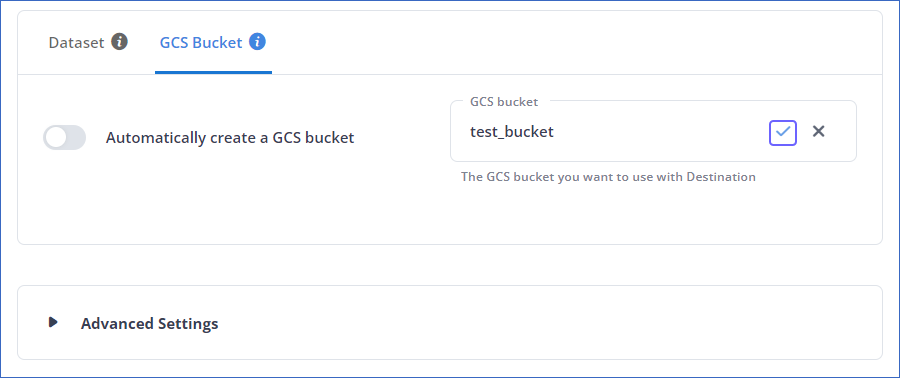
-
Advanced Settings:
-
Populate Loaded Timestamp: Enable this option to append the ___hevo_loaded_at_ column to the Destination table to indicate the time when the Event was loaded to the Destination.
-
Sanitize Table/Column Names: Enable this option to remove all non-alphanumeric characters and spaces in between the table and column names, and replace them with an underscore (_). Read Name Sanitization.
Note: This setting cannot be modified later.
Read Loading Data to a Data Warehouse.
-
Click TEST CONNECTION.
-
Click SAVE & CONTINUE.
Read the detailed Hevo documentation for the following related topics:
Handling Source Data with Different Data Types
For teams created in or after Hevo Release 1.56, Hevo automatically modifies the data type of Google BigQuery table columns to accommodate Source data with different data types. Data type promotion is performed on tables whose size is less than 50 GB. Read Handling Different Data Types in Source Data.
Note: Your Hevo release version is mentioned at the bottom of the Navigation Bar.
Handling JSON Fields
Read Parsing Nested JSON Fields in Events to know how Hevo parses the JSON data and makes it available at the Destination. Because BigQuery has built-in support for nested and repeated columns, JSON data is neither split nor compressed, but based on the Source type, arrays may be collapsed into JSON strings or passed as-is to the Destination. Read JSON functions in Standard SQL to know about parsing JSON strings back to arrays.
The fields of a JSON object are shown as a struct (for RECORD) or an array (mode: REPEATED) in the Schema Mapper. The nested fields are not editable.
Modifying BigQuery Destination Configuration
You can modify some of the settings post creation of the BigQuery Destination. However, changing any configuration would affect all the Pipelines that are using this Destination. Refer to section, Potential Impacts of Modifying the Configuration Settings to know the impacts.
To modify the BigQuery Destination configuration:
-
Navigate to the Destination Detailed View.
-
Do one of the following:
-
Click the Settings icon next to the Destination name and then, click the Edit icon.

-
Click the kebab menu on the right and click Edit.
-
Update the required field values in the Edit Google BigQuery Destination connection settings page. You can modify the following settings:
-
Click SAVE DESTINATION.
Potential impacts of modifying the configuration settings
-
Changing any configuration setting impacts all Pipelines using the Destination.
-
Changing the Project ID or Dataset ID may lead to data getting split between the old and the new Dataset. This is because the Events in the old Dataset are not copied to the new one. Further, new tables for all the existing Pipelines that are using this Destination are created in the new Dataset.
-
Changing the Bucket ID may lead to Events getting lost. The Events not yet copied from the old bucket are not copied to the Dataset.
Destination Considerations
-
Hevo supports loading Events in Geometry formats (such as Point, LineString, Polygon, MultiPoint, MultiLineString, MultiPolygon, and GeometryCollection). However, if you are loading any latitude values to your BigQuery Destination, these values must lie within -90 and +90, as that is the range that BigQuery supports. If the data lies outside this range, you can either change the data type in the Source or create a Transformation to change the data type to varchar.
-
Google BigQuery sets a fixed session duration for user accounts to enhance security. This allows Administrators to control how long users can access the BigQuery Destination before re-authentication is required. Once the session expires, you must re-authenticate the Destination to avoid ingestion failures or interruptions in data loading.
To avoid the need for frequent re-authentication, you can add Hevo as a trusted app in Google Workspace and configure to exempt trusted apps from re-authentication.
Note: Administrator access is required to add Hevo as a trusted app in Google Workspace.
Limitations
-
Hevo currently does not map arrays of type struct in the Source data to arrays of type struct in the BigQuery Destination. Instead, any struct arrays in the Source are mapped as varchar arrays. If needed, you can parse these varchar arrays in the Destination to change them back to struct. Read Strategy: Replicate JSON structure as is while collapsing arrays into strings.
-
Hevo replicates a maximum of 4096 columns to each BigQuery table, of which six are Hevo-reserved metadata columns used during data replication. Therefore, your Pipeline can replicate up to 4090 (4096-6) columns for each table. Read Limits on the Number of Destination Columns.
To circumvent this limitation, you can use Transformations to remove the columns you do not need.
Revision History
Refer to the following table for the list of key updates made to this page:
| Date |
Release |
Description of Change |
| Jun-26-2025 |
NA |
Updated section, Destination Considerations to add information about session length in Google BigQuery. |
| Mar-20-2025 |
NA |
Updated section Create a Google Cloud Storage bucket with information about soft delete policy. |
| Aug-13-2024 |
NA |
Updated sections, Set up the Google Cloud Platform (Optional) and Configure Google BigQuery as a Destination as per the latest Google BigQuery and Hevo UI. |
| Feb-05-2023 |
2.20 |
- Added a warning container at the top of the page to mention about removing support for streaming inserts.
- Updated section, Configure Google BigQuery as a Destination to remove information about streaming inserts. |
| Nov-06-2023 |
NA |
Merged the content of subsections, Organization of data in BigQuery and Data partitioning and clustering to Structure of Data in the Google BigQuery Data Warehouse page. |
| Sep-21-2023 |
NA |
Added section, Destination Considerations. |
| Aug-11-2023 |
NA |
Added limitation about the number of columns supported by Hevo in BigQuery tables. |
| Jul-25-2023 |
NA |
Added the process flow diagram in the page overview section. |
| Jun-19-2023 |
NA |
Updated sections, Create a Google Cloud project and Configure Google BigQuery as a Destination to add information about enabling billing on the project to use streaming inserts. |
| Mar-09-2023 |
NA |
Updated section, Configuring Google BigQuery as a Destination to add a note about switching your authentication method post-Pipeline creation. |
| Dec-20-2022 |
NA |
- Added content in the Roles and Permissions section to explain the permissions needed by Hevo.
- Updated the Prerequisites section to remove BigQuery Admin and Storage Admin roles requirement. |
| Nov-08-2022 |
2.01 |
Updated screenshot in the Configure Google BigQuery as a Destination section to reflect the latest UI. |
| Oct-17-2022 |
NA |
- Added the Set up the Google Cloud Platform section to help set up GCP.
- Modified the Prerequisites to add the requirement of an existing GCP project. |
| Aug-24-2022 |
NA |
Updated section, Limitations to add the limitation regarding Hevo not mapping arrays of type struct in the Source to arrays of type struct in the BigQuery Destination. |
| Apr-27-2022 |
NA |
- Removed sections, Retrieve the Project ID, Get your Dataset ID and Location, and Get your GCS Bucket and Bucket Location.
- Updated section, Configure Google BigQuery as a Destination. |
| Apr-11-2022 |
NA |
Updated screenshot in the Configure Google BigQuery as a Destination section to reflect the latest UI. |
| Aug-09-2021 |
1.69 |
Updated the section, Handling JSON Fields. |
| May-19-2021 |
NA |
Added the section Modifying BigQuery Destination Configuration. |
| Apr-20-2021 |
1.61 |
- Updated the page overview section and added sub-section User Authentication.
- Updated section Configure Google BigQuery as a Destination to include the option to connect to BigQuery using service accounts.
- Moved the section Assign BigQuery Admin and Storage Admin Roles to the User to Google Account Authentication Methods. |
| Apr-06-2021 |
1.60 |
Updated the overview to inform customers when to use clustering over partitioning and vice versa. |
| Feb-22-2021 |
1.57 |
Added the Enable Streaming Writes setting in Step 7 of section Configure Google BigQuery as a Destination. |
| Feb-11-2021 |
NA |
Updated the page overview to inform customers that the files written to GCS are deleted after seven days to free up their Google Cloud storage. |


 ). Hevo creates the dataset for you.


