- Introduction
- Getting Started
- Creating an Account in Hevo
- Subscribing to Hevo via AWS Marketplace
- Connection Options
- Familiarizing with the UI
- Creating your First Pipeline
- Data Loss Prevention and Recovery
- Data Ingestion
- Data Loading
- Loading Data in a Database Destination
- Loading Data to a Data Warehouse
- Optimizing Data Loading for a Destination Warehouse
- Deduplicating Data in a Data Warehouse Destination
- Manually Triggering the Loading of Events
- Scheduling Data Load for a Destination
- Loading Events in Batches
- Data Loading Statuses
- Data Spike Alerts
- Name Sanitization
- Table and Column Name Compression
- Parsing Nested JSON Fields in Events
- Pipelines
- Data Flow in a Pipeline
- Familiarizing with the Pipelines UI
- Working with Pipelines
- Managing Objects in Pipelines
- Pipeline Jobs
-
Transformations
-
Python Code-Based Transformations
- Supported Python Modules and Functions
-
Transformation Methods in the Event Class
- Create an Event
- Retrieve the Event Name
- Rename an Event
- Retrieve the Properties of an Event
- Modify the Properties for an Event
- Fetch the Primary Keys of an Event
- Modify the Primary Keys of an Event
- Fetch the Data Type of a Field
- Check if the Field is a String
- Check if the Field is a Number
- Check if the Field is Boolean
- Check if the Field is a Date
- Check if the Field is a Time Value
- Check if the Field is a Timestamp
-
TimeUtils
- Convert Date String to Required Format
- Convert Date to Required Format
- Convert Datetime String to Required Format
- Convert Epoch Time to a Date
- Convert Epoch Time to a Datetime
- Convert Epoch to Required Format
- Convert Epoch to a Time
- Get Time Difference
- Parse Date String to Date
- Parse Date String to Datetime Format
- Parse Date String to Time
- Utils
- Examples of Python Code-based Transformations
-
Drag and Drop Transformations
- Special Keywords
-
Transformation Blocks and Properties
- Add a Field
- Change Datetime Field Values
- Change Field Values
- Drop Events
- Drop Fields
- Find & Replace
- Flatten JSON
- Format Date to String
- Format Number to String
- Hash Fields
- If-Else
- Mask Fields
- Modify Text Casing
- Parse Date from String
- Parse JSON from String
- Parse Number from String
- Rename Events
- Rename Fields
- Round-off Decimal Fields
- Split Fields
- Examples of Drag and Drop Transformations
- Effect of Transformations on the Destination Table Structure
- Transformation Reference
- Transformation FAQs
-
Python Code-Based Transformations
-
Schema Mapper
- Using Schema Mapper
- Mapping Statuses
- Auto Mapping Event Types
- Manually Mapping Event Types
- Modifying Schema Mapping for Event Types
- Schema Mapper Actions
- Fixing Unmapped Fields
- Resolving Incompatible Schema Mappings
- Resizing String Columns in the Destination
- Changing the Data Type of a Destination Table Column
- Schema Mapper Compatibility Table
- Limits on the Number of Destination Columns
- File Log
- Troubleshooting Failed Events in a Pipeline
- Mismatch in Events Count in Source and Destination
- Audit Tables
- Activity Log
-
Pipeline FAQs
- Can multiple Sources connect to one Destination?
- What happens if I re-create a deleted Pipeline?
- Why is there a delay in my Pipeline?
- Can I change the Destination post-Pipeline creation?
- Why is my billable Events high with Delta Timestamp mode?
- Can I drop multiple Destination tables in a Pipeline at once?
- How does Run Now affect scheduled ingestion frequency?
- Will pausing some objects increase the ingestion speed?
- Can I see the historical load progress?
- Why is my Historical Load Progress still at 0%?
- Why is historical data not getting ingested?
- How do I set a field as a primary key?
- How do I ensure that records are loaded only once?
- Events Usage
- Sources
- Free Sources
-
Databases and File Systems
- Data Warehouses
-
Databases
- Connecting to a Local Database
- Amazon DocumentDB
- Amazon DynamoDB
- Elasticsearch
-
MongoDB
- Generic MongoDB
- MongoDB Atlas
- Support for Multiple Data Types for the _id Field
- Example - Merge Collections Feature
-
Troubleshooting MongoDB
-
Errors During Pipeline Creation
- Error 1001 - Incorrect credentials
- Error 1005 - Connection timeout
- Error 1006 - Invalid database hostname
- Error 1007 - SSH connection failed
- Error 1008 - Database unreachable
- Error 1011 - Insufficient access
- Error 1028 - Primary/Master host needed for OpLog
- Error 1029 - Version not supported for Change Streams
- SSL 1009 - SSL Connection Failure
- Troubleshooting MongoDB Change Streams Connection
- Troubleshooting MongoDB OpLog Connection
-
Errors During Pipeline Creation
- SQL Server
-
MySQL
- Amazon Aurora MySQL
- Amazon RDS MySQL
- Azure MySQL
- Generic MySQL
- Google Cloud MySQL
- MariaDB MySQL
-
Troubleshooting MySQL
-
Errors During Pipeline Creation
- Error 1003 - Connection to host failed
- Error 1006 - Connection to host failed
- Error 1007 - SSH connection failed
- Error 1011 - Access denied
- Error 1012 - Replication access denied
- Error 1017 - Connection to host failed
- Error 1026 - Failed to connect to database
- Error 1027 - Unsupported BinLog format
- Failed to determine binlog filename/position
- Schema 'xyz' is not tracked via bin logs
- Errors Post-Pipeline Creation
-
Errors During Pipeline Creation
- MySQL FAQs
- Oracle
-
PostgreSQL
- Amazon Aurora PostgreSQL
- Amazon RDS PostgreSQL
- Azure PostgreSQL
- Generic PostgreSQL
- Google Cloud PostgreSQL
- Heroku PostgreSQL
-
Troubleshooting PostgreSQL
-
Errors during Pipeline creation
- Error 1003 - Authentication failure
- Error 1006 - Connection settings errors
- Error 1011 - Access role issue for logical replication
- Error 1012 - Access role issue for logical replication
- Error 1014 - Database does not exist
- Error 1017 - Connection settings errors
- Error 1023 - No pg_hba.conf entry
- Error 1024 - Number of requested standby connections
- Errors Post-Pipeline Creation
-
Errors during Pipeline creation
- PostgreSQL FAQs
- Troubleshooting Database Sources
- File Storage
- Engineering Analytics
- Finance & Accounting Analytics
-
Marketing Analytics
- ActiveCampaign
- AdRoll
- Amazon Ads
- Apple Search Ads
- AppsFlyer
- CleverTap
- Criteo
- Drip
- Facebook Ads
- Facebook Page Insights
- Firebase Analytics
- Freshsales
- Google Ads
- Google Analytics
- Google Analytics 4
- Google Analytics 360
- Google Play Console
- Google Search Console
- HubSpot
- Instagram Business
- Klaviyo v2
- Lemlist
- LinkedIn Ads
- Mailchimp
- Mailshake
- Marketo
- Microsoft Ads
- Onfleet
- Outbrain
- Pardot
- Pinterest Ads
- Pipedrive
- Recharge
- Segment
- SendGrid Webhook
- SendGrid
- Salesforce Marketing Cloud
- Snapchat Ads
- SurveyMonkey
- Taboola
- TikTok Ads
- Twitter Ads
- Typeform
- YouTube Analytics
- Product Analytics
- Sales & Support Analytics
- Source FAQs
- Destinations
- Familiarizing with the Destinations UI
- Cloud Storage-Based
- Databases
-
Data Warehouses
- Amazon Redshift
- Amazon Redshift Serverless
- Azure Synapse Analytics
- Databricks
- Google BigQuery
- Hevo Managed Google BigQuery
- Snowflake
-
Destination FAQs
- Can I change the primary key in my Destination table?
- Can I change the Destination table name after creating the Pipeline?
- How can I change or delete the Destination table prefix?
- Why does my Destination have deleted Source records?
- How do I filter deleted Events from the Destination?
- Does a data load regenerate deleted Hevo metadata columns?
- How do I filter out specific fields before loading data?
- Transform
- Alerts
- Account Management
- Activate
- Glossary
Releases- Release 2.37.3 (Jun 23-30, 2025)
- Release 2.37.2 (Jun 16-23, 2025)
- Release 2.37.1 (Jun 09-16, 2025)
- Release 2.37 (May 12-Jun 09, 2025)
- 2025 Releases
-
2024 Releases
- Release 2.32 (Dec 16 2024-Jan 20, 2025)
- Release 2.31 (Nov 18-Dec 16, 2024)
- Release 2.30 (Oct 21-Nov 18, 2024)
- Release 2.29 (Sep 30-Oct 22, 2024)
- Release 2.28 (Sep 02-30, 2024)
- Release 2.27 (Aug 05-Sep 02, 2024)
- Release 2.26 (Jul 08-Aug 05, 2024)
- Release 2.25 (Jun 10-Jul 08, 2024)
- Release 2.24 (May 06-Jun 10, 2024)
- Release 2.23 (Apr 08-May 06, 2024)
- Release 2.22 (Mar 11-Apr 08, 2024)
- Release 2.21 (Feb 12-Mar 11, 2024)
- Release 2.20 (Jan 15-Feb 12, 2024)
-
2023 Releases
- Release 2.19 (Dec 04, 2023-Jan 15, 2024)
- Release Version 2.18
- Release Version 2.17
- Release Version 2.16 (with breaking changes)
- Release Version 2.15 (with breaking changes)
- Release Version 2.14
- Release Version 2.13
- Release Version 2.12
- Release Version 2.11
- Release Version 2.10
- Release Version 2.09
- Release Version 2.08
- Release Version 2.07
- Release Version 2.06
-
2022 Releases
- Release Version 2.05
- Release Version 2.04
- Release Version 2.03
- Release Version 2.02
- Release Version 2.01
- Release Version 2.00
- Release Version 1.99
- Release Version 1.98
- Release Version 1.97
- Release Version 1.96
- Release Version 1.95
- Release Version 1.93 & 1.94
- Release Version 1.92
- Release Version 1.91
- Release Version 1.90
- Release Version 1.89
- Release Version 1.88
- Release Version 1.87
- Release Version 1.86
- Release Version 1.84 & 1.85
- Release Version 1.83
- Release Version 1.82
- Release Version 1.81
- Release Version 1.80 (Jan-24-2022)
- Release Version 1.79 (Jan-03-2022)
-
2021 Releases
- Release Version 1.78 (Dec-20-2021)
- Release Version 1.77 (Dec-06-2021)
- Release Version 1.76 (Nov-22-2021)
- Release Version 1.75 (Nov-09-2021)
- Release Version 1.74 (Oct-25-2021)
- Release Version 1.73 (Oct-04-2021)
- Release Version 1.72 (Sep-20-2021)
- Release Version 1.71 (Sep-09-2021)
- Release Version 1.70 (Aug-23-2021)
- Release Version 1.69 (Aug-09-2021)
- Release Version 1.68 (Jul-26-2021)
- Release Version 1.67 (Jul-12-2021)
- Release Version 1.66 (Jun-28-2021)
- Release Version 1.65 (Jun-14-2021)
- Release Version 1.64 (Jun-01-2021)
- Release Version 1.63 (May-19-2021)
- Release Version 1.62 (May-05-2021)
- Release Version 1.61 (Apr-20-2021)
- Release Version 1.60 (Apr-06-2021)
- Release Version 1.59 (Mar-23-2021)
- Release Version 1.58 (Mar-09-2021)
- Release Version 1.57 (Feb-22-2021)
- Release Version 1.56 (Feb-09-2021)
- Release Version 1.55 (Jan-25-2021)
- Release Version 1.54 (Jan-12-2021)
-
2020 Releases
- Release Version 1.53 (Dec-22-2020)
- Release Version 1.52 (Dec-03-2020)
- Release Version 1.51 (Nov-10-2020)
- Release Version 1.50 (Oct-19-2020)
- Release Version 1.49 (Sep-28-2020)
- Release Version 1.48 (Sep-01-2020)
- Release Version 1.47 (Aug-06-2020)
- Release Version 1.46 (Jul-21-2020)
- Release Version 1.45 (Jul-02-2020)
- Release Version 1.44 (Jun-11-2020)
- Release Version 1.43 (May-15-2020)
- Release Version 1.42 (Apr-30-2020)
- Release Version 1.41 (Apr-2020)
- Release Version 1.40 (Mar-2020)
- Release Version 1.39 (Feb-2020)
- Release Version 1.38 (Jan-2020)
- Early Access New
Generic Oracle
Oracle database is a cross-platform Relational Database Management System (RDBMS) that can run on various hardware across operating systems including Windows Server, Unix, and various distributions of GNU/Linux. It is commonly referred to as Oracle database, OracleDB, or simply Oracle. The database software endorses transaction processing, business intelligence and different analytics applications, and used by both small and large enterprises to store and manage data.
Prerequisites
-
Oracle database version is 11 or above. You can retrieve the version of your Oracle database with the following command:
SELECT BANNER_FULL FROM V$VERSION WHERE BANNER_FULL LIKE 'Oracle Database%'; -
Redo Log-based replication is enabled for ingestion mode as Redo Log, along with SYSDBA privileges for the database user.
-
You are assigned the Team Administrator, Team Collaborator, or Pipeline Administrator role in Hevo, to create the Pipeline.
Perform the following steps to configure your Generic Oracle Source:
Create a Database User and Grant Privileges
Connect to your Oracle server as a database adminstrator (DBA) using SQL Developer or any other SQL client tool and run the following script. This script creates a new database user in your Oracle database with access to the metadata tables and LogMiner. Keeping your privacy in mind, it grants only the necessary permissions required by Hevo to ingest data from your Oracle database.
-- Create a Database User
CREATE USER <username> IDENTIFIED BY <password>;

-- Grant Privileges to the Database User
GRANT SELECT ANY DICTIONARY to <username>;
GRANT CREATE SESSION, ALTER SESSION TO <username>;
GRANT SELECT ON ALL_VIEWS TO <username>;
GRANT SELECT ON <schema_name>.<table_name> TO <username>;

-- Grant Privileges on Metadata tables
GRANT SELECT ON DATABASE_PROPERTIES TO <username>;
GRANT SELECT ON ALL_OBJECTS TO <username>;
GRANT SELECT ON ALL_TABLES TO <username>;
GRANT SELECT ON ALL_TAB_COLUMNS TO <username>;
GRANT SELECT ON ALL_CONSTRAINTS TO <username>;
GRANT SELECT ON ALL_CON_COLUMNS TO <username>;

-- Grant Permission to run LogMiner
GRANT LOGMINING TO <username>
GRANT SELECT ON SYS.V_$DATABASE TO <username>;
GRANT SELECT ON SYS.V_$LOG TO <username>;
GRANT SELECT ON SYS.V_$LOGFILE TO <username>;
GRANT SELECT ON SYS.V_$ARCHIVED_LOG TO <username>;
GRANT SELECT ON SYS.V_$LOGMNR_CONTENTS TO <username>;
GRANT SELECT ON SYS.V_$ARCHIVE_DEST_STATUS TO <username>;
GRANT EXECUTE ON SYS.DBMS_LOGMNR TO <username>;
GRANT EXECUTE ON SYS.DBMS_LOGMNR_D TO <username>;
Note: Replace the placeholder values in the commands above with your own. For example, <username> with hevo.
Refer to the table below for more information about these commands:
| Command | Grants access to |
|---|---|
| GRANT SELECT ANY DICTIONARY to <username>; | Query the data dictionary. This allows you to retrieve information about the database’s structure and metadata. |
| GRANT CREATE SESSION, ALTER SESSION TO <username>; | Create sessions and alter session settings. |
| GRANT SELECT ON ALL_VIEWS TO <username>; | Select data from all the views in the database. |
| GRANT SELECT ON <schema_name>.<table_name> TO <username>; | Select data from a specific table within a specific schema. |
| GRANT SELECT ON DATABASE_PROPERTIES TO <username>; | Retrieve information about the database properties from the configuration settings. |
| GRANT SELECT ON ALL_OBJECTS TO <username>; | Select data from all the objects in the database. |
| GRANT SELECT ON ALL_TABLES TO <username>; | Select data from all the tables in the database. |
| GRANT SELECT ON ALL_TAB_COLUMNS TO <username>; | Select columns from all the tables in the database. |
| GRANT SELECT ON ALL_CONSTRAINTS TO <username>; | Fetch information about all the constraints defined in the database. |
| GRANT SELECT ON ALL_CON_COLUMNS TO <username>; | Fetch information about the table constraints. |
| GRANT LOGMINING TO <username>; | LogMiner to analyze and extract information from the redo log files. |
| GRANT SELECT ON SYS.V_$DATABASE TO <username>; | Query information from the V_$DATABASE data dictionary view in the SYS schema. |
| GRANT SELECT ON SYS.V_$LOG TO <username>; | Select data from the V_$LOG view in the SYS schema. |
| GRANT SELECT ON SYS.V_$LOGFILE TO <username>; | Select data from the V_$LOGFILE view in the SYS schema. |
| GRANT SELECT ON SYS.V_$ARCHIVED_LOG TO <username>; | Query information from the V_$ARCHIVED_LOG view in the SYS schema. |
| GRANT SELECT ON SYS.V_$LOGMNR_CONTENTS TO <username>; | Select data from the V_$LOGMNR_CONTENTS view in the SYS schema. |
| GRANT SELECT ON SYS.V_$ARCHIVE_DEST_STATUS TO <username>; | Select data from the V_$ARCHIVE_DEST_STATUS view in the SYS schema. |
| GRANT EXECUTE ON SYS.DBMS_LOGMNR TO <username>; | Run procedures and functions from the DBMS_LOGMNR package in the SYS schema. |
| GRANT EXECUTE ON SYS.DBMS_LOGMNR_D TO <username>; | Run procedures and functions defined in the DBMS_LOGMNR_D package in the SYS schema. Note: This privilege is required for starting and stopping LogMiner, adding redo log files for analysis, querying change data, and managing LogMiner sessions effectively. |
Set up Redo Logs for Replication
Connect to your Oracle server as a user with SYSDBA privileges using SQL Developer or any other SQL client tool and perform the following steps:
1. Enable Archive Log
Archive logs are essential for backup and recovery processes of a database management system.
Enter the command below to verify the current archive log mode:
SELECT LOG_MODE FROM V$DATABASE;
This query returns either of the following values:
-
ARCHIVELOG: Indicates that the archive log is enabled. -
NOARCHIVELOG: Indicates that the archive redo is disabled.
If the archive mode is NOARCHIVELOG, enable it using the following commands:
-
Enter the command below to initiate the shutdown process without waiting for active sessions or transactions to complete. It forcefully terminates existing connections.
SHUTDOWN IMMEDIATE; -
Enter the command below to start the Oracle database instance in a mounted state:
STARTUP MOUNT; -
Enter the command below to alter the database and enable archive log mode. This command instructs the database to start archiving the redo log files:
ALTER DATABASE ARCHIVELOG; -
Enter the command below to open the database for operations after enabling ARCHIVELOG mode:
ALTER DATABASE OPEN;
2. Configure the Retention Policy
The Recovery Manager (RMAN) retention policy determines how long the database holds backlogs and archive logs.
-
Run the following command to connect to the RMAN:
RMAN CONNECT TARGET <database_username> -- (to connect to your database)Note: Replace the placeholder values in the commands above with your own. For example, <database_username> with jacobs.
-
Run the following command to view the log retention policy:
SELECT VALUE FROM V$RMAN_CONFIGURATION WHERE NAME = 'RETENTION POLICY'; -
If the log retention policy is less than 3 days, run the following command to configure it to 3 days (72 hours):
CONFIGURE RETENTION POLICY TO RECOVERY WINDOW OF 3 DAYS;Note: We recommend setting the archive log retention policy to at least 3 days (72 hours). This avoids any data loss that may occur due to downtimes in the Source database.
3. Enable Supplemental Logging
Supplemental logging ensures that any changes in columns are logged in Redo log files, which is essential for LogMiner to access the activity history of a database.
-
Check if supplemental logging is enabled:
SELECT SUPPLEMENTAL_LOG_DATA_MIN FROM "V$DATABASE";This query returns either of the following values:
-
YES: Indicates that supplemental logging is enabled. -
NO: Indicates that supplemental logging is disabled.
-
-
If the result of query above is NO, enable supplemental logging at the database level with the following command:
ALTER DATABASE ADD SUPPLEMENTAL LOG DATA (ALL) COLUMNS;-
Enter the following command to retrieve the status of table-level supplemental logging:
SELECT COUNT(*) FROM ALL_LOG_GROUPS WHERE LOG_GROUP_TYPE='ALL COLUMN LOGGING' AND OWNER= '<group_name>' AND TABLE_NAME='<table_name>';Note: Replace the placeholder values in the commands above with your own. For example, <group_name> with jacobs.
This returns one of the following values:
-
<number>: The number of log groups for which supplemental logging is enabled. -
zero: This represents that the supplemental logging is disabled.
-
-
If the result of the above query is zero, enable supplemental logging for all columns of a specific table present in your Source database:
ALTER TABLE <SCHEMA_NAME>.<TABLE_NAME> ADD SUPPLEMENTAL LOG DATA (ALL) COLUMNS;
-
4. Check PGA/SGA Memory Settings (Recommended)
In Oracle, the PGA memory settings allow you to manage and optimize memory usage for individual user processes involved in SQL execution.
-
Enter the command below to retrieve information about the initialization parameters ‘pga_aggregate_limit’ and ‘pga_aggregate_target’ from the
V$PARAMETERview:SELECT NAME, VALUE/1024/1024 as VALUE_MB FROM V$PARAMETER WHERE NAME IN ('pga_aggregate_limit', 'pga_aggregate_target');The following is an explanation of the command above:
-
SELECT NAME, VALUE/1024/1024 as VALUE_MB: This part retrieves data for the columns NAME and VALUE from the dynamic performance view V$PARAMETER. It retrieves theNAMEcolumn as is and calculates theVALUEcolumn divided by 1024 twice to convert the value from bytes to megabytes. It aliases the result as VALUE_MB. -
WHERE NAME IN ('pga_aggregate_limit', 'pga_aggregate_target'): This part filters the results to include only the rows where theNAMEcolumn is eitherpga_aggregate_limitorpga_aggregate_target.
-
-
Enter the command below to monitor the current PGA memory usage in your Oracle database:
SELECT NAME, VALUE, UNIT
    FROM V$PGASTAT
    WHERE NAME IN ('total PGA inuse','total PGA allocated');
The following is an explanation of the command above:
-
SELECT NAME, VALUE, UNIT: This part retrieves data for the columns NAME, VALUE, and UNIT from the dynamic performance view V$PGASTAT. It retrieves the PGA statistic name, its value, and the unit for the value. -
WHERE NAME IN ('total PGA inuse', 'total PGA allocated'): This part filters the results to include only the rows where theNAMEcolumn is eithertotal PGA inuseortotal PGA allocated.
-
Oracle Buffers
In Oracle, buffers refer to memory storage for caching data to enhance database performance. When LogMiner reads data from redo log files, it utilizes the native in-memory Oracle buffer to cache ongoing transactions (ones that have not been committed or rolled back).
Data Manipulation Language (DML) operations within a transaction are buffered until a commit or rollback is detected. A long-running transaction can have a negative impact on the database performance. It can lead to increased lag in processing change events and memory usage on the database server.
This accumulation of data in the Oracle LogMiner buffers can lead to increased Program Global Area (PGA) memory consumption in your database. Therefore, it is essential to appropriately set the PGA memory size based on your database workload. Read Check PGA/SGA Memory Settings to review the memory settings and configure the PGA_AGGREGATE_LIMIT to prevent server OutOfMemory (OOM) errors.
Additionally, you can modify the Long Transaction Window while configuring your Source in Hevo based on the available PGA memory in your database. Any transactions exceeding this window are discarded entirely, which may lead to a data mismatch. Further, setting an excessively large value may cause OOM issues. Only your DBA can determine if your database has long-running transactions with a large number of changes. If so, set the PGA_AGGREGATE_LIMIT to an appropriate value to process these transactions.
5. Configure the PGA Aggregate Limit (Recommended)
It is important to set up the PGA aggregate limit for managing and controlling memory usage in individual user sessions and queries. Depending on your database workload, you can set the pga_aggregate_limit parameter to prevent out-of-memory errors. To do this, enter the following command:
ALTER SYSTEM SET pga_aggregate_limit = <new value> SCOPE=BOTH;
Note:
-
You can set the above value in one of the following units of measurement:
-
Krepresents kilobytes. -
Mrepresents megabytes. -
Grepresents gigabytes.
-
-
Replace the placeholder value in the command above with your own. For example, <new value> with 1G.
Retrieve the Service Name
Service name represents an alias of the unique Oracle database to which Hevo connects.
To retrieve the Service Name, open your Oracle server in any SQL client tool as a database user with SYSDBA privilege and enter the following command:
select name from v$database;
Connect to a Local Database (Optional)
Refer to the steps in this section if you need to connect to your local database. For detailed information and troubleshooting help, read Connecting to a Local Database.
Prerequisites
-
Oracle service is running on your local machine.
-
Data to be loaded to the Destination is available in your Oracle database.
-
You have an account on ngrok and an installed ngrok utility on your local machine. To run ngrok on your local machine, follow these one-time steps:
-
Extract the ngrok utility:
-
On Linux or MacOS, unzip ngrok from a terminal:
unzip /path/to/ngrok.zip -
On Windows, double-click ngrok.zip to extract it.
-
-
Authenticate ngrok in your local machine:
./ngrok authtoken <your_auth_token>You can get the auth token from your ngrok dashboard. For example, in the image below, the auth_token starts with
2ig3VXv3v2ZX4LDg.
-
Connect to your local database
Perform the following steps to connect to the local database:
-
Log in to your database server.
-
Start a TCP tunnel forwarding to your database port.
./ngrok tcp <your_database_port>For example, the port address for Oracle is 3306. Therefore, the command would be:
./ngrok tcp 3306 -
Copy the public IP address (hostname and port number) for your local database and port. For example, in the image below,
8.tcp.ngrok.iois the database hostname and19789is the port number.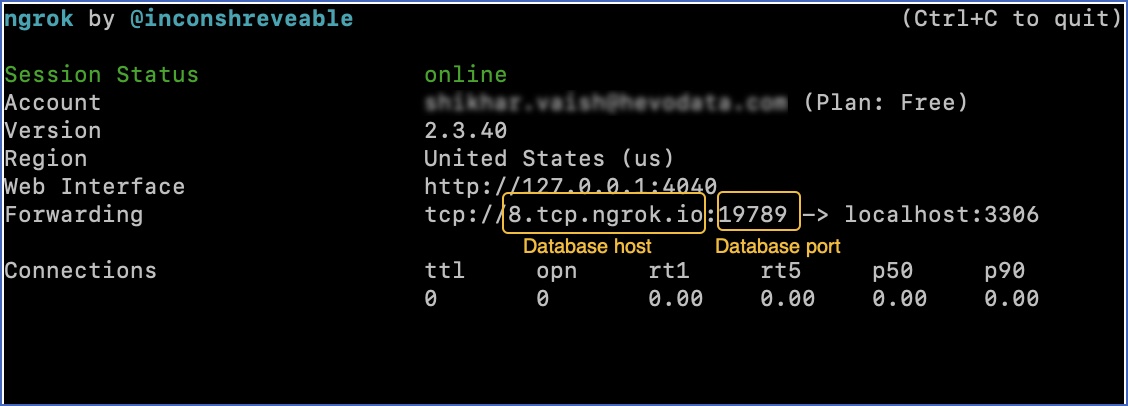
-
Paste the hostname and port number into the Database Host and Database Port fields respectively.
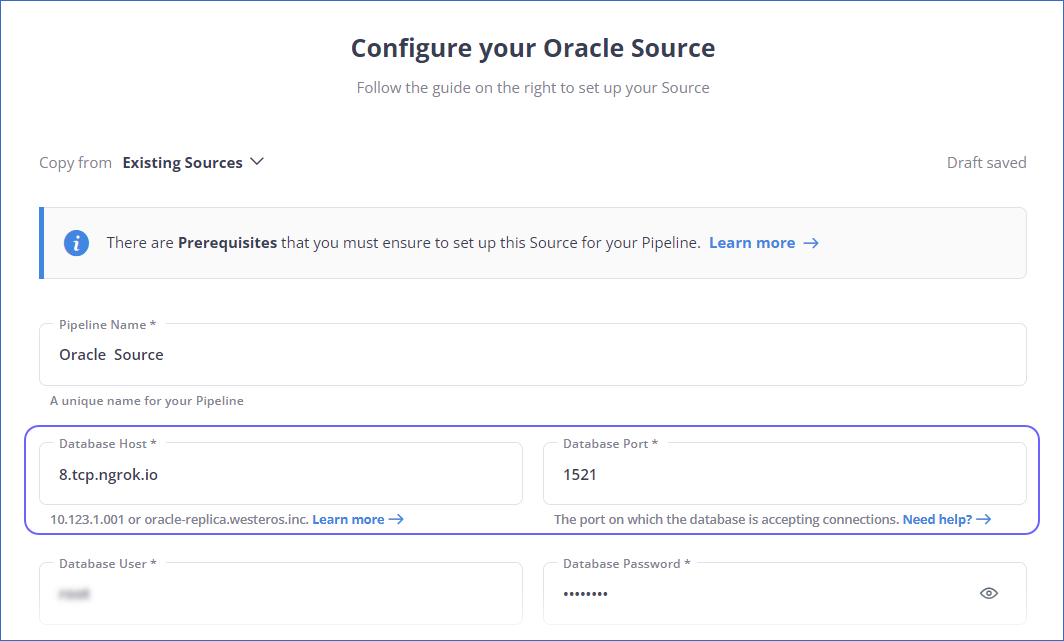
-
Specify all other settings and click TEST & CONTINUE.
Specify Oracle Connection Settings
Perform the following steps to configure Oracle as a Source in Hevo:
-
Click PIPELINES in the Navigation Bar.
-
Click + CREATE PIPELINE in the Pipelines List View.
-
On the Select Source Type page, select Oracle.
-
On the Configure your Oracle Source page, specify the following:
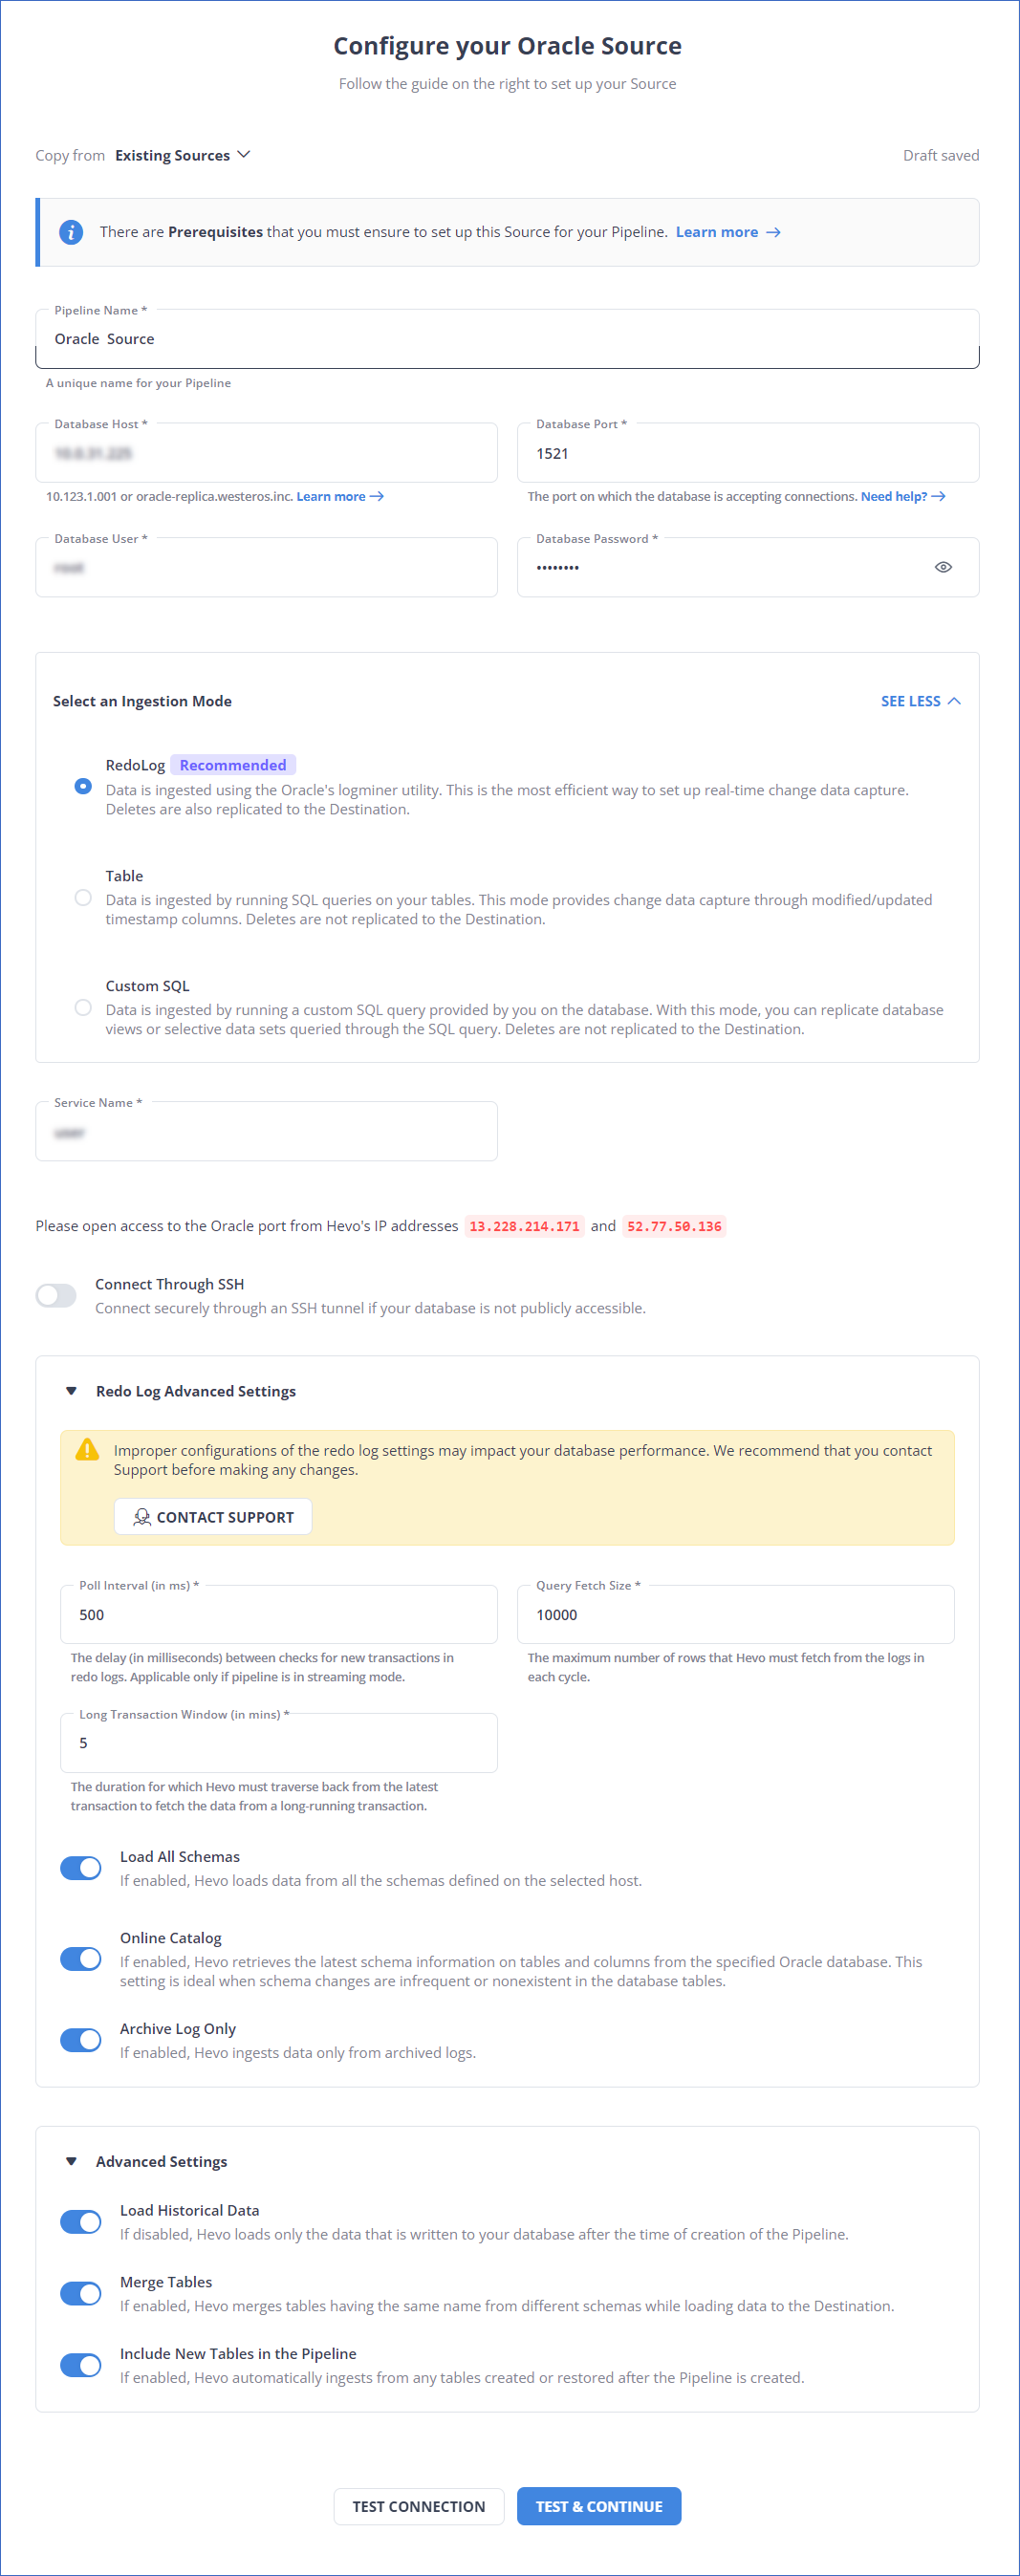
-
Pipeline Name: A unique name for your Pipeline, not exceeding 255 characters.
-
Database Host: The Oracle database host’s IP address or DNS.
The following table lists few examples of Oracle hosts:
Variant Host Amazon RDS Oracle oracle-rds-1.xxxxx.rds.amazonaws.com Generic Oracle 192.168.2.5 Note: For URL-based hostnames, exclude the http:// or https:// part. For example, if the hostname URL is https://oracle-rds-1.xxxxx.rds.amazonaws.com, enter oracle-rds-1.xxxxx.rds.amazonaws.com.
-
Database Port: The port on which your Oracle server listens for connections. Default value: 1521.
-
Database User: The authenticated user who has the permissions to read tables in your database.
-
Database Password: The password for the database user.
-
Select an Ingestion Mode: The desired mode by which you want to ingest data from the Source. You can expand this section by clicking SEE MORE to view the list of ingestion modes to choose from. Default value: RedoLog. The available ingestion modes are RedoLog, Table, and Custom SQL.

Depending on the ingestion mode you select, you must configure the objects to be replicated. Refer to section, Object and Query Mode Settings for the steps to do this.
For Pipelines created after Release 1.96, Hevo supports the RedoLog ingestion mode for Oracle Database 19c and higher.
Note: For Custom SQL ingestion mode, all Events loaded to the Destination are billable.
-
Service Name: An alias of the unique Oracle database to which Hevo connects. To retrieve the Service Name, open your Oracle server in any SQL client tool as a database user with
SYSDBAprivilege and enter the following command:select name from v$database; -
Owner: The name of the schema owner to identify the schemas for ingesting the data. Data of all the schemas defined by the specified owner are ingested for replication. This is required if ingestion mode is Table or Custom SQL.
-
Connect through SSH: Enable this option to connect to Hevo using an SSH tunnel, instead of directly connecting your Oracle database host to Hevo. This provides an additional level of security to your database by not exposing your Oracle setup to the public. Read Connecting Through SSH.
If this option is disabled, you must whitelist Hevo’s IP addresses to allow Hevo to connect to your Oracle database host. Refer to the content for your Oracle variant for steps to do this.
-
Redo Log Advanced Settings: This section is applicable if RedoLog is selected as an ingestion mode:
Note: Any modification in the default value of the following settings may impact your database performance. We recommend that you contact Hevo Support before making any changes.
-
Poll Interval (in ms): The delay in milliseconds between the checks that Hevo makes to search for new transactions in the redo logs. Default value: 500.
-
Query Fetch Size: The maximum number of rows that Hevo fetches from the logs in each query. Default value: 10,000.
-
Long Transaction Window (in mins): The duration in minutes that Hevo must traverse back from the current transaction to fetch the data in a long-running transaction. Default value: 5.
Note: Increasing the default value can lead to increased memory consumption by the Source database during log mining sessions.
-
-
Load All Schemas: If enabled, Hevo loads data for all the schemas.
If disabled, Hevo loads data from the schema(s) that you specify in a comma-separated list.
-
Online Catalog: If enabled, Hevo retrieves the updated schema information from the specified Oracle database. This setting is ideal when schema changes are infrequent or nonexistent in the database tables.
If disabled, Hevo retrieves the schema information from the copy that Hevo maintains.
Note: This option is non-editable post-Pipeline creation.
-
Archive Log Only: If enabled, Hevo ingests data only from the archived redo logs.
If disabled, Hevo ingests data from the archived and online redo logs.
-
Advanced Settings:
-
Load Historical Data: Applicable for Pipelines with RedoLog mode. If this option is enabled, the entire table data is fetched during the first run of the Pipeline. If disabled, Hevo loads only the data that was written in your database after the time of creation of the Pipeline.
-
Merge Tables: Applicable for Pipelines with RedoLog mode. If this option is enabled, Hevo merges tables with the same name from different databases while loading the data to the warehouse. Hevo loads the Database Name field with each record. If disabled, the database name is prefixed to each table name. Read How does the Merge Tables feature work?.
-
Include New Tables in the Pipeline: Applicable for all ingestion modes except Custom SQL. If enabled, Hevo automatically ingests data from tables created after the Pipeline has been built. If disabled, the new tables are listed in the Pipeline Detailed View in Skipped state, and you can manually include the ones you want and load their historical data. You can include these objects post-Pipeline creation to ingest data.
You can change this setting later.
-
-
-
Click TEST CONNECTION. This button is enabled once you specify all the mandatory fields. Hevo’s underlying connectivity checker validates the connection settings you provide.
-
Click TEST & CONTINUE to proceed for setting up the Destination. This button is enabled once you specify all the mandatory fields.
Object and Query Mode Settings
Once you have specified the Source connection settings in Step 5 above, do one of the following:
-
For Pipelines configured with the Table or RedoLog mode:
-
On the Select Objects page, select the objects you want to replicate and click CONTINUE.
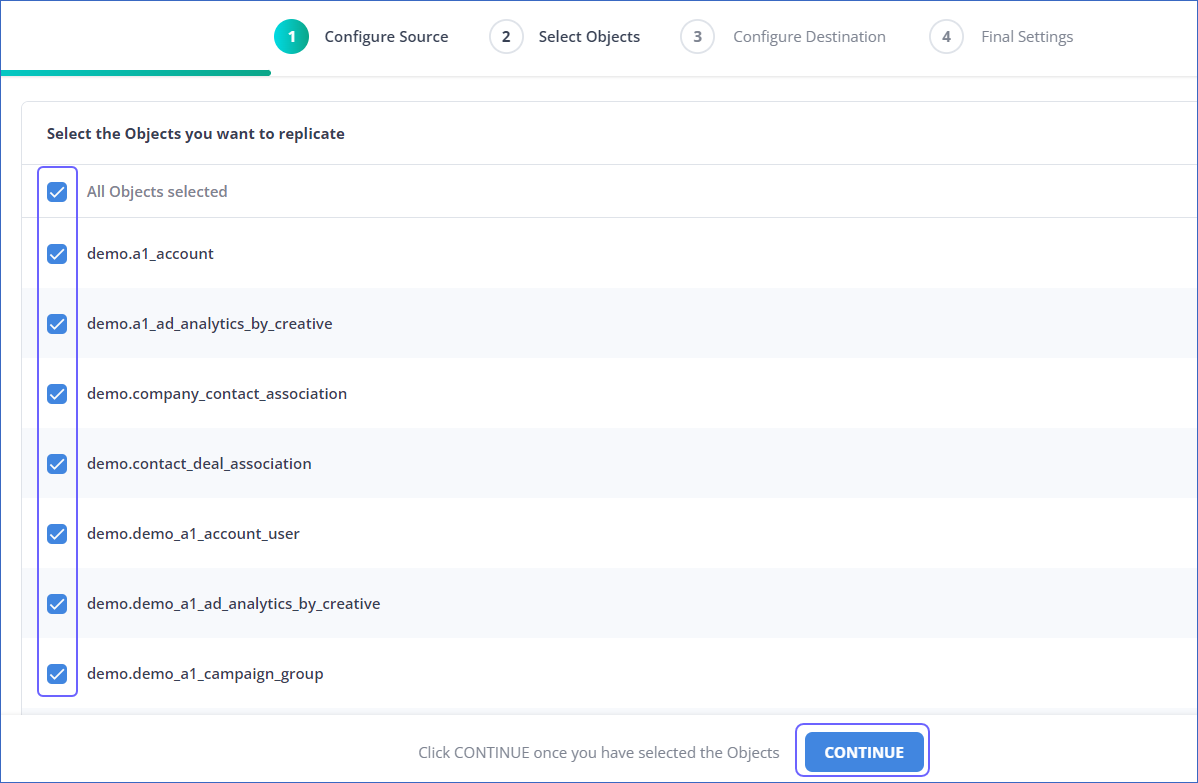
Note:
-
Each object represents a table in your database.
-
From Release 2.19 onwards, for log-based Pipelines, you can keep the objects listed on the Select Objects page deselected by default. In this case, when you skip object selection, all objects are skipped for ingestion, and the Pipeline is created in the Active state. You can include the required objects post-Pipeline creation. Contact Hevo Support to enable this option for your teams.
-
-
On the Configure Objects page, specify the query mode you want to use for each selected object.
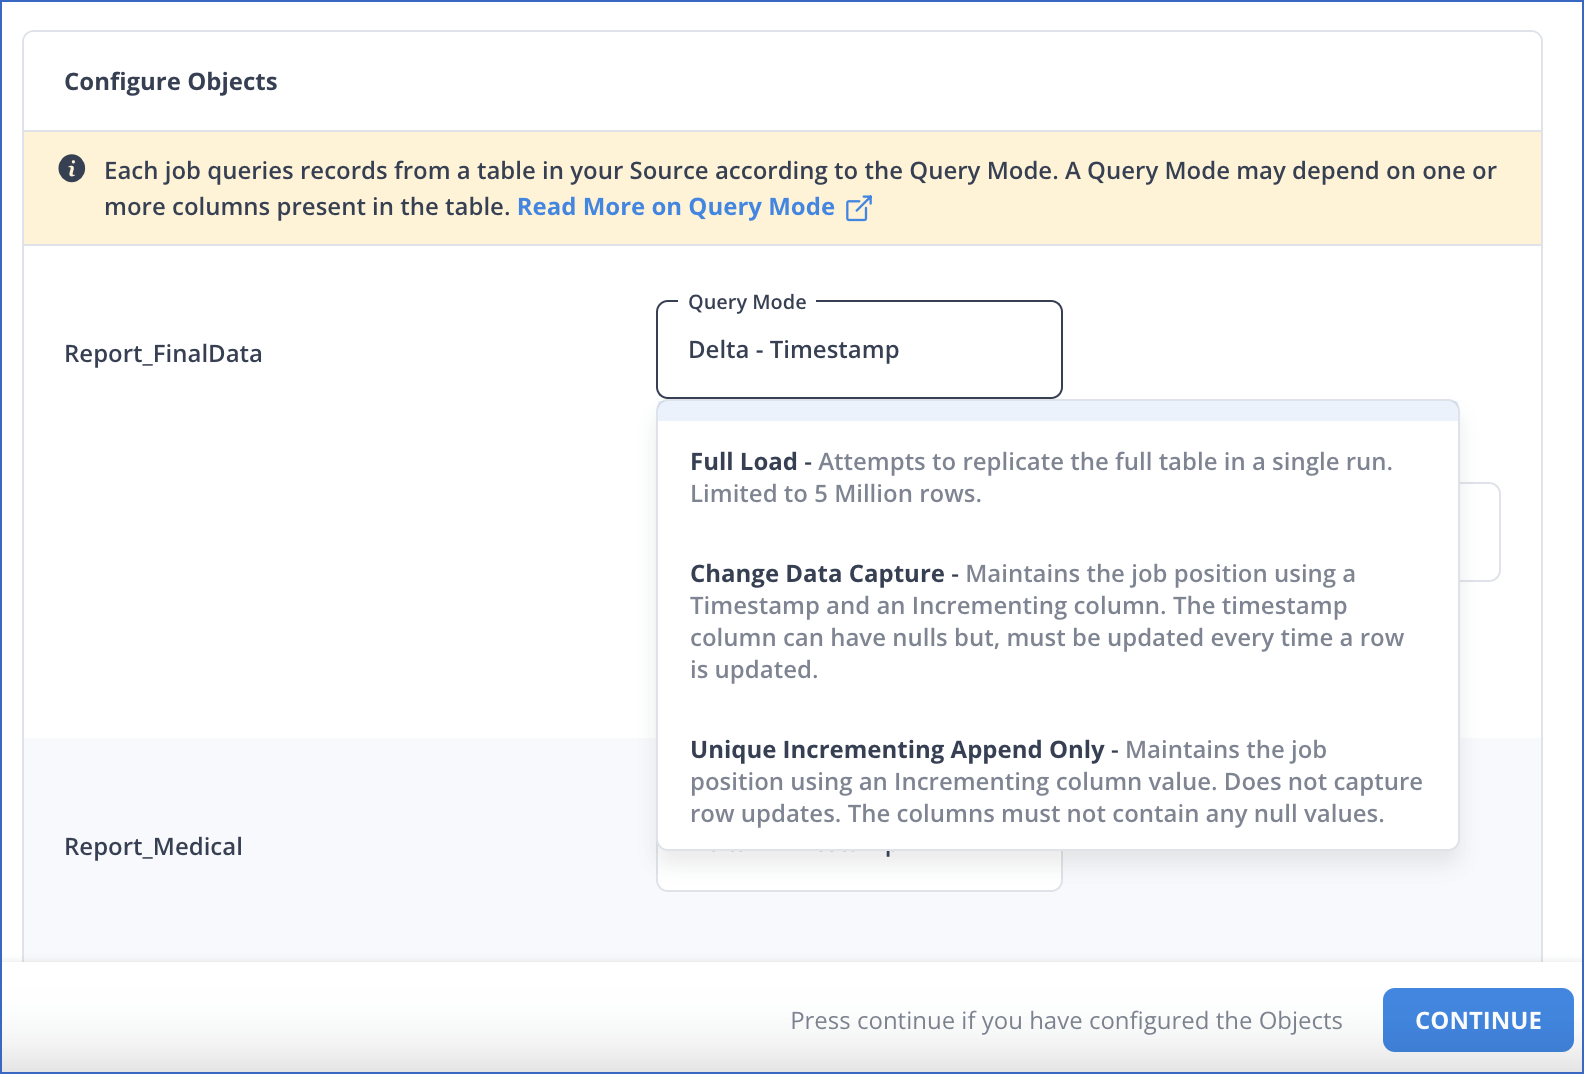
-
-
For Pipelines configured with the Custom SQL mode:
-
On the Provide Query Settings page, enter the custom SQL query to fetch data from the Source.
-
In the Query Mode drop-down, select the query mode, and click CONTINUE.
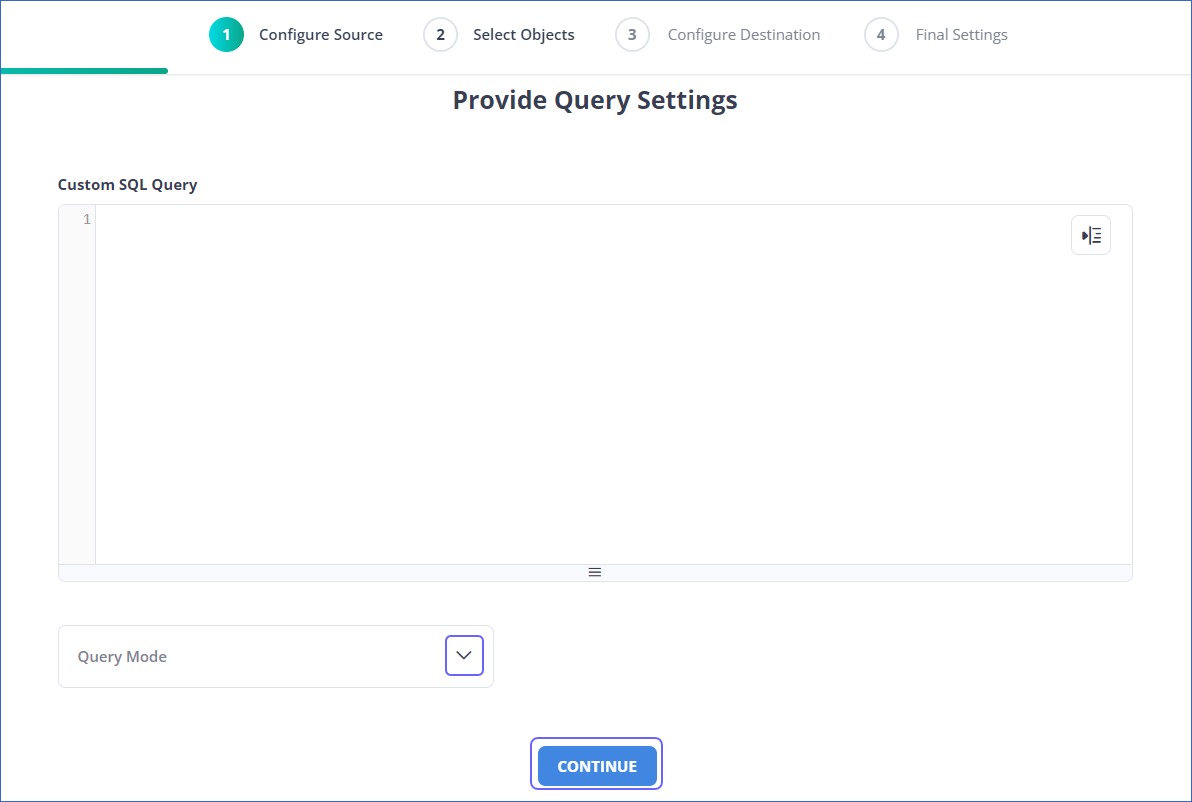
-
Data Replication
| For Teams Created | Ingestion Mode | Default Ingestion Frequency | Minimum Ingestion Frequency | Maximum Ingestion Frequency | Custom Frequency Range (in Hrs) |
|---|---|---|---|---|---|
| Before Release 2.21 | Table | 15 Mins | 5 Mins | 24 Hrs | 1-24 |
| Log-based | 5 Mins | 5 Mins | 1 Hr | NA | |
| After Release 2.21 | Table | 6 Hrs | 30 Mins | 24 Hrs | 1-24 |
| Log-based | 30 Mins | 30 Mins | 12 Hrs | 1-24 |
Note: The custom frequency must be set in hours as an integer value. For example, 1, 2, or 3 but not 1.5 or 1.75.
-
Historical Data: In the first run of the Pipeline, Hevo ingests all available data for the selected objects from your Source database.
-
Incremental Data: Once the historical load is complete, data is ingested as per the ingestion frequency.
Additional Information
Read the detailed Hevo documentation for the following related topics:
Limitations
-
Redo Log does not support user-defined data types. Therefore, fields with such data types are not captured in the log and are lost.
-
Hevo does not load an Event into the Destination table if its size exceeds 128 MB, which may lead to discrepancies between your Source and Destination data. To avoid such a scenario, ensure that each row in your Source objects contains less than 100 MB of data.
See Also
Revision History
Refer to the following table for the list of key updates made to this page:
| Date | Release | Description of Change |
|---|---|---|
| Jun-30-2025 | NA | Renamed the section, Configure the Retention Period to Configure the Retention Policy and added a command to view the archive log retention policy. |
| Jan-07-2025 | NA | Updated the Limitations section to add information on Event size. |
| Oct-22-2024 | NA | Updated sections, Connect to a Local Database (Optional) and Specify Oracle Connection Settings as per the latest Hevo UI. |
| Apr-29-2024 | NA | Updated section, Specify Oracle Connection Settings to include more detailed steps. |
| Apr-19-2024 | NA | Revamped the page content for clarity and coherence. |
| Mar-05-2024 | 2.21 | Added the Data Replication section. |
| Jan-22-2024 | 2.19.2 | Updated section, Object and Query Mode Settings to add a note about the enhanced object selection flow available for log-based Pipelines. |
| Jan-10-2024 | 2.19 | Updated section, Specify Oracle Connection Settings as per latest Hevo functionality. |
| Nov-03-2023 | NA | Added section, Object and Query Mode Settings. |
| Oct-09-2023 | NA | Added section, Configure the PGA Aggregate Limit. |
| Apr-21-2023 | NA | Updated section, Specify Oracle Connection Settings to add a note to inform users that all loaded Events are billable for Custom SQL mode-based Pipelines. |
| Mar-09-2023 | 2.09 | Updated section, Specify Oracle Connection Settings to mention about SEE MORE in the Select an Ingestion Mode section. |
| Dec-19-2022 | 2.04 | Updated section, Specify Oracle Connection Settings to add information that you must specify all fields to create a Pipeline. |
| Dec-07-2022 | 2.03 | Updated section, Specify Oracle Connection Settings to mention about including skipped objects post-Pipeline creation. |
| Dec-07-2022 | 2.03 | Updated section, Specify Oracle Connection Settings to mention about the connectivity checker. |
| Jun-16-2022 | NA | Added section, Connecting to a Local Database. |
| Dec-06-2021 | 1.77 | Added a See Also link to the Pipeline failure due to Redo Log expiry page. |
| Nov-22-2021 | NA | Updated the Limitations section. |
| Feb-22-2021 | 1.57 | Added sections: - Create a User and Grant Privileges - Retrieve the Service Name |