- Introduction
-
Getting Started
- Creating an Account in Hevo
- Subscribing to Hevo via AWS Marketplace
- Subscribing to Hevo via Snowflake Marketplace
- Connection Options
- Familiarizing with the UI
- Creating your First Pipeline
- Data Loss Prevention and Recovery
-
Data Ingestion
- Types of Data Synchronization
- Ingestion Modes and Query Modes for Database Sources
- Ingestion and Loading Frequency
- Data Ingestion Statuses
- Deferred Data Ingestion
- Handling of Primary Keys
- Handling of Updates
- Handling of Deletes
- Hevo-generated Metadata
- Best Practices to Avoid Reaching Source API Rate Limits
-
Edge
- Getting Started
- Data Ingestion
- Core Concepts
-
Pipelines
- Familiarizing with the Pipelines UI (Edge)
- Creating an Edge Pipeline
- Working with Edge Pipelines
- Object and Schema Management
- Pipeline Job History
- Sources
- Destinations
- Alerts
- Custom Connectors
-
Releases
- Edge Release Notes - February 18, 2026
- Edge Release Notes - February 10, 2026
- Edge Release Notes - February 03, 2026
- Edge Release Notes - January 20, 2026
- Edge Release Notes - December 08, 2025
- Edge Release Notes - December 01, 2025
- Edge Release Notes - November 05, 2025
- Edge Release Notes - October 30, 2025
- Edge Release Notes - September 22, 2025
- Edge Release Notes - August 11, 2025
- Edge Release Notes - July 09, 2025
- Edge Release Notes - November 21, 2024
-
Data Loading
- Loading Data in a Database Destination
- Loading Data to a Data Warehouse
- Optimizing Data Loading for a Destination Warehouse
- Deduplicating Data in a Data Warehouse Destination
- Manually Triggering the Loading of Events
- Scheduling Data Load for a Destination
- Loading Events in Batches
- Data Loading Statuses
- Data Spike Alerts
- Name Sanitization
- Table and Column Name Compression
- Parsing Nested JSON Fields in Events
-
Pipelines
- Data Flow in a Pipeline
- Familiarizing with the Pipelines UI
- Working with Pipelines
- Managing Objects in Pipelines
- Pipeline Jobs
-
Transformations
-
Python Code-Based Transformations
- Supported Python Modules and Functions
-
Transformation Methods in the Event Class
- Create an Event
- Retrieve the Event Name
- Rename an Event
- Retrieve the Properties of an Event
- Modify the Properties for an Event
- Fetch the Primary Keys of an Event
- Modify the Primary Keys of an Event
- Fetch the Data Type of a Field
- Check if the Field is a String
- Check if the Field is a Number
- Check if the Field is Boolean
- Check if the Field is a Date
- Check if the Field is a Time Value
- Check if the Field is a Timestamp
-
TimeUtils
- Convert Date String to Required Format
- Convert Date to Required Format
- Convert Datetime String to Required Format
- Convert Epoch Time to a Date
- Convert Epoch Time to a Datetime
- Convert Epoch to Required Format
- Convert Epoch to a Time
- Get Time Difference
- Parse Date String to Date
- Parse Date String to Datetime Format
- Parse Date String to Time
- Utils
- Examples of Python Code-based Transformations
-
Drag and Drop Transformations
- Special Keywords
-
Transformation Blocks and Properties
- Add a Field
- Change Datetime Field Values
- Change Field Values
- Drop Events
- Drop Fields
- Find & Replace
- Flatten JSON
- Format Date to String
- Format Number to String
- Hash Fields
- If-Else
- Mask Fields
- Modify Text Casing
- Parse Date from String
- Parse JSON from String
- Parse Number from String
- Rename Events
- Rename Fields
- Round-off Decimal Fields
- Split Fields
- Examples of Drag and Drop Transformations
- Effect of Transformations on the Destination Table Structure
- Transformation Reference
- Transformation FAQs
-
Python Code-Based Transformations
-
Schema Mapper
- Using Schema Mapper
- Mapping Statuses
- Auto Mapping Event Types
- Manually Mapping Event Types
- Modifying Schema Mapping for Event Types
- Schema Mapper Actions
- Fixing Unmapped Fields
- Resolving Incompatible Schema Mappings
- Resizing String Columns in the Destination
- Changing the Data Type of a Destination Table Column
- Schema Mapper Compatibility Table
- Limits on the Number of Destination Columns
- File Log
- Troubleshooting Failed Events in a Pipeline
- Mismatch in Events Count in Source and Destination
- Audit Tables
- Activity Log
-
Pipeline FAQs
- Can multiple Sources connect to one Destination?
- What happens if I re-create a deleted Pipeline?
- Why is there a delay in my Pipeline?
- Can I change the Destination post-Pipeline creation?
- Why is my billable Events high with Delta Timestamp mode?
- Can I drop multiple Destination tables in a Pipeline at once?
- How does Run Now affect scheduled ingestion frequency?
- Will pausing some objects increase the ingestion speed?
- Can I see the historical load progress?
- Why is my Historical Load Progress still at 0%?
- Why is historical data not getting ingested?
- How do I set a field as a primary key?
- How do I ensure that records are loaded only once?
- Events Usage
-
Sources
- Free Sources
-
Databases and File Systems
- Data Warehouses
-
Databases
- Connecting to a Local Database
- Amazon DocumentDB
- Amazon DynamoDB
- Elasticsearch
-
MongoDB
- Generic MongoDB
- MongoDB Atlas
- Support for Multiple Data Types for the _id Field
- Example - Merge Collections Feature
-
Troubleshooting MongoDB
-
Errors During Pipeline Creation
- Error 1001 - Incorrect credentials
- Error 1005 - Connection timeout
- Error 1006 - Invalid database hostname
- Error 1007 - SSH connection failed
- Error 1008 - Database unreachable
- Error 1011 - Insufficient access
- Error 1028 - Primary/Master host needed for OpLog
- Error 1029 - Version not supported for Change Streams
- SSL 1009 - SSL Connection Failure
- Troubleshooting MongoDB Change Streams Connection
- Troubleshooting MongoDB OpLog Connection
-
Errors During Pipeline Creation
- SQL Server
-
MySQL
- Amazon Aurora MySQL
- Amazon RDS MySQL
- Azure MySQL
- Generic MySQL
- Google Cloud MySQL
- MariaDB MySQL
-
Troubleshooting MySQL
-
Errors During Pipeline Creation
- Error 1003 - Connection to host failed
- Error 1006 - Connection to host failed
- Error 1007 - SSH connection failed
- Error 1011 - Access denied
- Error 1012 - Replication access denied
- Error 1017 - Connection to host failed
- Error 1026 - Failed to connect to database
- Error 1027 - Unsupported BinLog format
- Failed to determine binlog filename/position
- Schema 'xyz' is not tracked via bin logs
- Errors Post-Pipeline Creation
-
Errors During Pipeline Creation
- MySQL FAQs
- Oracle
-
PostgreSQL
- Amazon Aurora PostgreSQL
- Amazon RDS PostgreSQL
- Azure PostgreSQL
- Generic PostgreSQL
- Google Cloud PostgreSQL
- Heroku PostgreSQL
-
Troubleshooting PostgreSQL
-
Errors during Pipeline creation
- Error 1003 - Authentication failure
- Error 1006 - Connection settings errors
- Error 1011 - Access role issue for logical replication
- Error 1012 - Access role issue for logical replication
- Error 1014 - Database does not exist
- Error 1017 - Connection settings errors
- Error 1023 - No pg_hba.conf entry
- Error 1024 - Number of requested standby connections
- Errors Post-Pipeline Creation
-
Errors during Pipeline creation
-
PostgreSQL FAQs
- Can I track updates to existing records in PostgreSQL?
- How can I migrate a Pipeline created with one PostgreSQL Source variant to another variant?
- How can I prevent data loss when migrating or upgrading my PostgreSQL database?
- Why do FLOAT4 and FLOAT8 values in PostgreSQL show additional decimal places when loaded to BigQuery?
- Why is data not being ingested from PostgreSQL Source objects?
- Troubleshooting Database Sources
- Database Source FAQs
- File Storage
- Engineering Analytics
- Finance & Accounting Analytics
-
Marketing Analytics
- ActiveCampaign
- AdRoll
- Amazon Ads
- Apple Search Ads
- AppsFlyer
- CleverTap
- Criteo
- Drip
- Facebook Ads
- Facebook Page Insights
- Firebase Analytics
- Freshsales
- Google Ads
- Google Analytics 4
- Google Analytics 360
- Google Play Console
- Google Search Console
- HubSpot
- Instagram Business
- Klaviyo v2
- Lemlist
- LinkedIn Ads
- Mailchimp
- Mailshake
- Marketo
- Microsoft Ads
- Onfleet
- Outbrain
- Pardot
- Pinterest Ads
- Pipedrive
- Recharge
- Segment
- SendGrid Webhook
- SendGrid
- Salesforce Marketing Cloud
- Snapchat Ads
- SurveyMonkey
- Taboola
- TikTok Ads
- Twitter Ads
- Typeform
- YouTube Analytics
- Product Analytics
- Sales & Support Analytics
- Source FAQs
-
Destinations
- Familiarizing with the Destinations UI
- Cloud Storage-Based
- Databases
-
Data Warehouses
- Amazon Redshift
- Amazon Redshift Serverless
- Azure Synapse Analytics
- Databricks
- Google BigQuery
- Hevo Managed Google BigQuery
- Snowflake
- Troubleshooting Data Warehouse Destinations
-
Destination FAQs
- Can I change the primary key in my Destination table?
- Can I change the Destination table name after creating the Pipeline?
- How can I change or delete the Destination table prefix?
- Why does my Destination have deleted Source records?
- How do I filter deleted Events from the Destination?
- Does a data load regenerate deleted Hevo metadata columns?
- How do I filter out specific fields before loading data?
- Transform
- Alerts
- Account Management
- Activate
- Glossary
-
Releases- Release 2.45.2 (Feb 16-23, 2026)
- Release 2.45.1 (Feb 09-16, 2026)
- Release 2.45 (Jan 12-Feb 09, 2026)
-
2025 Releases
- Release 2.44 (Dec 01, 2025-Jan 12, 2026)
- Release 2.43 (Nov 03-Dec 01, 2025)
- Release 2.42 (Oct 06-Nov 03, 2025)
- Release 2.41 (Sep 08-Oct 06, 2025)
- Release 2.40 (Aug 11-Sep 08, 2025)
- Release 2.39 (Jul 07-Aug 11, 2025)
- Release 2.38 (Jun 09-Jul 07, 2025)
- Release 2.37 (May 12-Jun 09, 2025)
- Release 2.36 (Apr 14-May 12, 2025)
- Release 2.35 (Mar 17-Apr 14, 2025)
- Release 2.34 (Feb 17-Mar 17, 2025)
- Release 2.33 (Jan 20-Feb 17, 2025)
-
2024 Releases
- Release 2.32 (Dec 16 2024-Jan 20, 2025)
- Release 2.31 (Nov 18-Dec 16, 2024)
- Release 2.30 (Oct 21-Nov 18, 2024)
- Release 2.29 (Sep 30-Oct 22, 2024)
- Release 2.28 (Sep 02-30, 2024)
- Release 2.27 (Aug 05-Sep 02, 2024)
- Release 2.26 (Jul 08-Aug 05, 2024)
- Release 2.25 (Jun 10-Jul 08, 2024)
- Release 2.24 (May 06-Jun 10, 2024)
- Release 2.23 (Apr 08-May 06, 2024)
- Release 2.22 (Mar 11-Apr 08, 2024)
- Release 2.21 (Feb 12-Mar 11, 2024)
- Release 2.20 (Jan 15-Feb 12, 2024)
-
2023 Releases
- Release 2.19 (Dec 04, 2023-Jan 15, 2024)
- Release Version 2.18
- Release Version 2.17
- Release Version 2.16 (with breaking changes)
- Release Version 2.15 (with breaking changes)
- Release Version 2.14
- Release Version 2.13
- Release Version 2.12
- Release Version 2.11
- Release Version 2.10
- Release Version 2.09
- Release Version 2.08
- Release Version 2.07
- Release Version 2.06
-
2022 Releases
- Release Version 2.05
- Release Version 2.04
- Release Version 2.03
- Release Version 2.02
- Release Version 2.01
- Release Version 2.00
- Release Version 1.99
- Release Version 1.98
- Release Version 1.97
- Release Version 1.96
- Release Version 1.95
- Release Version 1.93 & 1.94
- Release Version 1.92
- Release Version 1.91
- Release Version 1.90
- Release Version 1.89
- Release Version 1.88
- Release Version 1.87
- Release Version 1.86
- Release Version 1.84 & 1.85
- Release Version 1.83
- Release Version 1.82
- Release Version 1.81
- Release Version 1.80 (Jan-24-2022)
- Release Version 1.79 (Jan-03-2022)
-
2021 Releases
- Release Version 1.78 (Dec-20-2021)
- Release Version 1.77 (Dec-06-2021)
- Release Version 1.76 (Nov-22-2021)
- Release Version 1.75 (Nov-09-2021)
- Release Version 1.74 (Oct-25-2021)
- Release Version 1.73 (Oct-04-2021)
- Release Version 1.72 (Sep-20-2021)
- Release Version 1.71 (Sep-09-2021)
- Release Version 1.70 (Aug-23-2021)
- Release Version 1.69 (Aug-09-2021)
- Release Version 1.68 (Jul-26-2021)
- Release Version 1.67 (Jul-12-2021)
- Release Version 1.66 (Jun-28-2021)
- Release Version 1.65 (Jun-14-2021)
- Release Version 1.64 (Jun-01-2021)
- Release Version 1.63 (May-19-2021)
- Release Version 1.62 (May-05-2021)
- Release Version 1.61 (Apr-20-2021)
- Release Version 1.60 (Apr-06-2021)
- Release Version 1.59 (Mar-23-2021)
- Release Version 1.58 (Mar-09-2021)
- Release Version 1.57 (Feb-22-2021)
- Release Version 1.56 (Feb-09-2021)
- Release Version 1.55 (Jan-25-2021)
- Release Version 1.54 (Jan-12-2021)
-
2020 Releases
- Release Version 1.53 (Dec-22-2020)
- Release Version 1.52 (Dec-03-2020)
- Release Version 1.51 (Nov-10-2020)
- Release Version 1.50 (Oct-19-2020)
- Release Version 1.49 (Sep-28-2020)
- Release Version 1.48 (Sep-01-2020)
- Release Version 1.47 (Aug-06-2020)
- Release Version 1.46 (Jul-21-2020)
- Release Version 1.45 (Jul-02-2020)
- Release Version 1.44 (Jun-11-2020)
- Release Version 1.43 (May-15-2020)
- Release Version 1.42 (Apr-30-2020)
- Release Version 1.41 (Apr-2020)
- Release Version 1.40 (Mar-2020)
- Release Version 1.39 (Feb-2020)
- Release Version 1.38 (Jan-2020)
- Early Access New
Creating a Custom Report
Hevo allows you to create custom reports for your Google Ads by selecting specific segments, dimensions, and metrics based on your reporting needs. However, not all combinations are permitted according to Google’s API rules. Before configuring the report in Hevo, it is essential to validate your chosen segments, dimensions, and metrics in Google’s Query Builder using Google’s Query Validator. Read Segments to learn more about segments in Google Ads and the compatible metrics and dimensions.
Example
Suppose you want to create a custom report to retrieve the following data for an ad:
-
Breakdown of the ad’s performance by date.
-
Most commonly used device to view the ads.
-
Ads and campaigns that generated user activity.
-
Total number of clicks and impressions the ad received.
Perform the following steps to build this custom report:
1. Add Segments
In this section, we are adding segments to break down the ad’s performance by date and identify the most frequently used device to view the ad.
Perform the following steps to add the segments:
-
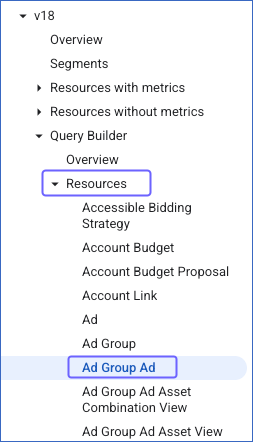
Open the Google Ads Query Builder to generate the query for the custom report.
-
In the left navigation pane, from the Resources drop-down, click Ad Group Ad to open the query builder for this resource.
-
On the ad_group_ad page, in the Choose a Clause to Select From section, from the Segments drop-down under the SELECT tab, select the check box next to segments.date and segments.device.
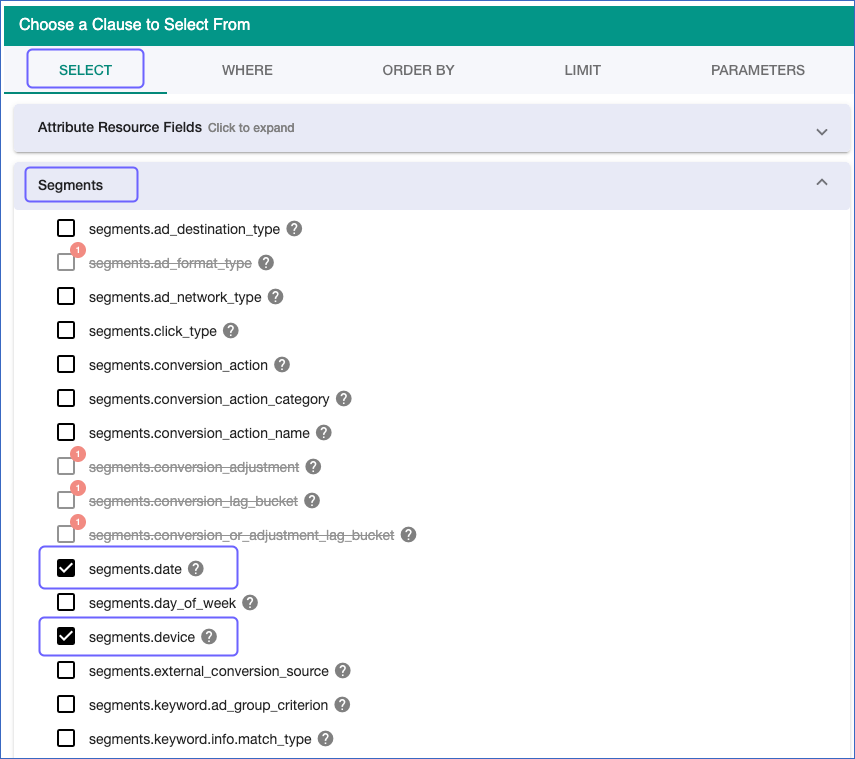
Note: After selecting a segment, any incompatible metrics, dimensions, and segments are grayed out and become unavailable for selection.
-
Specify a date range for segments.date. For this, do the following:
-
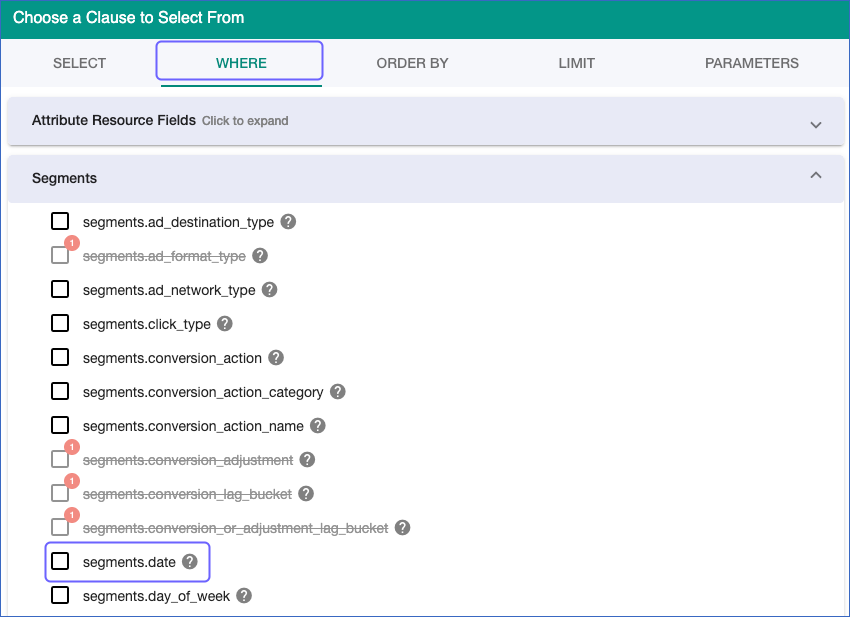
Navigate to the WHERE tab and expand the Segments drop-down.
-
Select the check box next to segments.date.
-
In the pop-up window that appears to specify the date range, select BETWEEN from the Choose an operator drop-down.
-
Enter the desired date range and click Add filter criteria.

-
2. Add Dimensions and Metrics
In this section, we are adding dimensions to get the details of the ad that generated user activity and the campaigns in which those ads were featured. We are also adding metrics to track the clicks and impressions for the ad.
Perform the following steps to add the dimensions and metrics:
-
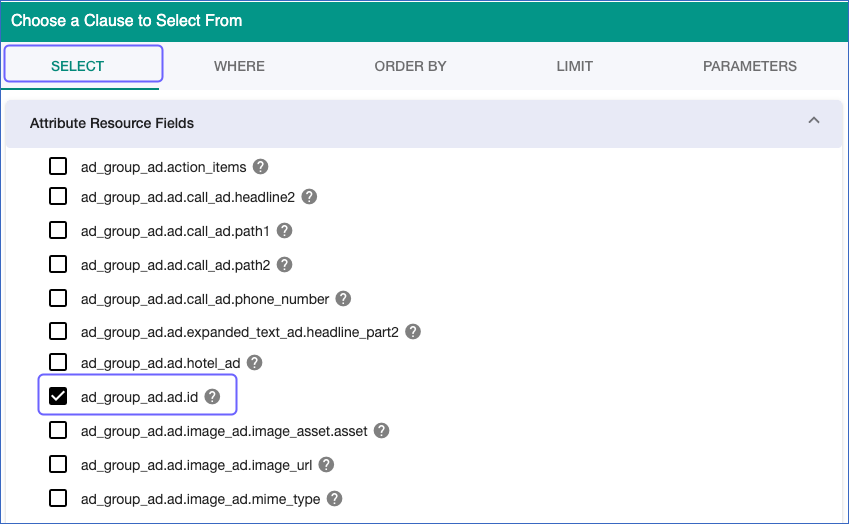
On the ad_group_ad page, under the Choose a Clause to Select From section, navigate to the SELECT tab.
-
Expand the Attribute Resource Fields drop-down and select the check box next to ad_group_ad.ad.id. This field helps identify the ads that generated user activity.
-
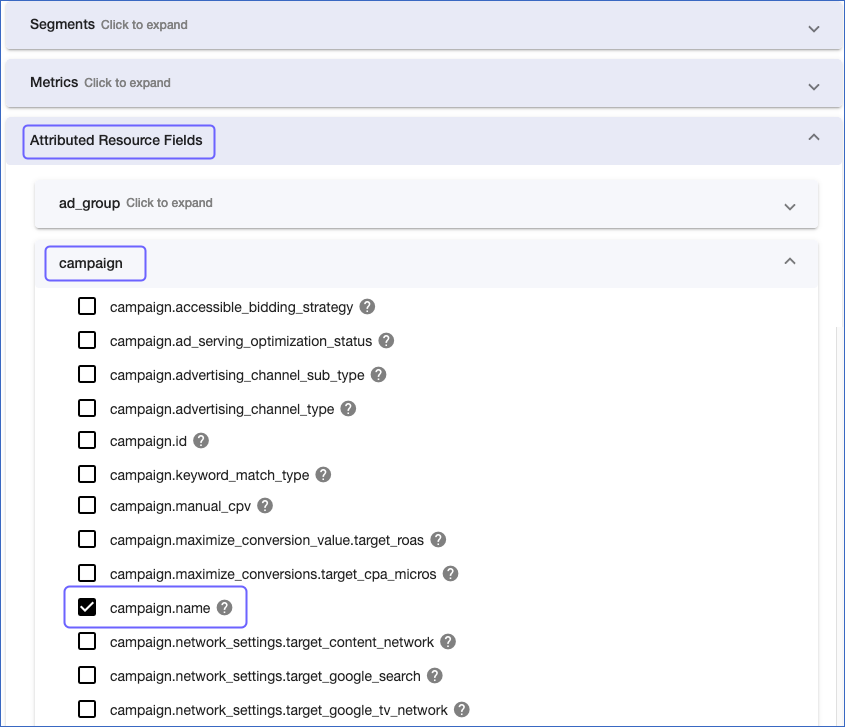
Expand the Attributed Resource Fields drop-down and from the campaign drop-down, select the check box next to campaign.name. This field helps identify the campaigns in which those ads were featured.
-
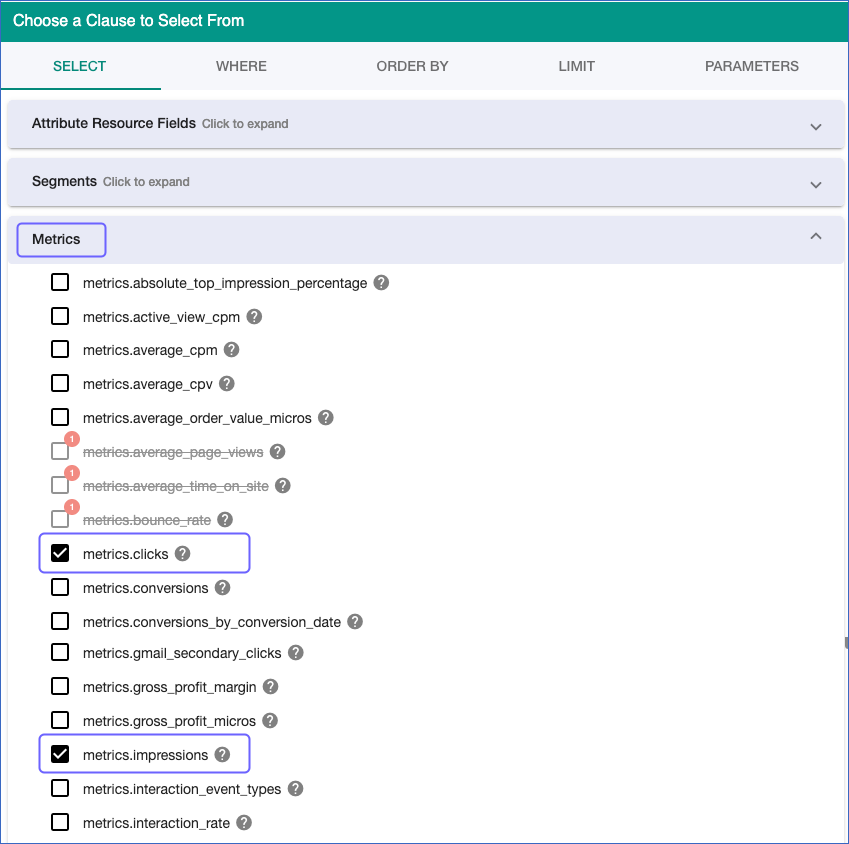
From the Metrics drop-down, select the check box next to metrics.clicks and metrics.impressions. These fields give the number of times the ad was clicked and displayed.
-
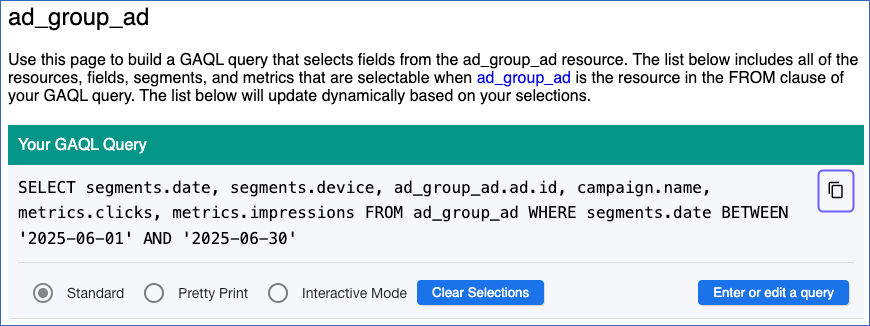
In the Your GAQL Query section, click the Copy icon to copy the query created.
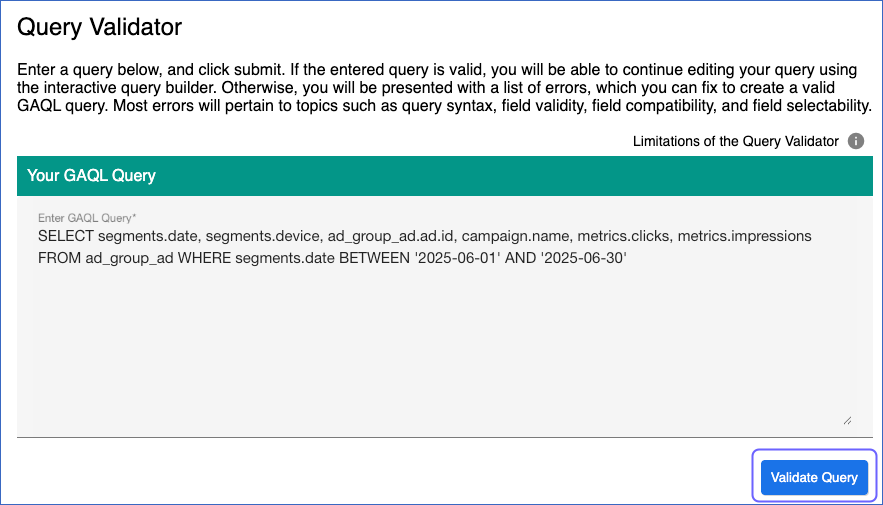
3. Validate the Query
In this section, we will validate the query to ensure the selected segments, dimensions, and metrics are compatible. You can use the query generated from the previous steps or test your own custom query.
Perform the following steps to validate your query:
-
Open the Query Validator.
-
Paste the GAQL query generated above or your own query and click Validate Query.
-
Once the query is successfully validated, you can proceed to configure the custom report in Hevo using the validated fields.
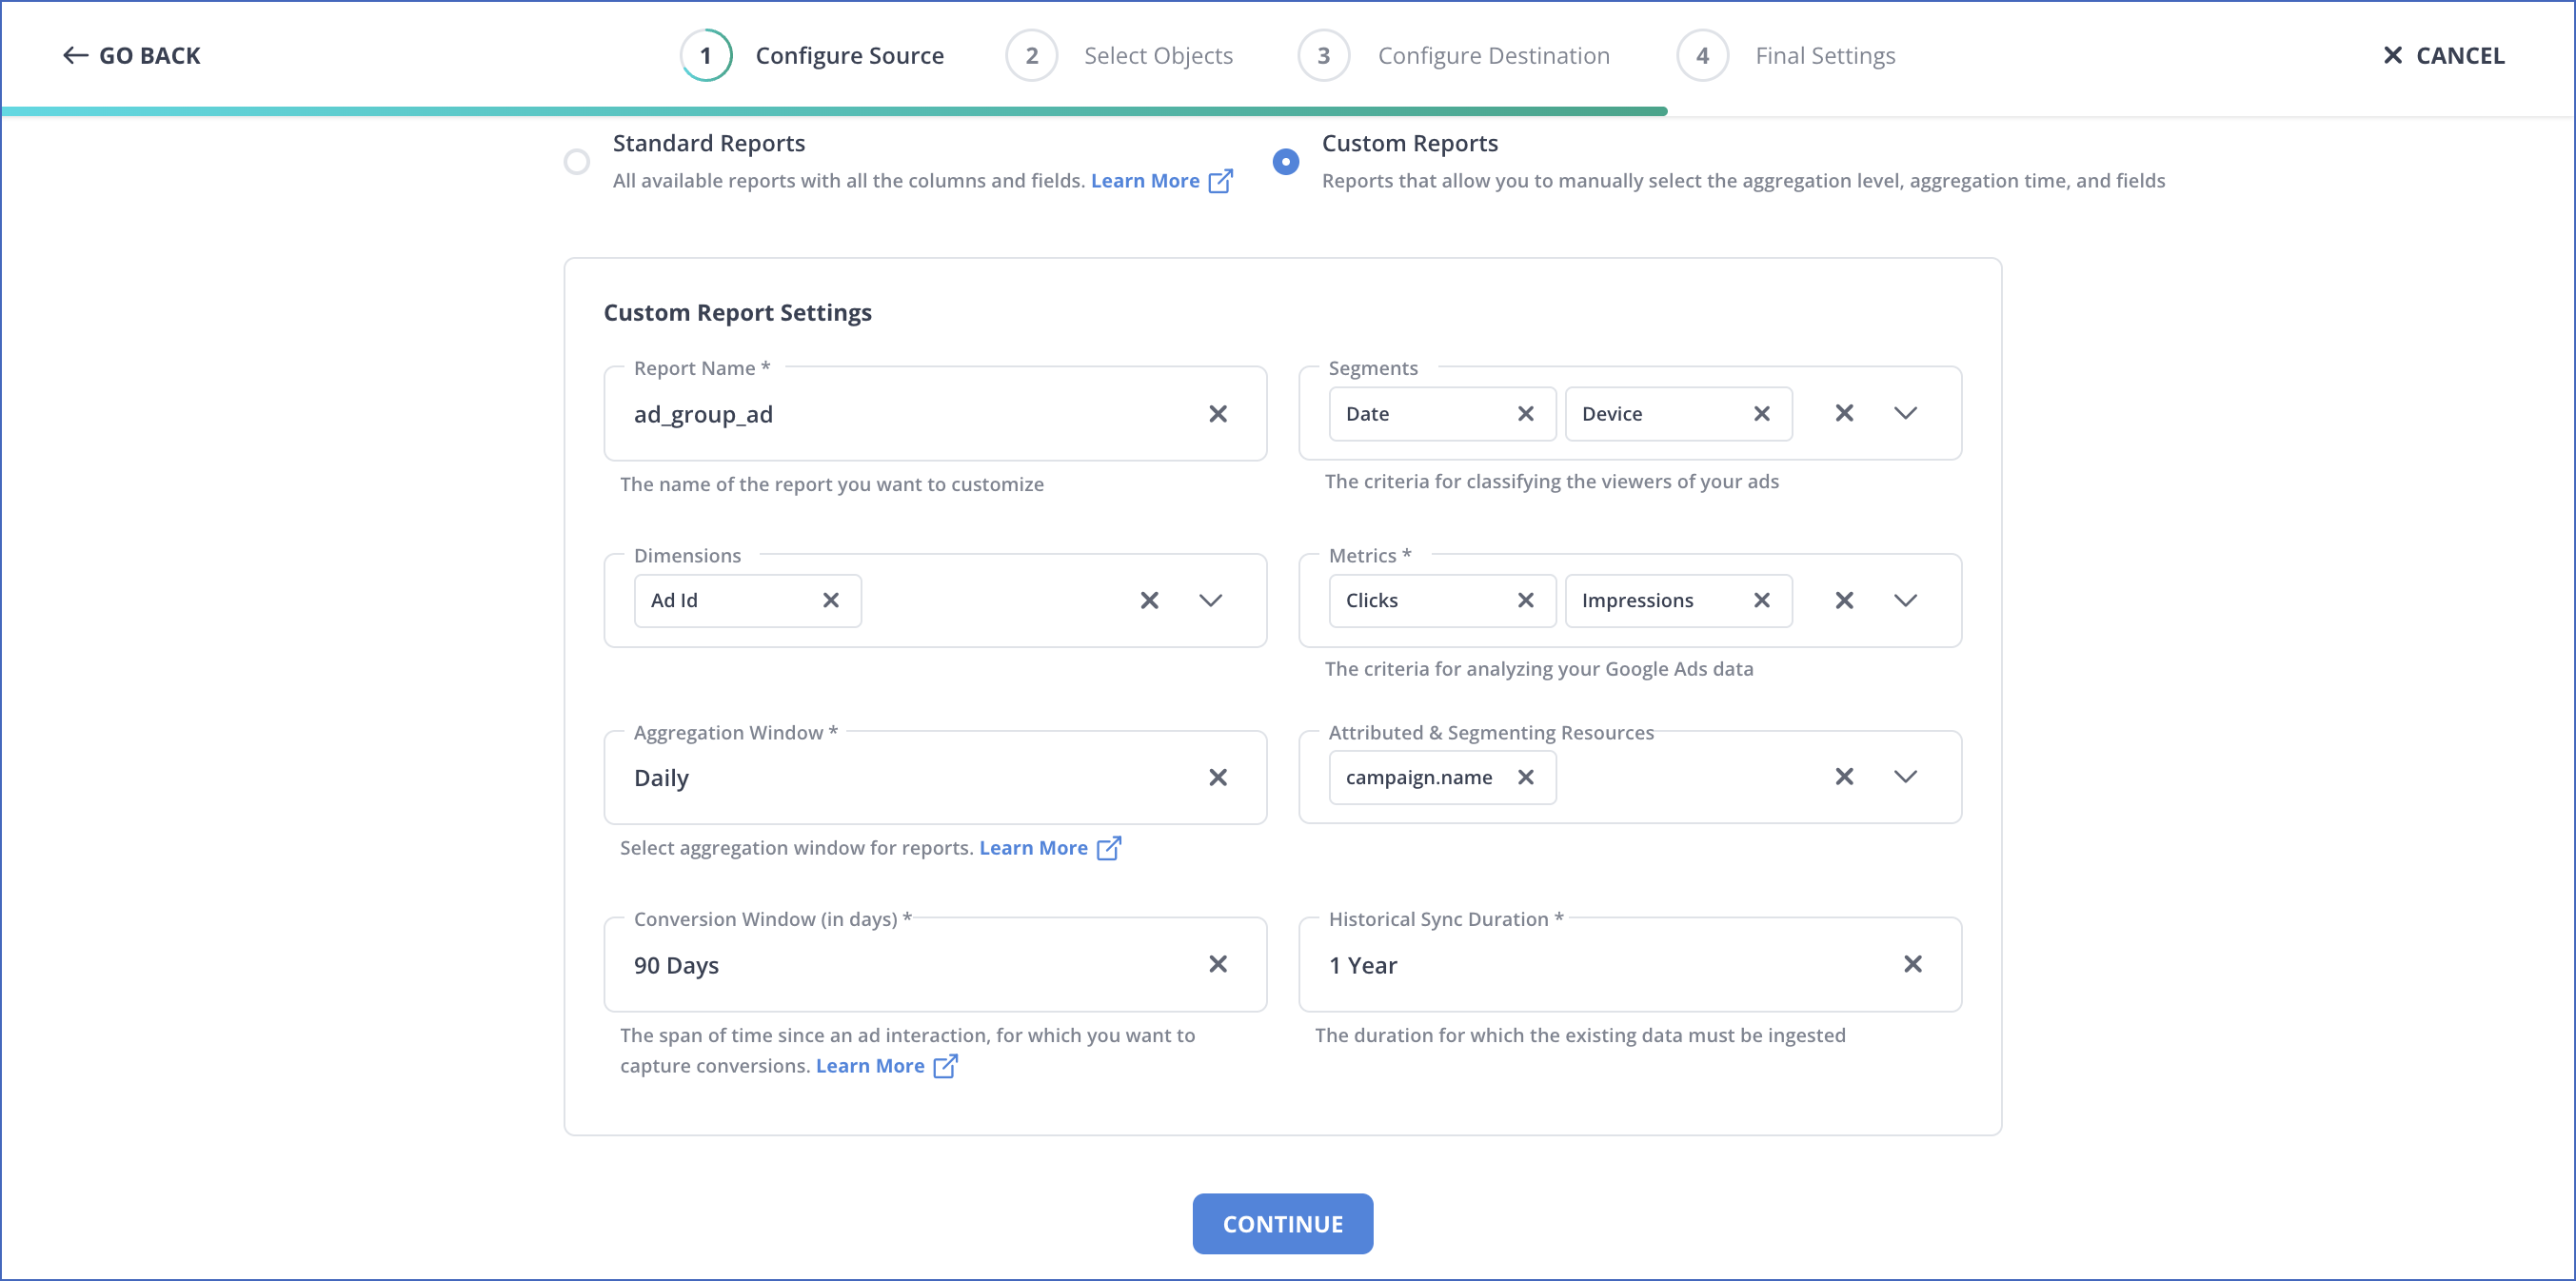
The configuration in Hevo for the above custom report query is as follows:
Revision History
Refer to the following table for the list of key updates made to this page:
| Date | Release | Description of Change |
|---|---|---|
| Jul-16-2025 | NA | New document. |