Databricks
On This Page
Databricks is an open-source storage layer that allows you to operate a data lakehouse architecture. This architecture provides data warehousing performance at data lake costs. Databricks runs on top of your existing data lake and is fully compatible with Apache Spark APIs. Apache Spark is an open-source data analytics engine that can perform analytics and data processing on very large data sets. Read A Gentle Introduction to Apache Spark on Databricks.
Hevo can load data from any of your Sources into a Databricks data warehouse. You can set up the Databricks Destination on the fly, while creating the Pipeline, or independently from the Navigation bar. The ingested data is first staged in Hevo’s S3 bucket before it is batched and loaded to the Databricks Destination. Additionally, Hevo supports Databricks on the AWS, Azure, and GCP platforms.
Hevo supports Databricks on the AWS, Azure, and GCP platforms. You can connect your Databricks warehouse hosted on any of these platforms to Hevo using one of the following methods:
-
Using the Databricks Partner Connect (Recommended Method)
The following image illustrates the key steps that you need to complete to configure Databricks as a Destination in Hevo:

Prerequisites
-
Your Databricks account is on the Premium plan or above, if you want to connect to the workspace using the Databricks Partner Connect.
-
An active AWS, Azure, or GCP account is available.
-
A Databricks workspace is created in your cloud service account (AWS, Azure, or GCP).
-
The workspace allows connections from the Hevo IP addresses of your region only if the IP access lists feature is enabled in your respective cloud provider.
Note: You must have Admin access to create an IP access list.
-
The URL of your Databricks workspace is available. It is in the format https://<deployment name>.cloud.databricks.com. For example, if the deployment name is dbc-westeros, the workspace URL is https://dbc-westeros.cloud.databricks.com.
-
The following requirements are met, if you want to connect to the workspace using your Databricks credentials:
-
The Databricks cluster or SQL warehouse is created.
-
The database hostname, port number, and HTTP Path are available.
-
The Personal Access Token (PAT) is available.
-
-
You are assigned the Team Collaborator or any administrator role except the Billing Administrator role in Hevo, to create the Destination.
Connect Databricks as a Destination using either of the following methods:
Connect Using the Databricks Partner Connect (Recommended Method)
Perform the following steps to configure Databricks as the Destination using the Databricks Partner Connect:
-
Log in to your Databricks account.
-
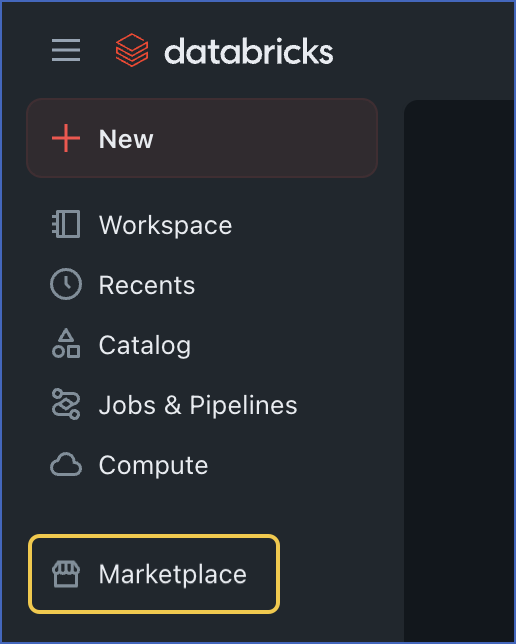
In the left navigation pane, click Marketplace.
-
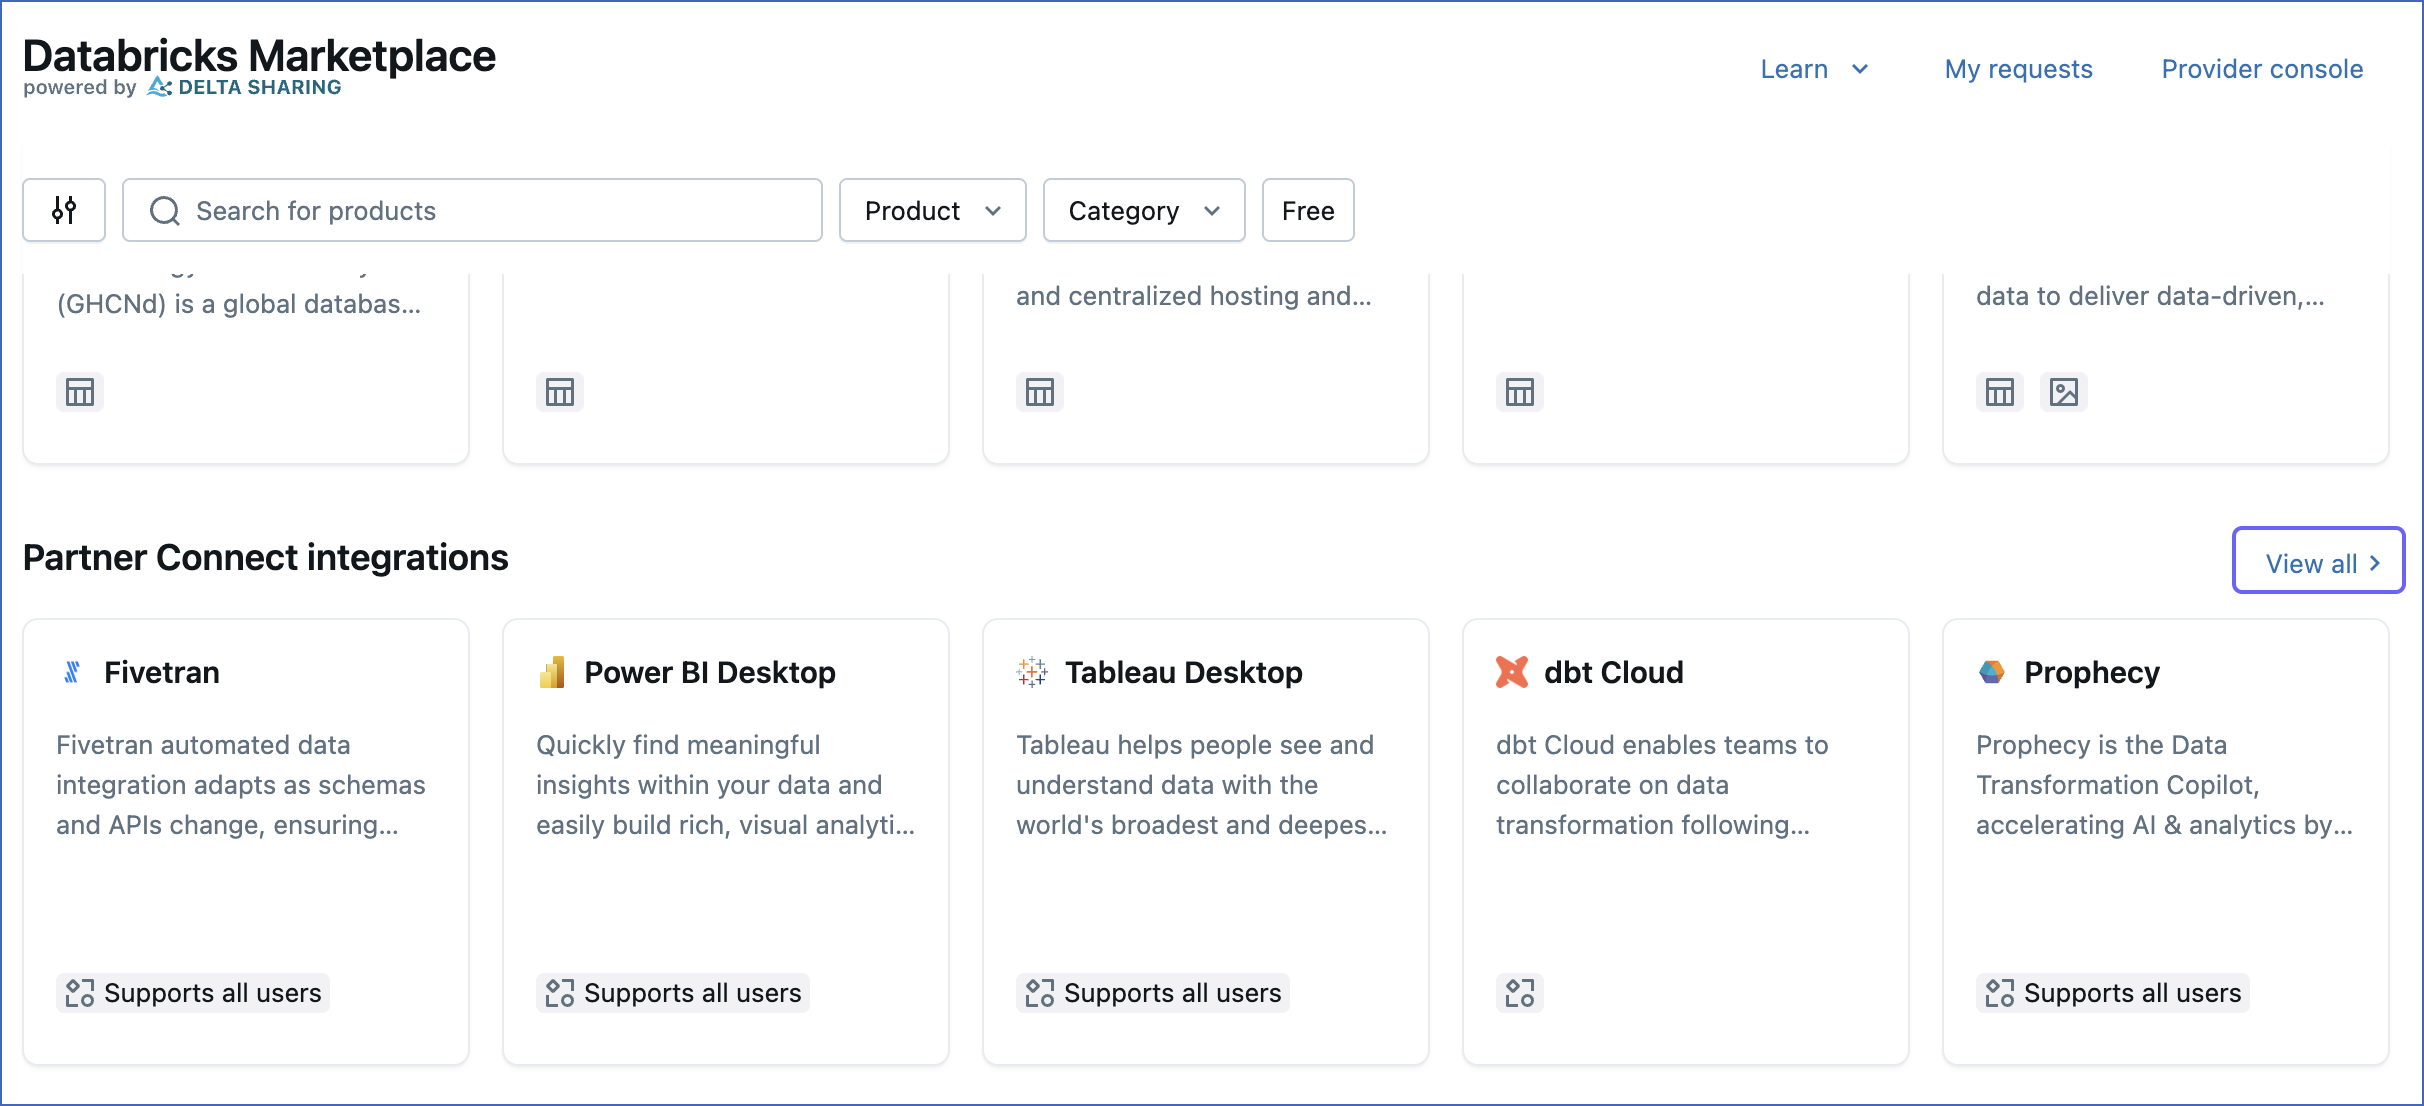
On the Databricks Marketplace page, scroll to the Partner Connect integrations section and click View all.
-
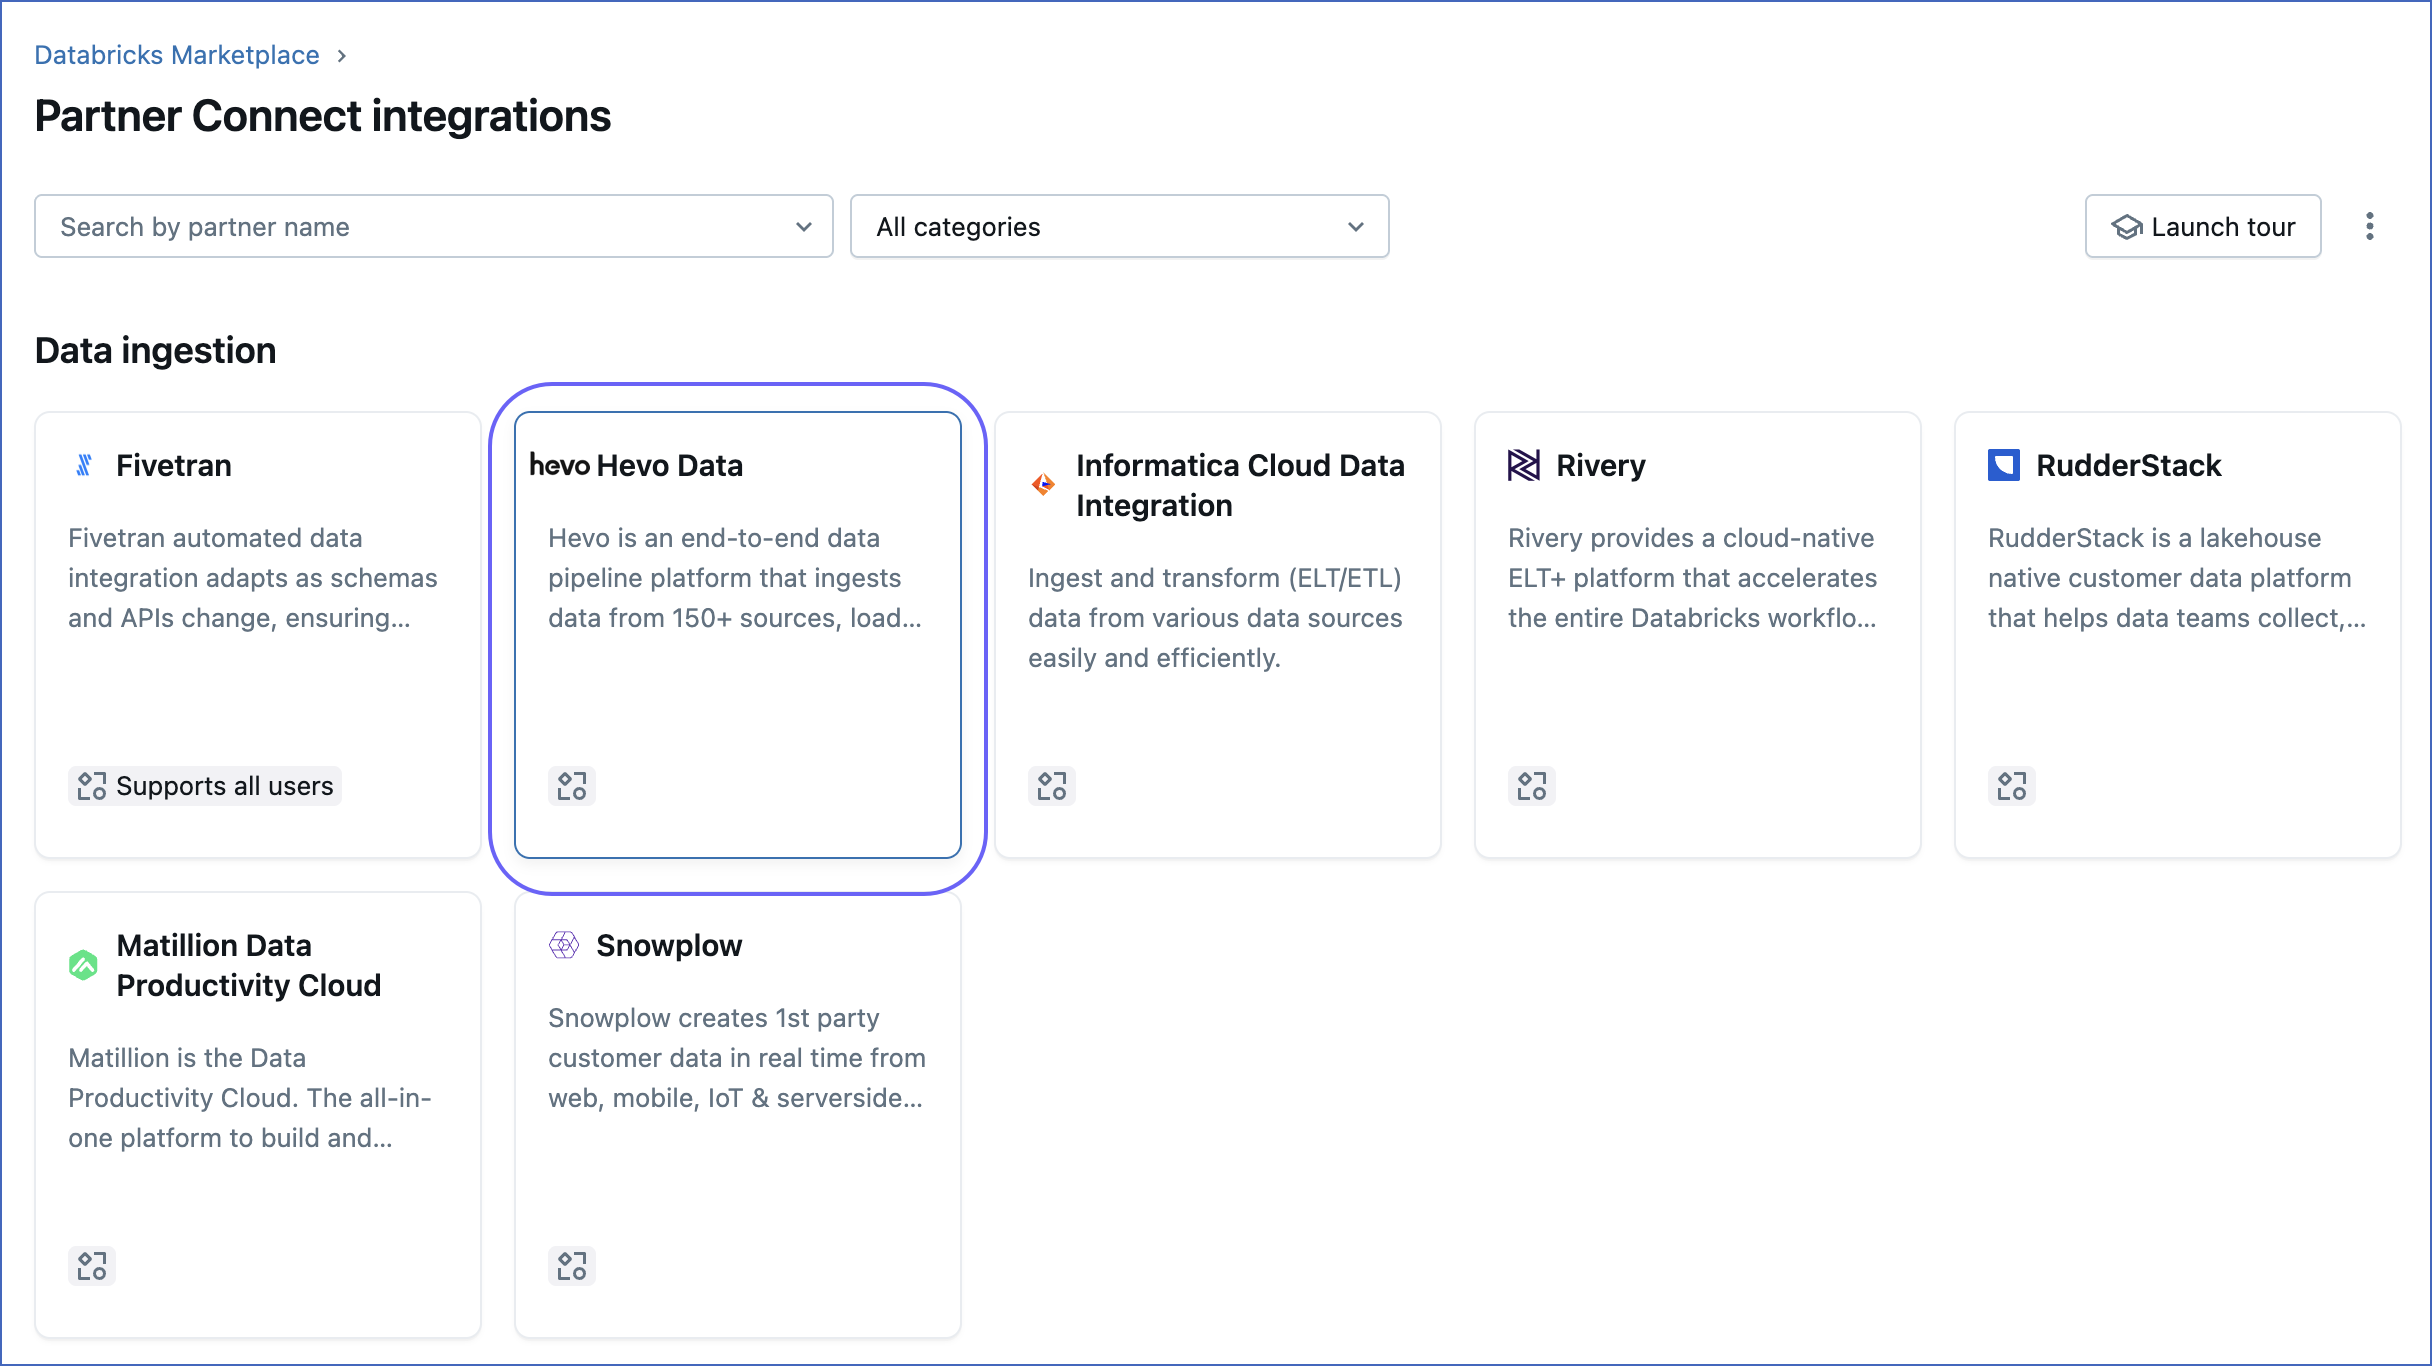
On the Partner Connect integrations page, under Data ingestion, click Hevo Data.
-
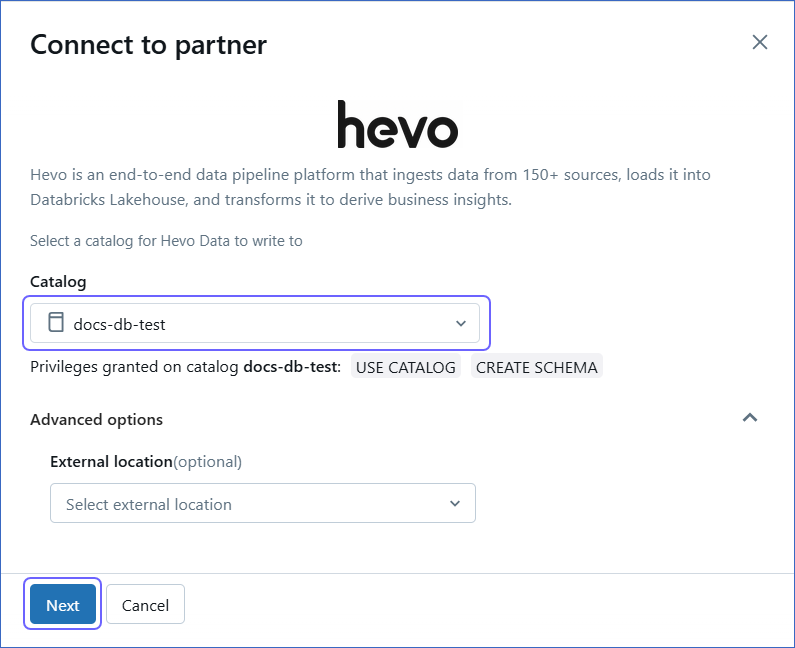
In the Connect to partner pop-up window, select the Catalog to which Hevo needs to write your data and click Next.
-
Review the settings of your Databricks resources. If required, edit the Compute field, and then click Next.
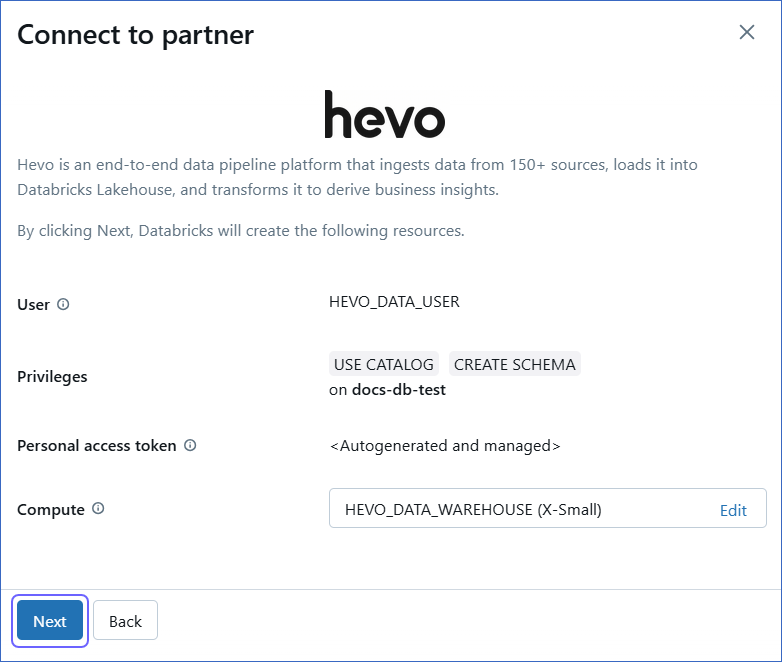
-
Click Connect to Hevo Data.
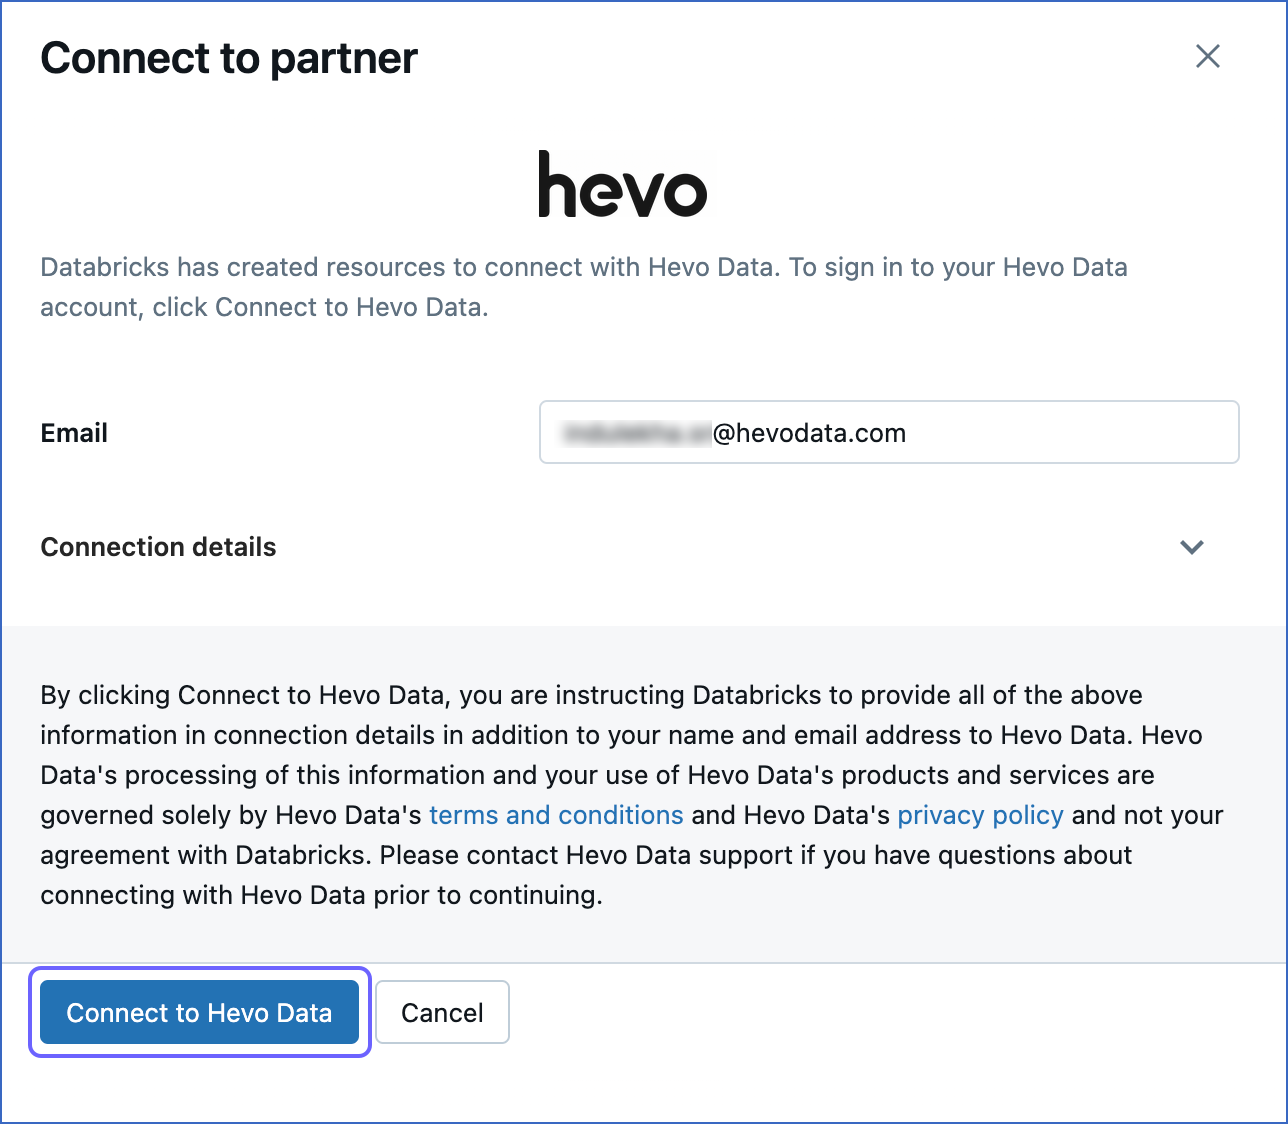
-
Sign up for Hevo or log in to your Hevo account. Post-login, you are redirected to the Configure your Databricks Destination page.
-
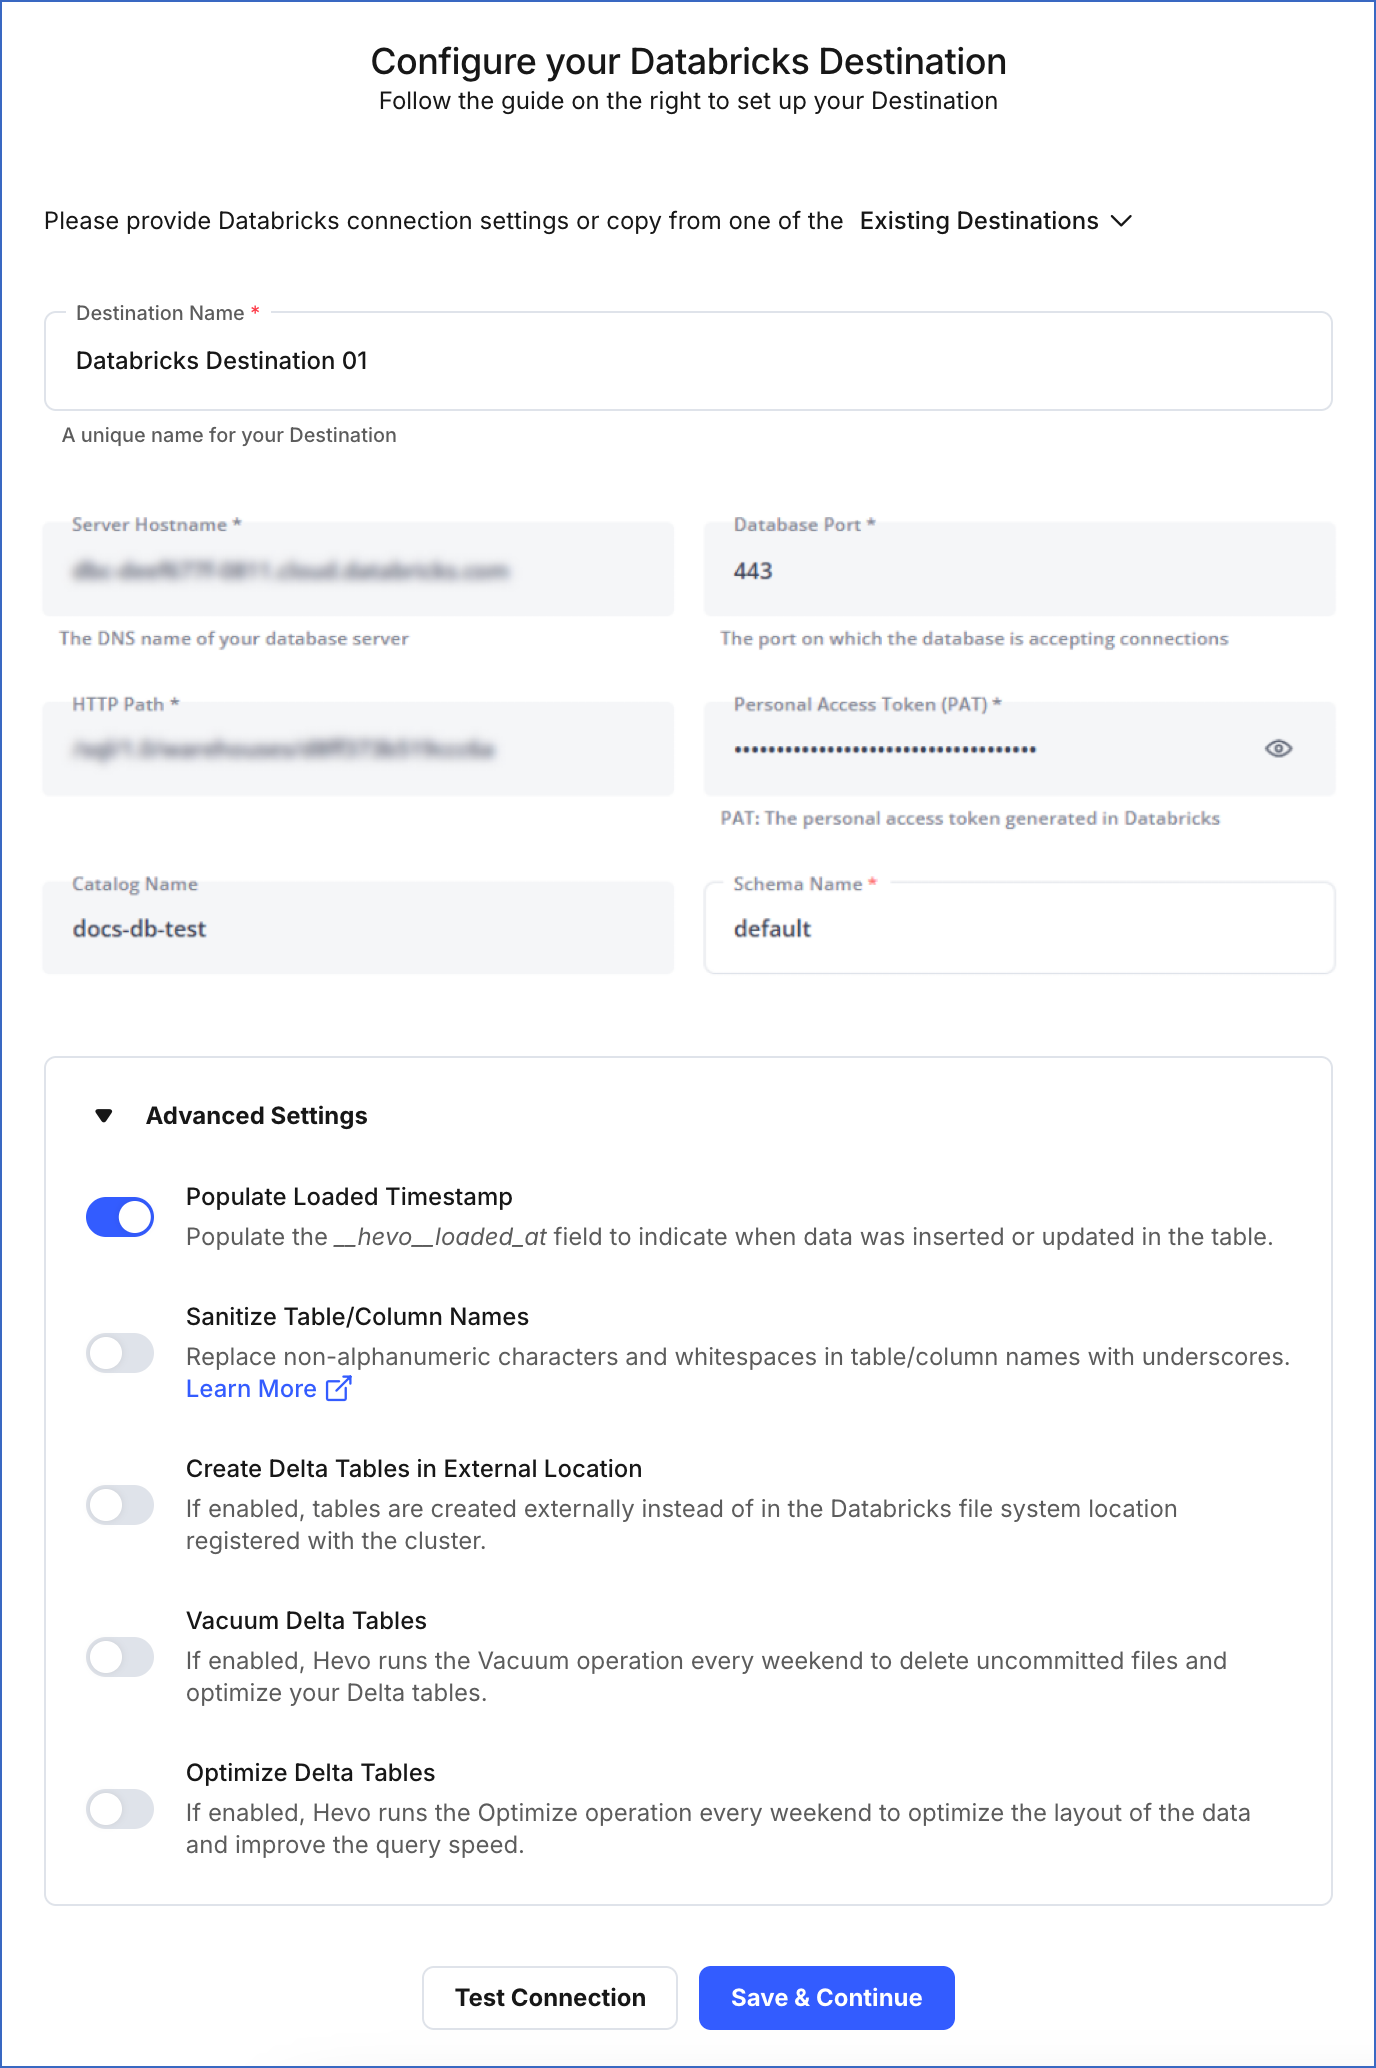
On the Configure your Databricks Destination page, specify the following:
Note: While establishing Partner Connect, the details of the Server Hostname, Database Port, HTTP Path, Personal Access Token (PAT), and Catalog Name fields are auto-populated, as Databricks creates these resources. Copy the PAT and save it securely like any other password. You may need to use it to allowlist Hevo’s IP address for your database region.
-
Destination Name: A unique name for the Destination, not exceeding 255 characters.
-
Schema Name: The name of the Destination database schema. Default value: default.
-
Advanced Settings:
-
Populate Loaded Timestamp: If enabled, Hevo appends the
___hevo_loaded_at_column to the Destination table to indicate the time when the Event was loaded. -
Sanitize Table/Column Names: If enabled, Hevo sanitizes the column names to remove all non-alphanumeric characters and spaces in the table and column names and replaces them with an underscore (_). Read Name Sanitization.
-
Create Delta Tables in External Location (Optional) (Non-editable): If enabled, Hevo creates the external Delta tables in the
/{schema}/{table}path, which is the default Databricks File System location registered with the cluster.Note: This option is disabled as Databricks automatically configures this option when connecting using the Databricks Partner Connect.
-
Vacuum Delta Tables: If enabled, Hevo runs the Vacuum operation every weekend to delete the uncommitted files and clean up your Delta tables. Databricks charges additional costs for these queries. Read Databricks Cloud Partners documentation to know more about vacuuming.
-
Optimize Delta Tables: If enabled, Hevo runs the Optimize queries every weekend to optimize the layout of the data and improve the query speed. Databricks charges additional costs for these queries. Read Databricks Cloud Partners documentation to know more about optimization.
-
-
-
Click Test Connection. This button is enabled once all the mandatory fields are specified.
Note: You must allow connections from the Hevo IP addresses of your region to your workspace if you have enabled the IP access lists feature for it.
-
Click Save & Continue. This button is enabled once all the mandatory fields are specified.
Connect Using the Databricks Credentials
Refer to the steps in this section to create a Databricks workspace, connect to a warehouse, and obtain the Databricks credentials.
(Optional) Create a Databricks workspace
A workspace refers to your Databricks deployment in the cloud service account. Within the workspace, you can create clusters and SQL warehouses and generate the credentials for configuring Databricks as a Destination in Hevo.
To create a workspace:
-
Log in to your Databricks account.
-
Create a workspace as per your cloud provider. Read Databricks Cloud Partners for the documentation related to each cloud partner (AWS, Azure, and GCP).
You are automatically assigned the
Admin accessto the workspace that you create.
(Optional) Add Members to the Workspace
Once you have created the workspace, add your team members who can access the workspace and create and manage clusters in it.
-
Log in to your Databricks account with
Admin access. -
Add users to the workspace and assign them the necessary privileges for creating clusters. Read Databricks Cloud Partners documentation to know more.
Create a Databricks Cluster or Warehouse
You must create a cluster or SQL warehouse to allow Hevo to connect to your Databricks workspace and load data. To do so, perform the steps in one of the following:
Create a Databricks cluster
A cluster is a computing resource that can be created within a Databricks workspace and be used for loading the objects to this workspace. You can use an existing Databricks cluster or create a new one for loading data.
Note: Apache Spark jobs are available only for clusters.
To create a Databricks cluster:
-
Log in to your Databricks workspace. URL: [https://<workspace-name><env>.databricks.com/]
-
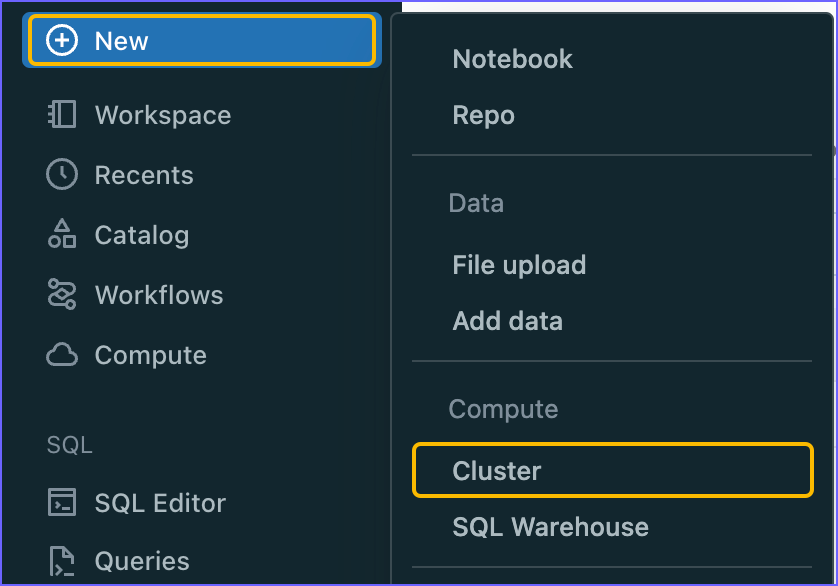
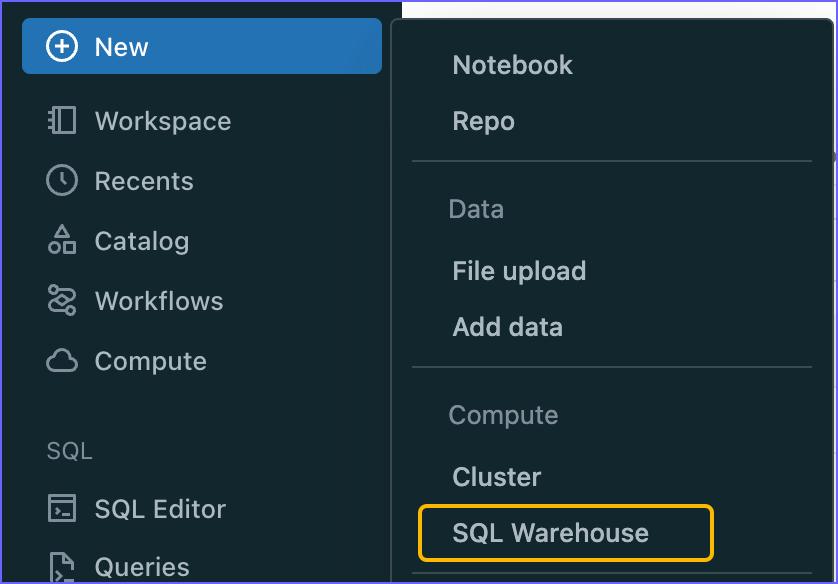
In the left navigation pane, click New, and then click Cluster.
-
Specify a Cluster name and select the required configuration, such as the Databricks runtime version and Node type.
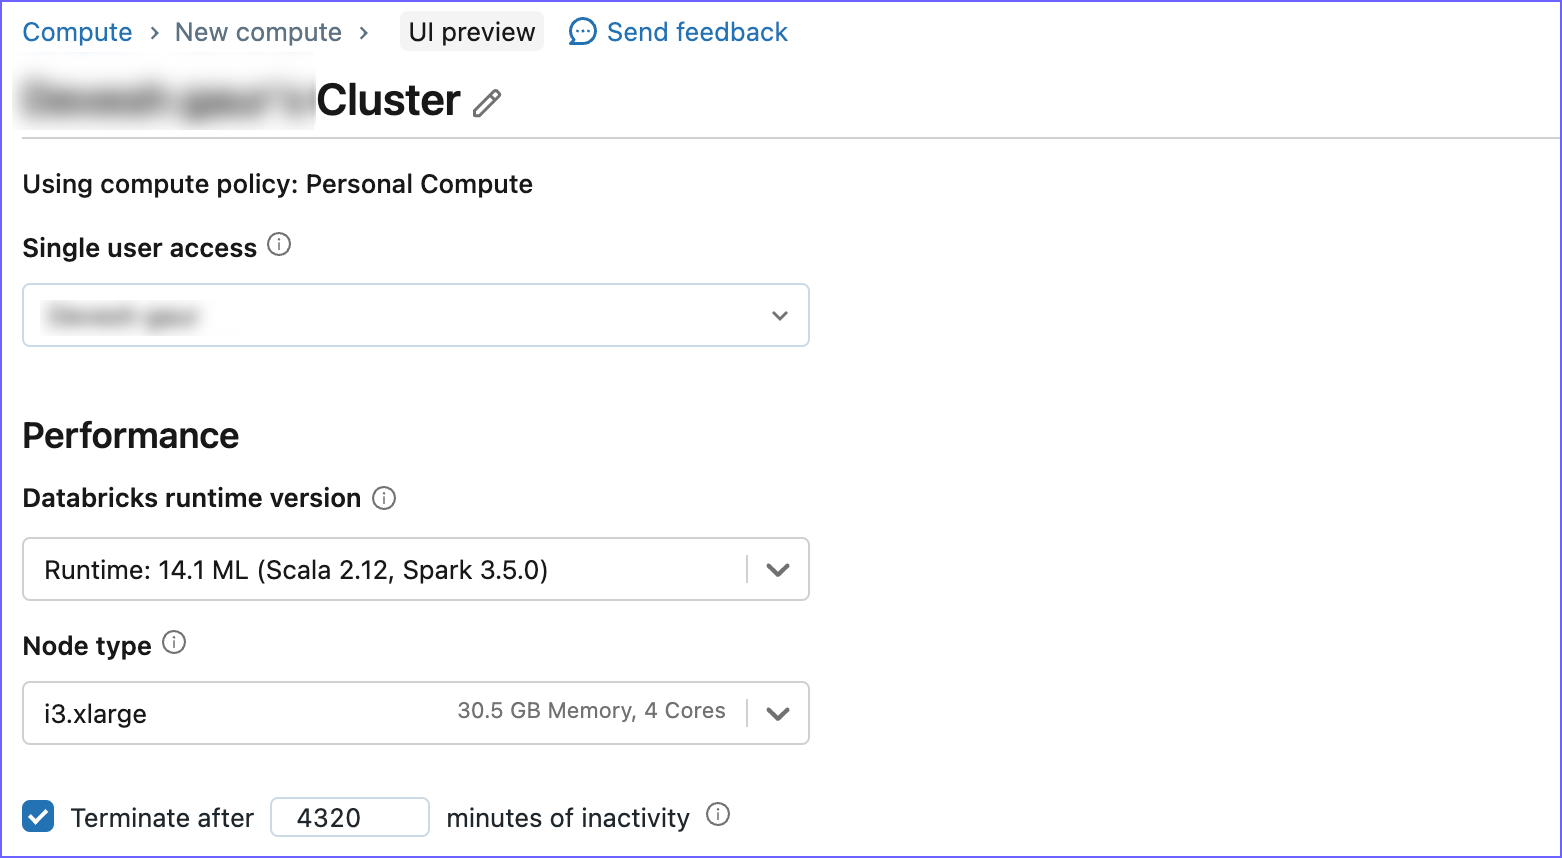
-
Expand the Advanced options section and click the Spark tab.
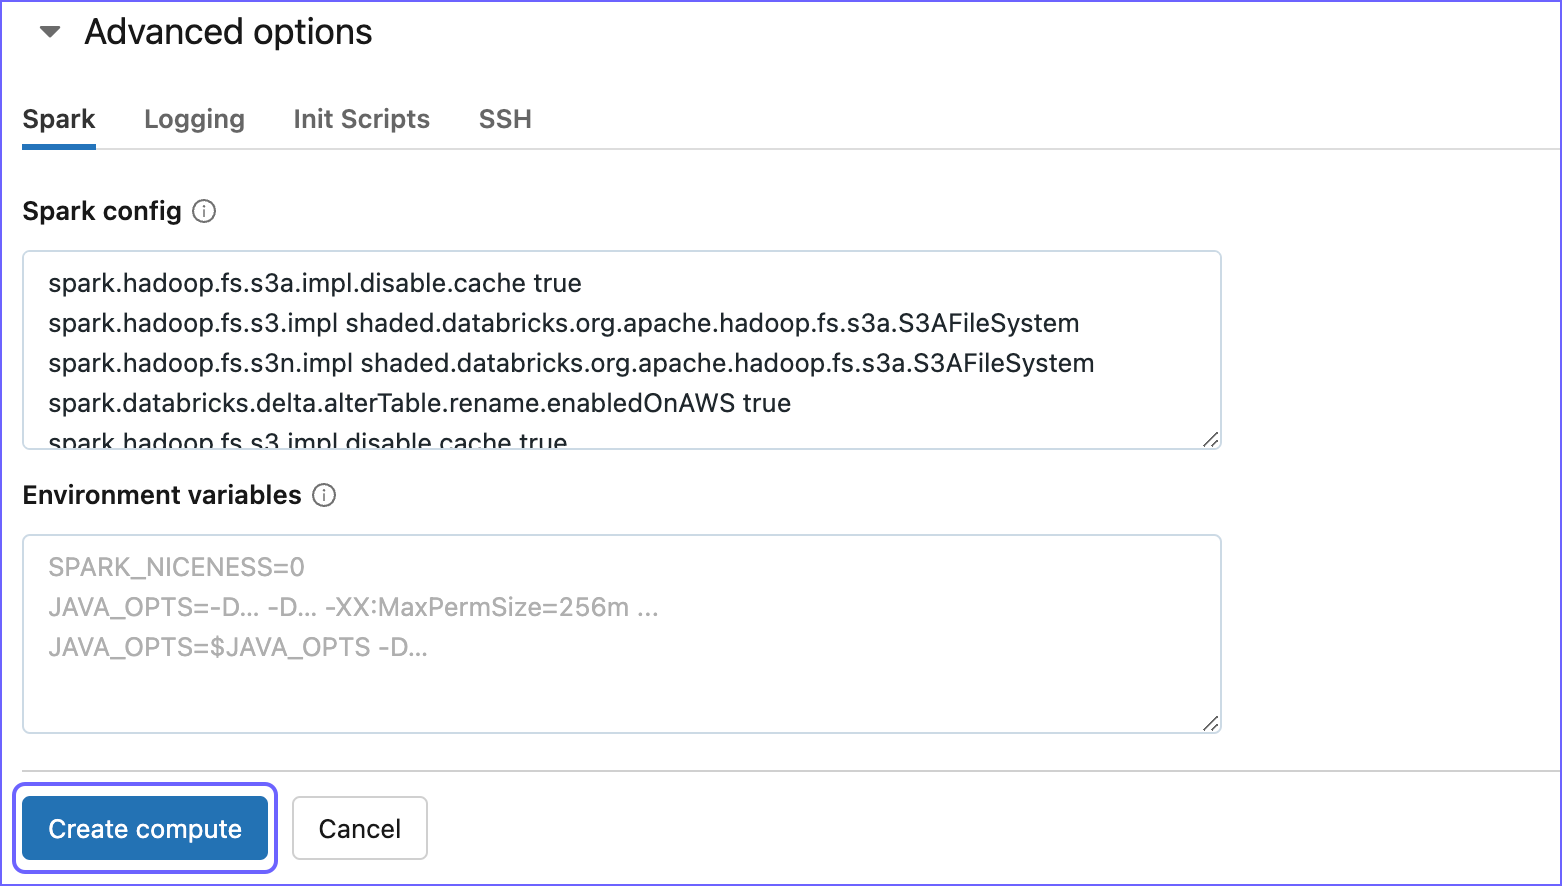
-
In the Spark Config box, paste the following code:
spark.databricks.delta.alterTable.rename.enabledOnAWS true
spark.hadoop.fs.s3a.impl shaded.databricks.org.apache.hadoop.fs.s3a.S3AFileSystem
spark.hadoop.fs.s3n.impl shaded.databricks.org.apache.hadoop.fs.s3a.S3AFileSystem
spark.hadoop.fs.s3n.impl.disable.cache true
spark.hadoop.fs.s3.impl.disable.cache true
spark.hadoop.fs.s3a.impl.disable.cache true
spark.hadoop.fs.s3.impl shaded.databricks.org.apache.hadoop.fs.s3a.S3AFileSystem
The above code snippet specifies the configurations required by Hevo to read the data from your AWS S3 account where the data is staged.
-
Click Create compute to create your cluster.
Create a Databricks SQL warehouse
An SQL warehouse is a computing resource that allows you to run only SQL commands on the data objects.
To create a Databricks SQL warehouse:
-
Log in to your Databricks account.
-
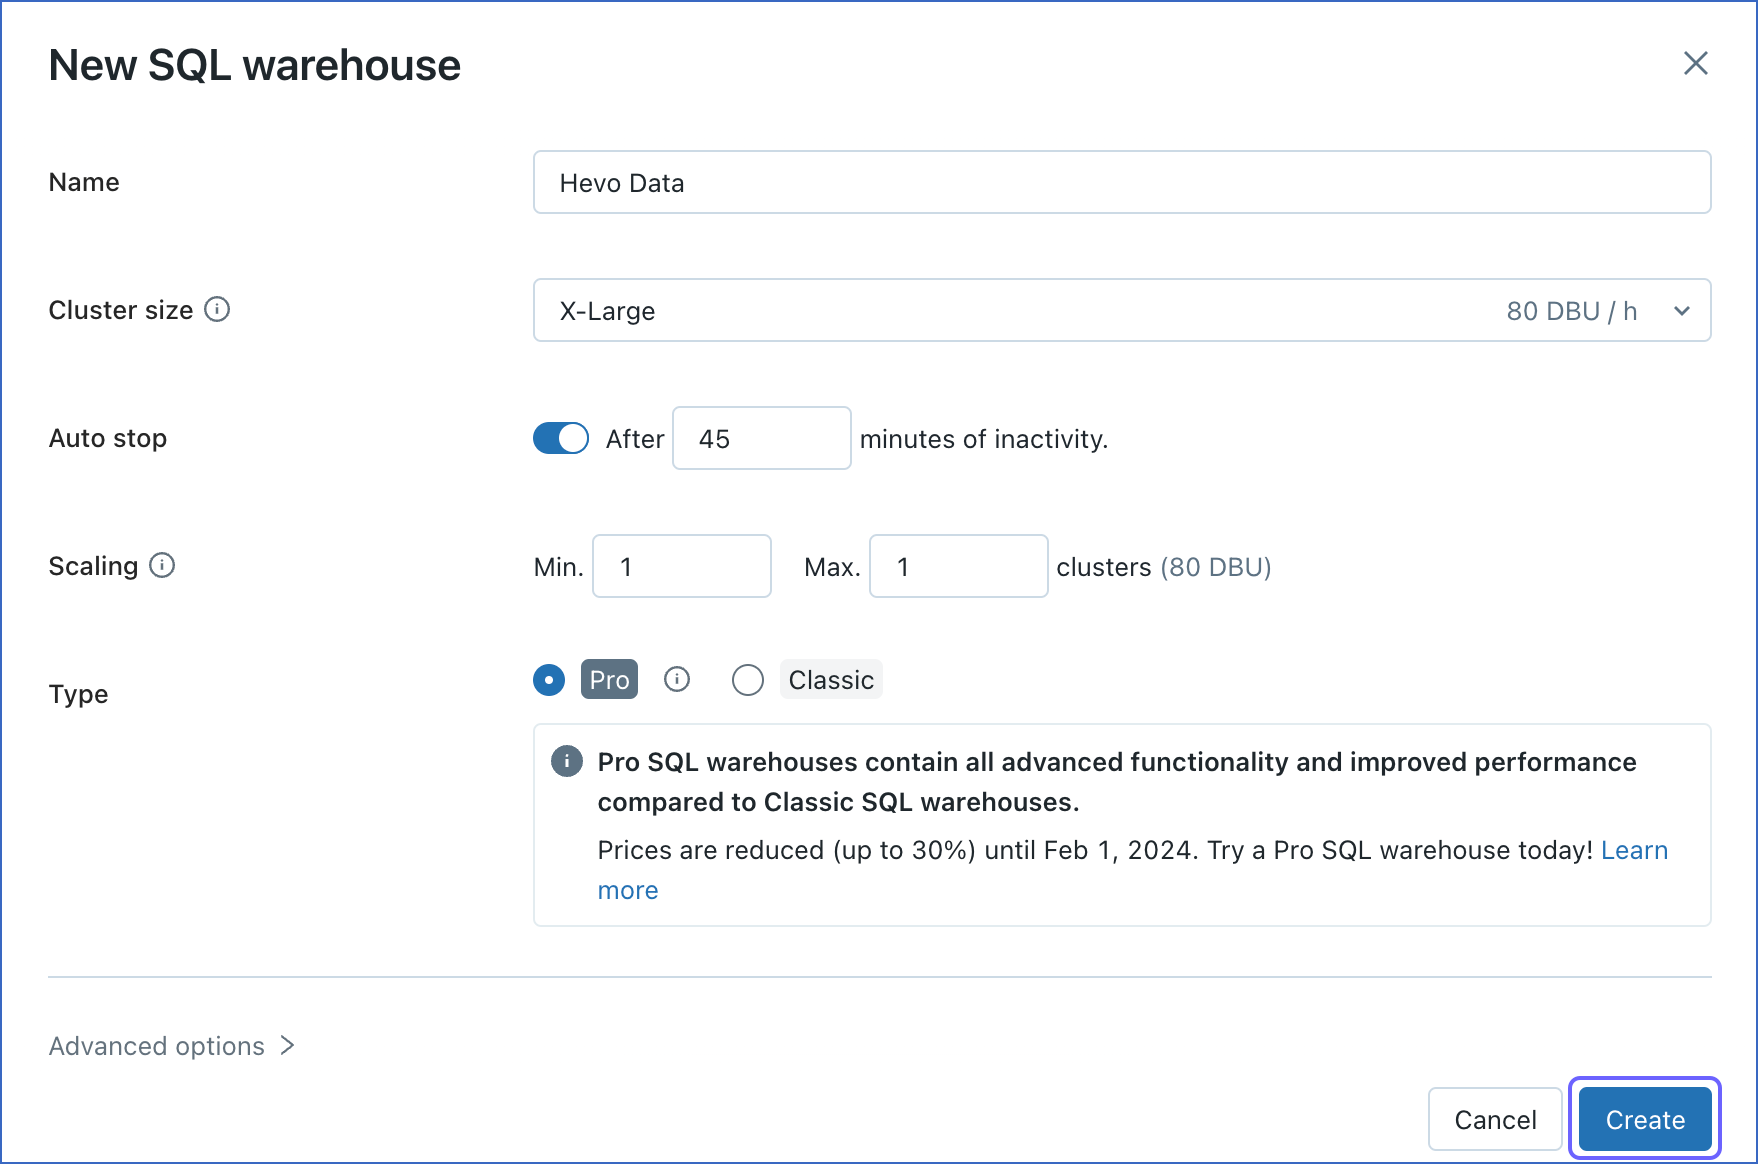
In the left navigation pane, click New, and then click SQL Warehouse.
-
In the New SQL Warehouse window, do the following:
-
Specify a Name for the warehouse.
-
Select your Cluster Size.
-
Configure other warehouse options, as required.
-
Click Create.
-
Obtain Databricks Credentials
Once you have created the cluster or warehouse for data loading, you must obtain its details for configuring Databricks in Hevo. Depending on the resource (cluster or warehouse) you created in Step 3 above, perform the steps in one of the following:
Obtain cluster details
-
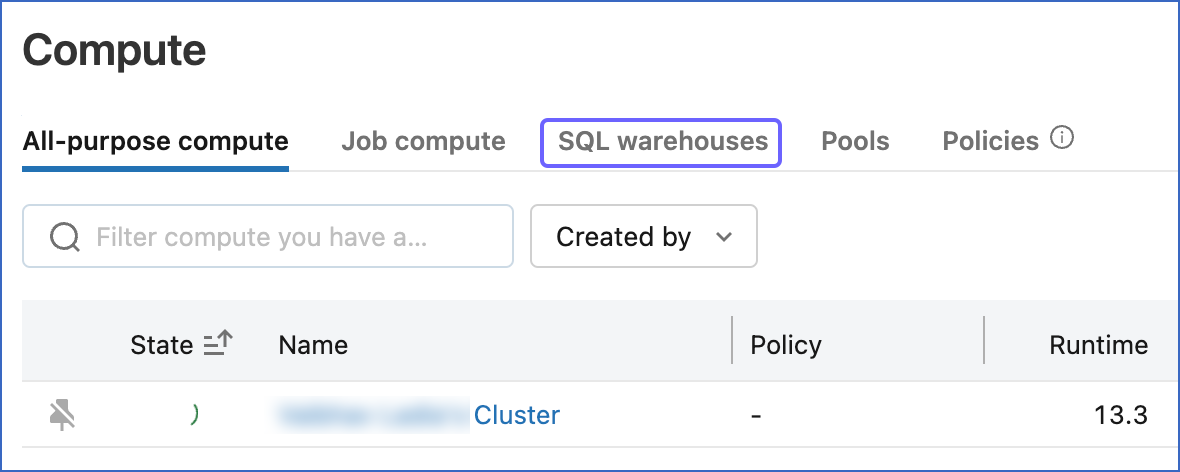
In the left navigation pane of the databricks console, click Compute.
-
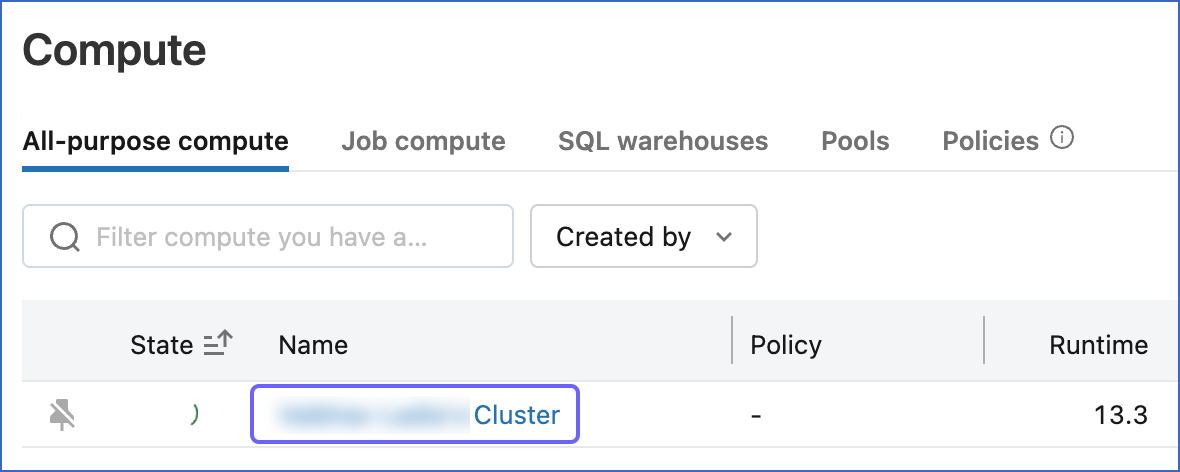
Click the cluster that you created above.
-
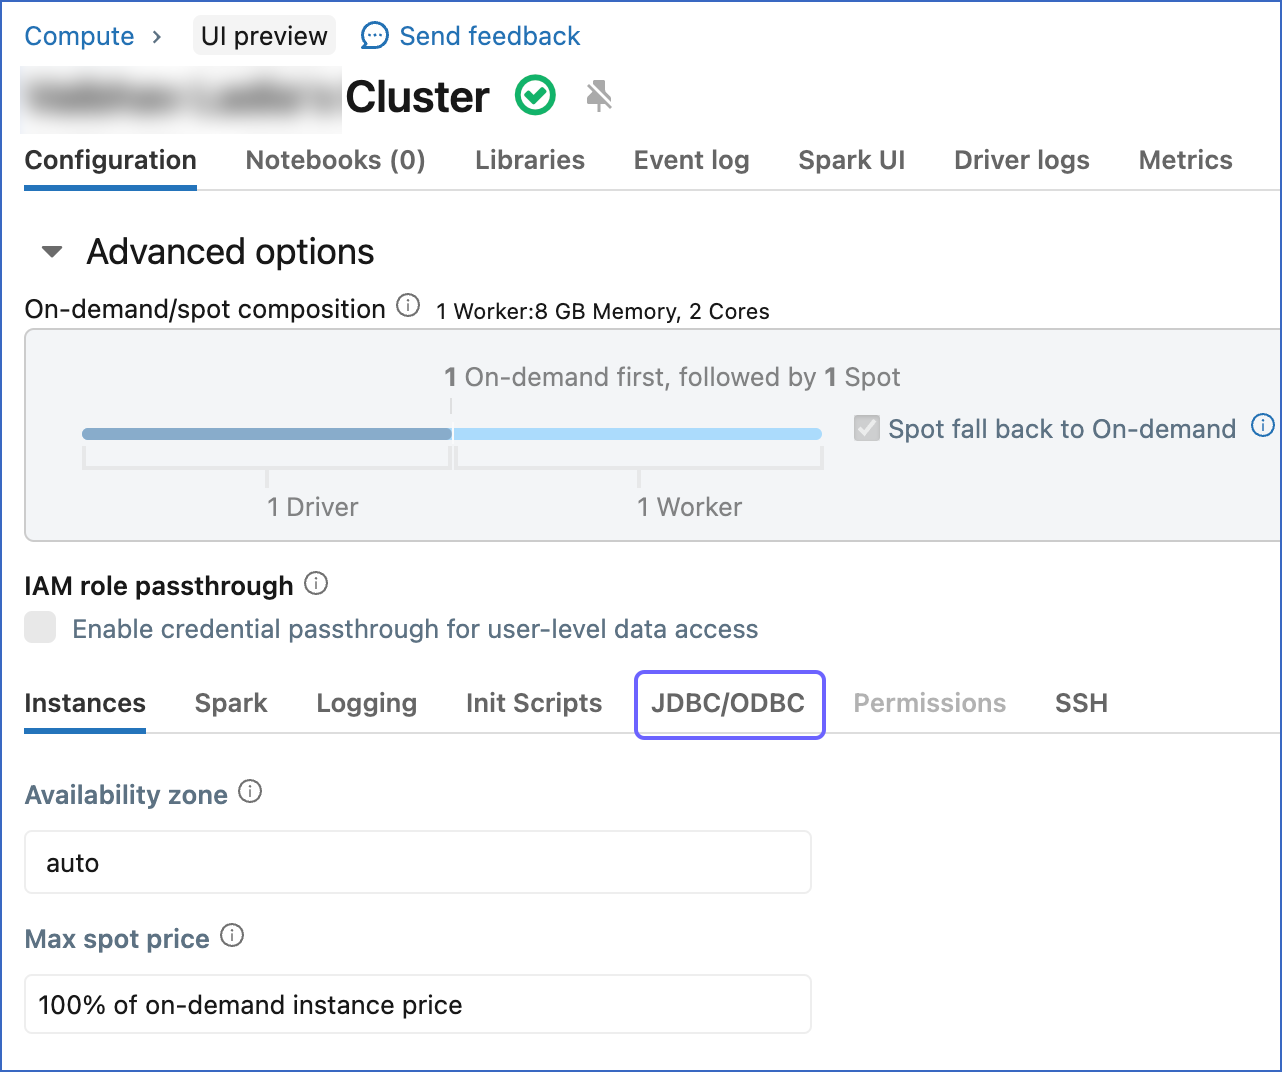
In the Configuration tab, scroll down to the Advanced Options section and click JDBC/ODBC.
-
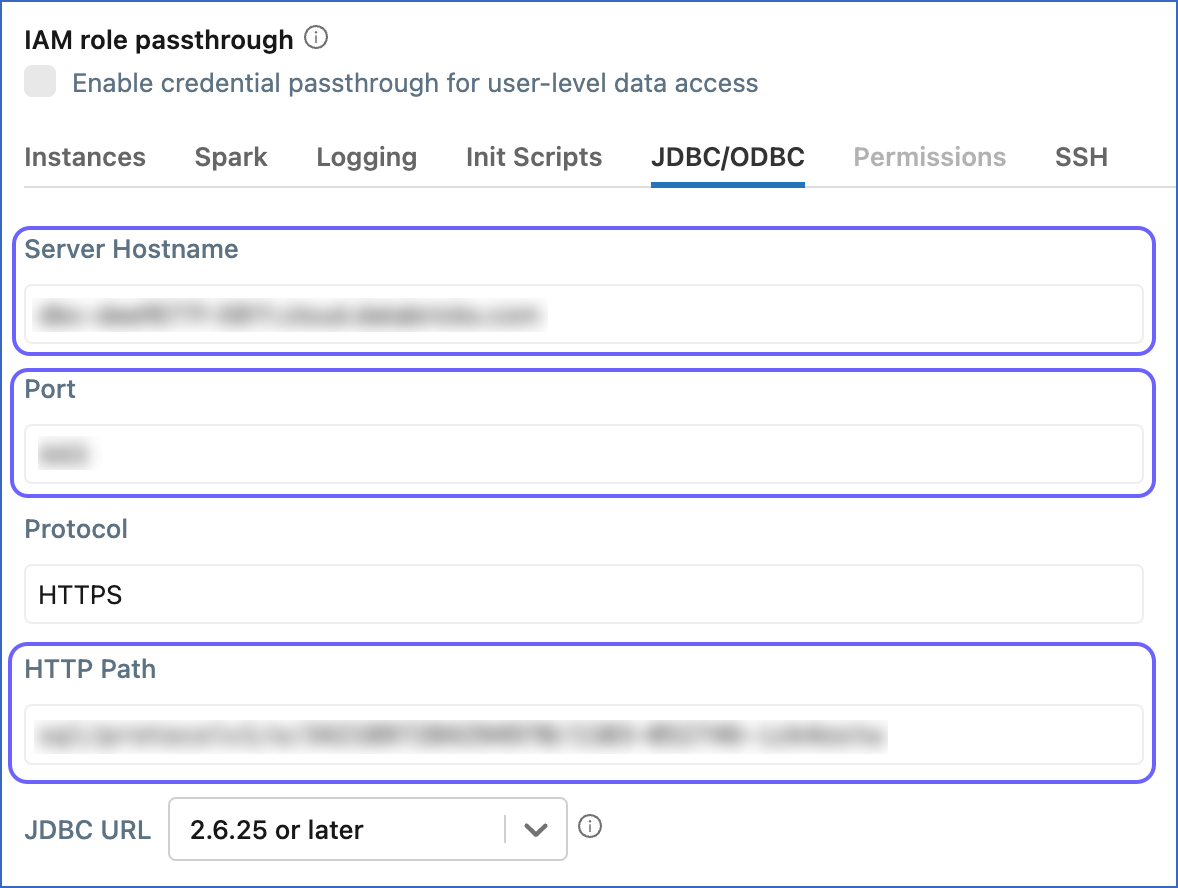
Copy the Server Hostname, Port, and HTTP Path, and save them securely like any other password. You can use these credentials while configuring your Databricks Destination.
Obtain SQL warehouse details
-
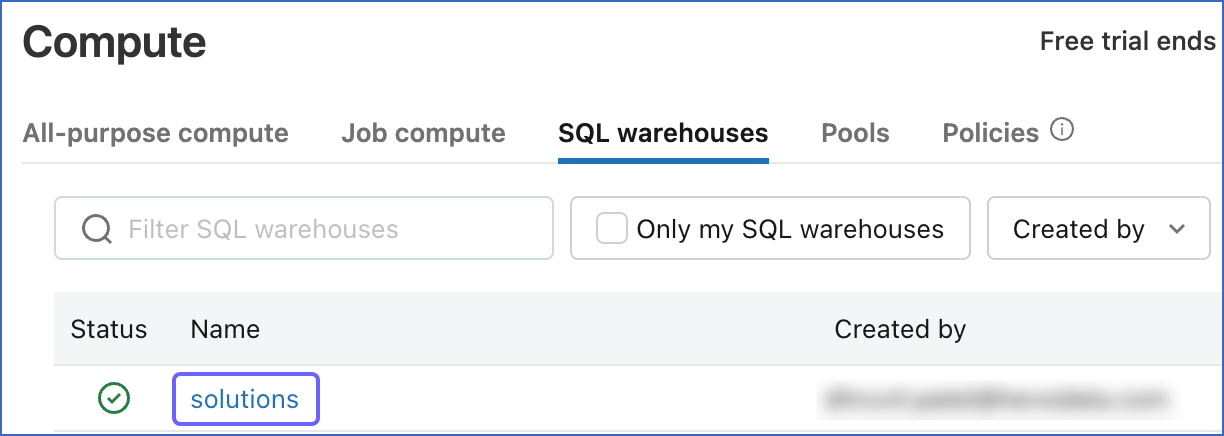
In the left navigation pane of the databricks console, click Compute.
-
On the Compute page, click SQL warehouses.
-
Click the SQL warehouse that you created above.
-
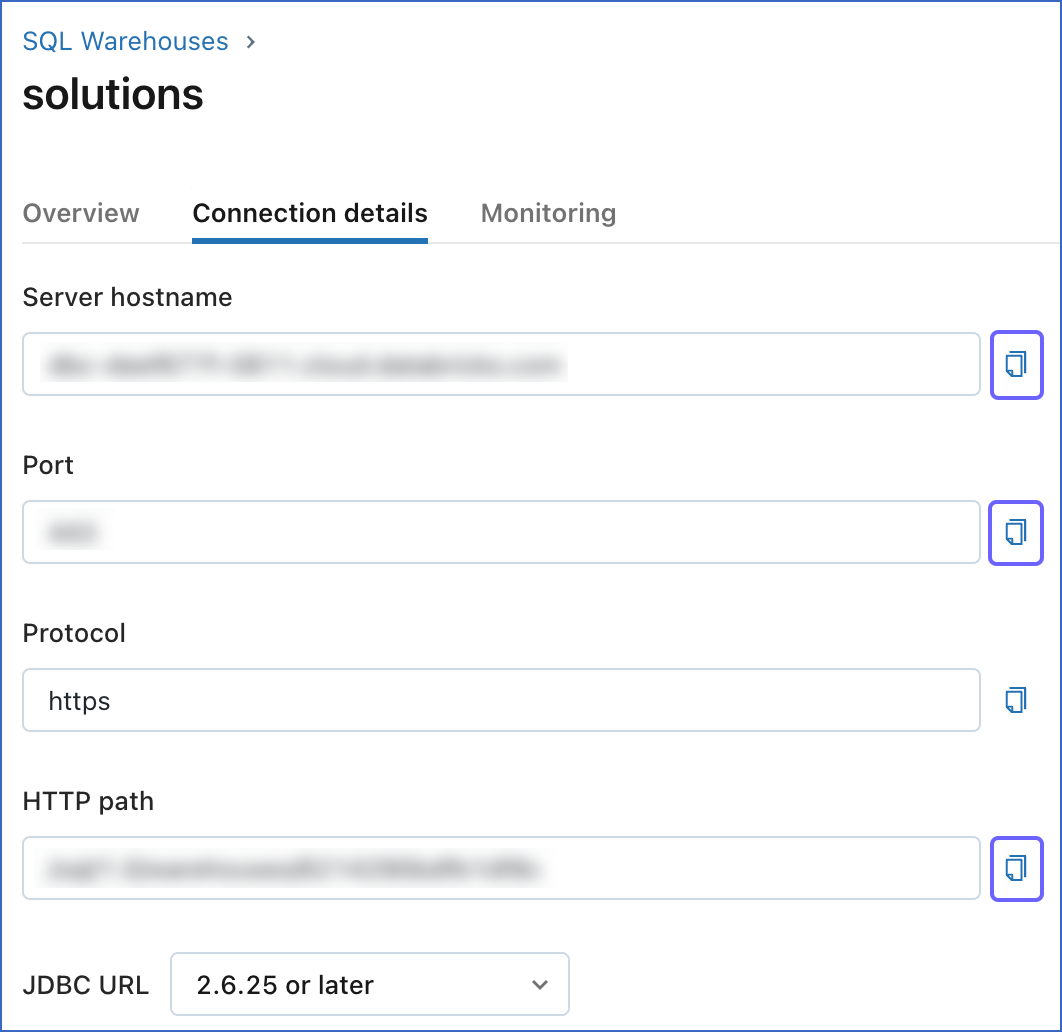
On the <SQL_Warehouse_Name> page, click Connection details.

-
Click the Copy icon corresponding to the Server hostname, Port, and HTTP path fields, to copy them and save them securely like any other password. You can use these credentials while configuring your Databricks Destination.
Create a Personal Access Token (PAT)
Hevo requires a Databricks Personal Access Token (PAT) to authenticate and connect to your Databricks instance and use the Databricks REST APIs.
To generate the PAT:
-
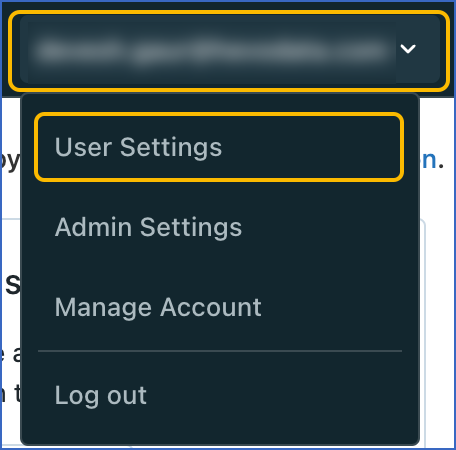
Click on the top right of your Databricks console, and in the drop-down, click User Settings.
-
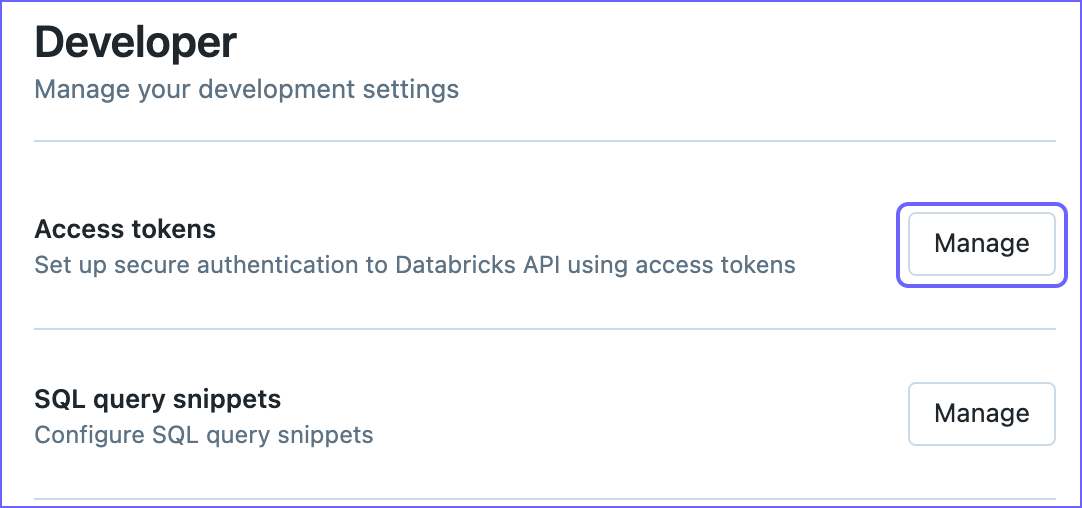
In the left navigation pane, under Settings, click Developer.

-
On the Developer page, click Manage corresponding to the Access tokens.
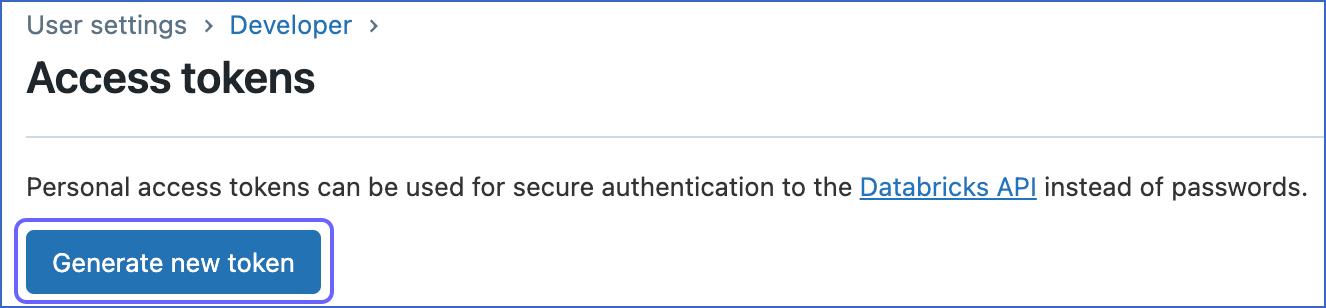
-
On the Access tokens page, click Generate new token.
-
Optionally, in the Generate new token dialog box, provide a description in the Comment field and specify the token Lifetime (expiration period).
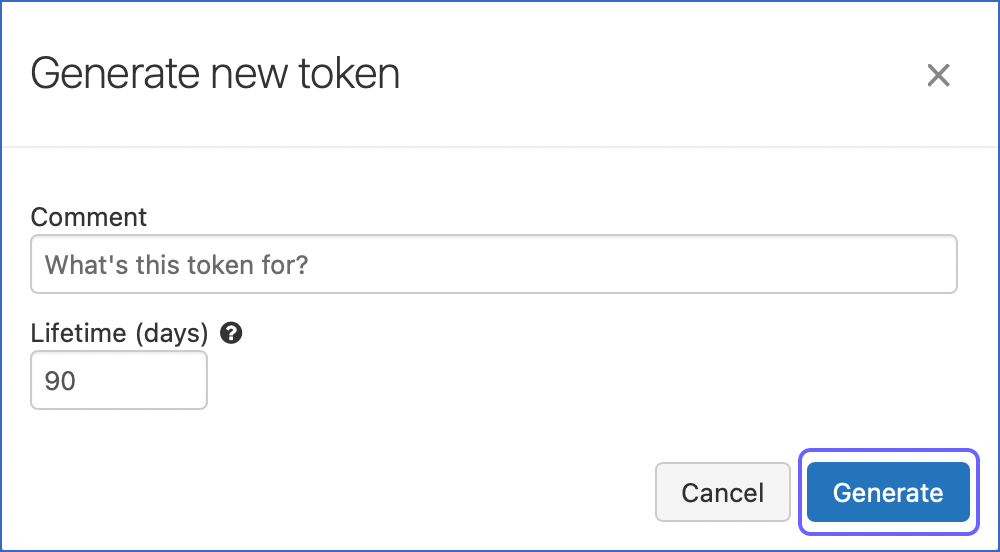
-
Click Generate.
-
Copy the generated token and save it securely like any other password. Use this token to connect Databricks as a Destination in Hevo.
Note: PATs are similar to passwords; store these securely.
Configure Databricks as a Destination
Perform the following steps to configure Databricks as a Destination in Hevo:
-
Click DESTINATIONS in the Navigation Bar.
-
Click + Create Standard Destination in the Destinations List View.
-
On the Add Destination page, select Databricks.
-
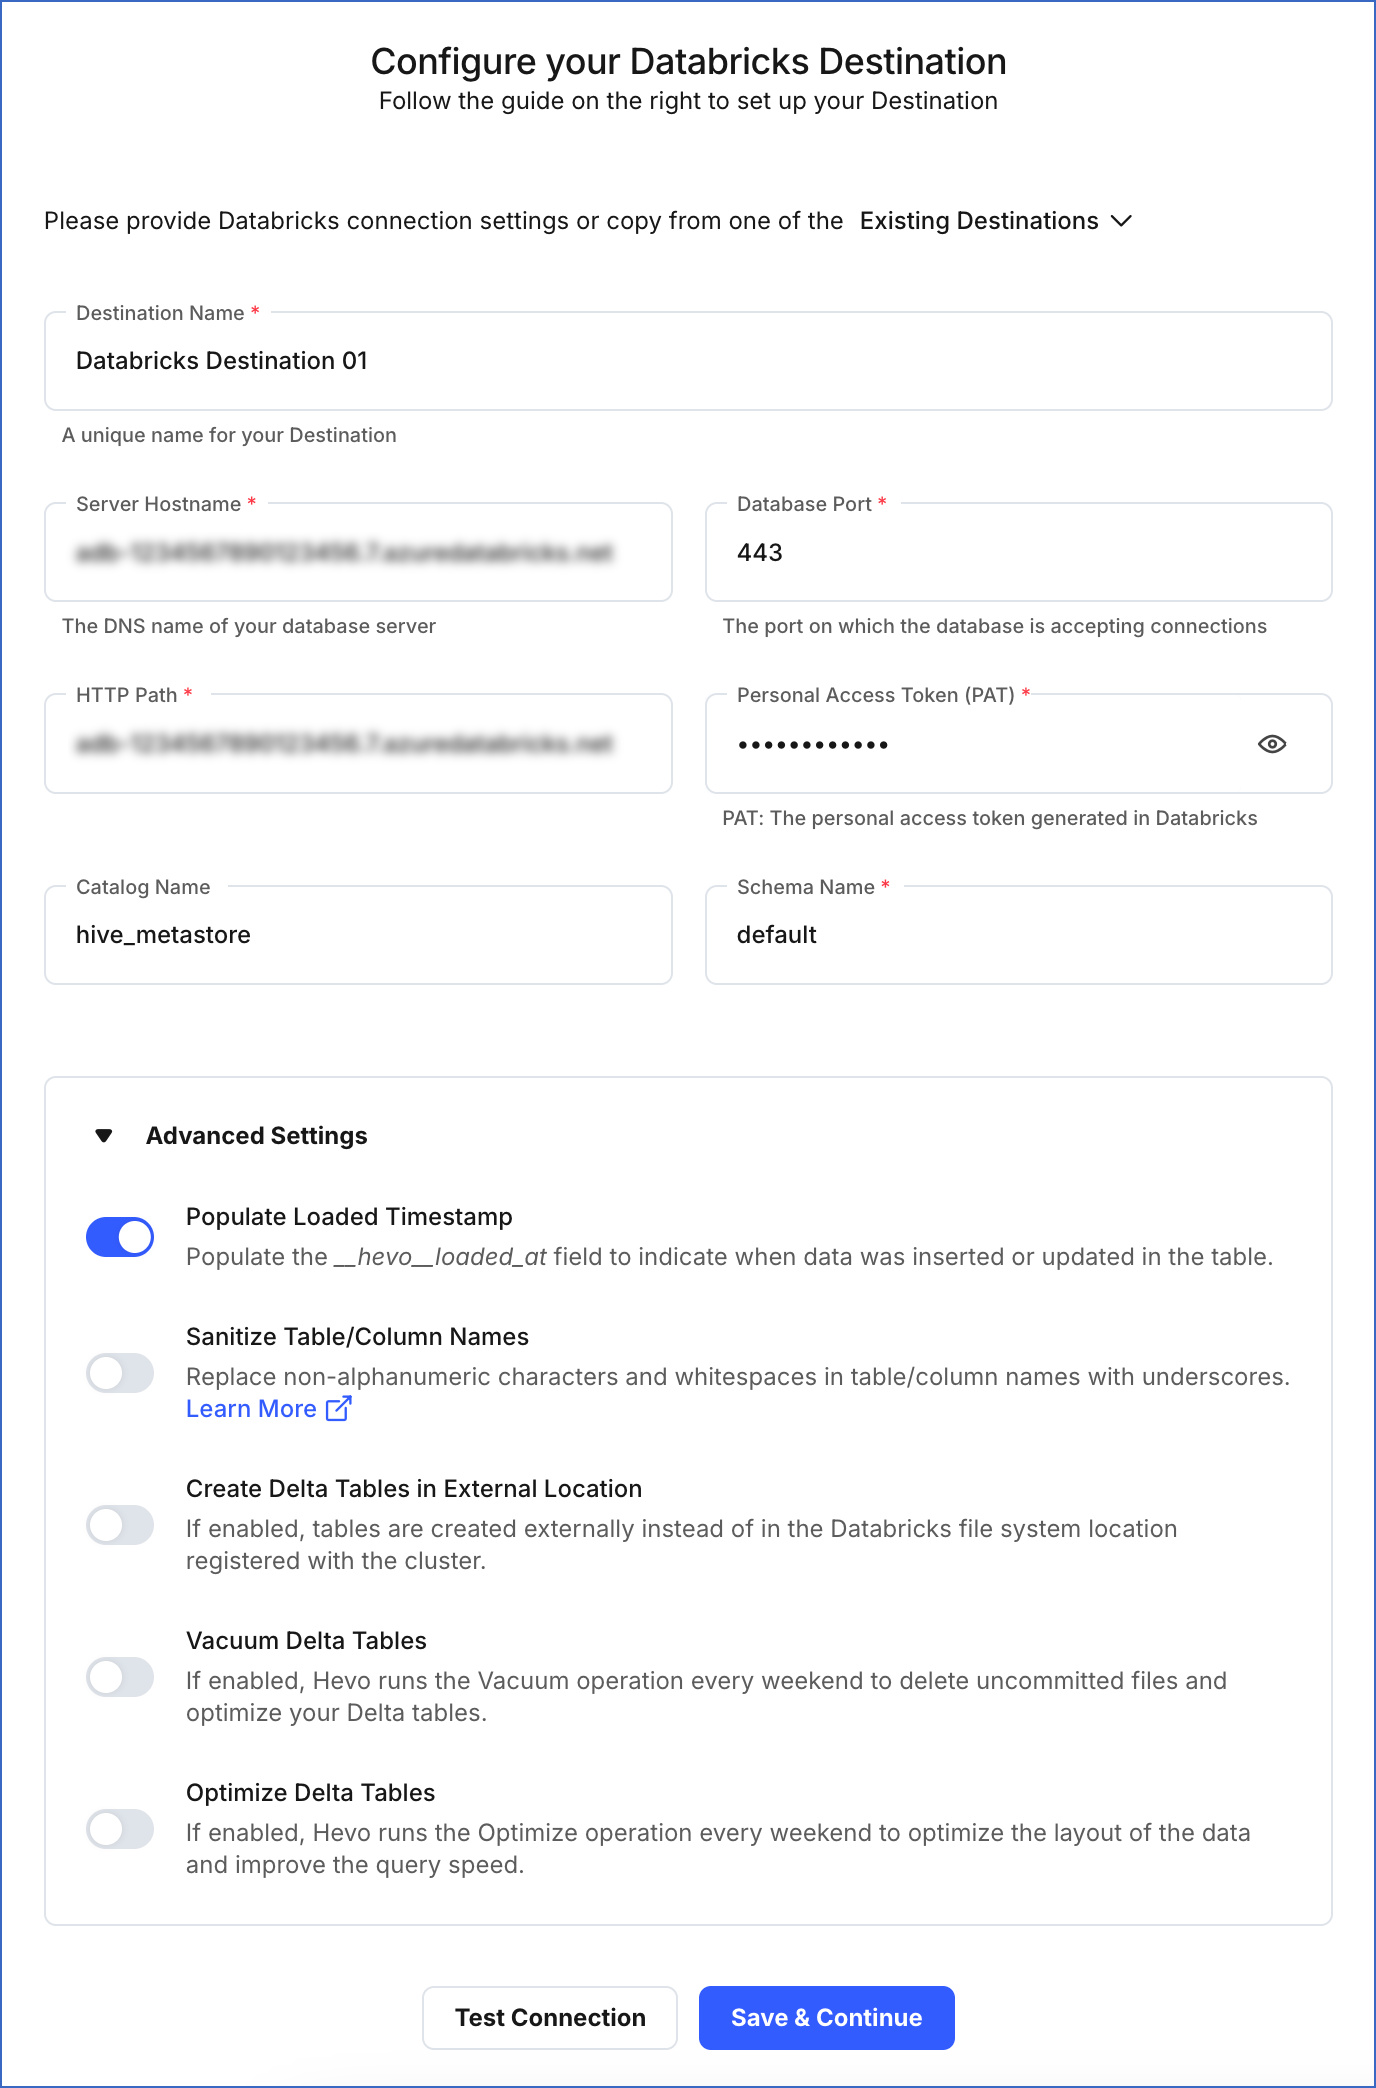
On the Configure your Databricks Destination page, specify the following:
-
Destination Name: A unique name for the Destination, not exceeding 255 characters.
-
Server Hostname: The server hostname that you obtained from your Databricks account.
-
Database Port: The port that you obtained from your Databricks account. Default value: 443.
-
HTTP Path: The HTTP path that you obtained from your Databricks account.
-
Personal Access Token (PAT): The PAT that you created in your Databricks account.
-
Catalog Name: The name of the catalog that contains the Destination database.
-
Schema Name: The name of the Destination database schema. Default value: default.
-
Advanced Settings:
-
Populate Loaded Timestamp: If enabled, Hevo appends the
___hevo_loaded_at_column to the Destination table to indicate the time when the Event was loaded. -
Sanitize Table/Column Names: If enabled, Hevo sanitizes the column names to remove all non-alphanumeric characters and spaces in the table and column names and replaces them with an underscore (_). Read Name Sanitization.
-
Create Delta Tables in External Location (Optional): If enabled, you can create tables in a different location than the Databricks file system location registered with the cluster. Read Identifying the External Location for Delta Tables.
If disabled, the default Databricks File System location registered with the cluster is used. Hevo creates the external Delta tables in the
/{schema}/{table}path. -
Vacuum Delta Tables: If enabled, Hevo runs the Vacuum operation every weekend to delete the uncommitted files and clean up your Delta tables. Databricks charges additional costs for these queries. Read Databricks Cloud Partners documentation to know more about vacuuming.
-
Optimize Delta Tables: If enabled, Hevo runs the Optimize queries every weekend to optimize the layout of the data and improve the query speed. Databricks charges additional costs for these queries. Read Databricks Cloud Partners documentation to know more about optimization.
-
-
-
Click Test Connection. This button is enabled once all the mandatory fields are specified.
-
Click Save & Continue. This button is enabled once all the mandatory fields are specified.
(Optional) Allowing Connections from Hevo IP Addresses to the Databricks Workspace
Perform the steps in this section if the IP access lists feature is enabled for your workspace.
Note: You must have the Admin access role in your Databricks workspace to perform these steps.
To add an IP access list:
-
Obtain the personal access token for your workspace. To do so:
-
If you are connecting using the Databricks credentials, follow Step 5 above.
-
If you are connecting using Partner Connect, follow these steps:
-
On the Configure your Databricks Destination page, Personal Access Token (PAT) field, click the View (
 ) icon to view the token.
 -
Copy it and save it securely like any other password.
-
Use the obtained PAT as the Bearer Token in your API call.
-
-
Call the add an IP access list API with the POST method from any API client, such as Postman or a Terminal window. Specify the following in the JSON request body:
-
label: A string value to identify the access list. For example, Hevo if you create the list to add Hevo IP addresses. -
list_type: A string value to identify the type of list created. This parameter can take one of these values:-
ALLOW: Add the specified IP addresses to the access list.
-
BLOCK: Remove the specified IP addresses from the access list or block connections from them.
-
-
ip_addresses: A JSON array of IP addresses and CIDR ranges, given as string values. Use the Hevo IP addresses of your region and their CIDR ranges in this parameter.
The base path for the API endpoint is https://<deployment name>.cloud.databricks.com/api/2.0. For example, if the deployment name is dbc-westeros, the base path for the API endpoint is https://dbc-westeros.cloud.databricks.com/api/2.0, and the URL to call the add an IP access list API is https://dbc-westeros.cloud.databricks.com/api/2.0/ip-access-lists.
The following example adds an access list to allow Hevo IP addresses for the Asia region:
curl -X POST -n \ -H "Authorization: Bearer <your personal access token>" -H "Content-Type: application/json" -H "Accept: application/json" https://<deployment-name>.cloud.databricks.com/api/2.0/ip-access-lists -d '{ "label": "HEVO", "list_type": "ALLOW", "ip_addresses": [ "13.228.214.171/32", "52.77.50.136/32" ] }'Note: Replace the placeholder values in the commands above with your own. For example, <deployment-name> with dbc-westeros.
-
-
Proceed to the Configure your Databricks Destination page to continue setting up your Databricks Destination.
Identifying the External Location for Delta Tables
If the Create Delta tables in an external location option is enabled, Hevo creates the Delta tables in the {external-location}/{schema}/{table} path specified by you.
To locate the path of the external location, do one of the following
-
If you have DBFS access in Databricks:
-
In the databricks console, click Data in the left navigation bar.

-
Click the DBFS tab on the top of the sliding sidebar.
-
Select/view the path where the tables must be created. For example, in the above image,
/demo/defaultis the path, and the external location is derived as/demo/default/{schema}/{table}.
-
-
If you do not have DBFS access:
- Run the following command in your Databricks instance or the Destination workbench in Hevo:
DESCRIBE TABLE EXTENDED <table-name>;Read Databricks Cloud Partners documentation to know more about DESCRIBE TABLE.
Additional Information
Read the detailed Hevo documentation for the following related topics:
Limitations
- Hevo currently does not support Databricks as a Destination in the US-GCP region.
See Also
Revision History
Refer to the following table for the list of key updates made to this page:
| Date | Release | Description of Change |
|---|---|---|
| Nov-12-2025 | NA | Updated the document as per the latest Hevo UI. |
| Nov-05-2025 | NA | Updated section, Connect Using the Databricks Partner Connect as per the latest Databricks UI. |
| Dec-16-2024 | 2.31 | Updated section, Connect Using the Databricks Partner Connect (Recommended Method) to include support for Unity Catalog and to reflect the latest UI. |
| Nov-25-2024 | 2.30.1 | Updated sub-section, Configure Databricks as a Destination to describe the new Catalog Name field and updated the screenshot as per the latest Hevo UI. |
| Jul-22-2024 | NA | Updated section, Connect Using the Databricks Partner Connect to reflect the latest Databricks UI. |
| Jun-04-2024 | NA | - Added the process flow diagram in the page overview section. - Updated section, Configure Databricks as a Destination to clarify the Schema Name field. |
| Nov-28-2023 | NA | - Renamed section Connect your Databricks Warehouse to Create a Databricks Cluster or Warehouse. - Updated section, Obtain Databricks Credentials to add subsections, Obtain cluster details and Obtain SQL warehouse details. |
| Aug-10-2023 | NA | - Added a prerequisite about adding Hevo IP addresses to an access list. - Added the subsection Allow connections from Hevo IP addresses to the Databricks workspace for the steps to create an IP access list. |
| Apr-25-2023 | 2.12 | Updated section, Connect Using the Databricks Partner Connect (Recommended Method) to add information that you must specify all fields to create a Pipeline. |
| Nov-23-2022 | 2.02 | - Added section, Connect Using the Databricks Partner Connect to mention about Databricks Partner Connect integration. - Updated screenshots in the page to reflect the latest Databricks UI. |
| Oct-17-2022 | NA | Updated section, Limitations to add limitation regarding Hevo not supporting Databricks on Google Cloud. |
| Jan-03-2022 | 1.79 | New document. |