SQL Server
On This Page
SQL Server is a popular Relational Database Management System (RDBMS) developed by Microsoft for storing and managing structured data across applications and networks. Hevo can load data from any of your Pipelines into a SQL Server database.
Hevo supports two authentication methods for SQL Server Destinations:
-
Username and Password: Connect to your SQL Server database using a database username and password. Supported for both on-premise SQL Server and Azure SQL database.
-
Microsoft Entra ID: Connect to Azure SQL database using a Service Principal, a dedicated application identity managed through Microsoft’s cloud-based identity and access management service. Use this method for Azure SQL database in production environments where centralized identity management is required.
Prerequisites
-
The SQL Server is running.
-
The SQL Server database host’s IP or DNS and port are available. If you do not have these details, you can obtain them from your SQL Server administrator.
-
Hevo’s IP address(es) for your region is added to the SQL Server database IP Allowlist.
-
For Microsoft Entra ID authentication:
-
The necessary privileges on the database are granted to your database user.
-
You are assigned the Team Collaborator, or any administrator role except the Billing Administrator role in Hevo to create the Destination.
Set up an SQL Server Instance (Optional)
To create a SQL Server database that you can use as a Destination in Hevo, you must have an active SQL Server instance. The steps to set up an SQL Server instance depend on whether you are using an on-premise SQL Server or an Azure SQL Database.
Set up an on-premise SQL Server Instance
This section explains the steps to install the SQL Server 2019 Evaluation Edition on a Microsoft Windows Server 2019. To continue using SQL Server post-trial expiry, you must upgrade to the SQL Server Enterprise or Standard Edition. Read SQL Server 2019: Hardware and software requirements for the hardware and software you need to install and set up SQL Server 2019.
Note: You must have administrative rights on the Windows server to set up the SQL Server instance.
1. Download SQL Server on Windows
-
Go to Microsoft Evaluation Center.
-
In the navigation bar, click SQL Server, and select SQL Server 2019 from the drop-down.

-
In the SQL Server 2019 page, click the Get Started for free tab, and then click Download the EXE.

-
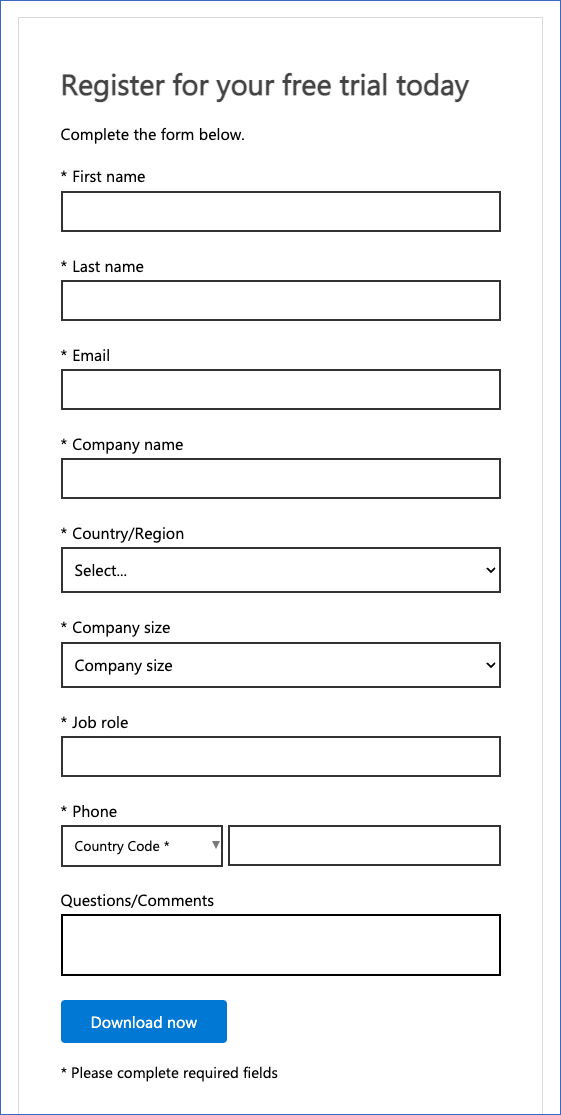
In the Evaluate SQL Server 2019 page, specify the following and click Download now:
-
Provide your details such as First name, Last name, and Job role.
-
Provide your company details such as the name, its size, and country/region.
-
Provide your email address that you want to register for the free trial.
-
-
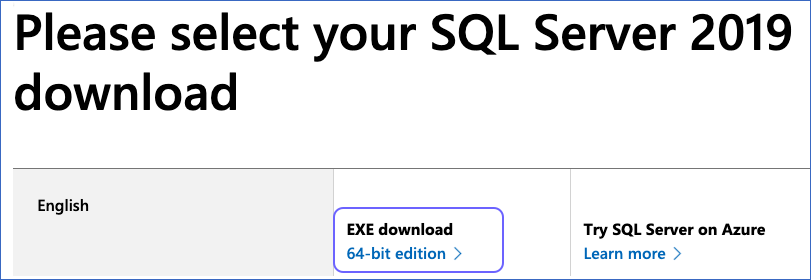
In the Please select your SQL Server 2019 download page, under EXE download, select 64-bit edition and save the server setup file.
-
Proceed to install the SQL Server.
2. Install the SQL Server on Windows
-
Go to the location where you saved the SQL Server setup file. For example, C:\MSSQL.
-
Launch the SQL Server setup file, SQL2019-SSEI-Eval.exe, and in the Select an installation type window, select Basic.
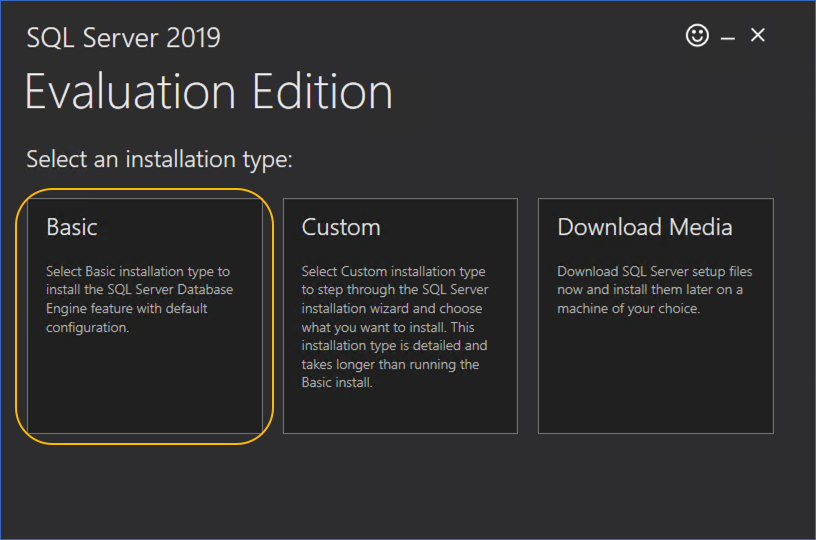
The Basic installation installs the SQL Server with the default configuration and starts the instance. Select the Custom installation type if you want to manually pick the components to install. You can select Download Media to download the installation file, to install the SQL Server later. Read the SQL Server installation guide for further guidance.
-
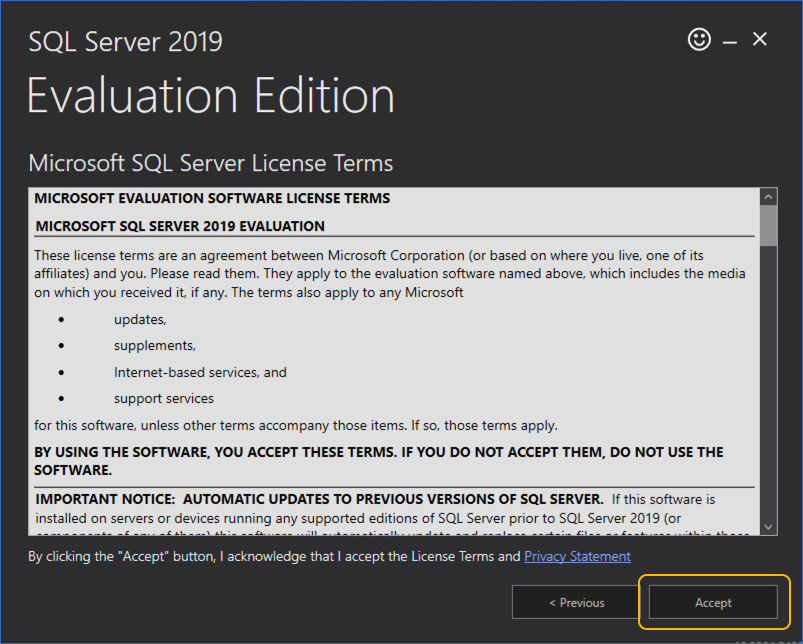
In the Microsoft SQL Server License Terms window, review and accept the license terms.
-
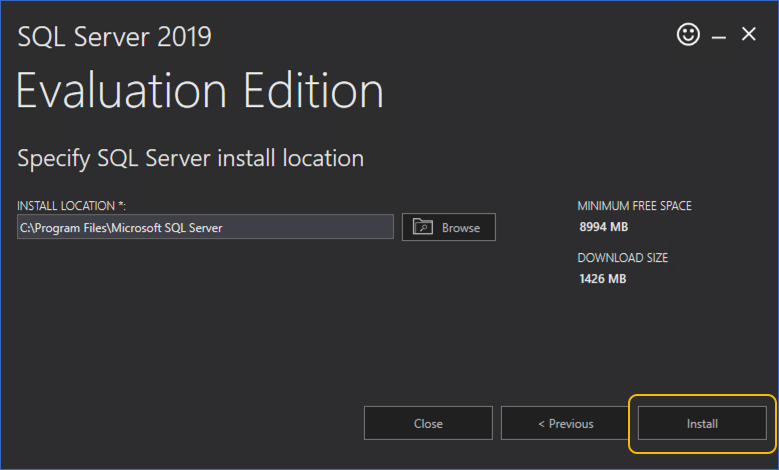
In the Specify SQL Server install location window, specify the INSTALL LOCATION, and click Install to start the installation process.
-
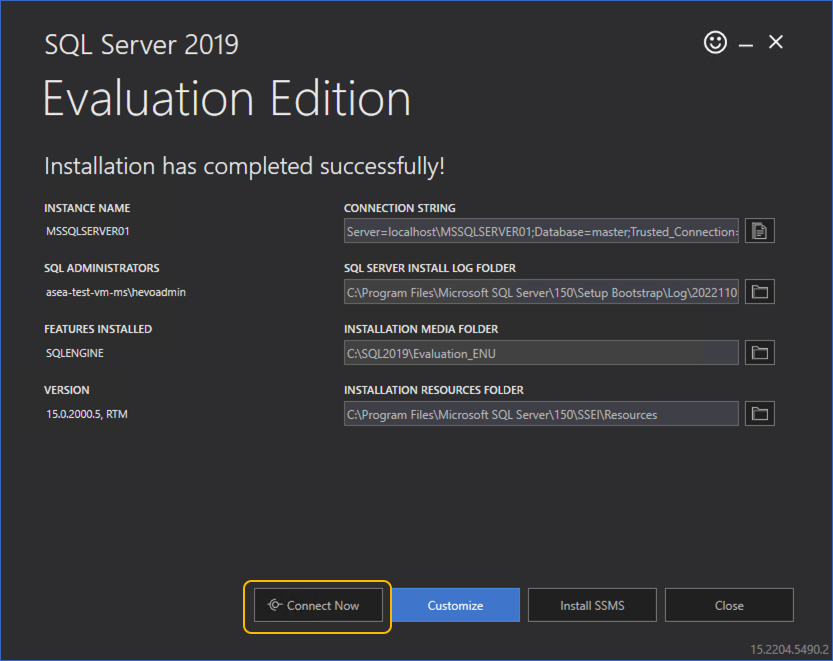
Click Connect Now if you want to connect to the installed SQL Server. This opens a command line window for testing the connection.
-
Click Install SSMS to install the SQL Server Management Studio (SSMS). You can use SSMS to connect to and manage your SQL Server instances and perform operations in it, such as changing the authentication method and creating login users and databases.
You have successfully installed the SQL Server and started the instance.
Set up an Azure SQL Database logical server
An Azure SQL database logical server is a central administrative container for your SQL databases. It manages the login credentials, firewall rules, and security settings for all databases hosted under it.
Perform the following steps to create an Azure SQL database logical server:
-
Log in to the Azure Portal.
-
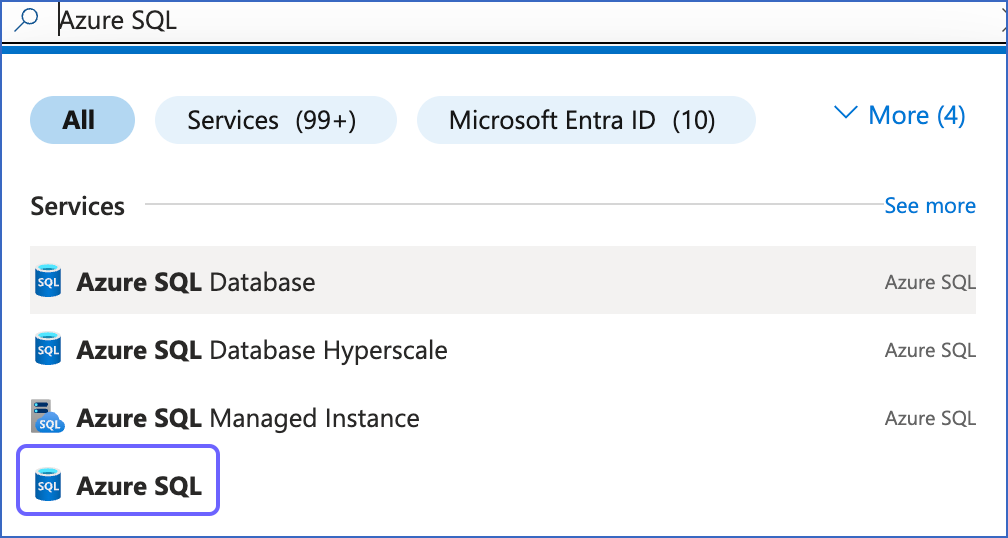
In the top search bar, search for and select Azure SQL.
-
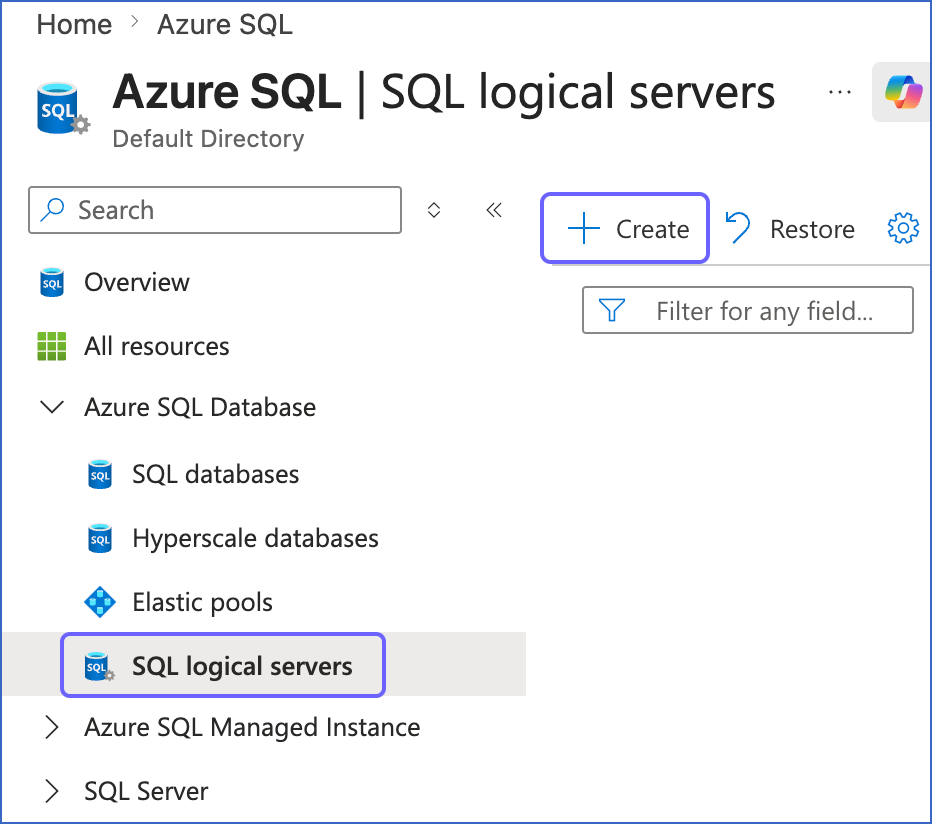
In the left navigation pane, under Azure SQL Database, click SQL logical servers, and then click + Create.
-
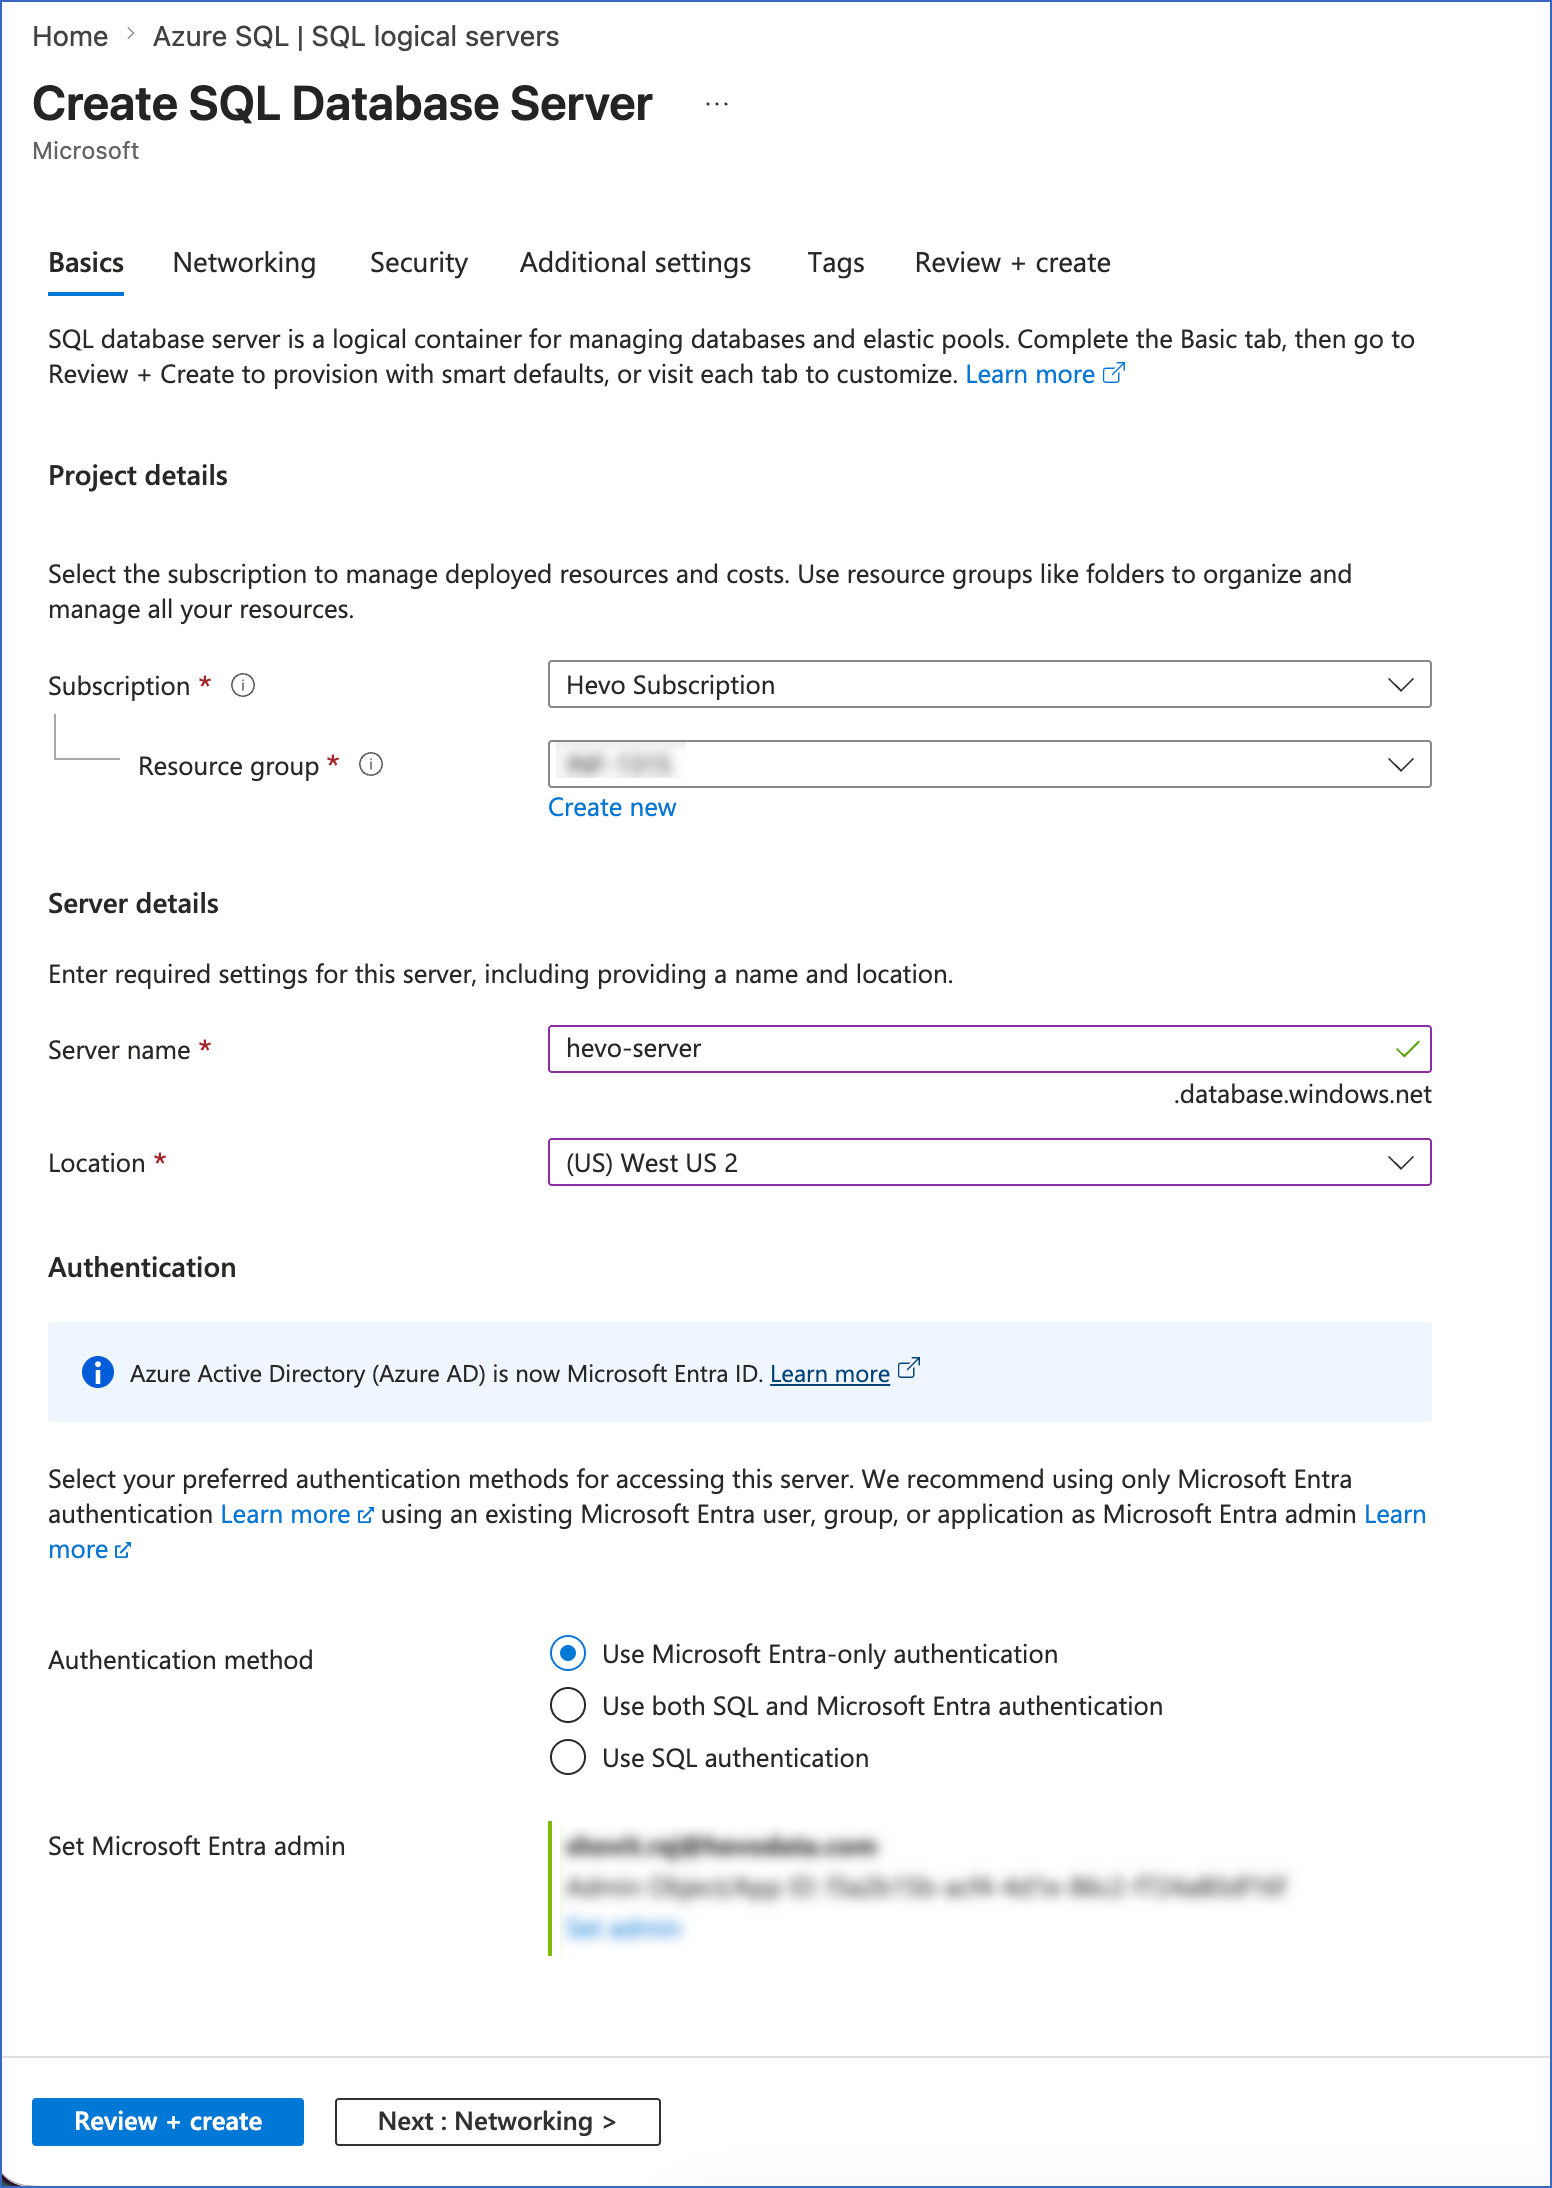
On the Create SQL Database Server page, in the Basics tab, do the following:
-
In the Project details section:
-
Subscription: Select your Azure subscription from the drop-down.
-
Resource group: Select an existing resource group from the drop-down or click Create new to create one. Read Azure Resource Groups to know more about creating and managing resource groups in Azure.
-
-
In the Server details section:
-
Server name: Specify a unique name for your server.
Note: The server is accessible at <server-name>.database.windows.net. Use this value as Database Host while configuring your SQL Server Destination in Hevo.
-
Location: Select the region from the drop-down where you want to host your server.
-
-
In the Authentication section, choose one of the following Authentication method options as per your requirements:
-
Use Microsoft Entra-only authentication: To connect to Hevo using a Client ID and Client Secret.
-
Use both SQL and Microsoft Entra authentication: To connect to Hevo using either a Client ID and Client Secret or a database username and password.
-
-
Click Review + create.
-
-
In the Review + create tab, review your configuration and click Create to create the logical server.
A notification is displayed confirming that the logical server has been successfully created.
Create a Database in the SQL Server Instance (Optional)
Once you have set up your SQL Server instance, create a database in it to use as a Destination. The steps to create a database depend on whether you are using an on-premise SQL Server or an Azure SQL Server.
Create a database in on-premise SQL Server
Note: Replace the placeholder values in all the commands with your own. For example, <database_name> with MSSQLDestination.
1. Create a database in your SQL Server
-
Open the SQL Server Management Studio (SSMS).
-
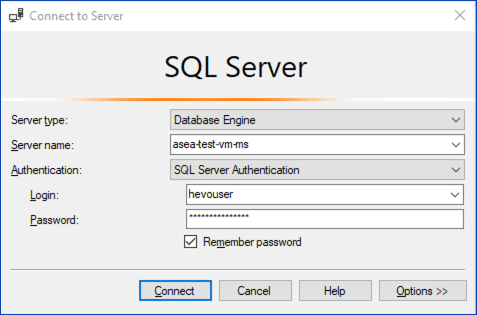
Connect to your SQL Server using a SQL login with the required privileges. Refer to Create a database user for Username and Password authentication section for steps to create one.
-
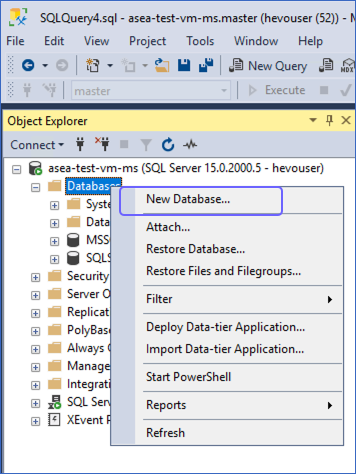
In the Object Explorer, under your SQL server name, right-click on Databases, and select New Database.
-
In the New Database dialog, specify a Database name, and click OK, to create the database.
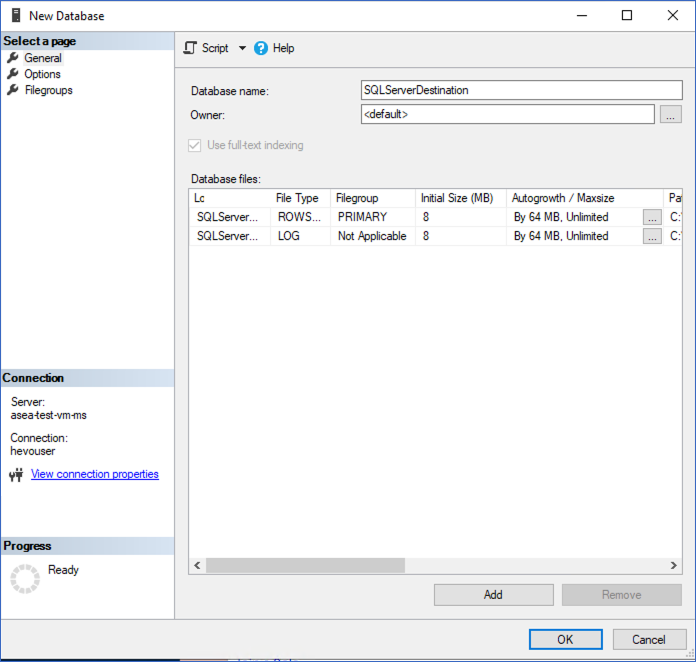
You can provide this database name while configuring your SQL Server Destination.
2. Create a schema in your database (Optional)
-
Log in to your SQL Server instance as a master user using an SQL client tool, such as sqlcmd. For example,
sqlcmd -U hevouser. -
Enter the following commands to access your database and create a schema in it:
USE [<your_database_name>]
GO
CREATE SCHEMA [<schema_name>]
GO
You can provide this schema name while configuring your SQL Server Destination.
Create a database in Azure SQL Server
Perform the following steps to create a database in an Azure SQL Server:
-
Log in to the Azure Portal.
-
In the top search bar, search for and select Azure SQL.
-
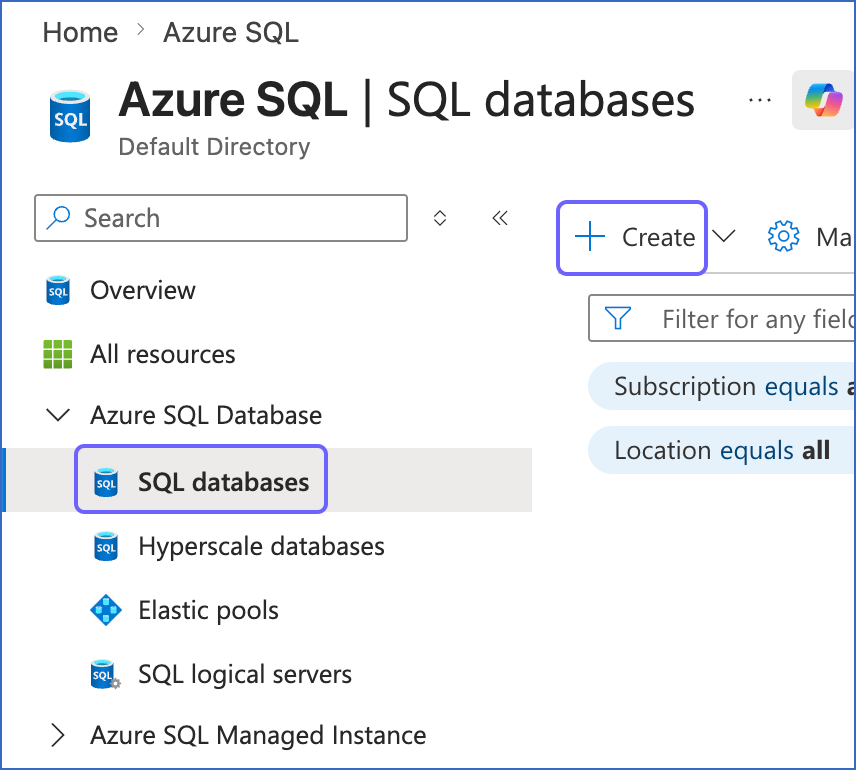
In the left navigation pane, under Azure SQL Database, click SQL databases, and then click + Create.
-
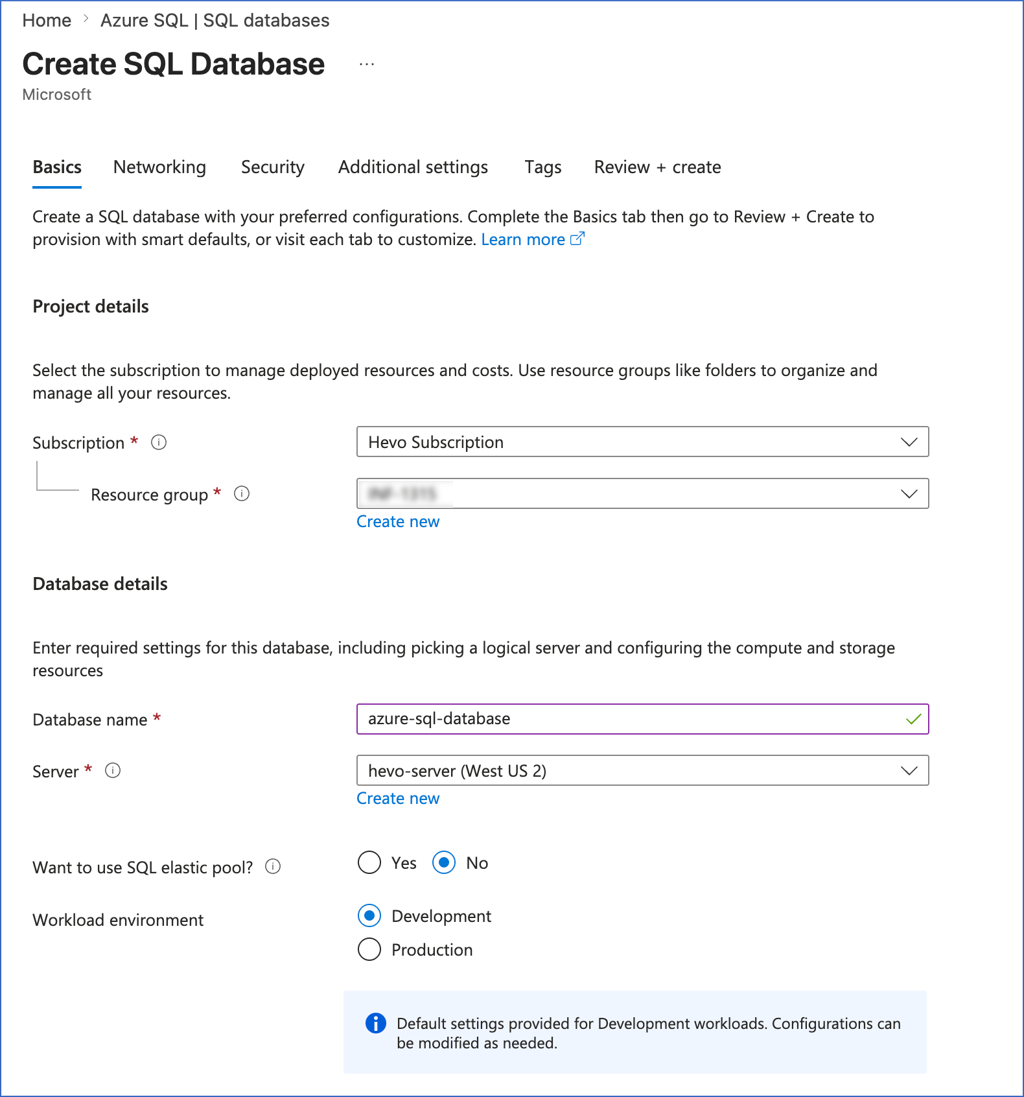
On the Create SQL Database page, in the Basics tab, specify the following:
-
In the Project details section:
-
Subscription: Select your Azure subscription.
-
Resource group: Select an existing resource group from the drop-down or click Create new to create one. Read Azure Resource Groups to know more about creating and managing resource groups in Azure.
-
-
In the Database details section:
-
Database name: Specify a unique name for your database. Use this as Database Name while configuring your SQL Server Destination in Hevo.
-
Server: Select the logical server you created in the Set up an Azure SQL Database logical server section.
-
Workload environment: Choose Development or Production based on your requirements. This setting applies default performance and configuration settings appropriate for each environment. You can modify these settings after creation.
-
-
Click Review + create.
-
-
In the Review + create tab, review your configuration and click Create to create the database.
A notification is displayed confirming that the database has been successfully created.
Allowlist Hevo IP Addresses for your Region
You must allowlist the Hevo IP addresses for your region to enable Hevo to connect to your SQL Server Destination. The steps to allowlist these IP addresses depend on whether you are using an on-premise SQL Server or an Azure SQL Server.
Configure Inbound Rules for On-premise SQL Server
To allow Hevo to connect to your on-premise SQL Server, perform the following steps:
1. Enable the TCP/IP port
The TCP/IP protocol enables Hevo to communicate with your SQL Server instance over the network. To do this:
-
Open the SQL Server Configuration Manager.
-
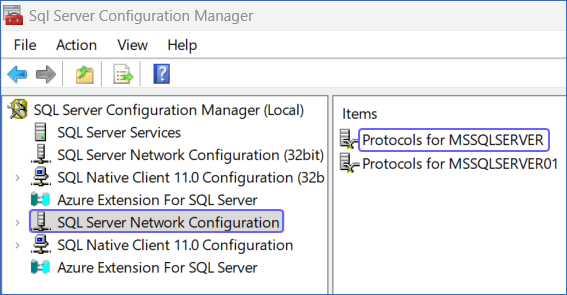
In the left pane, click SQL Server Network Configuration, and then double-click Protocols for <Your SQL Server Instance Name>. The default instance names are MSSQLSERVER and MSSQLSERVER01.
-
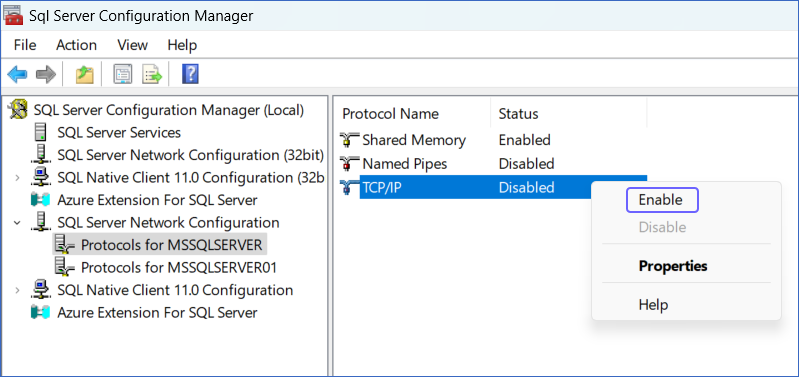
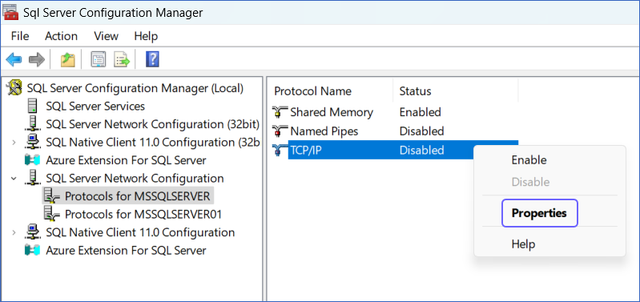
In the right pane, if the Status field of the TCP/IP Protocol Name is Disabled, then perform this step. Else, skip to the Verify the TCP/IP port section.
-
Right-click TCP/IP and select Enable.
-
Click OK to acknowledge the dialog box that warns you to restart the services for the changes to take effect.
-
2. Verify the TCP/IP port
After enabling TCP/IP, verify the port on which your SQL Server instance is listening for connections. To do this:
-
Right-click the TCP/IP Protocol Name and select Properties.
-
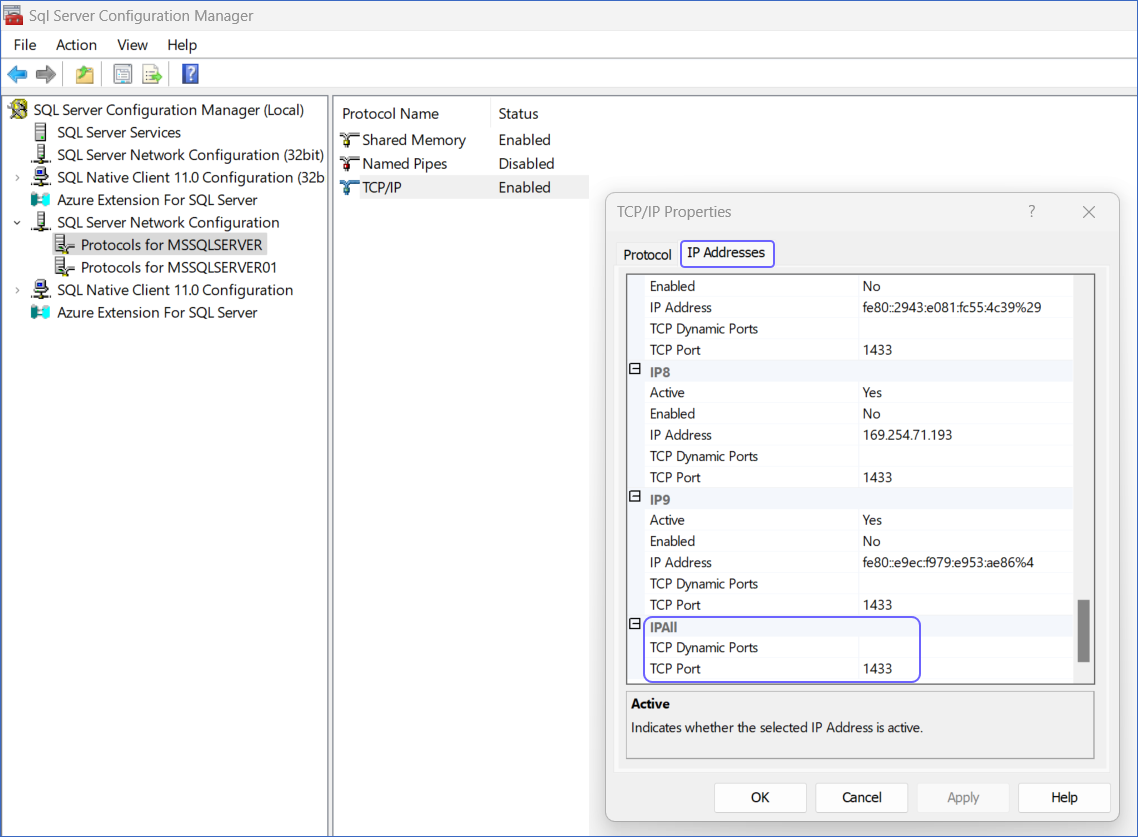
In the TCP/IP Properties dialog, click the IP Addresses tab.
-
Scroll down to the IPAll section and note the TCP Port for your SQL Server instance.
-
Click OK.
3. Restart the SQL Server instance
Once you have verified the TCP/IP port, restart the SQL Server instance for the changes to take effect. To do this:
-
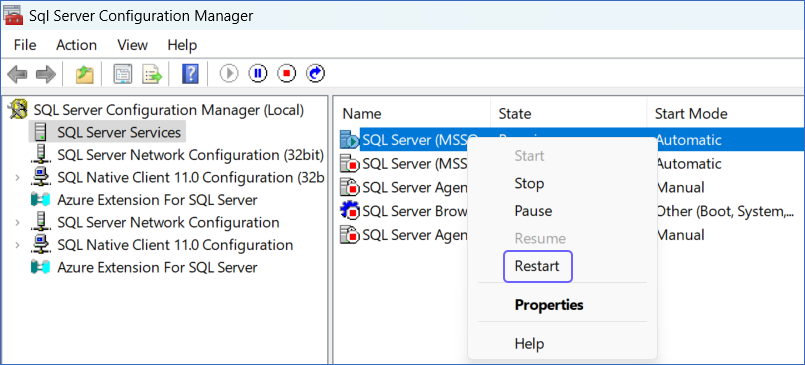
In the left pane, click SQL Server Services.
-
In the right pane, right-click the SQL Server (<Your SQL Server Instance Name>) and select Restart.
You have successfully enabled TCP/IP for your SQL Server instance.
4. Create inbound rules
After restarting the SQL Server instance, create an inbound rule to allowlist Hevo’s IP addresses for your region. To do this:
-
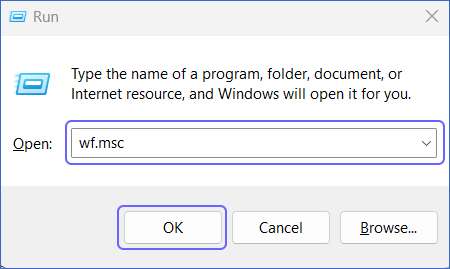
Press Windows + R to open the Run dialog box.
-
Type wf.msc in the Open field and click OK.
-
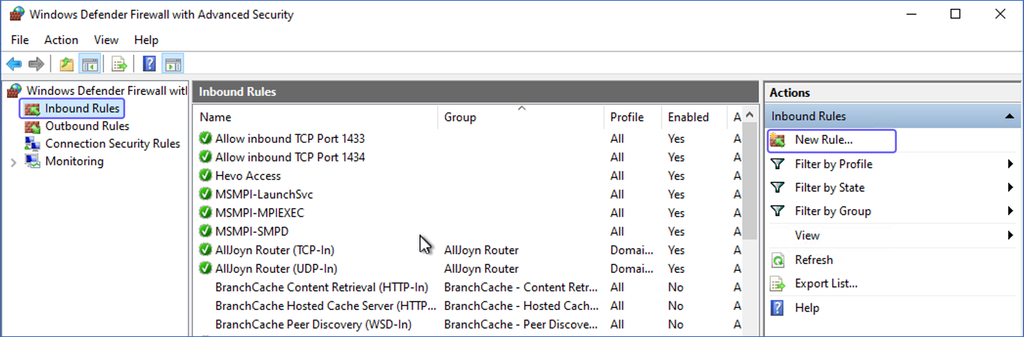
In the window that appears, click Inbound Rules in the left pane, and then click New Rule in the right pane.
-
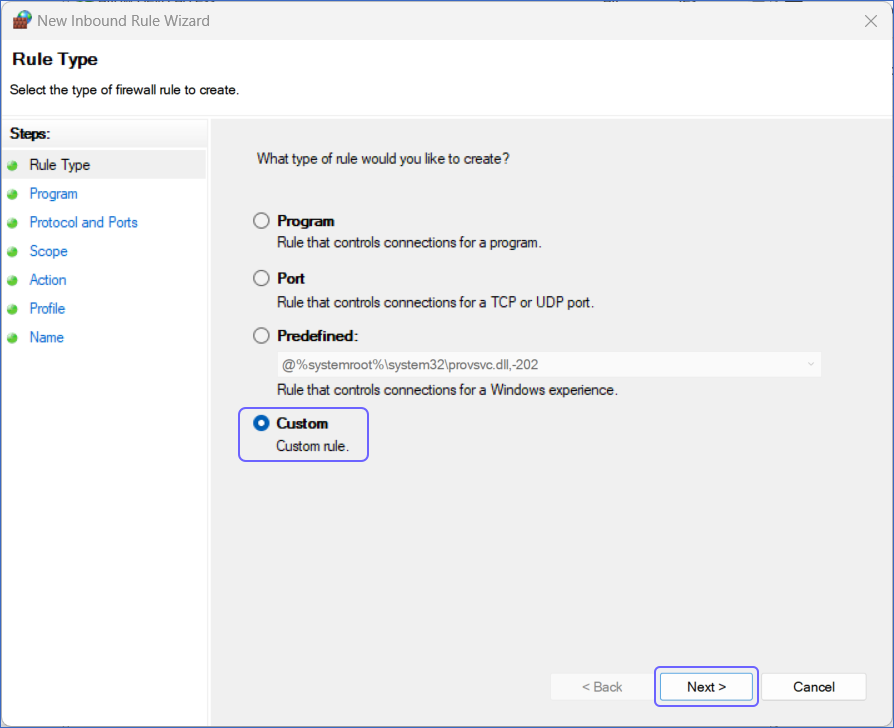
In the Rule Type dialog, select Custom and click Next.
-
In the Program dialog, select This program path, specify the path to the sqlservr.exe file, and then click Next.
Note: The sqlservr.exe file is generally found in the
%ProgramFiles%\Microsoft SQL Server\MSSQL16.MSSQLSERVER\MSSQL\Binn\folder.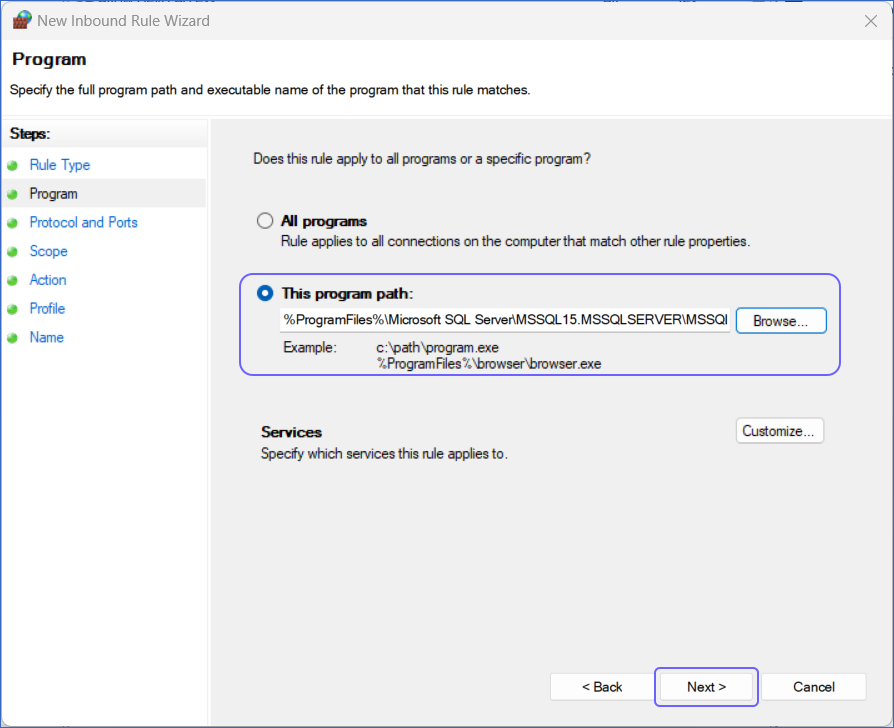
-
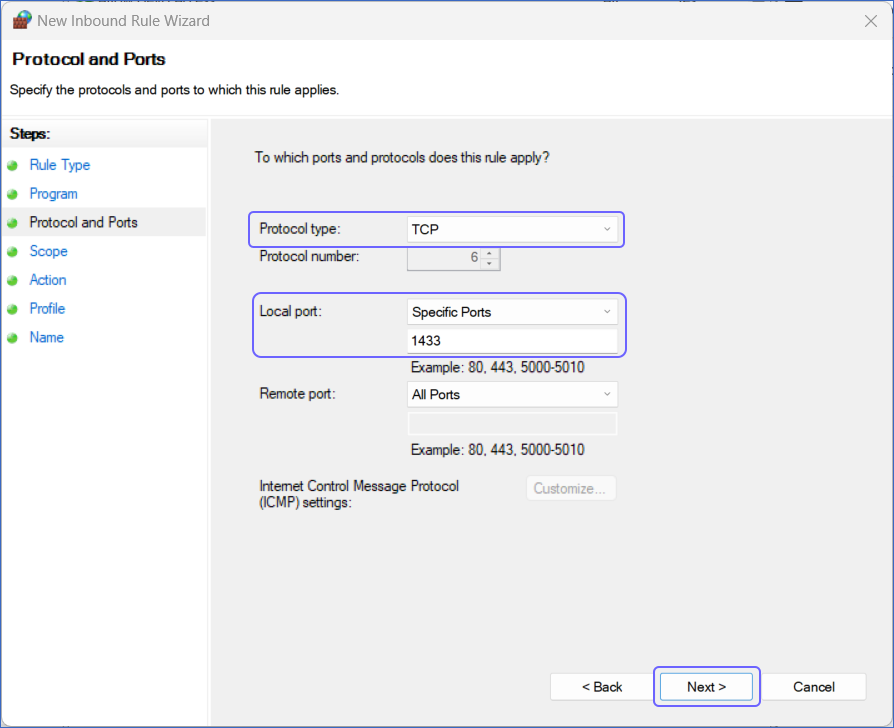
In the Protocol and Ports dialog, do the following:
-
Select TCP from the Protocol type drop-down.
-
Select Specific Ports from the Local port drop-down.
-
Specify the port on which your SQL Server listens for connections.
Note: By default, SQL Server listens for connections on port 1433.
-
Click Next.
-
-
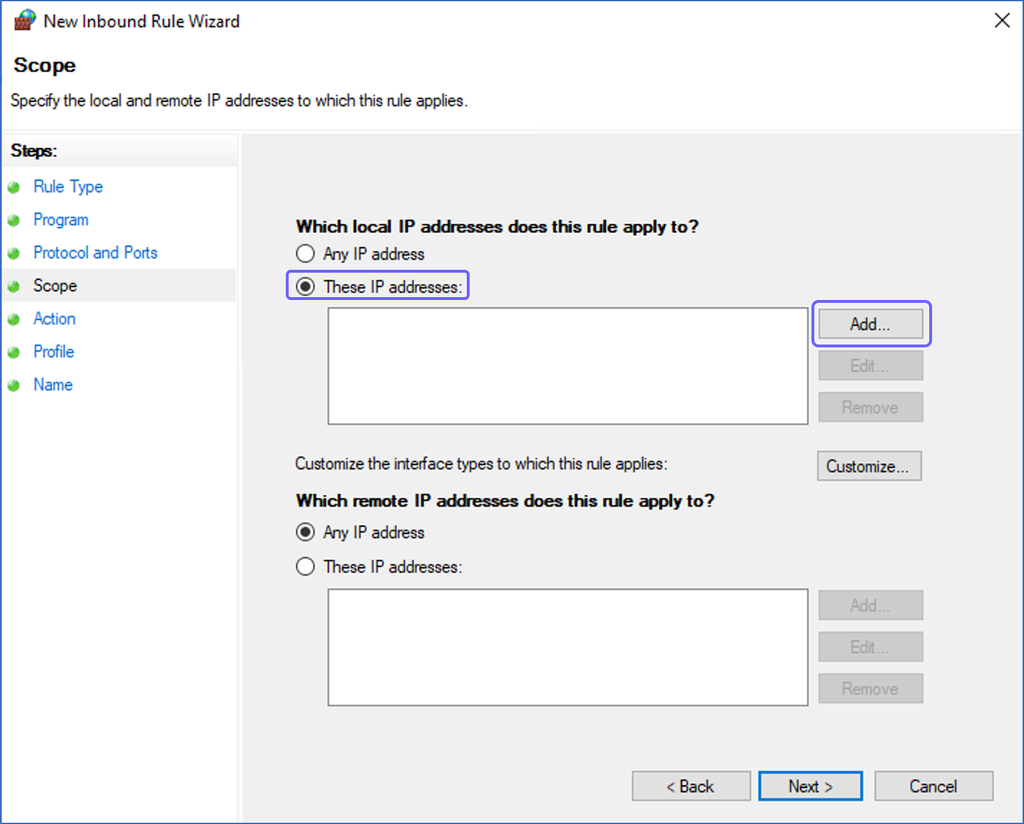
In the Scope dialog, select These IP addresses and click Add.
-
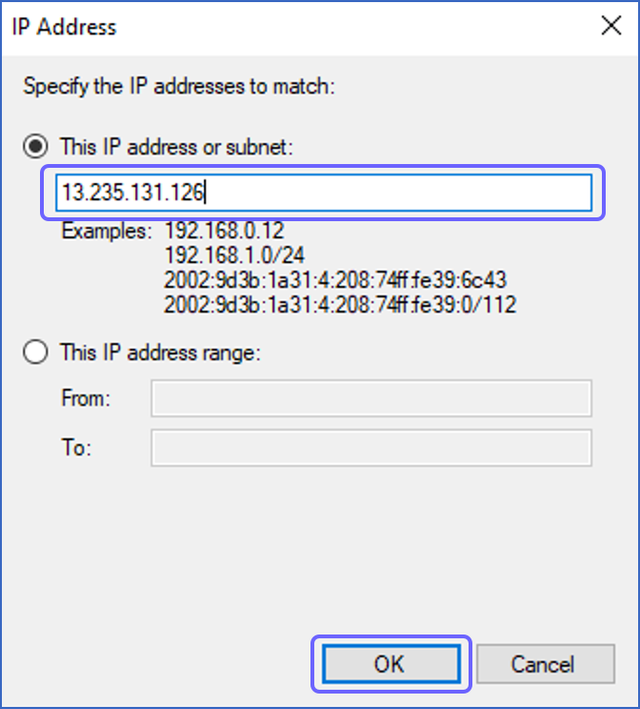
In the IP Address window that appears, enter Hevo’s IP address for your region and click OK.
-
(Optional) Click Add and repeat step 8 to allowlist all the IP addresses for your region.
-
Click Next.
-
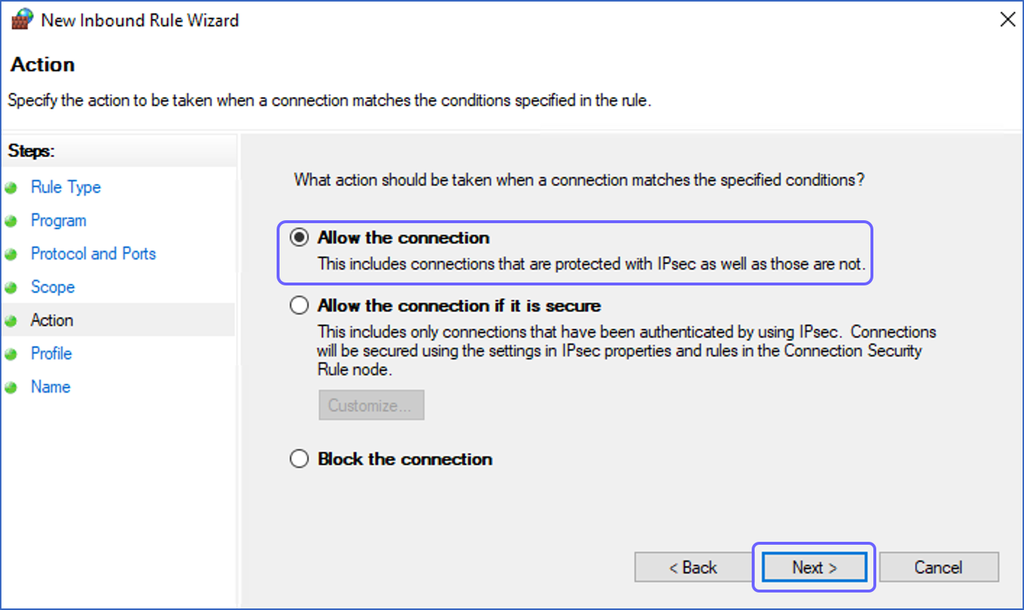
In the Action dialog, ensure that Allow the connection is selected and click Next.
-
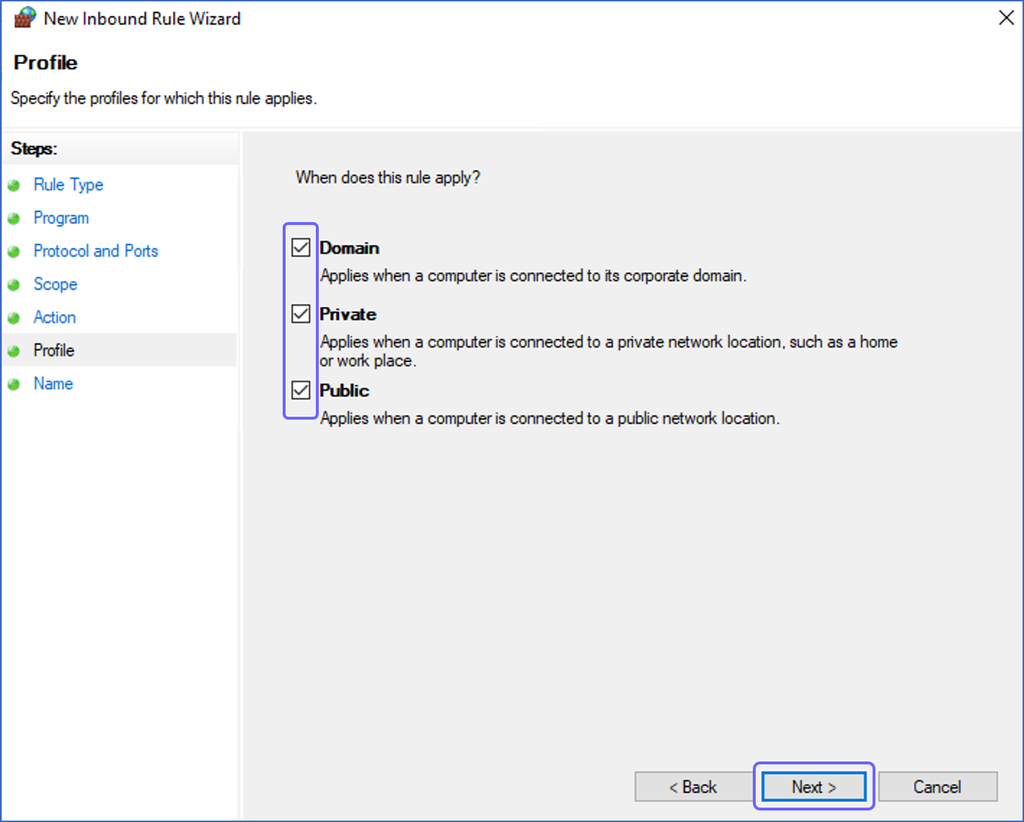
In the Profile dialog, ensure that all the check boxes are selected and click Next.
-
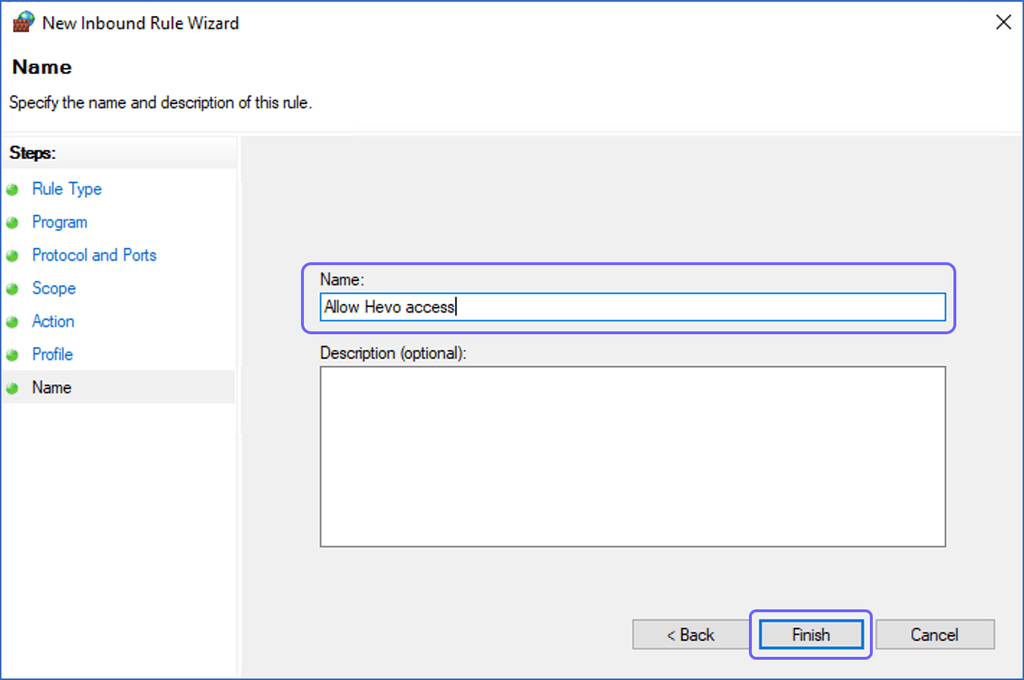
In the Name dialog, specify a name for your inbound rule and click Finish.
Create Firewall Rules for Azure SQL Server
Perform the following steps to create the firewall rules in your SQL database network settings to allowlist the Hevo IP addresses for your region:
-
Log in to the Azure Portal.
-
Under Azure services, select More services.

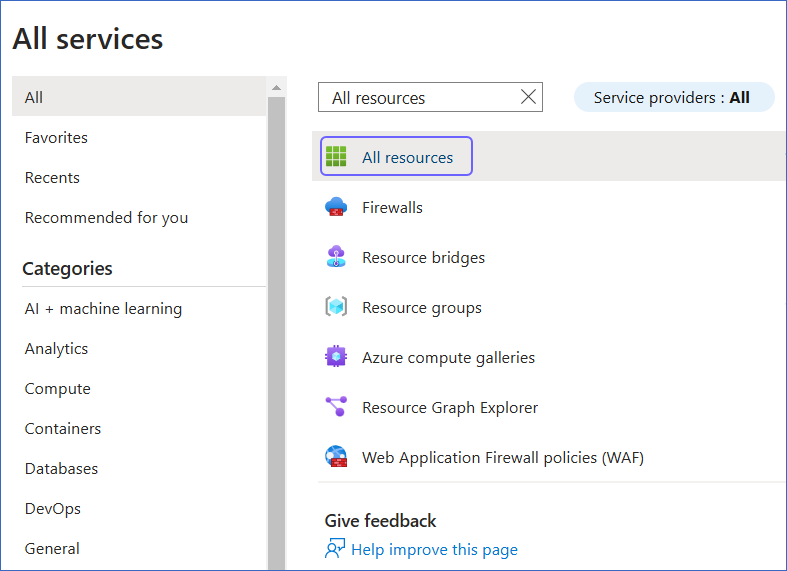
-
On the All services page, search for and select All resources.
-
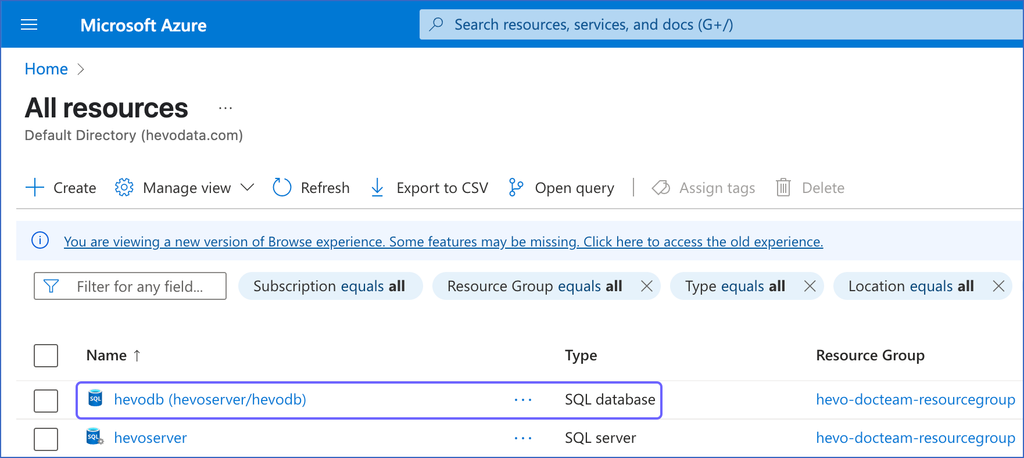
On the All resources page, click the SQL database you want to connect to Hevo.
-
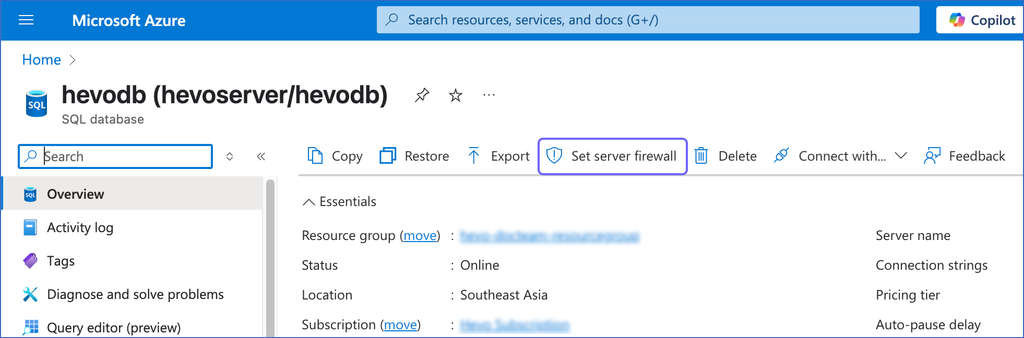
In the right pane of <Your Database Name> page, click Set server firewall.
-
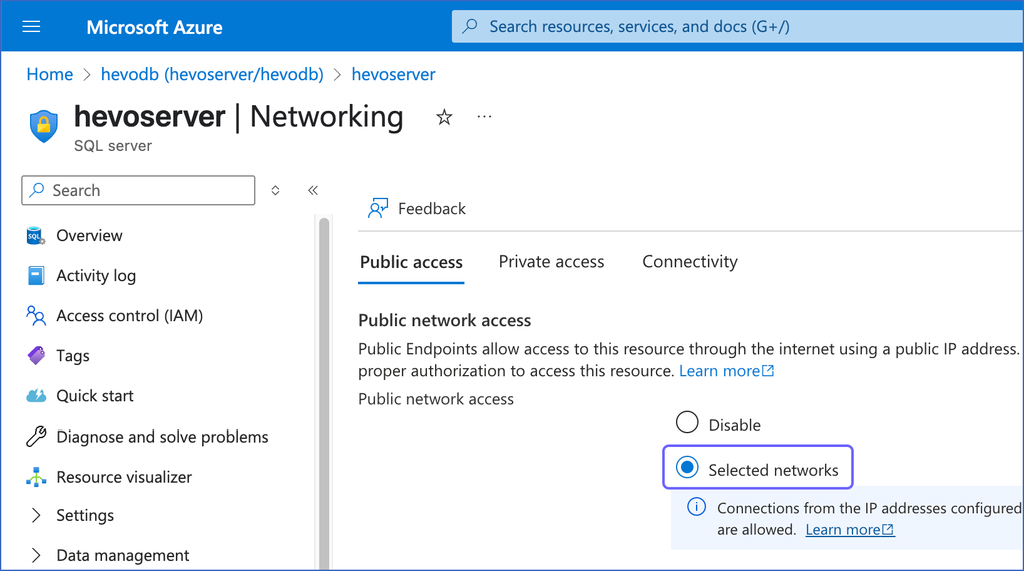
On the Networking page, under the Public access tab, select the Selected networks option.
-
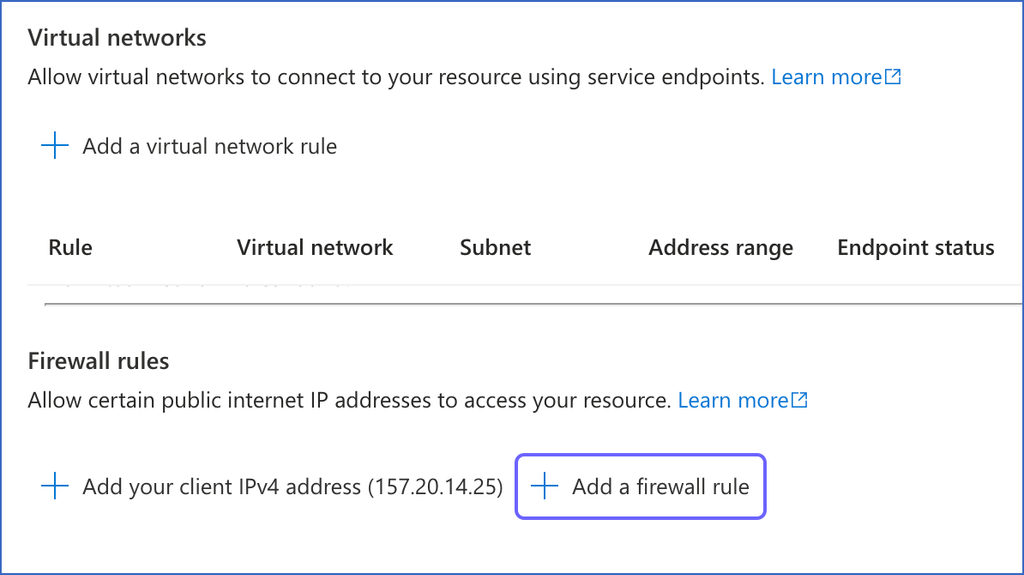
Under Firewall rules, click + Add a firewall rule.
-
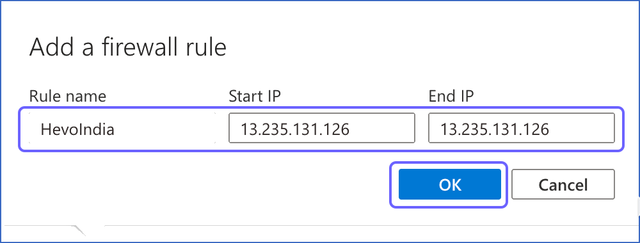
In the Add a firewall rule dialog box, do the following to add your firewall rule:
-
Specify the following:
-
Rule name: A name to identify the rule. For example, HevoIndia.
-
Start IP: The starting address of the IP range.
-
End IP: The ending address of the IP range.
Note: As Hevo has specific IP addresses and not a range, the value in the Start IP and End IP fields is the same. For example, 13.235.131.126 for the India region.
-
-
Click OK.
-
-
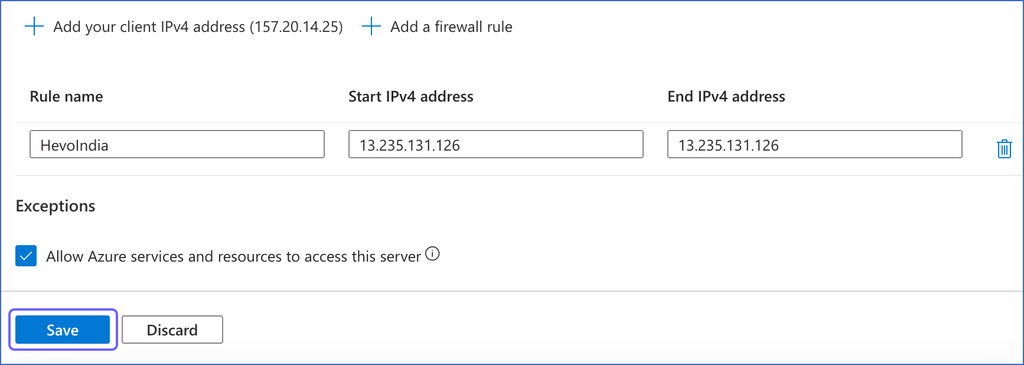
Repeat steps 7 and 8 to add all the IP addresses for your Hevo region.
-
Click Save to save the firewall rules.
Set up Microsoft Entra ID Authentication
Note: This section is applicable only if you want to configure your SQL Server Destination using Microsoft Entra ID authentication.
Microsoft Entra ID is a cloud-based identity and access management service that allows you to create and manage application identities called Service Principals, which can be granted access to your Azure resources. A Service Principal acts as a dedicated identity for an application, similar to how a user account represents a person.
To connect your SQL Server Destination to Hevo using Microsoft Entra ID authentication, perform the following steps:
1. Register a Service Principal in Microsoft Entra ID
Perform the following steps to register a Service Principal in Microsoft Entra ID:
-
Log in to the Azure Portal.
-
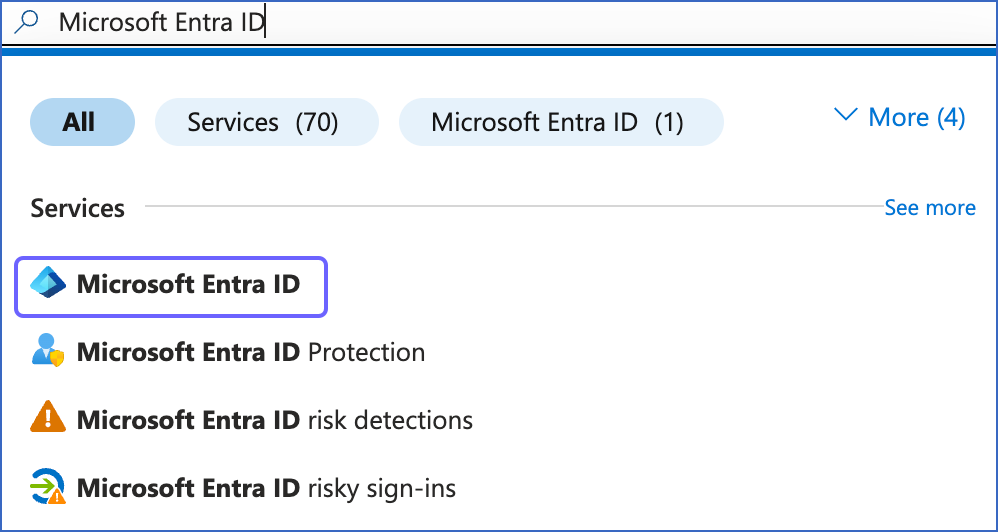
In the top search bar, search for and select Microsoft Entra ID.
-
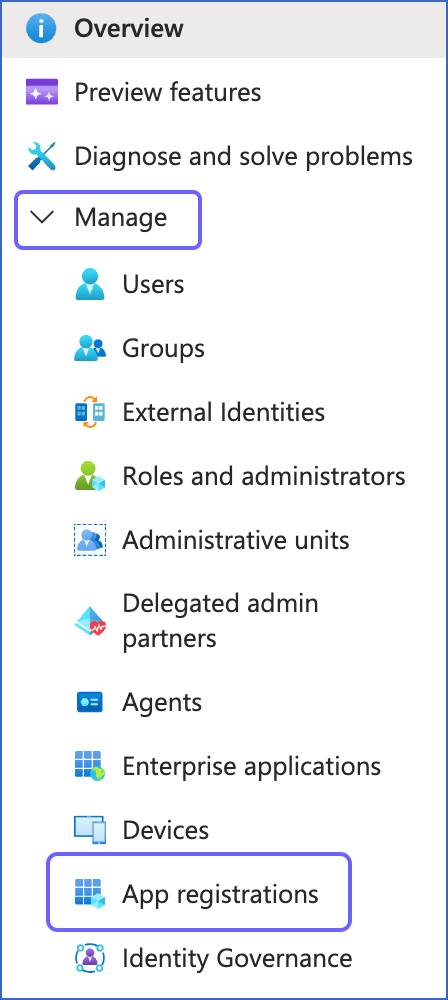
In the left navigation pane, click Manage, and then click App registrations.
-
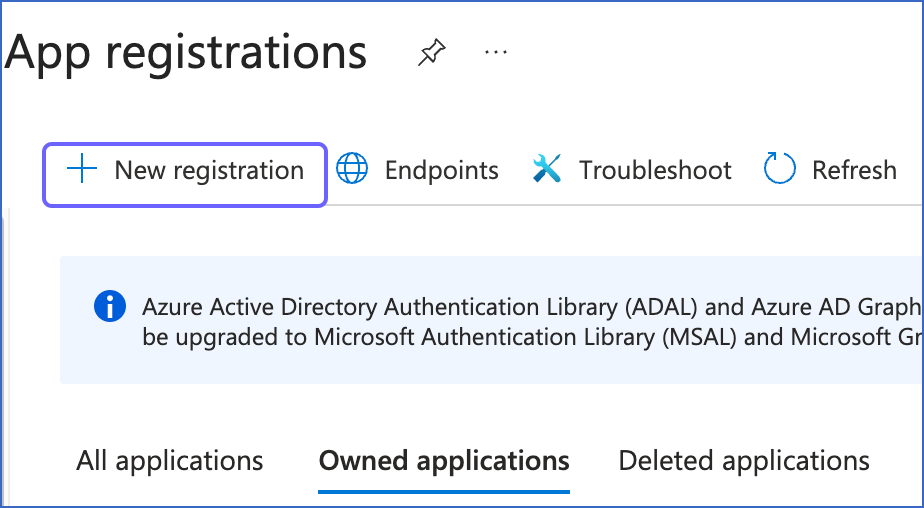
On the App registrations page, click + New registration.
-
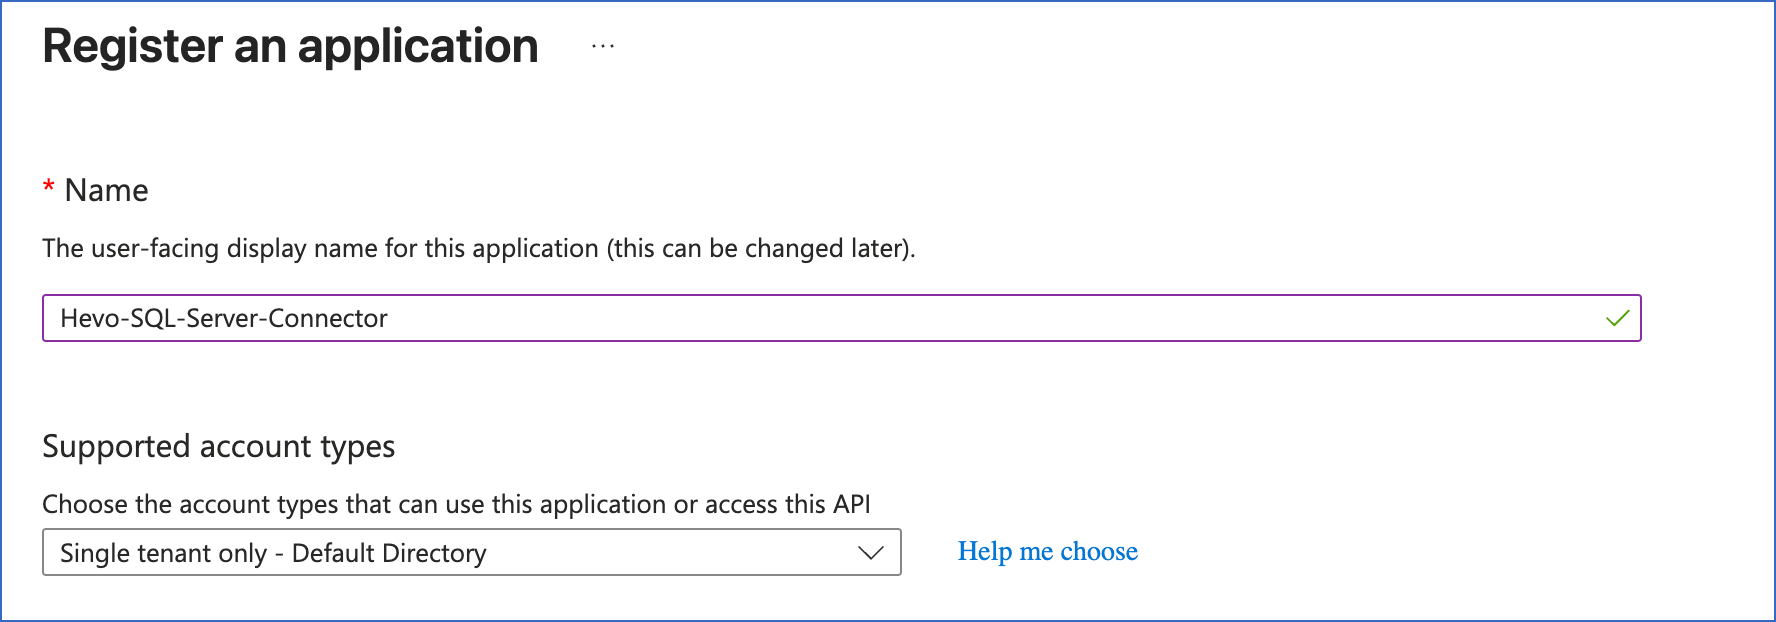
On the Register an application page, do the following:
-
Name: Specify a unique name for your app. For example, Hevo-SQL-Server-Connector.
-
Supported account types: Select the scope of accounts that can use this application. To know more about the available options, refer to Supported account types in Microsoft Entra ID.
-
-
Click Register to register the application in Microsoft Entra ID.
-
In the Essentials section, copy and save the Application (client) ID. Use this value as Client ID while configuring your SQL Server Destination in Hevo.

2. Generate a Client Secret for the Service Principal
Perform the following steps to generate a Client Secret for the Service Principal:
-
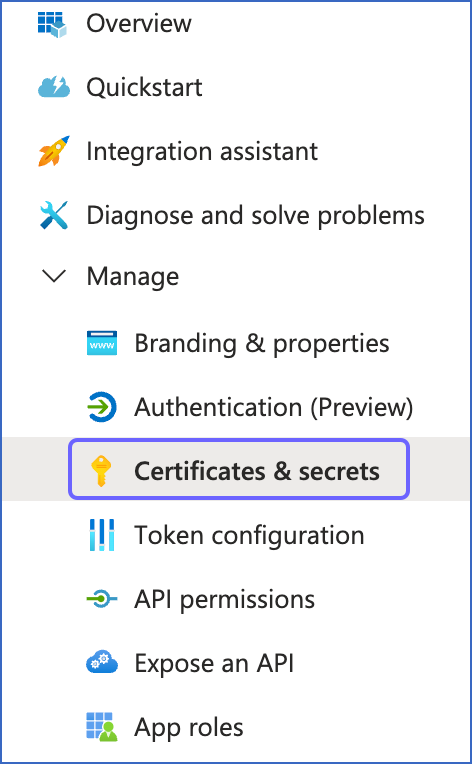
In the left navigation pane, under Manage, click Certificates & secrets.
-
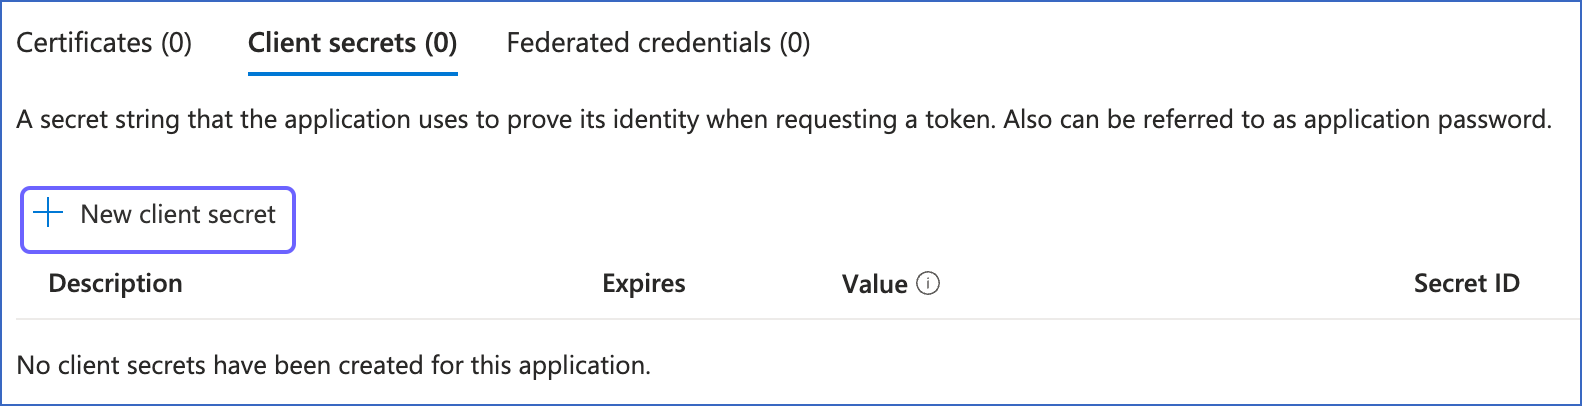
In the Client secrets tab, click + New client secret.
-
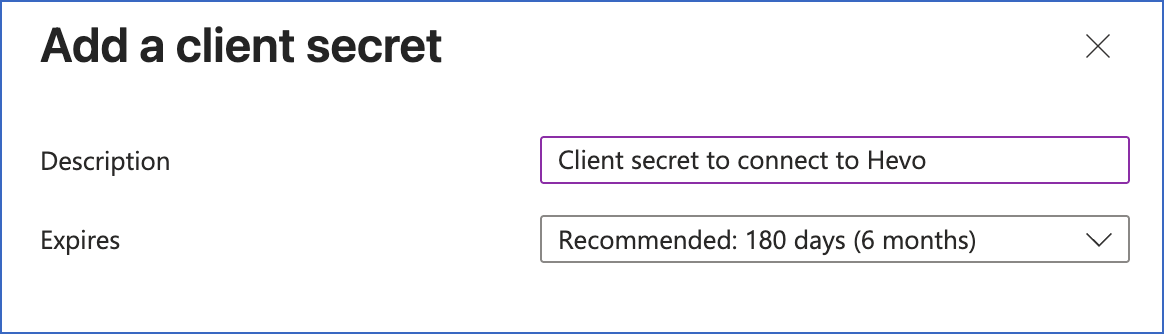
In the Add a client secret slide-in page, do the following:
-
Description: Specify a description for your client secret.
-
Expires: Select an expiration period from the drop-down.
-
-
Click Add.
-
In the Client secrets tab, copy the Value of the secret and save it securely like any other password.
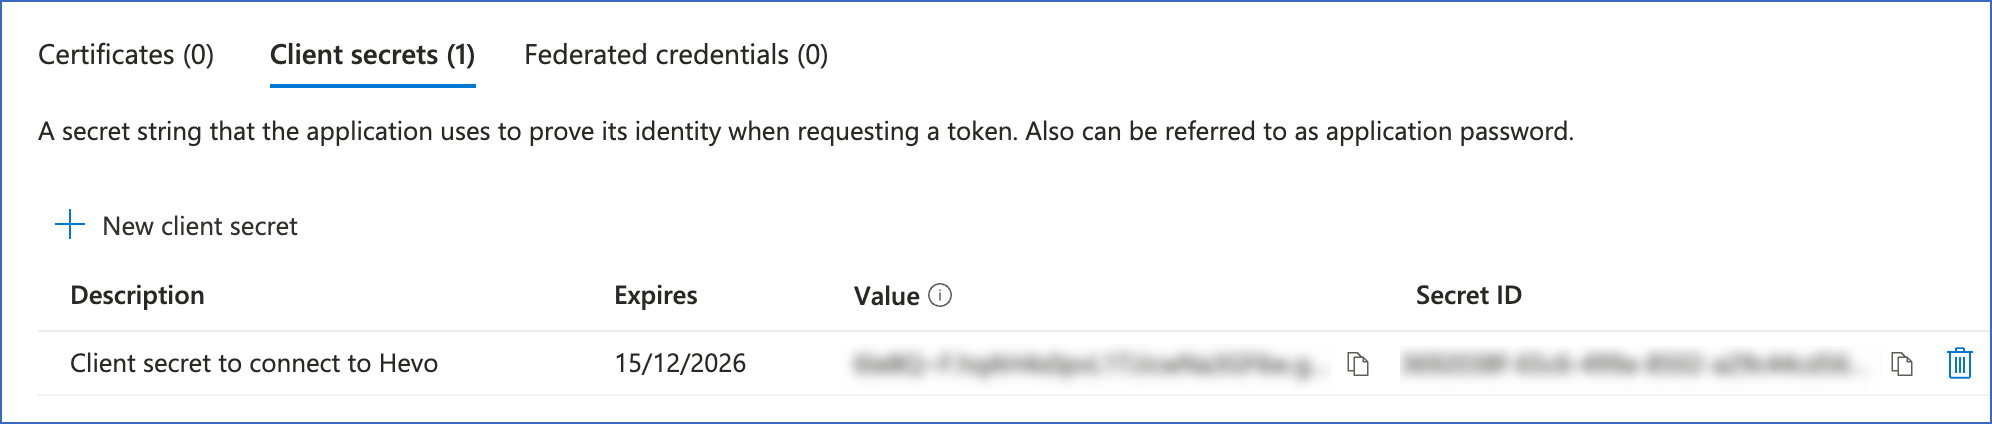
Use this as Client Secret while configuring your SQL Server Destination in Hevo.
Create a Database User and Grant Privileges
1. Create a database user (Optional)
The steps to create a database user depend on the authentication method you want to use to connect your SQL Server Destination to Hevo.
-
Username and Password authentication: Create a login user and a corresponding database user in your SQL Server.
-
Microsoft Entra ID authentication: Create a database user for the Service Principal that you registered in the Set up Microsoft Entra ID Authentication section.
Create a database user for Username and Password authentication
Note: Skip to the Grant privileges for Username and Password authentication section if you are using an existing database user.
Perform the following steps to create a database user in your SQL Server database:
-
Connect to your SQL Server database as an admin user with any SQL client tool, such as sqlcmd.
-
Run the following commands:
-- Select the master database to create a login USE master; CREATE LOGIN <login_user> WITH PASSWORD = '<password>'; -- Add a database user to your database for the login created above USE <database_name>; CREATE USER <database_user> FOR LOGIN <login_user>;Note: Replace the placeholder values in the commands above with your own. For example, <login_user> with hevouser.
Create a database user for Microsoft Entra ID authentication
To allow Hevo to connect to your Azure SQL database using Microsoft Entra ID authentication, you must create an external user for the Service Principal you registered in the Set up Microsoft Entra ID Authentication section. Perform the following steps to do this:
-
Connect to your Azure SQL database as an admin user with any SQL client tool, such as sqlcmd.
-
Run the following command to create a database user for the Service Principal:
USE [<database_name>];
GO

CREATE USER [<service_principal_name>] FROM EXTERNAL PROVIDER;
Note: Replace the placeholder values in the commands above with your own. For example, <service_principal_name> with the name of the Service Principal you registered in the Set up Microsoft Entra ID Authentication section.
2. Grant privileges to the database user
The privileges that Hevo requires to connect to and load data into your SQL Server Destination depend on the authentication method you select while configuring your Destination.
Grant privileges for Username and Password authentication
The following table lists the privileges that Hevo requires to connect to and load data into your SQL Server Destination:
| Privilege Name | Privilege Description | Applies to |
|---|---|---|
| ALTER | Allows Hevo to create, alter, and drop objects from the schema. | SCHEMA |
| INSERT | Allows Hevo to insert rows, synonyms, tables and columns, and views and columns into the schema or database. | - SCHEMA - DATABASE |
| SELECT | Allows Hevo to select rows, synonyms, tables and columns, and views and columns from the schema or database. | - SCHEMA - DATABASE |
| UPDATE | Allows Hevo to update rows, synonyms, tables and columns, and views and columns in the schema or database. | - SCHEMA - DATABASE |
| CREATE TABLE | Allows Hevo to create tables in the database. | DATABASE |
Perform the following steps to grant the required privileges to the database user for creating the database objects needed to load and store your data:
-
Log in to your SQL Server instance as a login user using an SQL client tool, such as sqlcmd. For example,
sqlcmd -U hevouser. -
Enter the following command to access the database in which you created the database user:
USE <database_name> GO -
Enter the following commands to grant privileges to the database user:
GRANT ALTER, SELECT, INSERT, UPDATE ON SCHEMA::<schema_name> TO <username>
GO
GRANT CREATE TABLE, INSERT, SELECT, UPDATE ON DATABASE::<database_name> to <username>
GO
Note: Replace the placeholder values in all the commands above with your own.
Grant privileges for Microsoft Entra ID authentication
To allow Hevo to read data from and write data to your Azure SQL database, you must grant the Service Principal the following privileges:
| Privilege | Allows Hevo to |
|---|---|
| db_datareader | Read data from all tables in your database. |
| db_datawriter | Write data to all tables in your database. |
| CREATE TABLE | Create tables in your database during the historical load. |
| ALTER on SCHEMA | Create, alter, and drop objects from the schema. |
Perform the following steps to grant these privileges to the Service Principal:
-
Connect to your Azure SQL database as an admin user with any SQL client tool, such as sqlcmd.
-
Run the following commands:
USE [<database_name>]; GO ALTER ROLE db_datareader ADD MEMBER [<service_principal_name>]; ALTER ROLE db_datawriter ADD MEMBER [<service_principal_name>]; GRANT CREATE TABLE TO [<service_principal_name>]; GRANT ALTER ON SCHEMA::<schema_name> TO [<service_principal_name>];Note: Replace the placeholder values in the commands above with your own. For example, <service_principal_name> with the name of the Service Principal you registered in the Set up Microsoft Entra ID Authentication section.
Configure your SQL Server Connection Settings
Perform the following steps to configure SQL Server as a Destination in Hevo:
-
Click Destinations in the Navigation Bar.
-
Click + Create Standard Destination in the Destinations List View.
-
On the Add Destination page, select SQL Server.
-
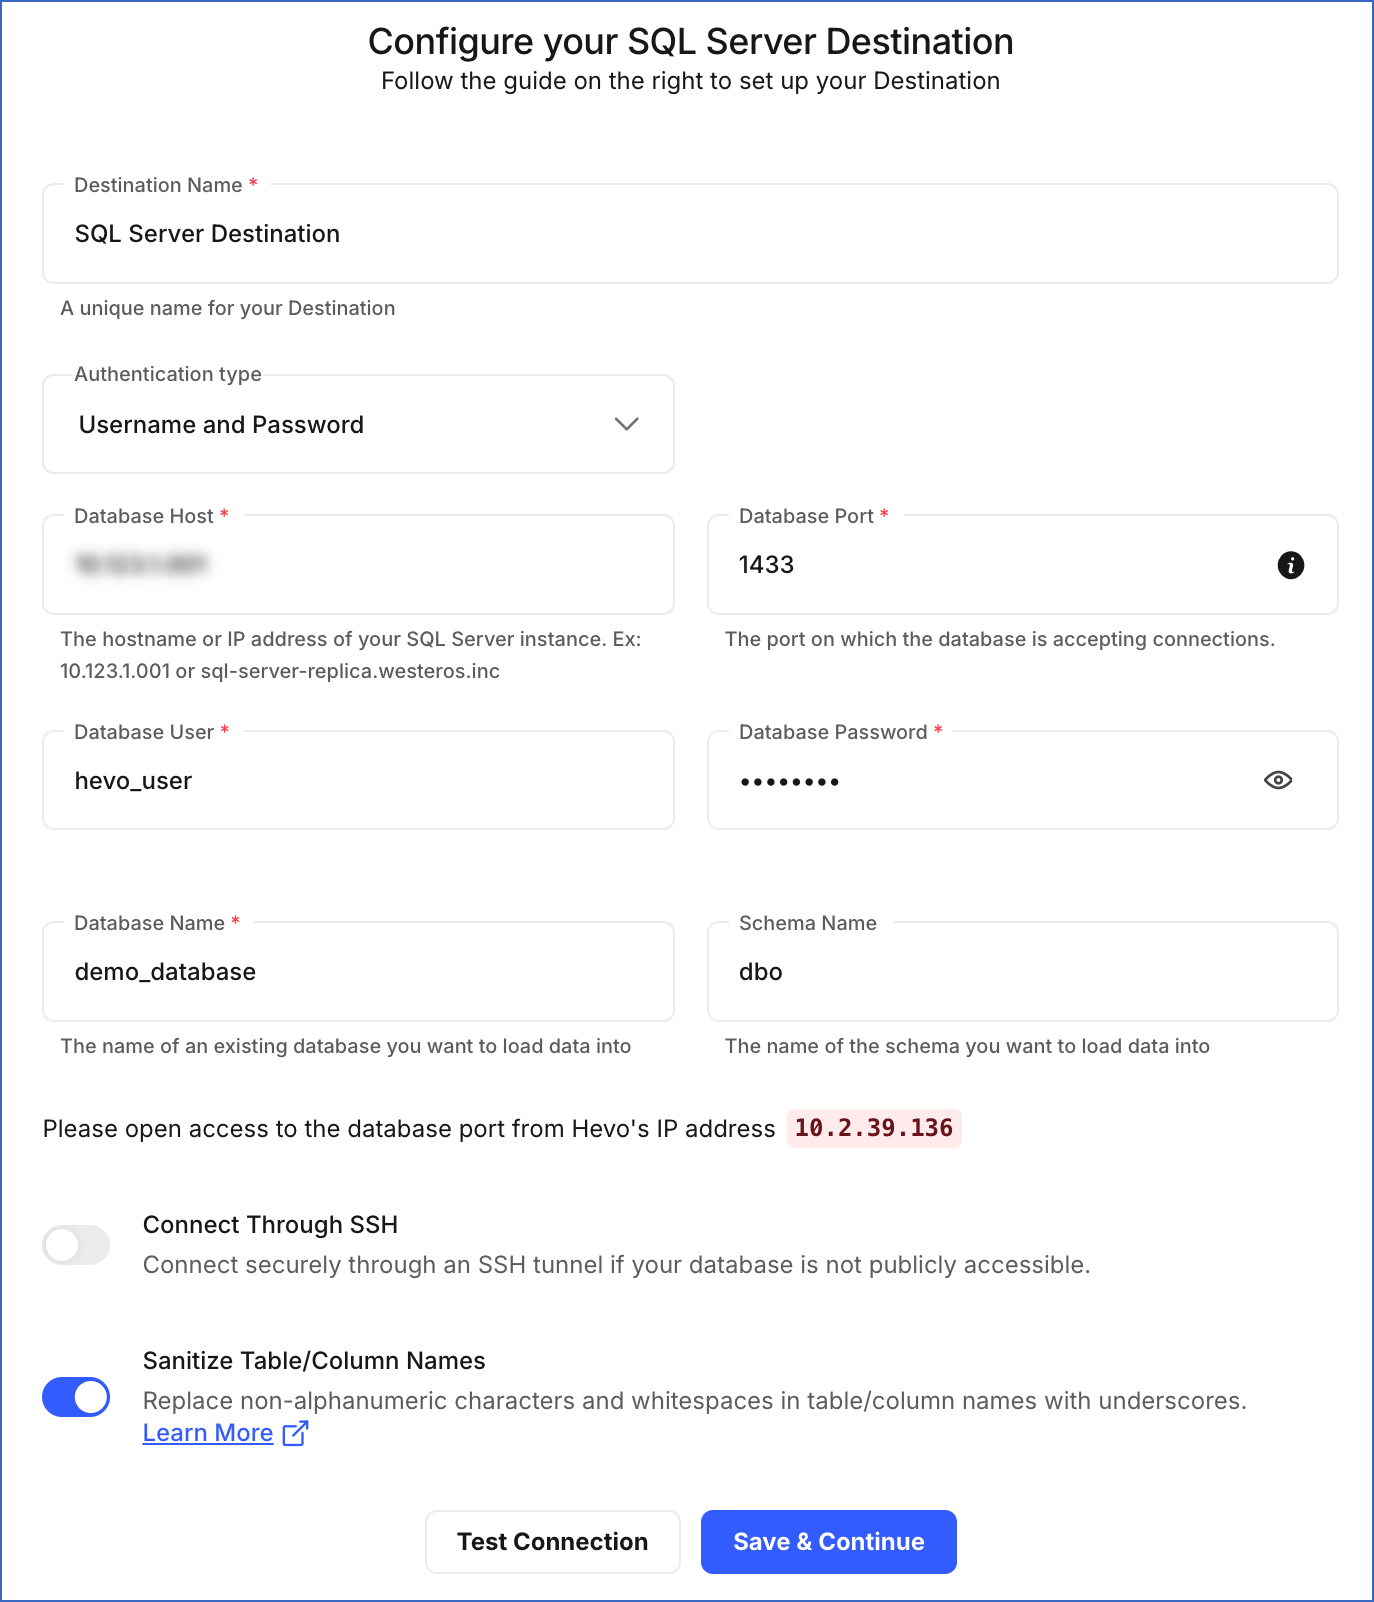
On the Configure your SQL Server Destination page, specify the following:
-
Destination Name: A unique name for your Destination, not exceeding 255 characters.
-
Authentication type: Select the authentication method from the drop-down that you want Hevo to use to connect to your SQL Server database.
-
Username and Password: Connect to your SQL Server database using a database username and password.
-
Database Host: The IP address or DNS of your SQL Server instance. This can be an IP address, such as 10.123.10.001, or an endpoint, such as mssql.westeros.inc.
For URL-based hostnames, exclude the http:// or https:// part. For example, if the hostname URL is https://mssql.database.windows.net, enter mssql.database.windows.net.
If you want to configure a local database as your Destination, read Connecting to a Local Database for the steps to do this.
-
Database Port: The port on which your SQL Server listens for connections. Default value: 1433
-
Database User: A login user with a non-administrative role in the SQL Server database. This can be the login user that you created in the Create a database user for Username and Password authentication section.
-
Database Password: The password for the login user.
-
Database Name: The name of the Destination database to which the data is loaded. This can be the database that you created in the Create a database in your SQL Server section. The login user must have permission to access this database.
-
Schema Name (Optional): The name of the Destination database schema. This can be the database schema that you created in the Create a schema in your database (Optional) section. Default value: dbo
-
-
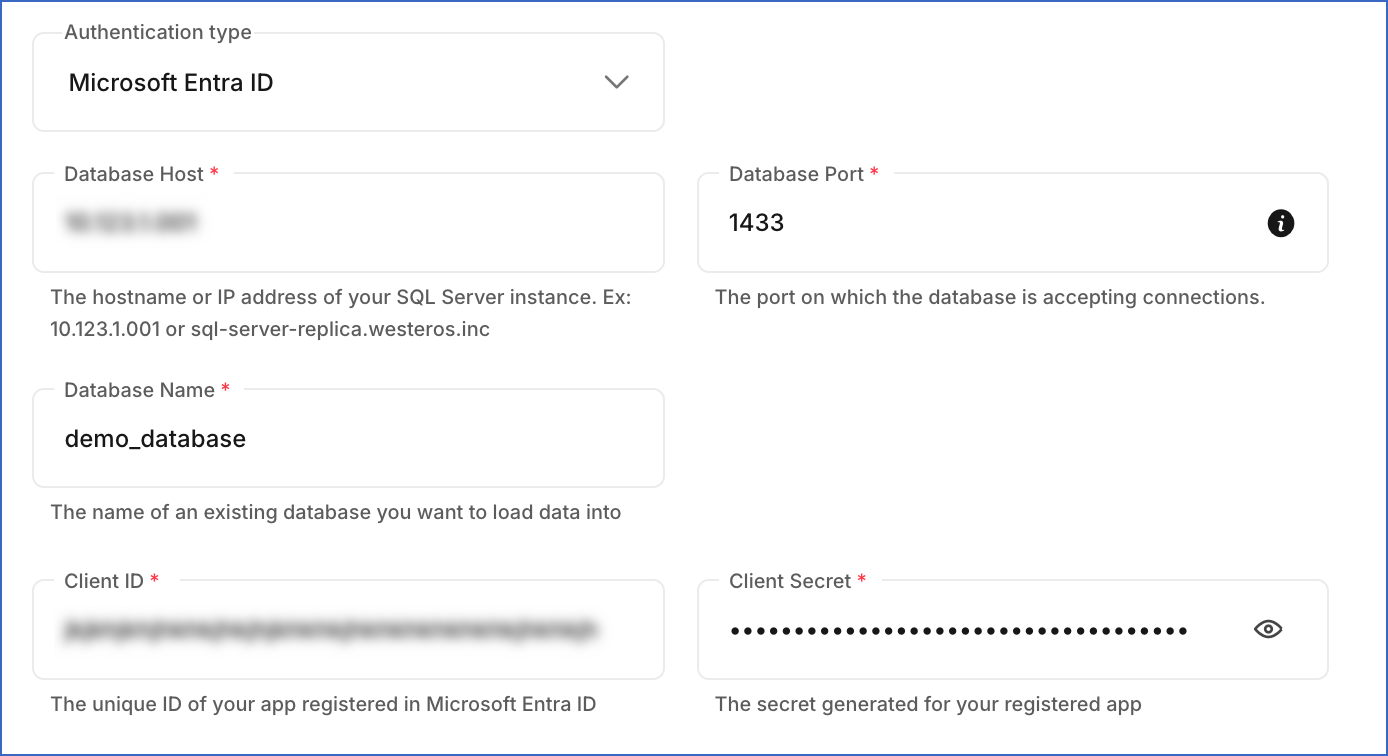
Microsoft Entra ID: Connect to your Azure SQL database using a Service Principal registered in Microsoft Entra ID.
-
Database Host: The Azure SQL Server host’s IP address or DNS. For example, sqlserver.database.windows.net. This is the server name you obtained in the Set up an Azure SQL Database logical server section.
-
Database Port: The port on which your Azure SQL database listens for connections. Default value: 1433. Update this value if your instance uses a different port.
-
Database Name: The name of an existing database where the data is to be loaded. This can be the one you created in the Create a database in Azure SQL Server section.
-
Client ID: The application ID of the Service Principal you registered in the Set up Microsoft Entra ID Authentication section.
-
Client Secret: The client secret you generated in the Set up Microsoft Entra ID Authentication section.
-
-
-
Additional Settings:
-
Connect through SSH: Enable this option to connect to Hevo using an SSH tunnel. This provides an additional level of security to your database by not exposing your SQL Server setup to the public. Read Connecting Through SSH.
If this option is disabled, you must whitelist Hevo’s IP addresses.
-
Sanitize Table/Column Names: Enable this option to remove all non-alphanumeric characters and spaces in a table or column name, and replace them with an underscore (_). Read Name Sanitization.
-
-
-
Click Test Connection. This button is enabled once all the mandatory fields are specified.
-
Click Save & Continue. This button is enabled once all the mandatory fields are specified.
Additional Information
Read the detailed Hevo documentation for the following related topics:
Destination Considerations
-
You must disable any foreign keys defined in the target tables. Foreign keys do not allow data to be loaded until the reference table has a corresponding key defined.
-
You can replicate data for only 1018 columns in a given SQL Server table. Read Limits on the Number of Columns.
-
SQL Server stores row data on pages of size 8,192 bytes (8 KB). Out of this, 8,060 bytes are available for row data, and the remaining bytes are used for page metadata. As a result, if the Event size in the Source object exceeds this limit, Hevo may not be able to load the Event. This can lead to data mismatches between the Source and Destination. To avoid such a scenario, ensure that each Event contains less than 8,060 bytes of data.
Read SQL Server documentation for information on how SQL Server handles larger rows.
-
By default, SQL Server uses case-insensitive collation, which means table names such as Test and test are treated as identical.
If you have enabled the Sanitize Table/Column Names option while configuring the Destination, Hevo converts all table names to lowercase. This can cause auto-mapping failures if Source contains multiple objects that differ only by case, or if a similarly named table already exists in the Destination. In such cases, Test and test are treated as identical and mapped to the same test Destination table, causing data mismatch.
Even if name sanitization is disabled, SQL Server may still reject the creation of tables with names that differ only by casing, due to its default collation settings. As a best practice, avoid using Source table names that differ only by case when using SQL Server Destination.
Revision History
Refer to the following table for the list of key updates made to this page:
| Date | Release | Description of Change |
|---|---|---|
| Jul-01-2026 | 2.50 | Updated the page to reflect support for Microsoft Entra ID authentication. |
| Nov-12-2025 | NA | Updated the document as per the latest Hevo UI. |
| Sep-25-2025 | NA | Added a Destination Consideration about the SQL Server row size limit. |
| May-23-2025 | NA | Updated section, Destination Considerations to add information about Auto Mapping failing due to case insensitive table names. |
| Oct-03-2023 | NA | Added a step to run the commands in the Create an SQL login with sysadmin privileges section. |
| Apr-25-2023 | 2.12 | Updated section, Configure your SQL Server Connection Settings to add information that you must specify all fields to create a Pipeline. |
| Mar-10-2023 | NA | Added the privileges table in the section, Grant privileges to the database user to explain the privileges required by Hevo. |
| Dec-07-2022 | 2.03 | - Added sections, Set up an SQL Server Instance, Allow Access to the SQL Server Instance, and Create a Database in the SQL Server Instance to help set up a SQL Server Destination. - Modified the sections, Create a Database User and Grant Privileges and Configure your SQL Server Connection Settings to add more clarity. |
| Sep-07-2022 | NA | - Updated the Prerequisites section and added the Create a Database User and Grant Privileges section. - Updated the Configure your SQL Server Connection Settings to add a link to the Connecting to a Local Database page. - Deleted the Connect to a Local Database section. |
| Jul-26-2021 | 1.68 | Added section, Connect to a Local Database. |
| Jul-12-2021 | NA | Updated the section, Destination Considerations. |