Amazon Aurora PostgreSQL is a fully managed, PostgreSQL-compatible relational database engine that combines the speed and reliability of high-end commercial databases with the simplicity and cost-effectiveness of open-source databases. Its enterprise database capabilities, combined with the PostgreSQL compatibility, help deliver a higher throughput than a standard PostgreSQL running on the same hardware.
You can ingest data from your Amazon Aurora PostgreSQL database using Hevo Pipelines and replicate it to a Destination of your choice.
Prerequisites
Set up Logical Replication for Incremental Data
Note: If your Pipeline is created using XMIN mode, skip to the Allowlist Hevo IP addresses for your region section.
Hevo supports data replication from PostgreSQL servers using the pgoutput plugin (available on PostgreSQL version 10.0 and above). For this, Hevo identifies the incremental data from publications, which are defined to track changes generated by all or some database tables. A publication identifies the changes generated by the tables from the Write-Ahead Logs (WALs) set at the logical level.
Perform the following steps to enable logical replication on your Amazon Aurora PostgreSQL server:
1. Create a parameter group
-
Log in to the Amazon RDS console.
-
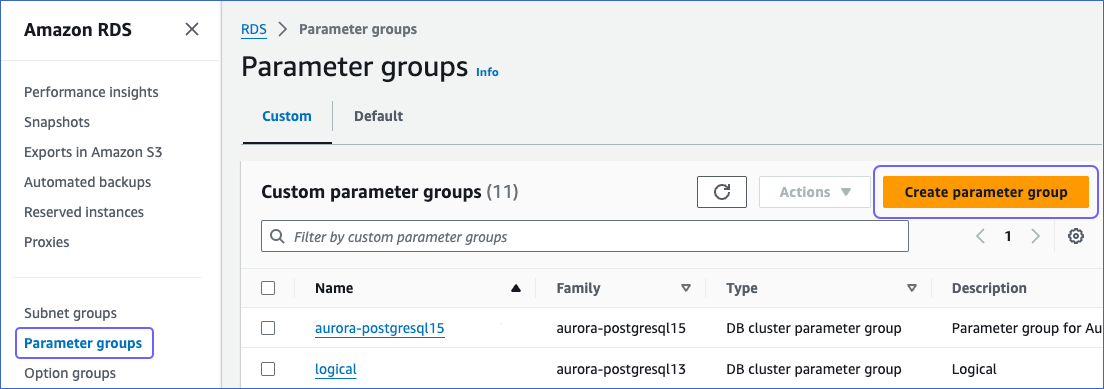
In the left navigation pane, select Parameter groups.
-
On the Parameter groups page, click Create parameter group.
-
On the Create parameter group page, perform the following steps:
-
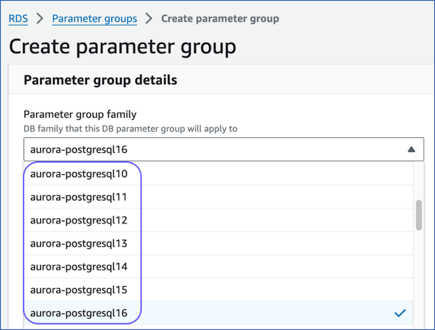
Select an aurora-postgresql version from the Parameter group family drop-down.
-
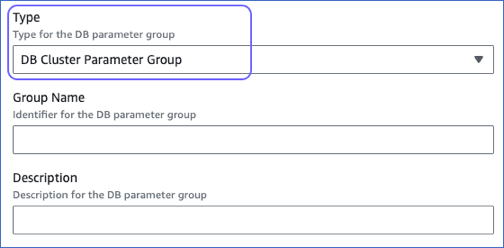
Select DB Cluster Parameter Group from the Type drop-down.
-
Specify the Group Name and Description, and then click Create.
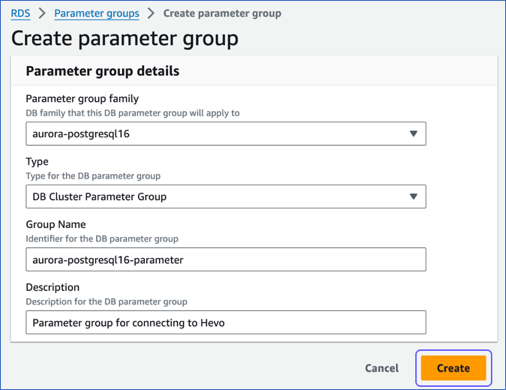
You have successfully created a parameter group.
-
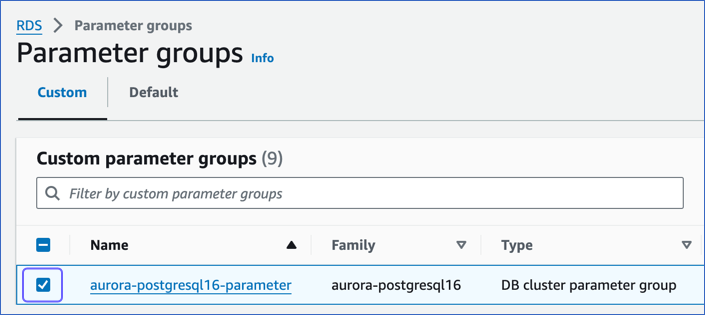
On the Parameter groups page, select the check box corresponding to the parameter group that you created above.
-
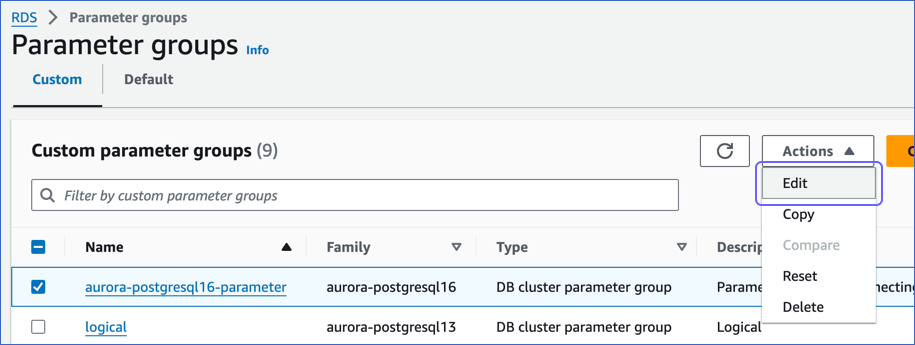
In the Actions drop-down, click Edit.
-
On the page that appears, search and update the value of the following parameters:

| Parameter |
Value |
Description |
max_replication_slots |
5 |
The number of clients that can connect to the server. Default value: 20.
RDS recommends setting this parameter value to more than or equal to the number of planned publications and subscriptions so that internal replication by RDS is not affected. |
rds.logical_replication |
1 |
The setting to enable or turn off logical replication. The default value for this parameter is 0, which means logical replication is turned off. To enable logical replication, a value of 1 is required. |
max_wal_senders |
5 |
The maximum number of processes that can simultaneously transmit the WAL. Default value: 10.
RDS recommends setting this value to at least 5 so that its internal replication is not affected. |
wal_sender_timeout |
0 |
The time after which PostgreSQL terminates the replication connections due to inactivity. A time value specified without units is assumed to be in milliseconds. Default value: 60 seconds.
You must set the value to 0 so that the connections are never terminated, and your Pipeline does not fail. |
3. Apply the parameter group to your PostgreSQL database
-
In your Amazon RDS console, click Databases in the left navigation pane.
-
On the Databases page, click the DB identifier for your database, and then Modify.
-
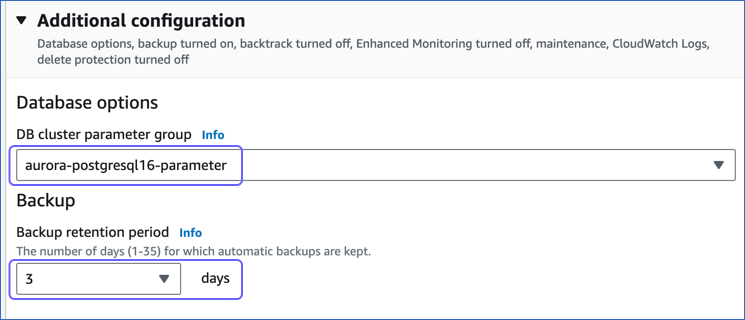
Scroll to the Additional configuration section, and in the Database options, do the following:
-
From the drop-down, select the DB cluster parameter group you created in Step 1.
-
Set the Backup retention period to at least 3 days. This setting defines the number of days for which automated backups are retained. Default value: 7.
-
Click Continue.
-
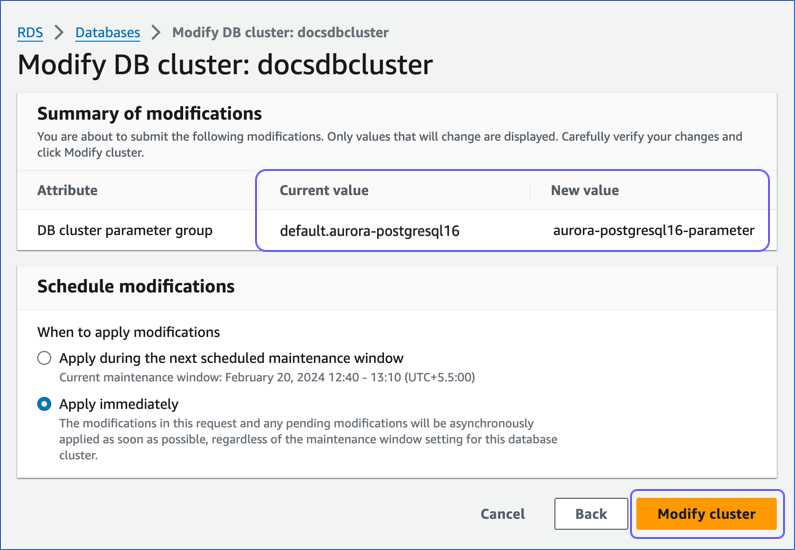
On the Modify DB cluster: <your database cluster> page, in the Schedule modifications section, select the time window for applying the changes and click Modify cluster.
-
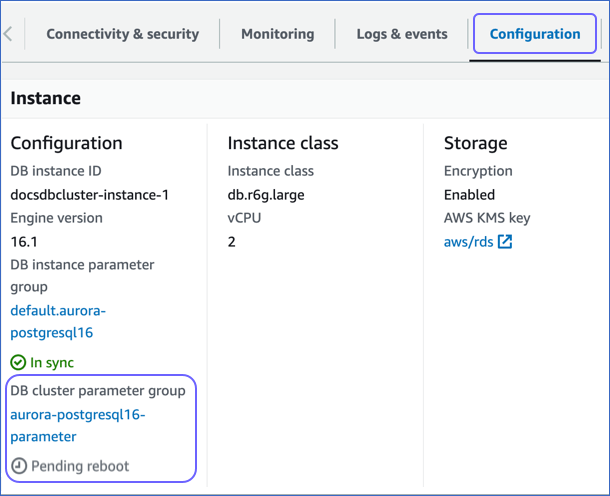
Once the DB cluster parameter group status changes to Pending reboot, reboot the DB instance for the changes to take effect. You can check this from the Configuration tab of your database instance.
4. Create a publication for your database tables
In PostgreSQL 10 and later, the data to be replicated is identified via publications. A publication defines a group that can include all tables in a database, all tables within a specific schema, or individual tables. It tracks and determines the set of changes generated by those tables from the Write-Ahead Logs (WALs).
Note: The scope of a publication is restricted to the database in which it is created.
To define a publication:
Note: You must define a publication with the insert, update, and delete privileges.
-
Connect to your Amazon Aurora PostgreSQL database instance as a Superuser with an SQL client tool, such as psql.
-
Run one of the following commands to create a publication:
Note: You can create multiple distinct publications whose names do not start with a number in a single database.
-
In PostgreSQL 11 and above, up to 17 without the publish_via_partition_root parameter:
Note: By default, the versions that support this parameter create a publication with publish_via_partition_root set to FALSE.
-
In PostgreSQL 13 and above, up to 17 with the publish_via_partition_root parameter:
Read Handling Source Partitioned Tables for information on how this parameter affects data loading from partitioned tables.
-
(Optional) Run the following command to add table(s) to or remove them from a publication:
Note: You can modify a publication only if it is not defined on all tables and you have ownership rights on the table(s) being added or removed.
ALTER PUBLICATION <publication_name> ADD/DROP TABLE <table_name>;
When you alter a publication, you must refresh the schema for the changes to be visible in your Pipeline.
-
(Optional) Run the following command to create a publication on a column list:
Note: This feature is available in PostgreSQL versions 15 and higher.
CREATE PUBLICATION <columns_publication> FOR TABLE <table_name> (<column_name1>, <column_name2>, <column_name3>, <column_name4>,...);

-- Example to create a publication with three columns

CREATE PUBLICATION film_data_filtered FOR TABLE film (film_id, title, description);
Run the following command to alter a publication created on a column list:
ALTER PUBLICATION <columns_publication> SET TABLE <table_name> (<column_name1>, <column_name2>, ...);

-- Example to drop a column from the publication created above

ALTER PUBLICATION film_data_filtered SET TABLE film (film_id, title);
Note: Replace the placeholder values in the commands above with your own. For example, <publication_name> with hevo_publication.
5. Create a replication slot
Hevo uses replication slots to track changes from the Write-Ahead Logs (WALs) for incremental ingestion.
Perform the following steps to create a replication slot:
-
Connect to your Amazon Aurora PostgreSQL database instance as a user with the REPLICATION privilege using any SQL client tool, such as psql.
-
Run the following command to create a replication slot using the pgoutput plugin:
SELECT * FROM pg_create_logical_replication_slot('hevo_slot', 'pgoutput');
Note: You can replace the sample value, hevo_slot, in the command above with your own replication slot name.
-
Run the following command to view the replication slots created in your database:
SELECT slot_name, database, plugin FROM pg_replication_slots;
This command lists all the replication slots along with the associated database and plugin.
Verify that the output displays your replication slot name, the corresponding database, and the plugin as pgoutput.
Sample Output:
| slot_name |
database |
plugin |
| hevo_slot |
mydb |
pgoutput |
Allowlist Hevo IP addresses for your region
You must add Hevo’s IP address for your region to the database IP allowlist, enabling Hevo to connect to your Amazon Aurora PostgreSQL database. To do this:
1. Add inbound rules
-
Log in to the Amazon RDS console.
-
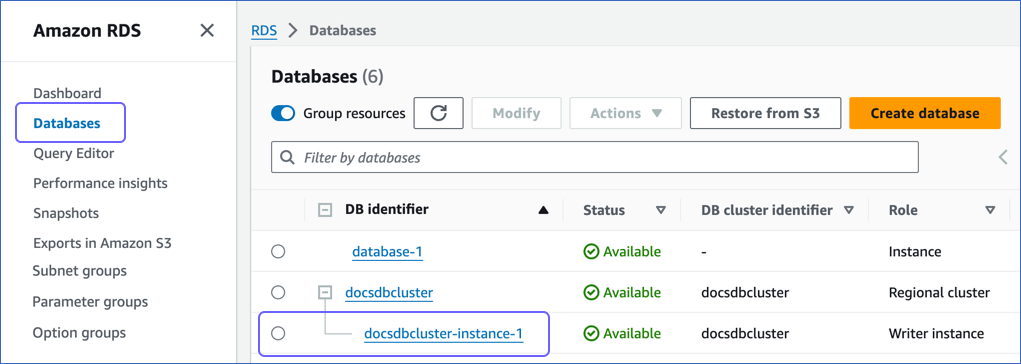
In the left navigation pane, click Databases.
-
In the Databases section on the right, click the DB identifier of your Amazon Aurora database instance.
-
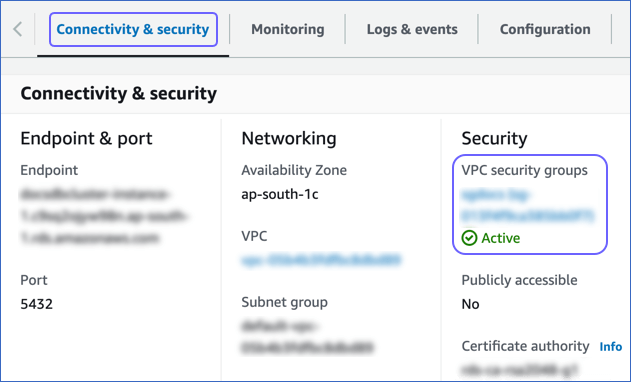
In the Connectivity & security tab, click the link text under Security, VPC security groups.
-
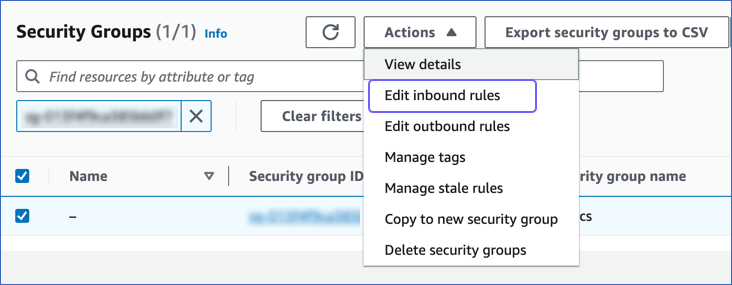
On the Security groups page, select the check box for your Security group ID, and from the Actions drop-down, click Edit inbound rules.
-
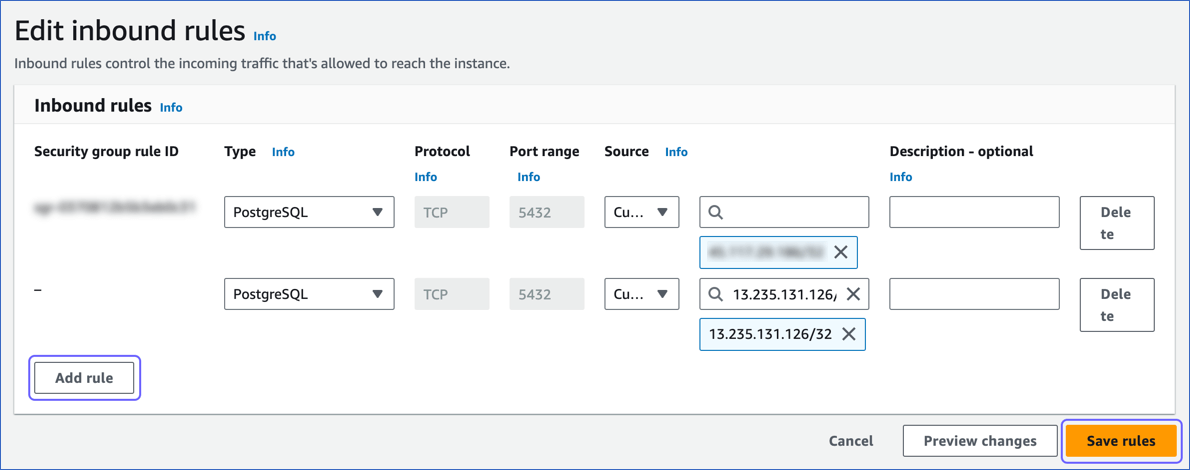
On the Edit inbound rules page:
-
Click Add rule.
-
Add Hevo’s IP address for your region to allow connections to your Amazon Aurora PostgreSQL database instance.
-
Click Save rules.
-
Follow steps 1-3 from the section above.
-
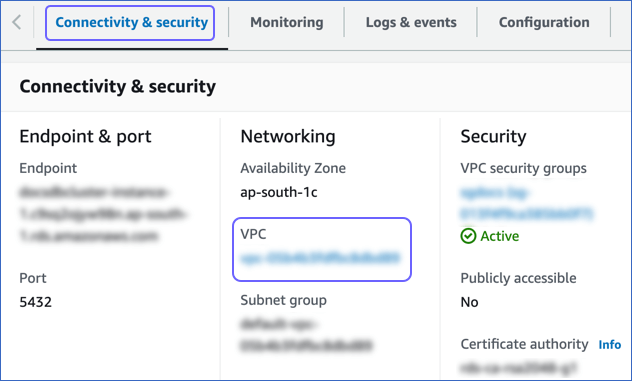
In the Connectivity & security tab, click the link text under Networking, VPC.
-
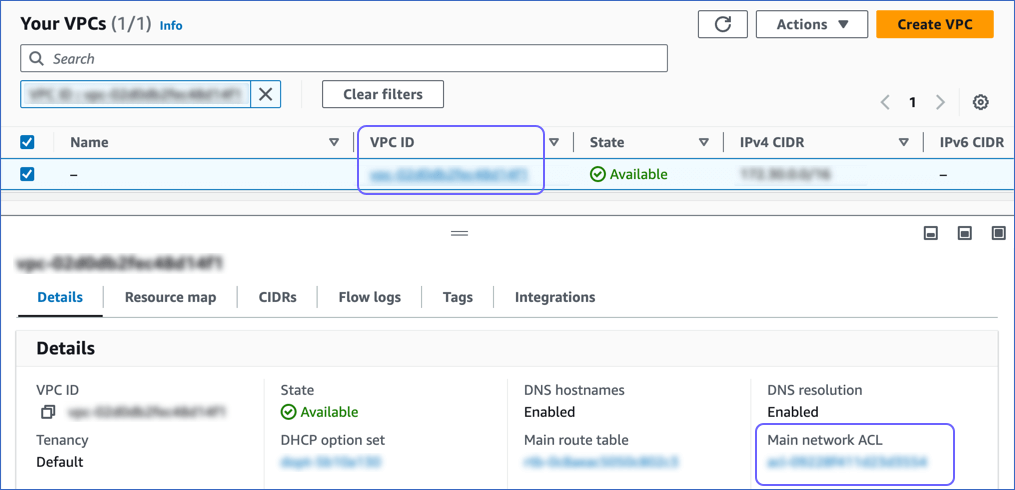
On the Your VPCs page, click the VPC ID, and in the Details section, click the link text under Main network ACL.
-
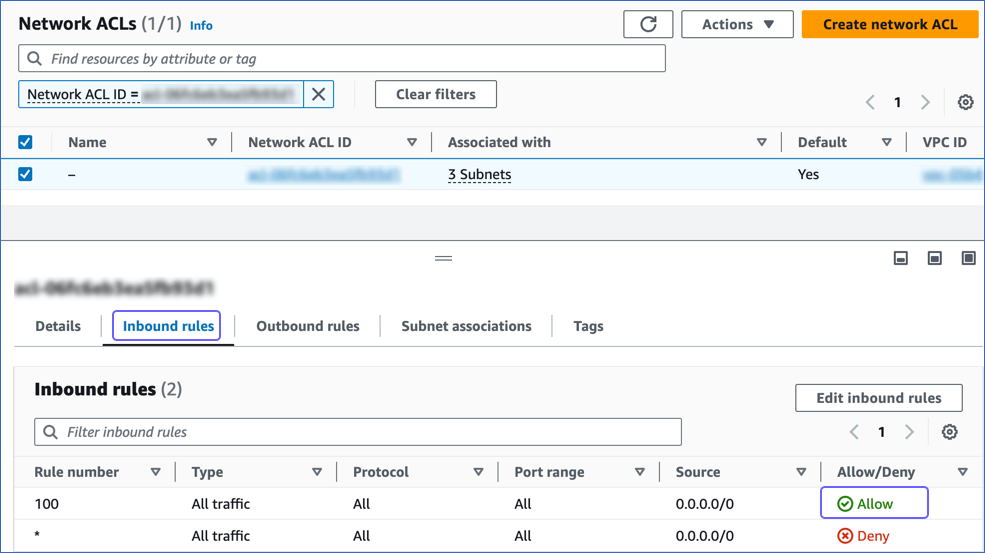
On the Network ACLs page, click the Inbound Rules tab and ensure that the IP address you added is set to Allow.
Create a Database User and Grant Privileges
1. Create a database user (Optional)
Perform the following steps to create a user in your Amazon Aurora PostgreSQL database:
-
Connect to your Amazon Aurora PostgreSQL database instance as a Superuser with an SQL client tool, such as psql.
-
Run the following command to create a user in your database:
CREATE USER <database_username> WITH LOGIN PASSWORD '<password>';
Note: Replace the placeholder values in the command above with your own. For example, <database_username> with hevouser.
2. Grant privileges to the user
The following table lists the privileges that the database user for Hevo requires to connect to and ingest data from your PostgreSQL database:
| Privilege Name |
Allows Hevo to |
| CONNECT |
Connect to the specified database. |
| USAGE |
Access the objects in the specified schema. |
| SELECT |
Select rows from the database tables. |
| ALTER DEFAULT PRIVILEGES |
Access new tables created in the specified schema after Hevo has connected to the PostgreSQL database. |
| rds_replication |
Access the WALs.
Note: This privilege is not required if your Pipeline is created using XMIN mode. |
Perform the following steps to grant privileges to the database user connecting to the PostgreSQL database as follows:
-
Connect to your Amazon Aurora PostgreSQL database instance as a Superuser with an SQL client tool, such as psql.
-
Run the following commands to grant privileges to your database user:
GRANT CONNECT ON DATABASE <database_name> TO <database_username>;
GRANT USAGE ON SCHEMA <schema_name> TO <database_username>;
GRANT SELECT ON ALL TABLES IN SCHEMA <schema_name> to <database_username>;
-
(Optional) Alter the schema to grant SELECT privileges on tables created in the future to your database user:
Note: Grant this privilege only if you want Hevo to replicate data from tables created in the schema after the Pipeline is created.
ALTER DEFAULT PRIVILEGES IN SCHEMA <schema_name> GRANT SELECT ON TABLES TO <database_username>;
-
Run the following command to grant your database user permission to read from the WALs:
GRANT rds_replication TO <database_username>;
Note: Replace the placeholder values in the commands above with your own. For example, <database_username> with hevouser.
Retrieve the Database Hostname and Port Number (Optional)
The Amazon Aurora PostgreSQL hostnames start with your database name and end with rds.amazonaws.com. For example, docsdbcluster-instance-1.xxxxx.xxxx.rds.amazonaws.com.
Perform the following steps to retrieve the database hostname (Endpoint):
-
In the left navigation pane of the Amazon RDS console, click Databases.
-
In the Databases section on the right, click the DB identifier of your Amazon Aurora PostgreSQL database instance. For example, docsdbcluster-instance-1 in the image below.
-
Click the Connectivity & security tab, and copy the values under Endpoint and Port.
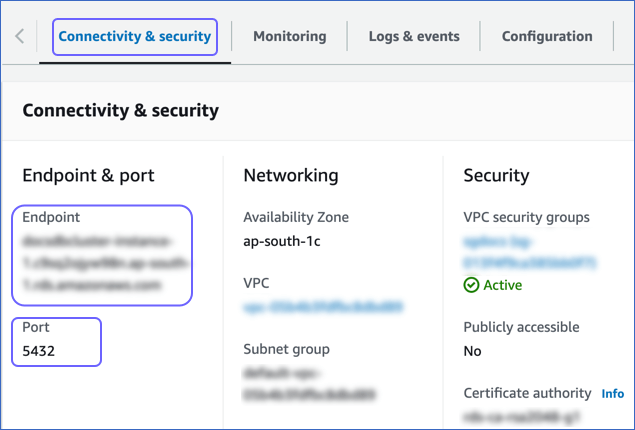
Use these values as your Database Host and Database Port, respectively, while configuring your Amazon Aurora PostgreSQL Source in Hevo.
Configure Amazon Aurora PostgreSQL as a Source in your Pipeline
Perform the following steps to configure your Amazon Aurora PostgreSQL Source:
-
Click PIPELINES in the Navigation Bar.
-
Click + Create Pipeline in the Pipelines List View.
-
On the Select Source Type page, select Amazon Aurora PostgreSQL.
-
On the Select Destination Type page, select the type of Destination you want to use.
-
On the page that appears, do the following:
-
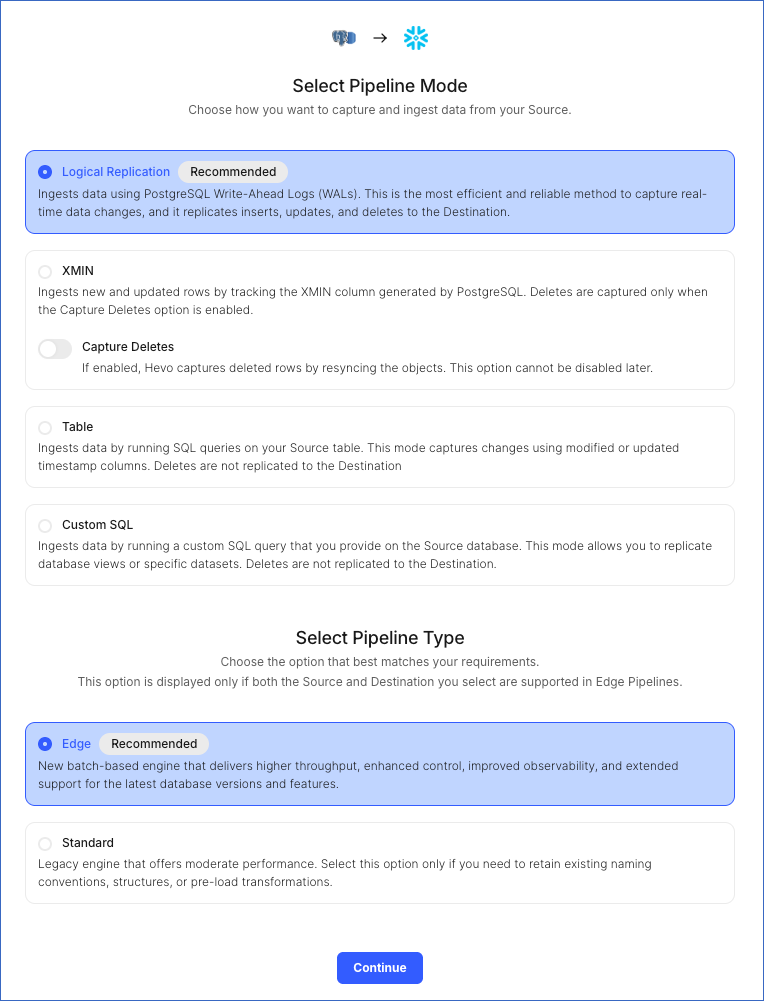
Select Pipeline Mode: Choose Logical Replication or XMIN. Hevo supports only these modes for Edge Pipelines created with PostgreSQL Source. If you choose any other mode, you can proceed to create a Standard Pipeline.
-
Select Pipeline Type: Choose the type of Pipeline you want to create based on your requirements, and then click Continue.
-
If you select Edge, skip to step 6 below.
-
If you select Standard, read Amazon Aurora PostgreSQL to configure your Standard Pipeline.
This section is displayed only if all the following conditions are met:
-
The selected Destination type is supported in Edge.
-
The Pipeline mode is set to Logical Replication.
-
Your Team was created before September 15, 2025, and has an existing Pipeline created with the same Destination type and Pipeline mode.
For Teams that do not meet the above criteria, if the selected Destination type is supported in Edge and the Pipeline mode is set to Logical Replication or XMIN, you can proceed to create an Edge Pipeline. Otherwise, you can proceed to create a Standard Pipeline. Read Amazon Aurora PostgreSQL to configure your Standard Pipeline.
-
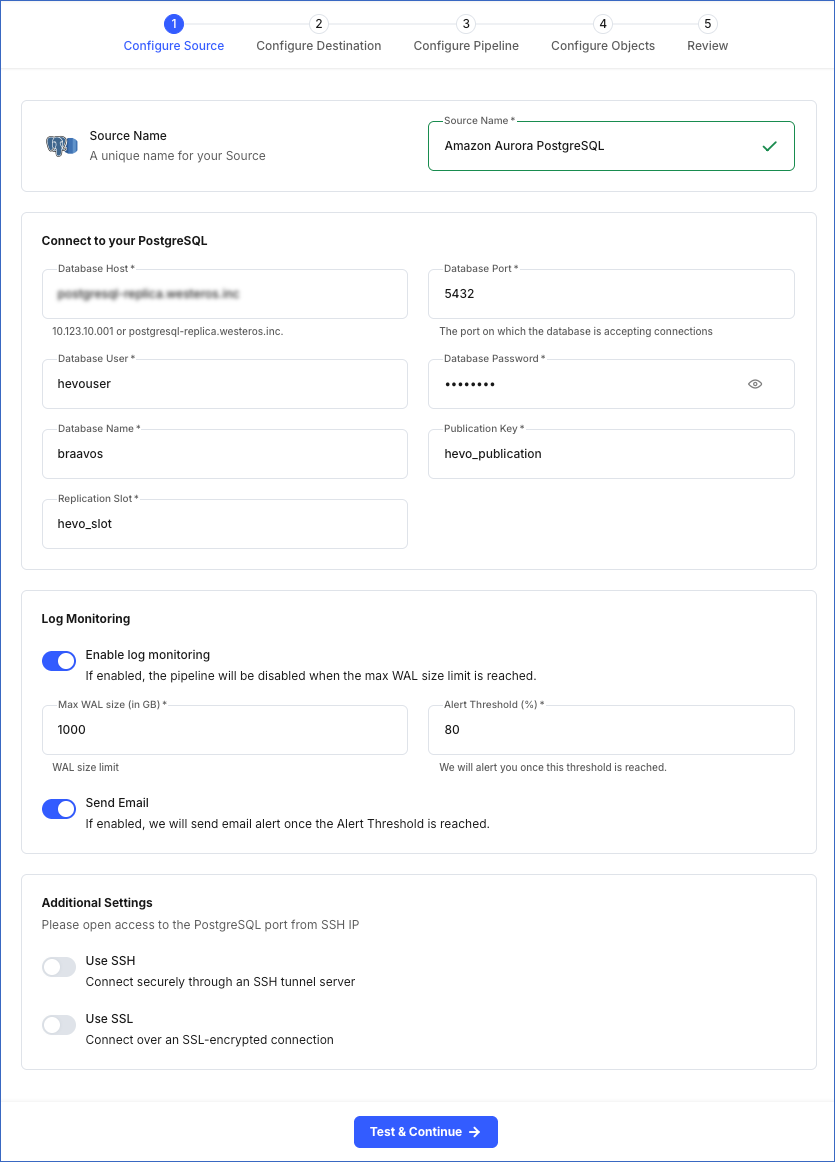
In the Configure Source screen, specify the following:
-
Source Name: A unique name for your Source, not exceeding 255 characters. For example, Amazon Aurora PostgreSQL.
-
In the Connect to your PostgreSQL section:
-
Database Host: The Amazon Aurora PostgreSQL host’s IP address or DNS. This is the endpoint that you obtained in the Retrieve the Database Hostname and Port Number section.
-
Database Port: The port on which your Amazon Aurora PostgreSQL server listens for connections. This is the port number that you obtained in the Retrieve the Database Hostname and Port Number section. Default value: 5432.
-
Database User: The user who has permission only to read data from your database. This user can be the one you added in the Create a database user section or an existing user. For example, hevouser.
-
Database Password: The password for your database user.
-
Database Name: The database from which you want to replicate data. For example, braavos.
-
Publication Key: The name of the publication that tracks changes to the tables in your Source database. This key can be the publication you added in the Create a publication for your database tables section or an existing publication.
Note: For an existing publication, ensure that it is created in the database you specified above.
-
Replication Slot: The name of the replication slot created for your Source database to stream changes from the Write-Ahead Logs (WALs) to Hevo for incremental ingestion. This can be the slot you added in the Create a replication slot section or an existing replication slot. For example, hevo_slot.
Note: Publication Key and Replication Slot fields are not displayed if your Pipeline is created using XMIN mode.
-
Log Monitoring: Enable this option if you want Hevo to disable your Pipeline when the size of the WAL being monitored reaches the set maximum value. Specify the following:
Note: This option is not displayed if your Pipeline is created using XMIN mode.
-
Max WAL Size (in GB): The maximum allowable size of the Write-Ahead Logs that you want Hevo to monitor. Specify a number greater than 1.
-
Alert Threshold (%): The percentage limit for the WAL, whose size Hevo is monitoring. An alert is sent when this threshold is reached. Specify a value between 50 to 80. For example, if you set the Alert Threshold to 80, Hevo sends a notification when the WAL size is at 80% of the Max WAL Size specified above.
-
Send Email: Enable this option to send an email when the WAL size has reached the specified Alert Threshold percentage.
If this option is turned off, Hevo does not send an email alert.
-
Additional Settings
-
Use SSH: Enable this option to connect to Hevo using an SSH tunnel instead of directly connecting your PostgreSQL database host to Hevo. This provides an additional level of security to your database by not exposing your PostgreSQL setup to the public.
If this option is turned off, you must configure your Source to accept connections from Hevo’s IP addresses.
-
Use SSL: Enable this option to use an SSL-encrypted connection. Specify the following:
-
CA File: The file containing the SSL server certificate authority (CA).
-
Client Certificate: The client’s public key certificate file.
-
Client Key: The client’s private key file.
-
Click Test & Continue to test the connection to your Amazon Aurora PostgreSQL Source. Once the test is successful, you can proceed to set up your Destination.
Read the detailed Hevo documentation for the following related topics:
Data Type Mapping
Hevo maps the PostgreSQL Source data type internally to a unified data type, referred to as the Hevo Data Type, in the table below. This data type is used to represent the Source data from all supported data types in a lossless manner.
The following table lists the supported PostgreSQL data types and the corresponding Hevo data type to which they are mapped:
| PostgreSQL Data Type |
Hevo Data Type |
- INT_2
- SHORT
- SMALLINT
- SMALLSERIAL |
SHORT |
- BIT(1)
- BOOL |
BOOLEAN |
- BIT(M), M>1
- BYTEA
- VARBIT |
BYTEARRAY
Note: PostgreSQL supports both single BYTEA values and BYTEA arrays. Hevo replicates these arrays as JSON arrays, where each element is Base64-encoded. |
- INT_4
- INTEGER
- SERIAL |
INTEGER |
- BIGSERIAL
- INT_8
- OID |
LONG |
- FLOAT_4
- REAL |
FLOAT
Note: Hevo loads Not a Number (NaN) values in FLOAT columns as NULL. |
- DOUBLE_PRECISION
- FLOAT_8 |
DOUBLE
Note: Hevo loads Not a Number (NaN) values in DOUBLE columns as NULL. |
- BOX
- BPCHAR
- CIDR
- CIRCLE
- CITEXT
- COMPOSITE
- DATERANGE
- DOMAIN
- ENUM
- GEOMETRY
- GEOGRAPHY
- HSTORE
- INET
- INT_4_RANGE
- INT_8_RANGE
- INTERVAL
- LINE
- LINE SEGMENT
- LTREE
- MACADDR
- MACADDR_8
- NUMRANGE
- PATH
- POINT
- POLYGON
- TEXT
- TSRANGE
- TSTZRANGE
- UUID
- VARCHAR
- XML |
VARCHAR |
| - TIMESTAMPTZ |
TIMESTAMPTZ (Format: YYYY-MM-DDTHH:mm:ss.SSSSSSZ) |
- ARRAY
- JSON
- JSONB
- MULTIDIMENSIONAL ARRAY
- POINT |
JSON |
| - DATE |
DATE |
| - TIME |
TIME |
| - TIMESTAMP |
TIMESTAMP |
- MONEY
- NUMERIC |
DECIMAL
Note: Based on the Destination, Hevo maps DECIMAL values to either DECIMAL (NUMERIC) or VARCHAR. The mapping is determined by:
P – the total number of significant digits, and
S – the number of digits to the right of the decimal point. |
At this time, the following PostgreSQL data types are not supported by Hevo:
Note: If any of the Source objects contain data types that are not supported by Hevo, the corresponding fields are marked as unsupported during object configuration in the Pipeline.
Handling Range Data
In PostgreSQL Sources, range data types, such as NUMRANGE or DATERANGE, have the start bound and an end bounds defined for each value. These bounds can be:
-
Inclusive [ ]: The boundary value is included. For example, [1,10] includes all numbers from 1 to 10.
-
Exclusive ( ): The boundary value is excluded. For example, (1,10) includes numbers between 1 to 10.
-
Combination of inclusive and exclusive: For example, [1,10) includes 1 but excludes 10.
-
Open bounds (, ): One or both boundaries are unbounded or infinite. For example, (,10] has no lower limit and [5,) has no upper limit.
Hevo represents these ranges as JSON objects, explicitly marking each bound and its value. For example, a PostgreSQL range of [2023-01-01,2023-02-01) is represented as:
{
  "start_bound": "INCLUSIVE",
  "start_date": "2023-01-01",
  "end_bound": "EXCLUSIVE",
  "end_date": "2023-02-01"
}
When a bound is open, no specific value is stored for that boundary. For an open range such as (,100), Hevo represents it as:
{
  "start_bound": "OPEN",
  "end_value": 100,
  "end_bound": "EXCLUSIVE"
}
Handling of Deletes
In a PostgreSQL database for which the WAL level is set to logical, Hevo uses the database logs for data replication. As a result, Hevo can track all operations, such as insert, update, or delete, that take place in the database. Hevo replicates delete actions in the database logs to the Destination table by setting the value of the metadata column, __hevo__marked_deleted to True.
If your Pipeline is created using XMIN mode, read Handling of Deletes in XMIN to understand how deletes are captured and replicated.
Source Considerations
-
If you add a column with a default value to a table in PostgreSQL, entries with it are created in the WAL only for the rows that are added or updated after the column is added. As a result, in the case of log-based Pipelines, Hevo cannot capture the column value for the unchanged rows. To capture those values, you need to:
-
Any table included in a publication must have a replica identity configured. PostgreSQL uses it to track the UPDATE and DELETE operations. Hence, these operations are disallowed on tables without a replica identity. As a result, Hevo cannot track updated or deleted rows (data) for such tables.
By default, PostgreSQL picks the table’s primary key as the replica identity. If your table does not have a primary key, you must either define one or set the replica identity as FULL, which records the changes to all the columns in a row.
Limitations
-
Hevo supports logical replication of partitioned tables for PostgreSQL versions 11 and above, up to 17. However, loading data ingested from all the partitions of the table into a single Destination table is available only for PostgreSQL versions 13 and above. Read Handling Source Partitioned Tables.
-
Hevo currently does not support ingesting data from read replicas. Also, if you are using PostgreSQL version 17, Hevo does not support logical replication failover. This means that if your standby server becomes the primary, Hevo will not synchronize the replication slots from the primary server with the standby, causing your Pipeline to fail.
-
Hevo does not support data replication from foreign tables, temporary tables, and views.
-
If your Source table has indexes (indices) and or constraints, you must recreate them in your Destination table, as Hevo does not replicate them. It only creates the existing primary keys.
-
Hevo does not set the __hevo__marked_deleted field to True for data deleted from the Source table using the TRUNCATE command. This action could result in a data mismatch between the Source and Destination tables.
-
You cannot select Source objects that Hevo marks as inaccessible for data ingestion during object configuration in the Pipeline. Following are some of the scenarios in which Hevo marks the Source objects as inaccessible:
-
The object is not included in the publication (key) specified while configuring the Source.
-
The publication is defined with a row filter expression. For such publications, only those rows for which the expression evaluates to FALSE are not published to the WAL. For example, suppose a publication is defined as follows:
CREATE PUBLICATION active_employees FOR TABLE employees WHERE (active IS TRUE);
In this case, as Hevo cannot determine the changes made in the employees object, it marks the object as inaccessible.
-
The publication specified in the Source configuration does not have the privileges to publish the changes from the UPDATE and DELETE operations. For example, suppose a publication is defined as follows:
CREATE PUBLICATION insert_only FOR TABLE employees WITH (publish = 'insert');
In this case, as Hevo cannot identify the new and updated data in the employees table, it marks the object as inaccessible.
See Also
Refer to the following table for the list of key updates made to this page:


