- Introduction
- Getting Started
- Creating an Account in Hevo
- Subscribing to Hevo via AWS Marketplace
- Connection Options
- Familiarizing with the UI
- Creating your First Pipeline
- Data Loss Prevention and Recovery
- Data Ingestion
- Data Loading
- Loading Data in a Database Destination
- Loading Data to a Data Warehouse
- Optimizing Data Loading for a Destination Warehouse
- Deduplicating Data in a Data Warehouse Destination
- Manually Triggering the Loading of Events
- Scheduling Data Load for a Destination
- Loading Events in Batches
- Data Loading Statuses
- Data Spike Alerts
- Name Sanitization
- Table and Column Name Compression
- Parsing Nested JSON Fields in Events
- Pipelines
- Data Flow in a Pipeline
- Familiarizing with the Pipelines UI
- Working with Pipelines
- Managing Objects in Pipelines
- Pipeline Jobs
-
Transformations
-
Python Code-Based Transformations
- Supported Python Modules and Functions
-
Transformation Methods in the Event Class
- Create an Event
- Retrieve the Event Name
- Rename an Event
- Retrieve the Properties of an Event
- Modify the Properties for an Event
- Fetch the Primary Keys of an Event
- Modify the Primary Keys of an Event
- Fetch the Data Type of a Field
- Check if the Field is a String
- Check if the Field is a Number
- Check if the Field is Boolean
- Check if the Field is a Date
- Check if the Field is a Time Value
- Check if the Field is a Timestamp
-
TimeUtils
- Convert Date String to Required Format
- Convert Date to Required Format
- Convert Datetime String to Required Format
- Convert Epoch Time to a Date
- Convert Epoch Time to a Datetime
- Convert Epoch to Required Format
- Convert Epoch to a Time
- Get Time Difference
- Parse Date String to Date
- Parse Date String to Datetime Format
- Parse Date String to Time
- Utils
- Examples of Python Code-based Transformations
-
Drag and Drop Transformations
- Special Keywords
-
Transformation Blocks and Properties
- Add a Field
- Change Datetime Field Values
- Change Field Values
- Drop Events
- Drop Fields
- Find & Replace
- Flatten JSON
- Format Date to String
- Format Number to String
- Hash Fields
- If-Else
- Mask Fields
- Modify Text Casing
- Parse Date from String
- Parse JSON from String
- Parse Number from String
- Rename Events
- Rename Fields
- Round-off Decimal Fields
- Split Fields
- Examples of Drag and Drop Transformations
- Effect of Transformations on the Destination Table Structure
- Transformation Reference
- Transformation FAQs
-
Python Code-Based Transformations
-
Schema Mapper
- Using Schema Mapper
- Mapping Statuses
- Auto Mapping Event Types
- Manually Mapping Event Types
- Modifying Schema Mapping for Event Types
- Schema Mapper Actions
- Fixing Unmapped Fields
- Resolving Incompatible Schema Mappings
- Resizing String Columns in the Destination
- Changing the Data Type of a Destination Table Column
- Schema Mapper Compatibility Table
- Limits on the Number of Destination Columns
- File Log
- Troubleshooting Failed Events in a Pipeline
- Mismatch in Events Count in Source and Destination
- Audit Tables
- Activity Log
-
Pipeline FAQs
- Can multiple Sources connect to one Destination?
- What happens if I re-create a deleted Pipeline?
- Why is there a delay in my Pipeline?
- Can I change the Destination post-Pipeline creation?
- Why is my billable Events high with Delta Timestamp mode?
- Can I drop multiple Destination tables in a Pipeline at once?
- How does Run Now affect scheduled ingestion frequency?
- Will pausing some objects increase the ingestion speed?
- Can I see the historical load progress?
- Why is my Historical Load Progress still at 0%?
- Why is historical data not getting ingested?
- How do I set a field as a primary key?
- How do I ensure that records are loaded only once?
- Events Usage
- Sources
- Free Sources
-
Databases and File Systems
- Data Warehouses
-
Databases
- Connecting to a Local Database
- Amazon DocumentDB
- Amazon DynamoDB
- Elasticsearch
-
MongoDB
- Generic MongoDB
- MongoDB Atlas
- Support for Multiple Data Types for the _id Field
- Example - Merge Collections Feature
-
Troubleshooting MongoDB
-
Errors During Pipeline Creation
- Error 1001 - Incorrect credentials
- Error 1005 - Connection timeout
- Error 1006 - Invalid database hostname
- Error 1007 - SSH connection failed
- Error 1008 - Database unreachable
- Error 1011 - Insufficient access
- Error 1028 - Primary/Master host needed for OpLog
- Error 1029 - Version not supported for Change Streams
- SSL 1009 - SSL Connection Failure
- Troubleshooting MongoDB Change Streams Connection
- Troubleshooting MongoDB OpLog Connection
-
Errors During Pipeline Creation
- SQL Server
-
MySQL
- Amazon Aurora MySQL
- Amazon RDS MySQL
- Azure MySQL
- Generic MySQL
- Google Cloud MySQL
- MariaDB MySQL
-
Troubleshooting MySQL
-
Errors During Pipeline Creation
- Error 1003 - Connection to host failed
- Error 1006 - Connection to host failed
- Error 1007 - SSH connection failed
- Error 1011 - Access denied
- Error 1012 - Replication access denied
- Error 1017 - Connection to host failed
- Error 1026 - Failed to connect to database
- Error 1027 - Unsupported BinLog format
- Failed to determine binlog filename/position
- Schema 'xyz' is not tracked via bin logs
- Errors Post-Pipeline Creation
-
Errors During Pipeline Creation
- MySQL FAQs
- Oracle
-
PostgreSQL
- Amazon Aurora PostgreSQL
- Amazon RDS PostgreSQL
- Azure PostgreSQL
- Generic PostgreSQL
- Google Cloud PostgreSQL
- Heroku PostgreSQL
-
Troubleshooting PostgreSQL
-
Errors during Pipeline creation
- Error 1003 - Authentication failure
- Error 1006 - Connection settings errors
- Error 1011 - Access role issue for logical replication
- Error 1012 - Access role issue for logical replication
- Error 1014 - Database does not exist
- Error 1017 - Connection settings errors
- Error 1023 - No pg_hba.conf entry
- Error 1024 - Number of requested standby connections
- Errors Post-Pipeline Creation
-
Errors during Pipeline creation
- PostgreSQL FAQs
- Troubleshooting Database Sources
- File Storage
- Engineering Analytics
- Finance & Accounting Analytics
-
Marketing Analytics
- ActiveCampaign
- AdRoll
- Amazon Ads
- Apple Search Ads
- AppsFlyer
- CleverTap
- Criteo
- Drip
- Facebook Ads
- Facebook Page Insights
- Firebase Analytics
- Freshsales
- Google Ads
- Google Analytics
- Google Analytics 4
- Google Analytics 360
- Google Play Console
- Google Search Console
- HubSpot
- Instagram Business
- Klaviyo v2
- Lemlist
- LinkedIn Ads
- Mailchimp
- Mailshake
- Marketo
- Microsoft Ads
- Onfleet
- Outbrain
- Pardot
- Pinterest Ads
- Pipedrive
- Recharge
- Segment
- SendGrid Webhook
- SendGrid
- Salesforce Marketing Cloud
- Snapchat Ads
- SurveyMonkey
- Taboola
- TikTok Ads
- Twitter Ads
- Typeform
- YouTube Analytics
- Product Analytics
- Sales & Support Analytics
- Source FAQs
- Destinations
- Familiarizing with the Destinations UI
- Cloud Storage-Based
- Databases
-
Data Warehouses
- Amazon Redshift
- Amazon Redshift Serverless
- Azure Synapse Analytics
- Databricks
- Google BigQuery
- Hevo Managed Google BigQuery
- Snowflake
-
Destination FAQs
- Can I change the primary key in my Destination table?
- Can I change the Destination table name after creating the Pipeline?
- How can I change or delete the Destination table prefix?
- Why does my Destination have deleted Source records?
- How do I filter deleted Events from the Destination?
- Does a data load regenerate deleted Hevo metadata columns?
- How do I filter out specific fields before loading data?
- Transform
- Alerts
- Account Management
- Activate
- Glossary
Releases- Release 2.38.1 (Jul 07-14, 2025)
- Release 2.38 (Jun 09-July 07, 2025)
- Release 2.37 (May 12-Jun 09, 2025)
- 2025 Releases
-
2024 Releases
- Release 2.32 (Dec 16 2024-Jan 20, 2025)
- Release 2.31 (Nov 18-Dec 16, 2024)
- Release 2.30 (Oct 21-Nov 18, 2024)
- Release 2.29 (Sep 30-Oct 22, 2024)
- Release 2.28 (Sep 02-30, 2024)
- Release 2.27 (Aug 05-Sep 02, 2024)
- Release 2.26 (Jul 08-Aug 05, 2024)
- Release 2.25 (Jun 10-Jul 08, 2024)
- Release 2.24 (May 06-Jun 10, 2024)
- Release 2.23 (Apr 08-May 06, 2024)
- Release 2.22 (Mar 11-Apr 08, 2024)
- Release 2.21 (Feb 12-Mar 11, 2024)
- Release 2.20 (Jan 15-Feb 12, 2024)
-
2023 Releases
- Release 2.19 (Dec 04, 2023-Jan 15, 2024)
- Release Version 2.18
- Release Version 2.17
- Release Version 2.16 (with breaking changes)
- Release Version 2.15 (with breaking changes)
- Release Version 2.14
- Release Version 2.13
- Release Version 2.12
- Release Version 2.11
- Release Version 2.10
- Release Version 2.09
- Release Version 2.08
- Release Version 2.07
- Release Version 2.06
-
2022 Releases
- Release Version 2.05
- Release Version 2.04
- Release Version 2.03
- Release Version 2.02
- Release Version 2.01
- Release Version 2.00
- Release Version 1.99
- Release Version 1.98
- Release Version 1.97
- Release Version 1.96
- Release Version 1.95
- Release Version 1.93 & 1.94
- Release Version 1.92
- Release Version 1.91
- Release Version 1.90
- Release Version 1.89
- Release Version 1.88
- Release Version 1.87
- Release Version 1.86
- Release Version 1.84 & 1.85
- Release Version 1.83
- Release Version 1.82
- Release Version 1.81
- Release Version 1.80 (Jan-24-2022)
- Release Version 1.79 (Jan-03-2022)
-
2021 Releases
- Release Version 1.78 (Dec-20-2021)
- Release Version 1.77 (Dec-06-2021)
- Release Version 1.76 (Nov-22-2021)
- Release Version 1.75 (Nov-09-2021)
- Release Version 1.74 (Oct-25-2021)
- Release Version 1.73 (Oct-04-2021)
- Release Version 1.72 (Sep-20-2021)
- Release Version 1.71 (Sep-09-2021)
- Release Version 1.70 (Aug-23-2021)
- Release Version 1.69 (Aug-09-2021)
- Release Version 1.68 (Jul-26-2021)
- Release Version 1.67 (Jul-12-2021)
- Release Version 1.66 (Jun-28-2021)
- Release Version 1.65 (Jun-14-2021)
- Release Version 1.64 (Jun-01-2021)
- Release Version 1.63 (May-19-2021)
- Release Version 1.62 (May-05-2021)
- Release Version 1.61 (Apr-20-2021)
- Release Version 1.60 (Apr-06-2021)
- Release Version 1.59 (Mar-23-2021)
- Release Version 1.58 (Mar-09-2021)
- Release Version 1.57 (Feb-22-2021)
- Release Version 1.56 (Feb-09-2021)
- Release Version 1.55 (Jan-25-2021)
- Release Version 1.54 (Jan-12-2021)
-
2020 Releases
- Release Version 1.53 (Dec-22-2020)
- Release Version 1.52 (Dec-03-2020)
- Release Version 1.51 (Nov-10-2020)
- Release Version 1.50 (Oct-19-2020)
- Release Version 1.49 (Sep-28-2020)
- Release Version 1.48 (Sep-01-2020)
- Release Version 1.47 (Aug-06-2020)
- Release Version 1.46 (Jul-21-2020)
- Release Version 1.45 (Jul-02-2020)
- Release Version 1.44 (Jun-11-2020)
- Release Version 1.43 (May-15-2020)
- Release Version 1.42 (Apr-30-2020)
- Release Version 1.41 (Apr-2020)
- Release Version 1.40 (Mar-2020)
- Release Version 1.39 (Feb-2020)
- Release Version 1.38 (Jan-2020)
- Early Access New
Azure SQL Server
On This Page
- Prerequisites
- Create a Geo-Replication Database (Optional)
- Whitelist Hevo’s IP Addresses
- Enable Change Tracking
- Create a Database User and Grant Privileges
- Retrieve the Hostname and Port Number (Optional)
- Specify Azure SQL Server Connection Settings
- Object and Query Mode Settings
- Data Replication
- Limitations
- Revision History
Azure MS SQL Database is an intelligent, scalable, and relational database service built for the cloud. It can automate your database management and maintenance, including routine updates, backups, and security, enabling you to focus on working with your data.
You can ingest data from your Azure MS SQL database using Hevo Pipelines and replicate it to a Destination of your choice.
Prerequisites
-
The MS SQL Server version is 2008 or higher.
-
CHANGE TRACKING and ALTER DATABASE privileges are granted to the database user, if Pipeline Mode is Change Tracking or Table, and Query mode is Change Tracking.
-
SELECT and VIEW CHANGE TRACKING privileges are granted to the database user.
-
Database hostname and port number of the Source instance are available.
-
You are assigned the Team Administrator, Team Collaborator, or Pipeline Administrator role in Hevo, to create the Pipeline.
Perform the following steps to configure your Azure MS SQL Source:
Create a Geo-Replication Database (Optional)
Geo-Replication is an Azure SQL database feature that allows you to create a readable secondary database in the same region or different regions.
Note: Creation of geo-replication database incurs additional costs.
To use an existing, active geo-replication database or connect Hevo to your master database, skip to Whitelist Hevo’s IP Addresses section.
To create a geo-replication database:
-
Log in to the Azure Portal.
-
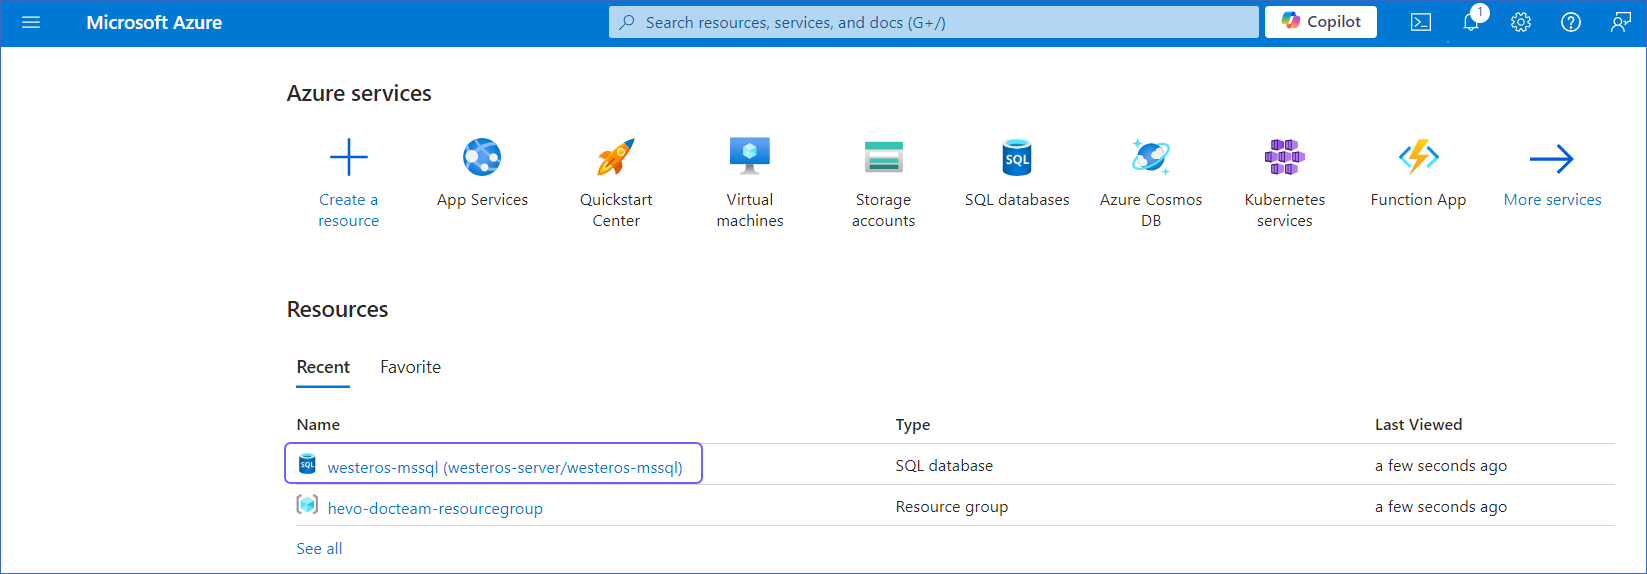
Under Resources, Recent tab, select the database for which you want to create a geo-replication database.
-
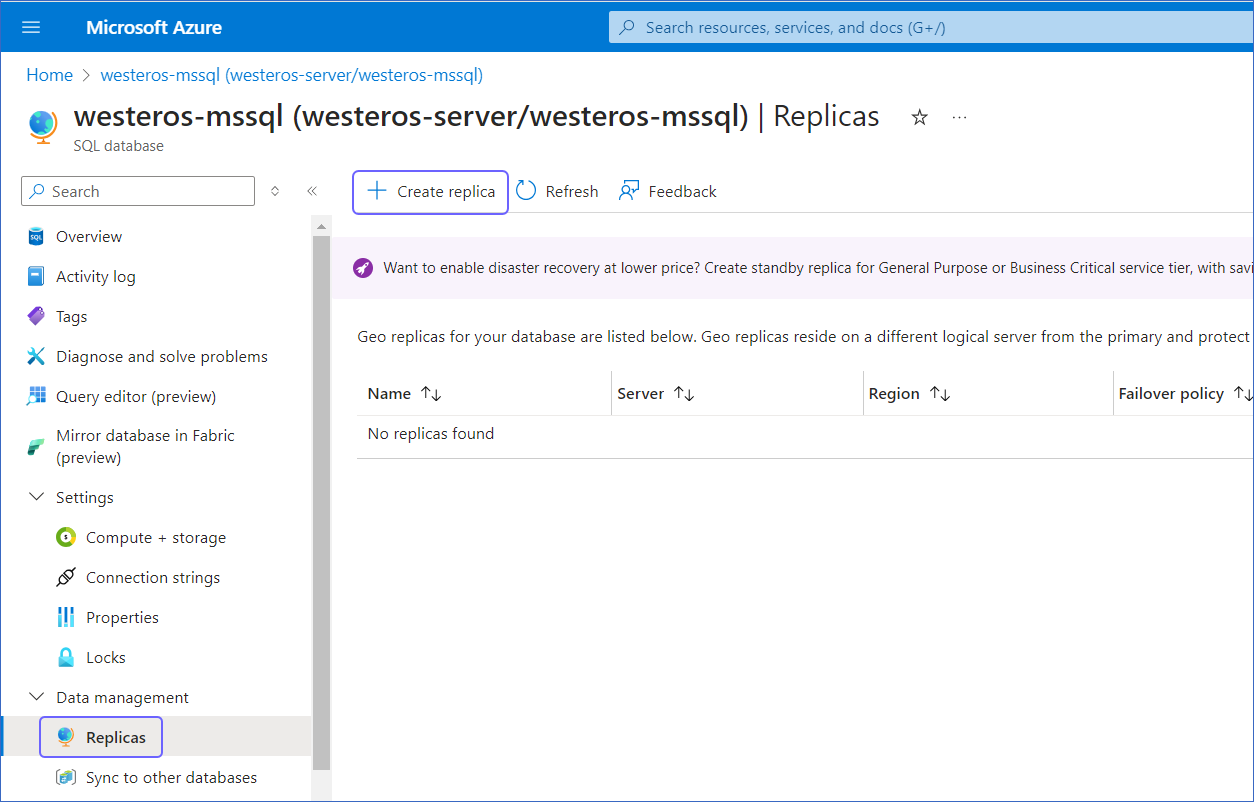
In the left navigation pane, under Data management, click Replicas, and then click + Create replica.
-
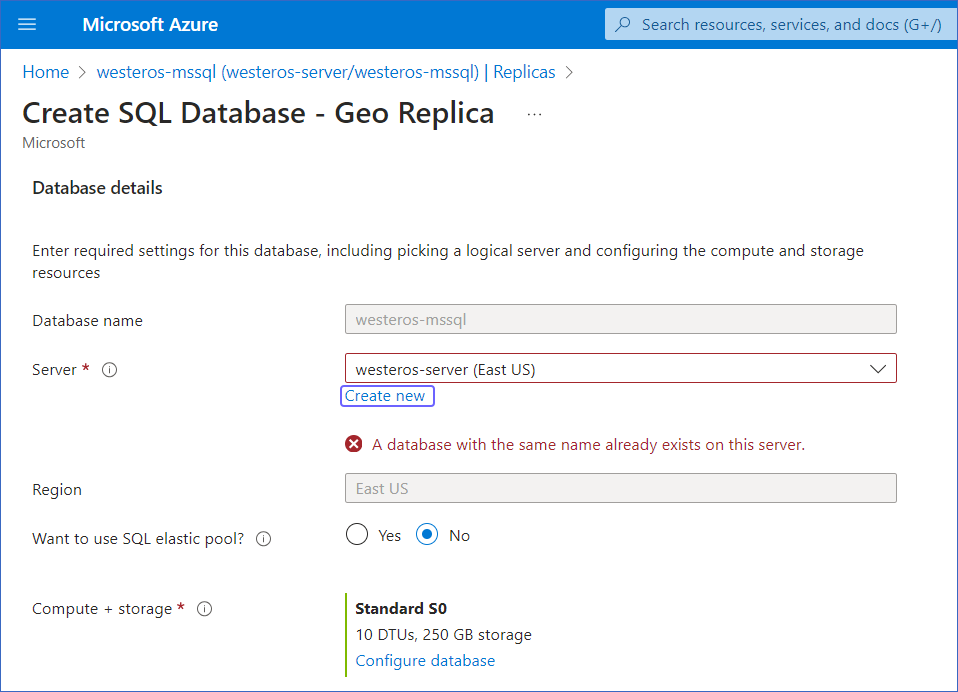
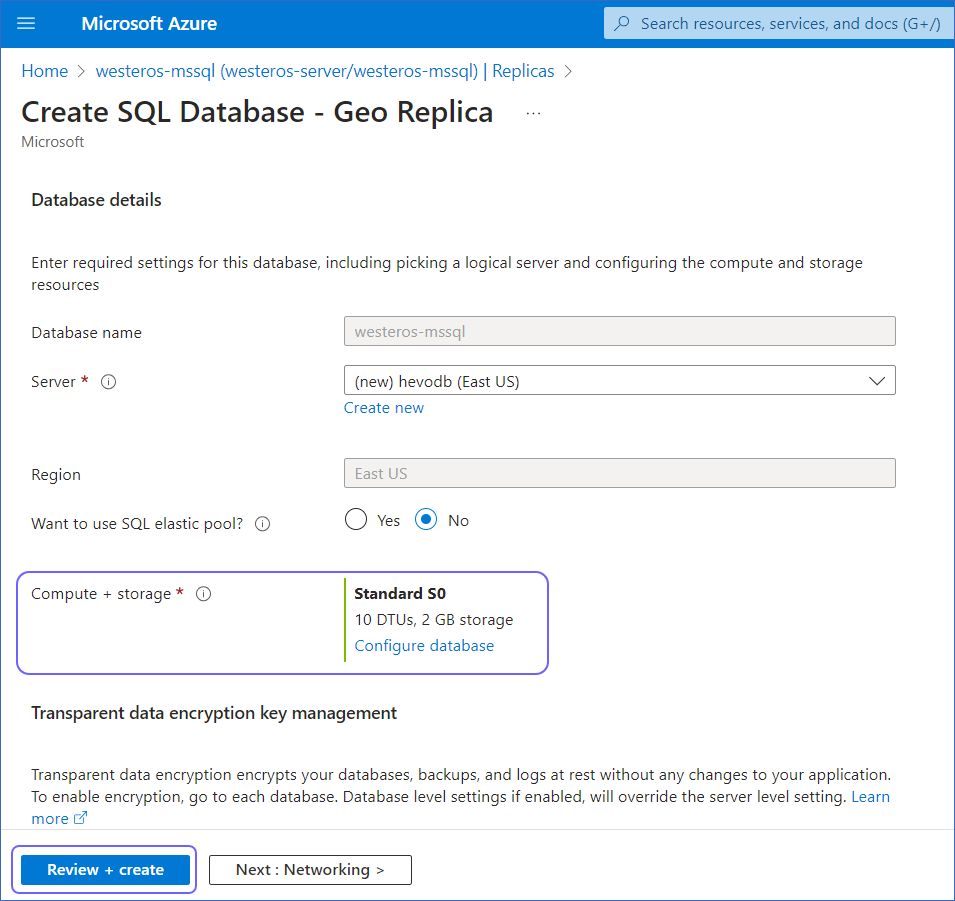
On the Create SQL Database - Geo Replica page, below the Server drop-down, click Create new.
-
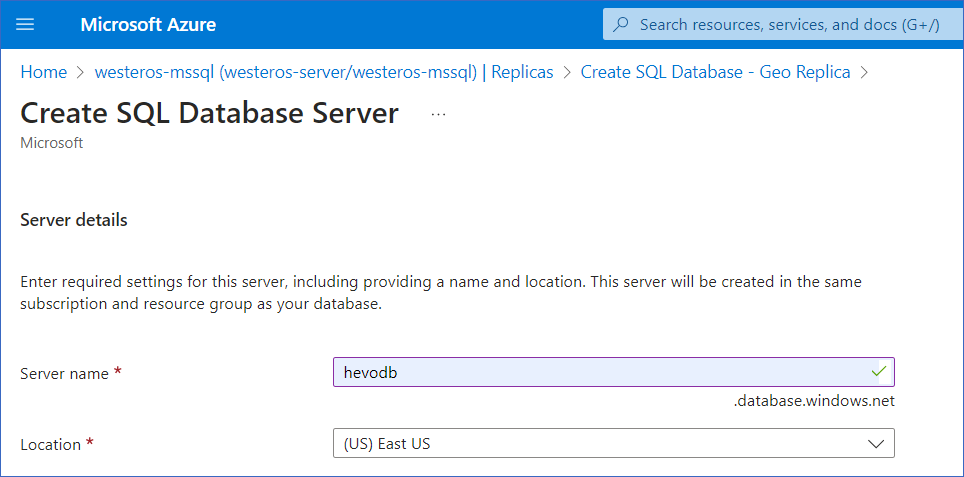
On the Create SQL Database Server page, specify the Server name and Location, and then click OK to create the SQL database server.
-
On the Create SQL Database - Geo Replica page, specify the Compute + Storage, and then click Review + Create to review your configuration.
-
Click Create to create a geo-replication database.
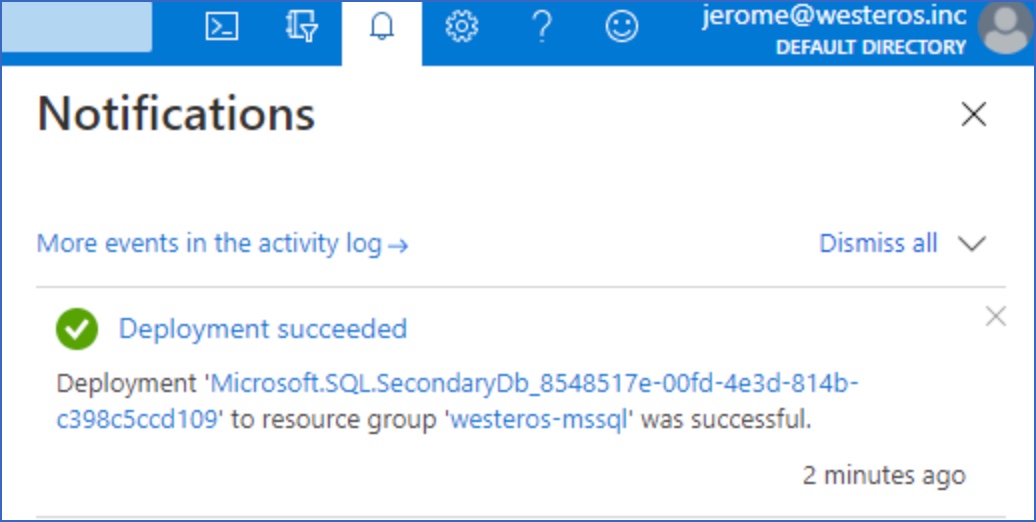
A notification is displayed to confirm that the geo-replication database was created successfully.
Whitelist Hevo’s IP Addresses
You need to whitelist the Hevo IP addresses for your region to enable Hevo to connect to your Azure SQL database. You can do this by creating firewall rules in your Microsoft Azure database settings as follows:
-
Access your Azure MS SQL instance.
-
Under Resources, Recent tab, select the database you want to synchronize with Hevo.

-
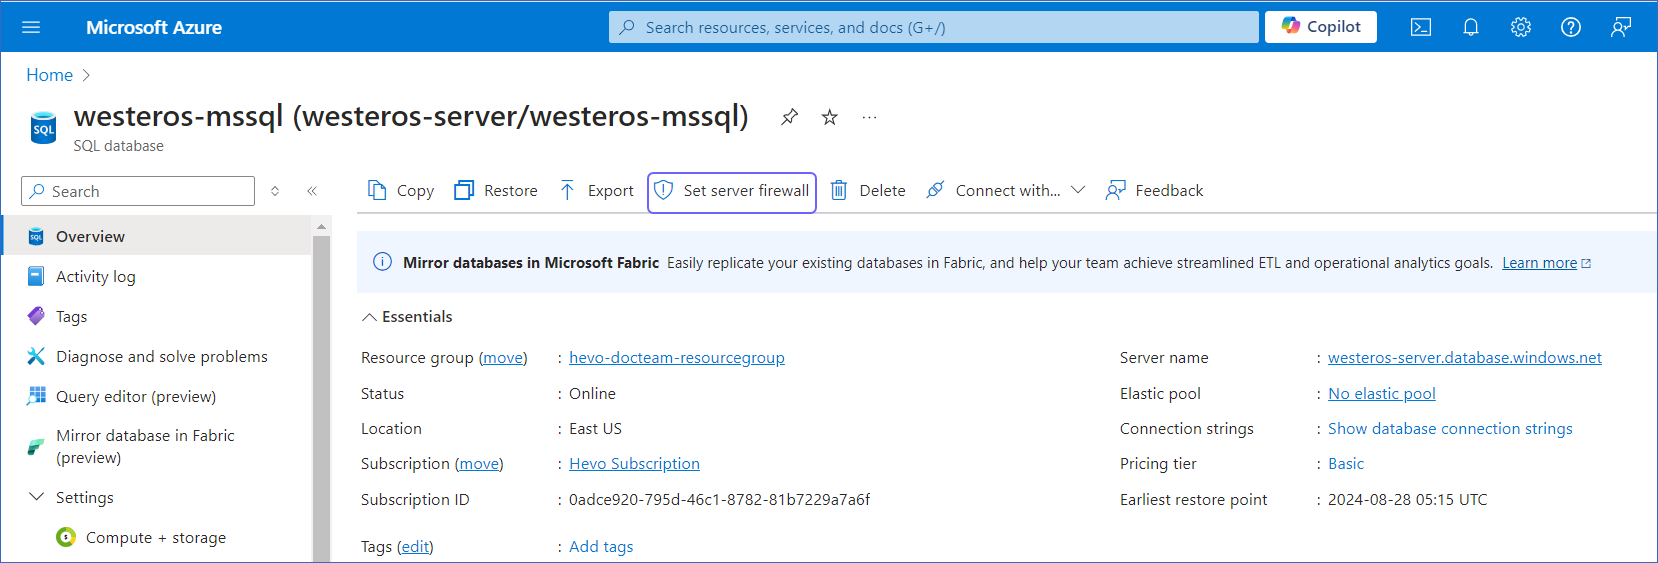
In the right pane, click the Set server firewall tab to open the Firewall settings.
-
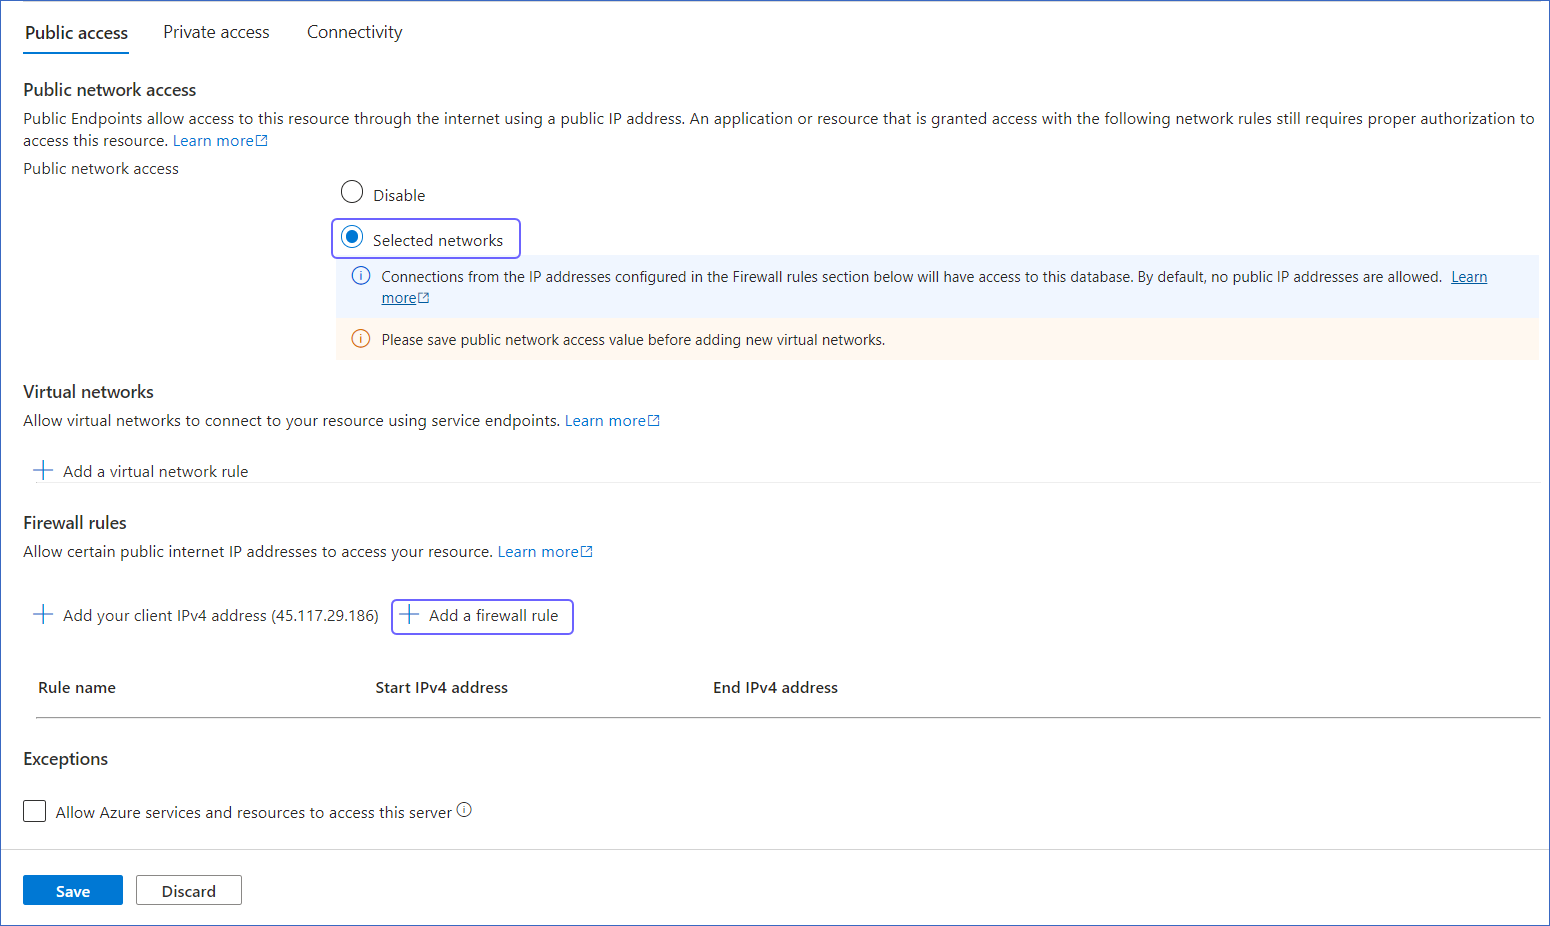
Under Public access tab, select the Selected networks option, and then click + Add a firewall rule.
-
Specify a Rule name.
-
Specify Hevo’s IP addresses in the Start IP and End IP fields as per your region, and then click OK.
Note: As Hevo has specific IP addresses and not a range, the value in Start IP and End IP fields is the same.

-
Click Save.
-
Repeat this step to add the IP address for each applicable Hevo region.
-
Enable Change Tracking
The Change Tracking mechanism captures changes made to a database. In order to enable, or disable change tracking, the database user must have the ALTER DATABASE privilege.
To enable change tracking, connect your Azure SQL Database in your SQL Client tool, and enter these commands:
-
Enable change tracking at the database level:
ALTER DATABASE [<database>] SET CHANGE_TRACKING = ON; -
Enable change tracking for each table you want to integrate:
ALTER TABLE [<schema>].[<table>]
ENABLE CHANGE_TRACKING;
Create a Database User and Grant Privileges
1. Create a database user (optional)
To create a database user, open your Azure MS SQL database in your SQL client tool and enter the following commands:
USE [<database>]; # <database> is the database name
CREATE USER hevo WITH PASSWORD = '<password>';
This creates a contained database user who grants access to the database user on an individual database level instead of the master database level.
2. Grant privileges to the user
The database user specified in the Hevo Pipeline must have the following global privileges:
-
SELECT -
VIEW CHANGE TRACKING(If Pipeline Mode is Change Tracking or Table, and Query mode is Change Tracking)
To assign these privileges, connect your Azure SQL Database in your SQL Client tool, and enter these commands:
-
Grant
SELECTprivilege at the table and schema level:GRANT SELECT ON <schema_name>.<table_name> TO <username>; -
Grant
VIEW CHANGE TRACKINGprivilege, if Pipeline Mode is Change Tracking or Table, and Query mode is Change Tracking:GRANT VIEW CHANGE TRACKING ON <schema_name>.<table_name> TO <username>;
Retrieve the Hostname and Port Number (Optional)
Note: The Azure MS SQL hostnames start with your database name and end with windows.net.
For example:
Host : mssql.database.windows.net
Port : 1433
Refer to the steps below to gather the configuration details required to create your Hevo Pipeline:
To retrieve the hostname:
-
Log in to the Microsoft Azure Portal.
-
Under Resources, Recent tab, select your SQL database.

-
In the Essentials panel, locate the Server name. Use this as the hostname while creating your Pipeline.

The default port value is 1433.
Specify Azure SQL Server Connection Settings
Perform the following steps to configure Azure SQL Server as a Source in Hevo:
-
Click PIPELINES in the Navigation Bar.
-
Click + CREATE PIPELINE in the Pipelines List View.
-
On the Select Source Type page, select Azure SQL Server.
-
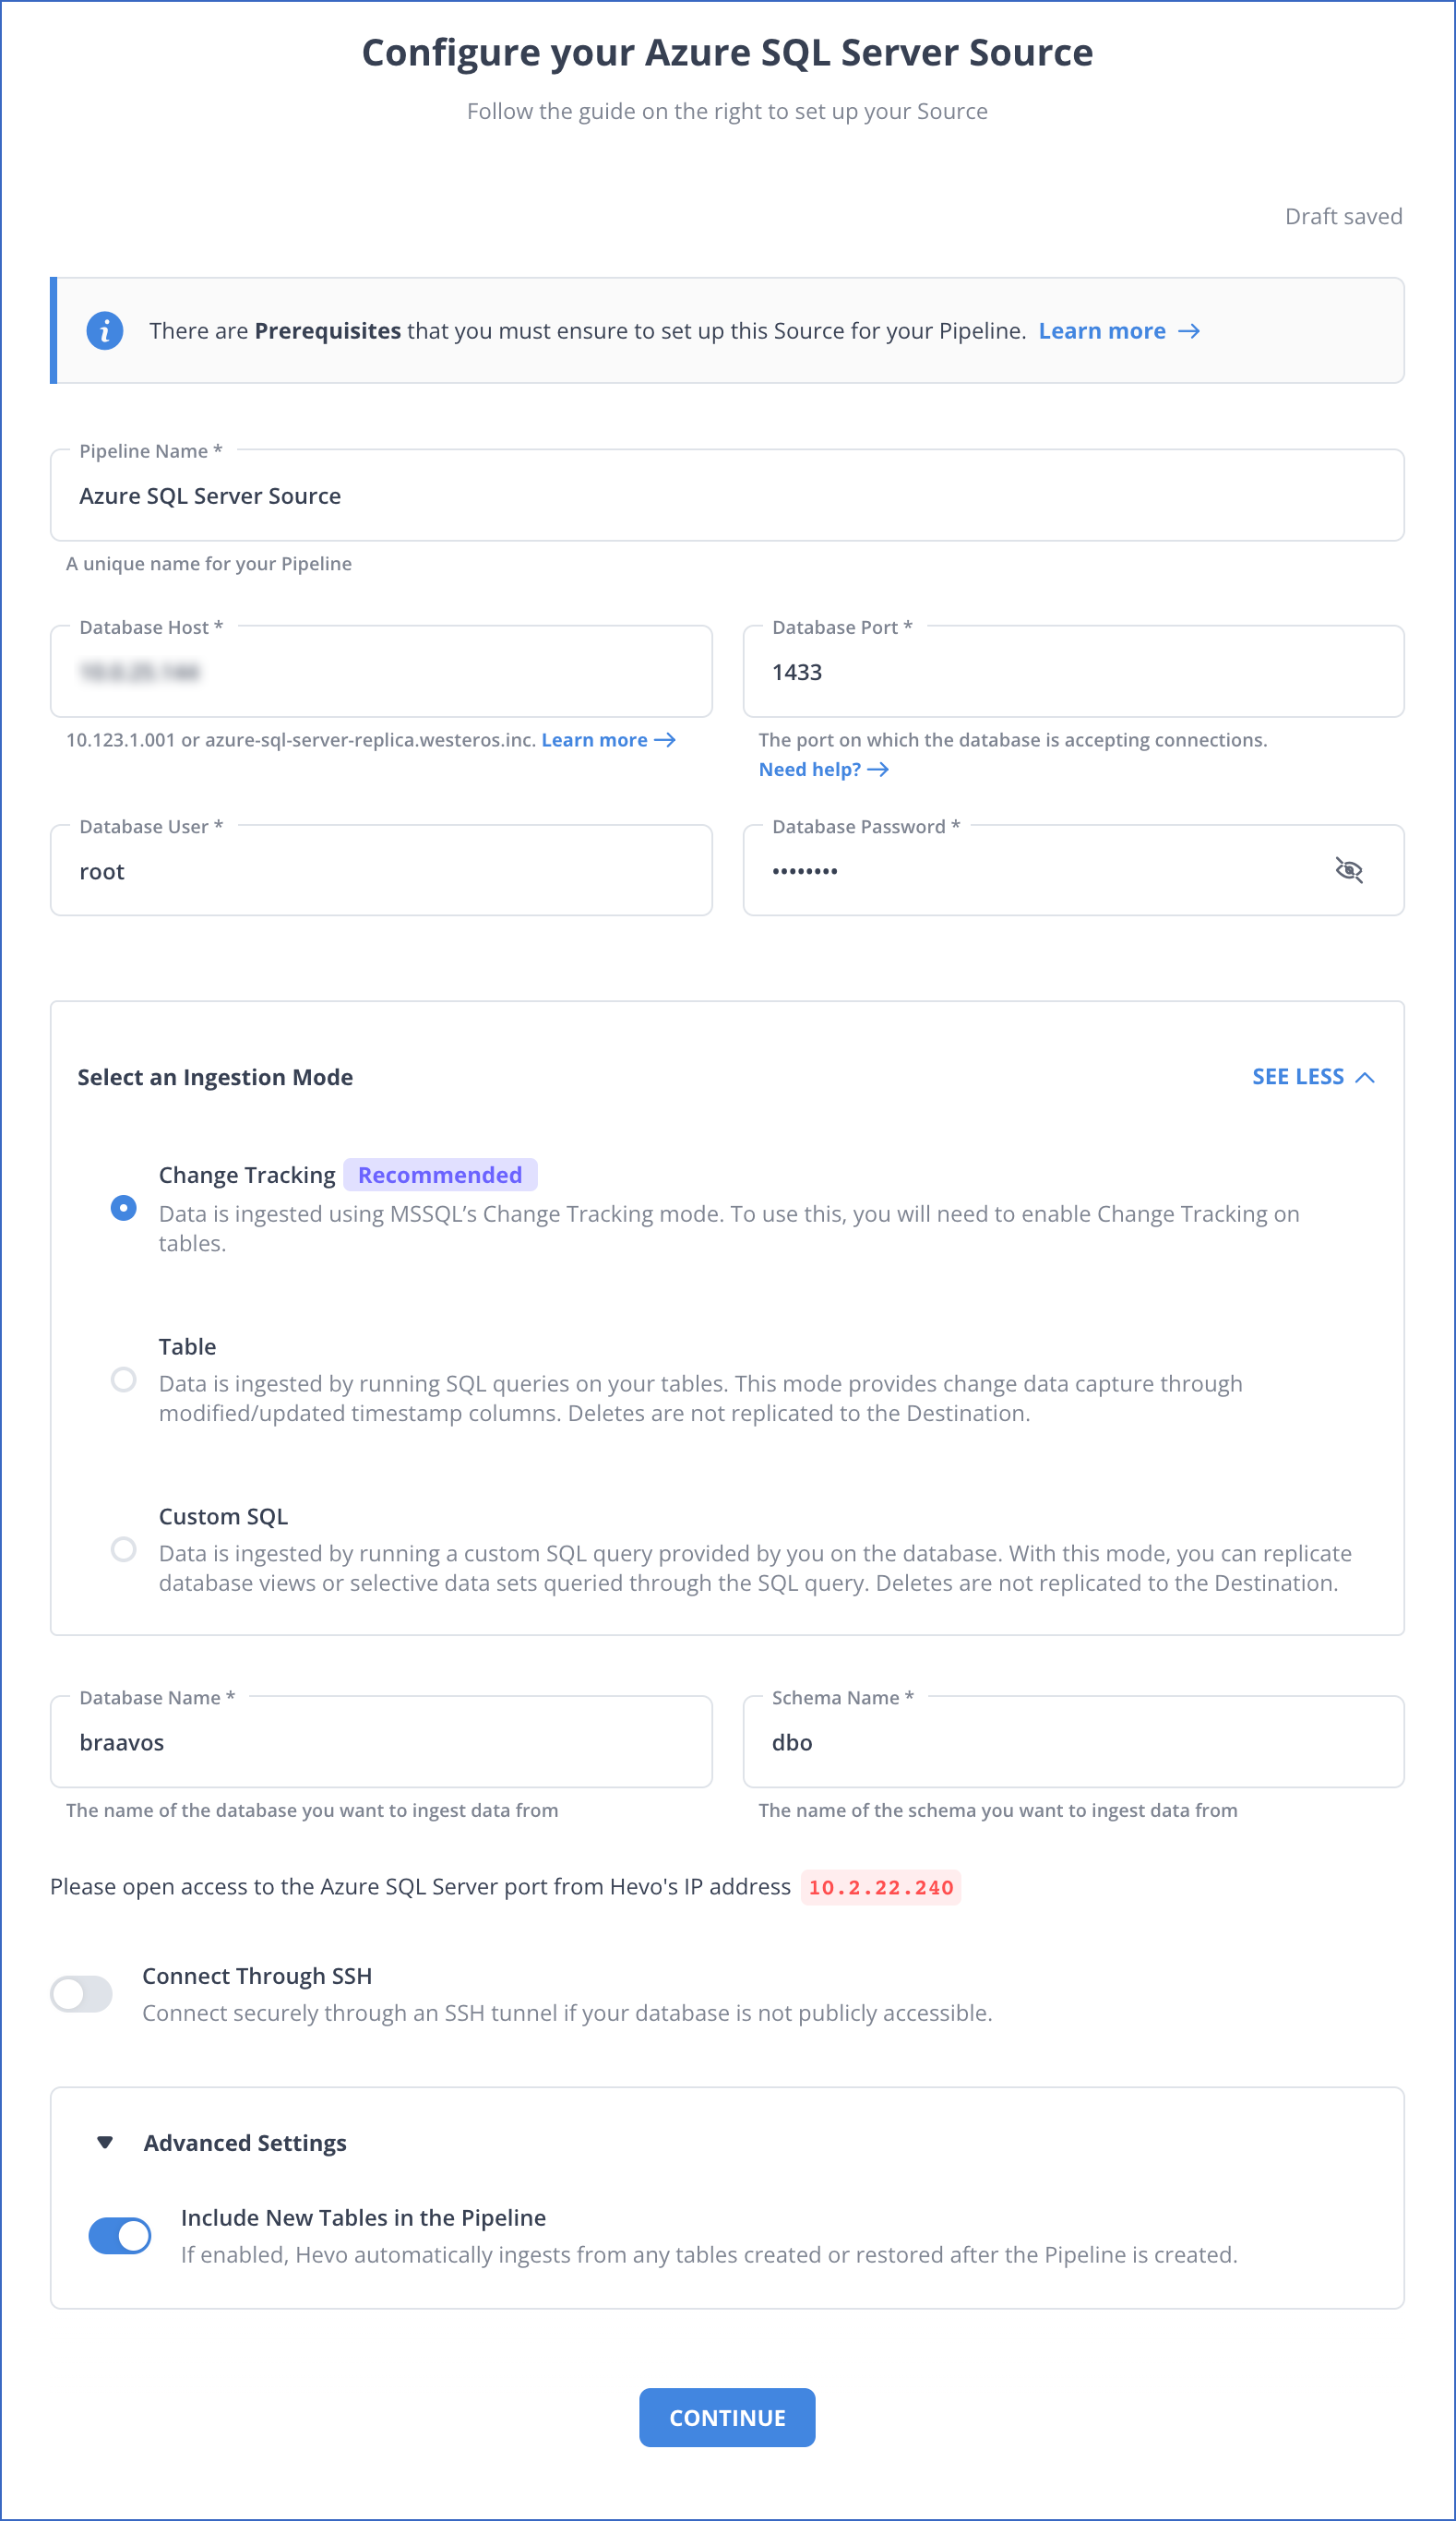
On the Configure your Azure SQL Server Source page, specify the following:
-
Pipeline Name: A unique name for the Pipeline, not exceeding 255 characters.
-
Database Host: SQL Server host’s IP address or DNS.
The following table lists a few examples of SQL Server hosts:
Variant Host Amazon RDS SQL Server ms-sql-server-1.xxxxx.rds.amazonaws.com Azure MS SQL mssql.database.windows.net Generic MS SQL 10.123.10.001 or mssql.westeros.inc Google Cloud SQL Server 35.220.150.0 Note: For URL-based hostnames, exclude the http:// or https:// part. For example, if the hostname URL is https://mssql.database.windows.net, enter mssql.database.windows.net.
-
Database Port: The port on which your SQL Server is listening for connections. Default value: 1433.
-
Database User: The read-only user who has the permissions to read tables in your database.
-
Database Password: The password for the read-only user.
-
Select an Ingestion Mode: The desired mode by which you want to ingest data from the Source. You can expand this section by clicking SEE MORE to view the list of ingestion modes to choose from. Default value: Change Tracking. The available ingestion modes are Change Tracking, Table, and Custom SQL.

Depending on the ingestion mode you select, you must configure the objects to be replicated. Refer to section, Object and Query Mode Settings for the steps to do this.
Note: For Custom SQL ingestion mode, all Events loaded to the Destination are billable.
-
Database Name: The database that you wish to replicate.
-
Schema Name: The schema that holds the tables to be replicated. Default value: dbo.
-
Connect through SSH: Enable this option to connect to Hevo using an SSH tunnel, instead of directly connecting your SQL Server database host to Hevo. This provides an additional level of security to your database by not exposing your SQL Server setup to the public. Read Connecting Through SSH.
If this option is disabled, you must whitelist Hevo’s IP addresses. Refer to the content for your SQL Server variant for steps to do this.
-
Advanced Settings:
-
Include New Tables in the Pipeline: Applicable for all ingestion modes except Custom SQL. If enabled, Hevo automatically ingests data from tables created after the Pipeline has been built. If disabled, the new tables are listed in the Pipeline Detailed View in Skipped state, and you can manually include the ones you want and load their historical data. You can include these objects post-Pipeline creation to ingest data.
You can change this setting later.
-
-
-
Click TEST CONNECTION. This button is enabled once you specify all the mandatory fields. Hevo’s underlying connectivity checker validates the connection settings you provide.
-
Click TEST & CONTINUE to proceed for setting up the Destination. This button is enabled once you specify all the mandatory fields.
Object and Query Mode Settings
Once you have specified the Source connection settings in Step 6 above, do one of the following:
-
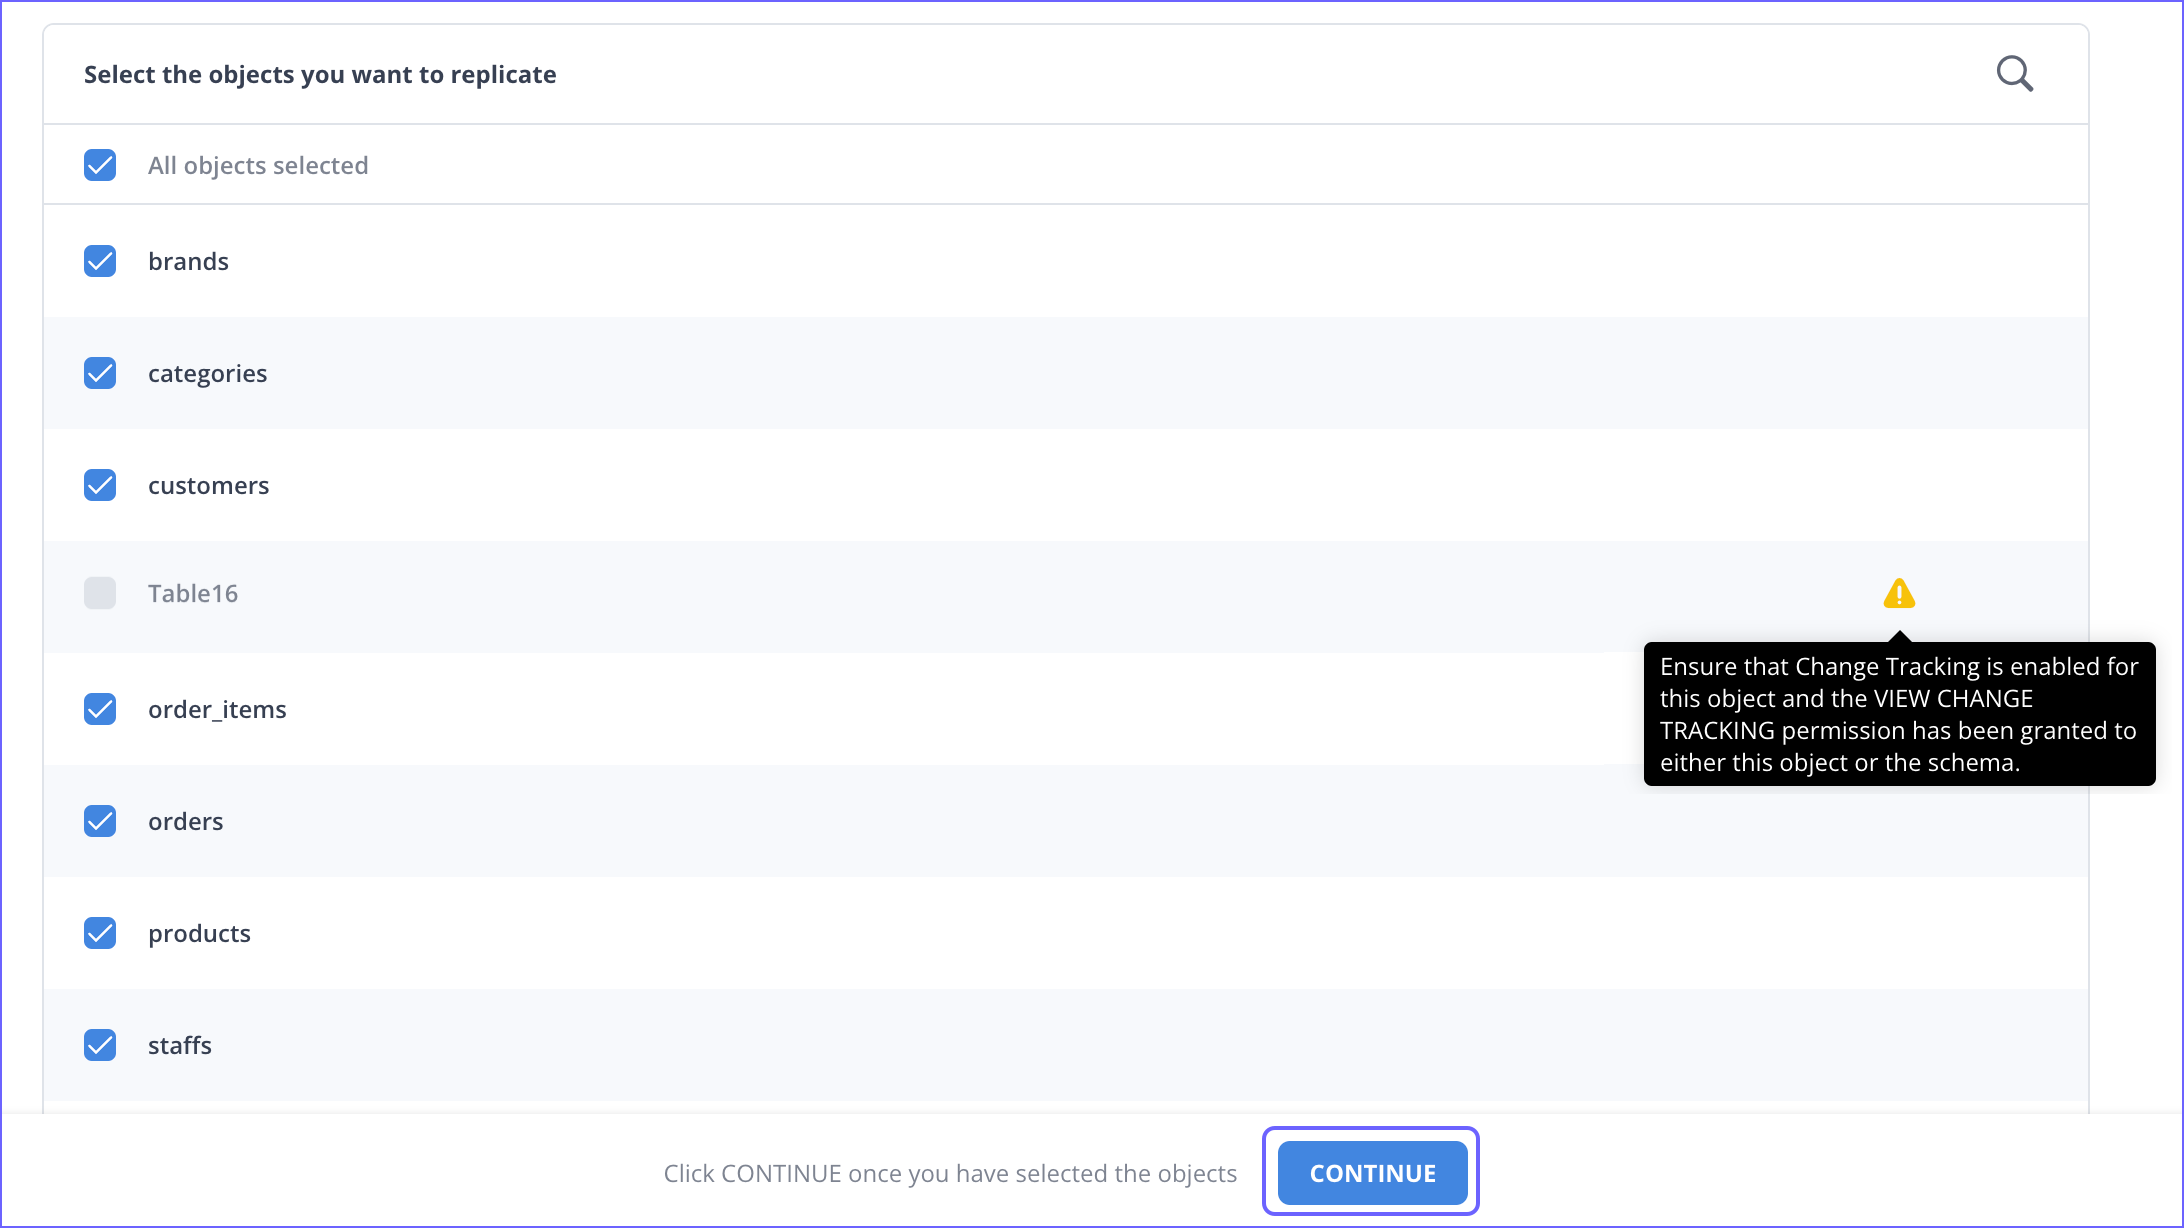
For Pipelines configured with the Change Tracking ingestion mode:
-
On the Select Objects page, select the objects you want to replicate.
-
Click CONTINUE. This button is enabled once you select at least one object for which Change Tracking is enabled.
Note:
-
Each object represents a table in your database.
-
You must enable Change Tracking for the objects you want to ingest data from. If disabled, Hevo adds these objects to your Pipeline in the SKIPPED state.
-
For customers signing up after Release 2.19, Hevo automatically uses the Unique Incrementing Append Only (UIAO) query mode for the objects that contain a unique column. For the others, it ingests data using the Full Load query mode.
-
-
-
For Pipelines configured with the Table ingestion mode:
-
On the Select Objects page, select the objects you want to replicate and click CONTINUE.
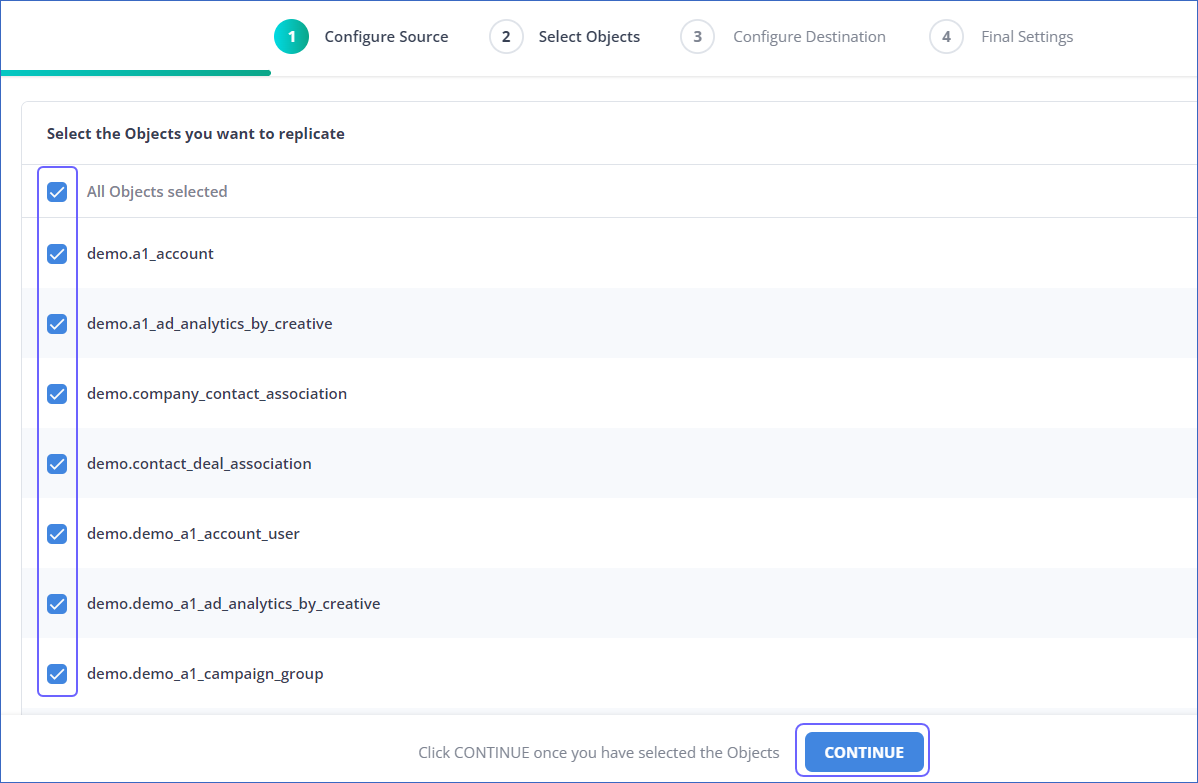
Note: Each object represents a table in your database.
-
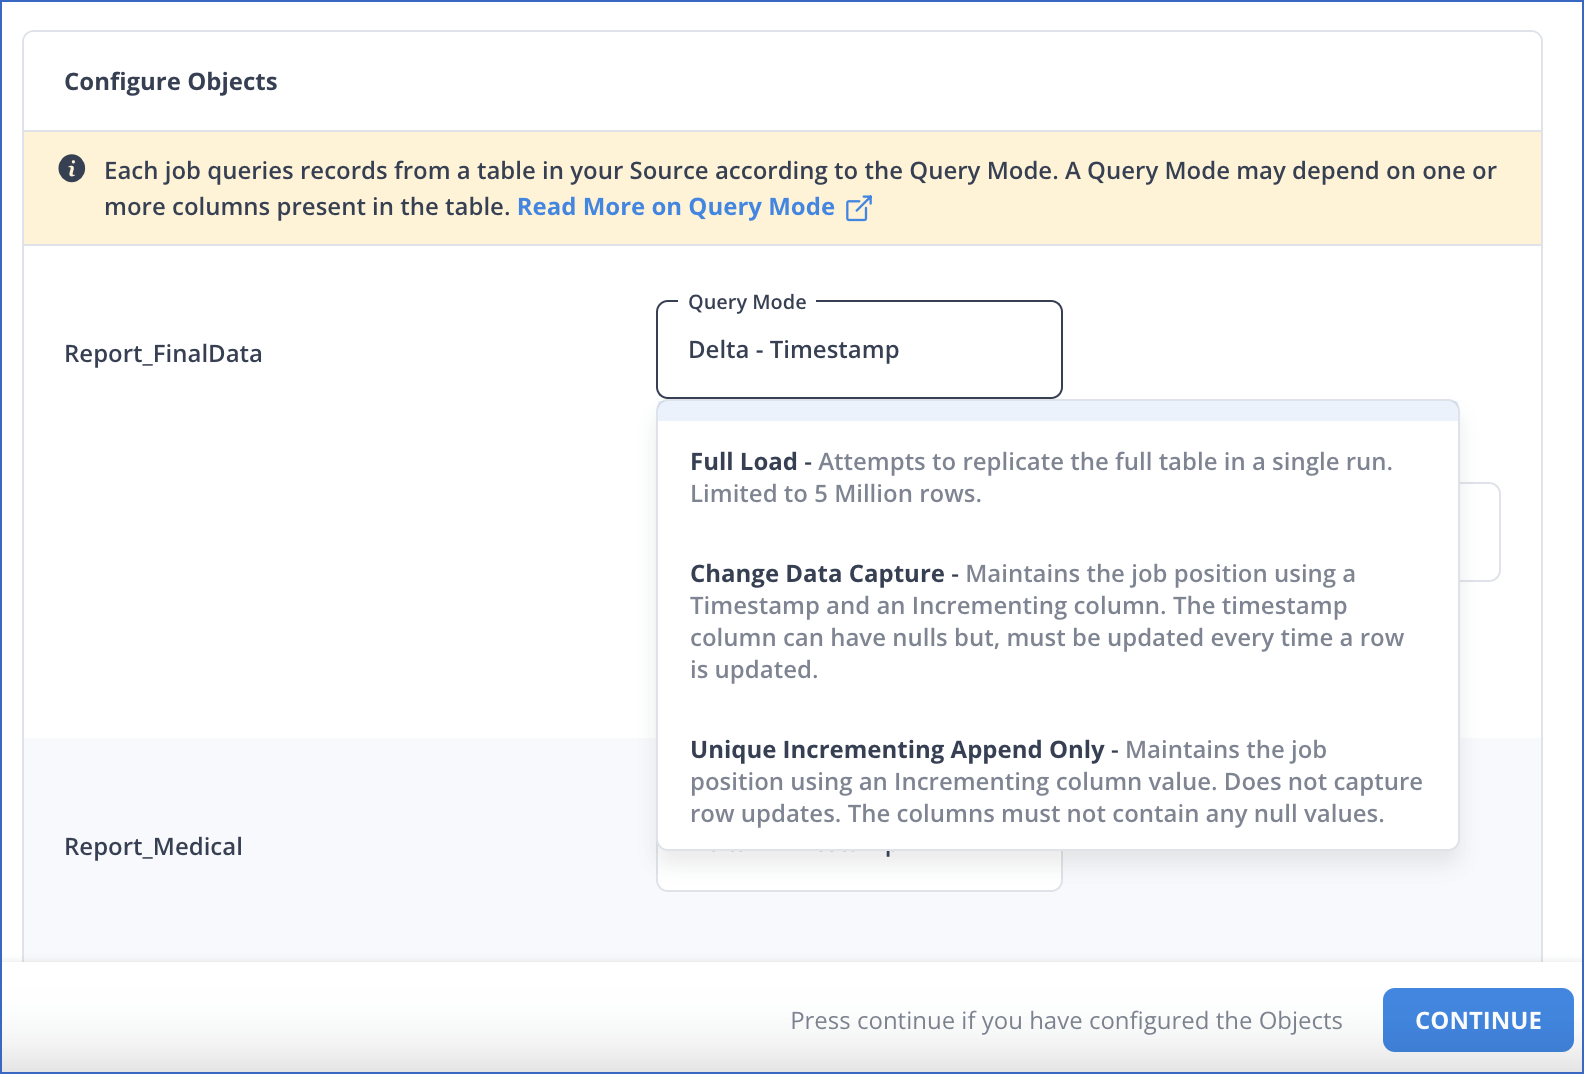
On the Configure Objects page, specify the query mode you want to use for each selected object.
-
-
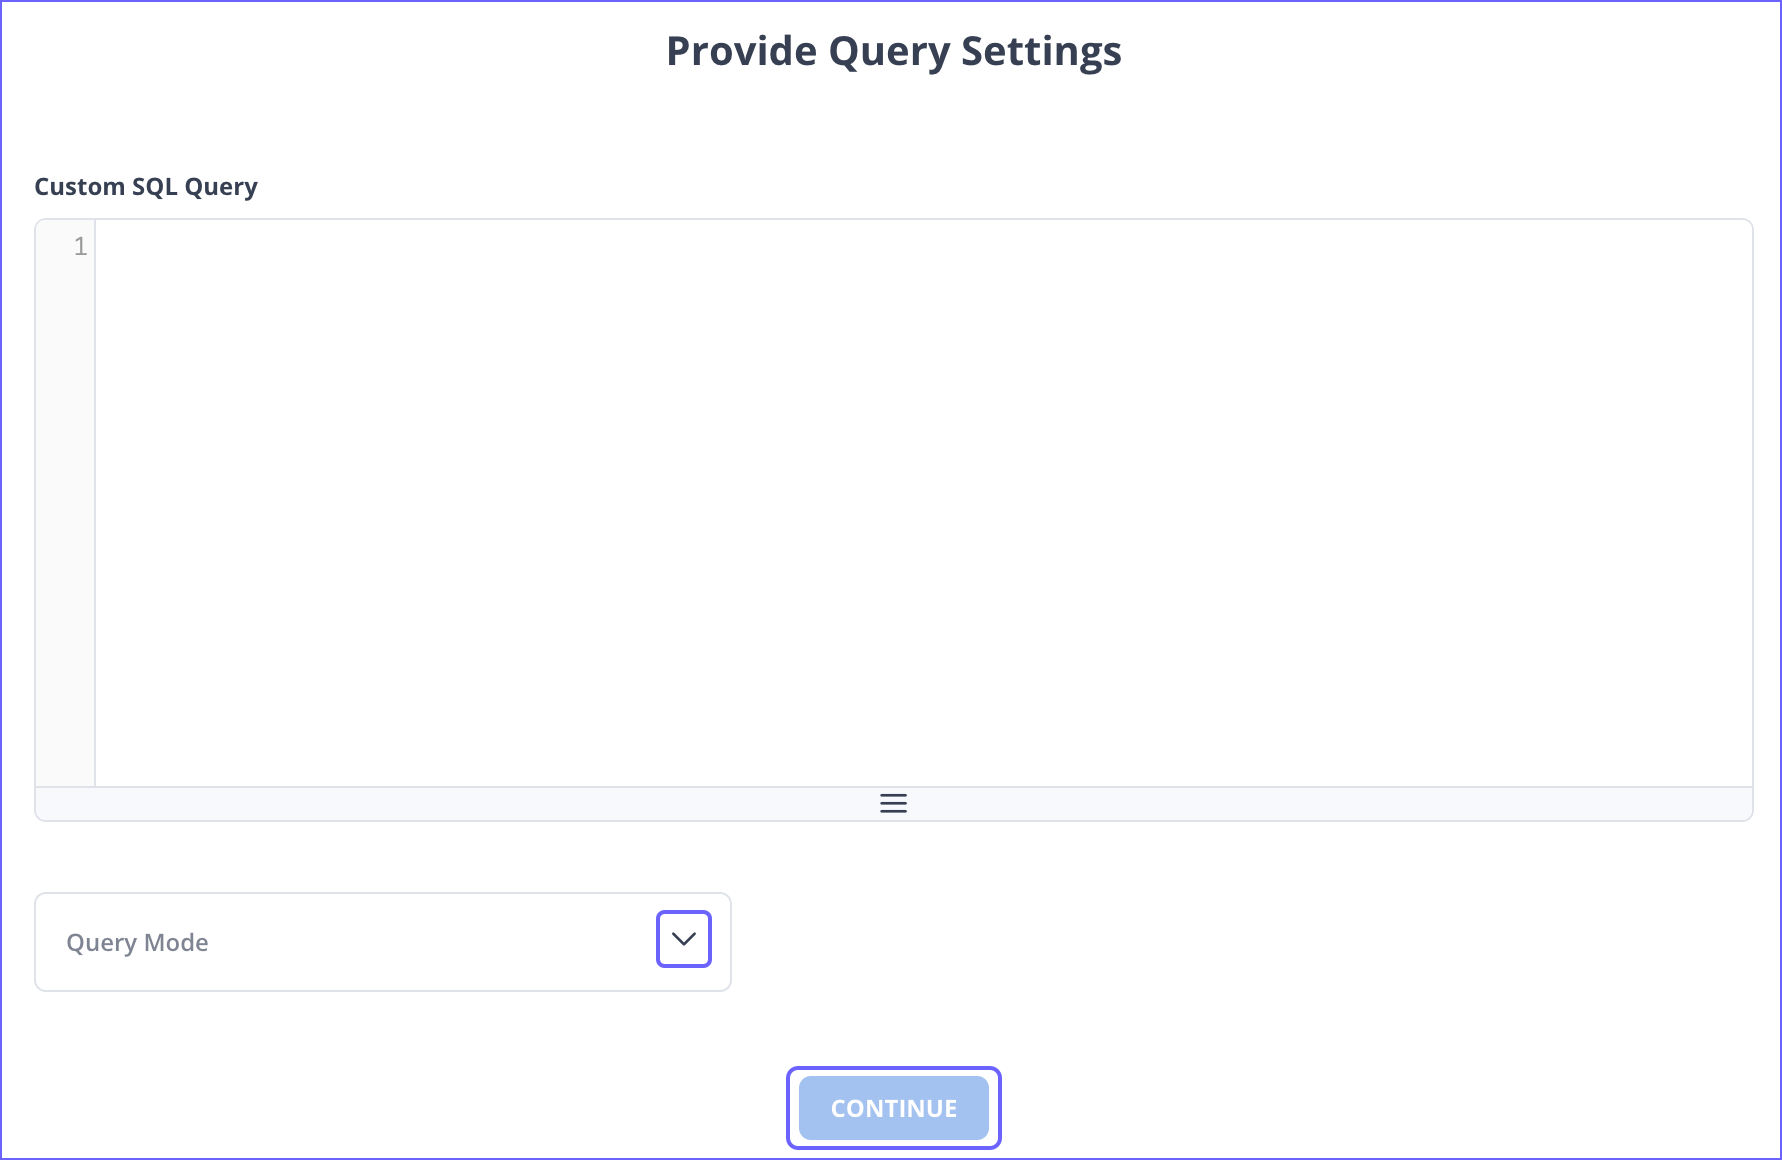
For Pipelines configured with the Custom SQL ingestion mode:
-
On the Provide Query Settings page, enter the custom SQL query to fetch data from the Source.
-
In the Query Mode drop-down, select the query mode, and click CONTINUE.
-
Data Replication
| For Teams Created | Default Ingestion Frequency | Minimum Ingestion Frequency | Maximum Ingestion Frequency | Custom Frequency Range (in Hrs) |
|---|---|---|---|---|
| Before Release 2.21 | 15 Mins | 5 Mins | 24 Hrs | 1-24 |
| After Release 2.21 | 6 Hrs | 30 Mins | 24 Hrs | 1-24 |
Note: The custom frequency must be set in hours as an integer value. For example, 1, 2, or 3 but not 1.5 or 1.75.
- Historical Data: In the first run of the Pipeline, Hevo ingests all available data for the selected objects from your Source database.
- Incremental Data: Once the historical load is complete, data is ingested as per the ingestion frequency.
Additional Information
Read the detailed Hevo documentation for the following related topics:
Limitations
-
Hevo does not support Azure CDC for replication.
-
Hevo does not fetch Views from the Azure MS SQL database automatically. As a workaround, you can create individual Pipelines in Custom SQL mode to fetch each View. However, some limitations may arise based on the type of data synchronization, the query mode, or the number of Events. Contact Hevo Support for more details.
-
Hevo does not support data replication from temporary tables.
-
Hevo does not load data from a column into the Destination table if its size exceeds 16 MB, and skips the Event if it exceeds 40 MB. If the Event contains a column larger than 16 MB, Hevo attempts to load the Event after dropping that column’s data. However, if the Event size still exceeds 40 MB, then the Event is also dropped. As a result, you may see discrepancies between your Source and Destination data. To avoid such a scenario, ensure that each Event contains less than 40 MB of data.
-
When using the Unique Incrementing Append Only query mode, selecting a Globally Unique Identifier (GUID or UUID) field as the auto-incrementing column can lead to data ingestion issues. UUIDs do not follow a sequential numeric or alphabetical order. This can cause incorrect offset calculations, which might result in valid Events being skipped during ingestion and lead to data mismatches. If your Source object uses a UUID as the incrementing field and you observe missing records in your Destination, contact Hevo Support.
Revision History
Refer to the following table for the list of key updates made to this page:
| Date | Release | Description of Change |
|---|---|---|
| Jul-14-2025 | NA | Updated section, Limitations to add a point about UUID columns not recommended for UIAO. |
| Jul-07-2025 | NA | Updated the Limitations section to inform about the max record and column size in an Event. |
| Jan-07-2025 | NA | Updated the Limitations section to add information on Event size. |
| Nov-11-2024 | NA | Updated sections, Create a Geo-Replication Database (Optional) and Whitelist Hevo’s IP Addresses as per the latest Azure SQL Server UI. |
| Apr-29-2024 | NA | Updated section, Specify Azure SQL Server Connection Settings to include more detailed steps. |
| Mar-05-2024 | 2.21 | Added the Data Replication section. |
| Jan-15-2024 | NA | Updated section, Limitations to add information about Hevo not supporting data replication from temporary tables. |
| Jan-10-2024 | 2.19 | Updated section, Object and Query Mode Settings as per the latest Hevo functionality. |
| Nov-03-2023 | NA | Added section, Object and Query Mode Settings. |
| Apr-21-2023 | NA | Updated section, Specify Azure SQL Server Connection Settings to add a note to inform users that all loaded Events are billable for Custom SQL mode-based Pipelines. |
| Mar-09-2023 | 2.09 | Updated section, Specify Azure SQL Server Connection Settings to mention about SEE MORE in the Select an Ingestion Mode section. |
| Dec-07-2022 | 2.03 | Updated section, Specify Azure SQL Server Connection Settings to mention about including skipped objects post-Pipeline creation. |
| Dec-07-2022 | 2.03 | Updated section, Specify Azure SQL Server Connection Settings to mention about the connectivity checker. |
| Apr-21-2022 | 1.86 | Updated section, Specify Azure SQL Server Connection Settings. |
| Sep-08-2021 | NA | - Updated the third list item under Prerequisites - Updated sub-section Grant privileges to the user. |
| Jul-26-2021 | 1.68 | Added a note for the SQL Server Host field. |
| Jul-12-2021 | NA | Added section, Specify Azure MS SQL Connection Settings. |
| Apr-20-2021 | 1.61 | Added the second bullet point to the Limitations section. |
| Mar-09-2021 | 1.58 | Replaced references to Logical Replication with Change Tracking as Change Tracking is a distinct Pipeline mode for SQL Server Source types. |
| Feb-22-2021 | 1.57 | Added sections: - Create a Geo-replication Database - Create a User and Grant Privileges - Retrieve the Hostname and Port Number |