Azure Synapse Analytics
On This Page
Azure Synapse is a cloud-based analytics service that combines the technologies required for data integration, data warehousing, and big data analytics. Users can query and perform analytics on data using resources organized in both serverless and dedicated SQL pools.
Hevo integrates with dedicated SQL pools, which are SQL data warehouses in Azure Synapse Analytics. You must provision the dedicated SQL pool from within a Synapse workspace. A Synapse workspace helps to securely collaborate between your Azure resources, which are logically grouped together in a container called resource group.
If you are new to Azure Synapse Analytics and need assistance with setting up an instance, refer to these sections:
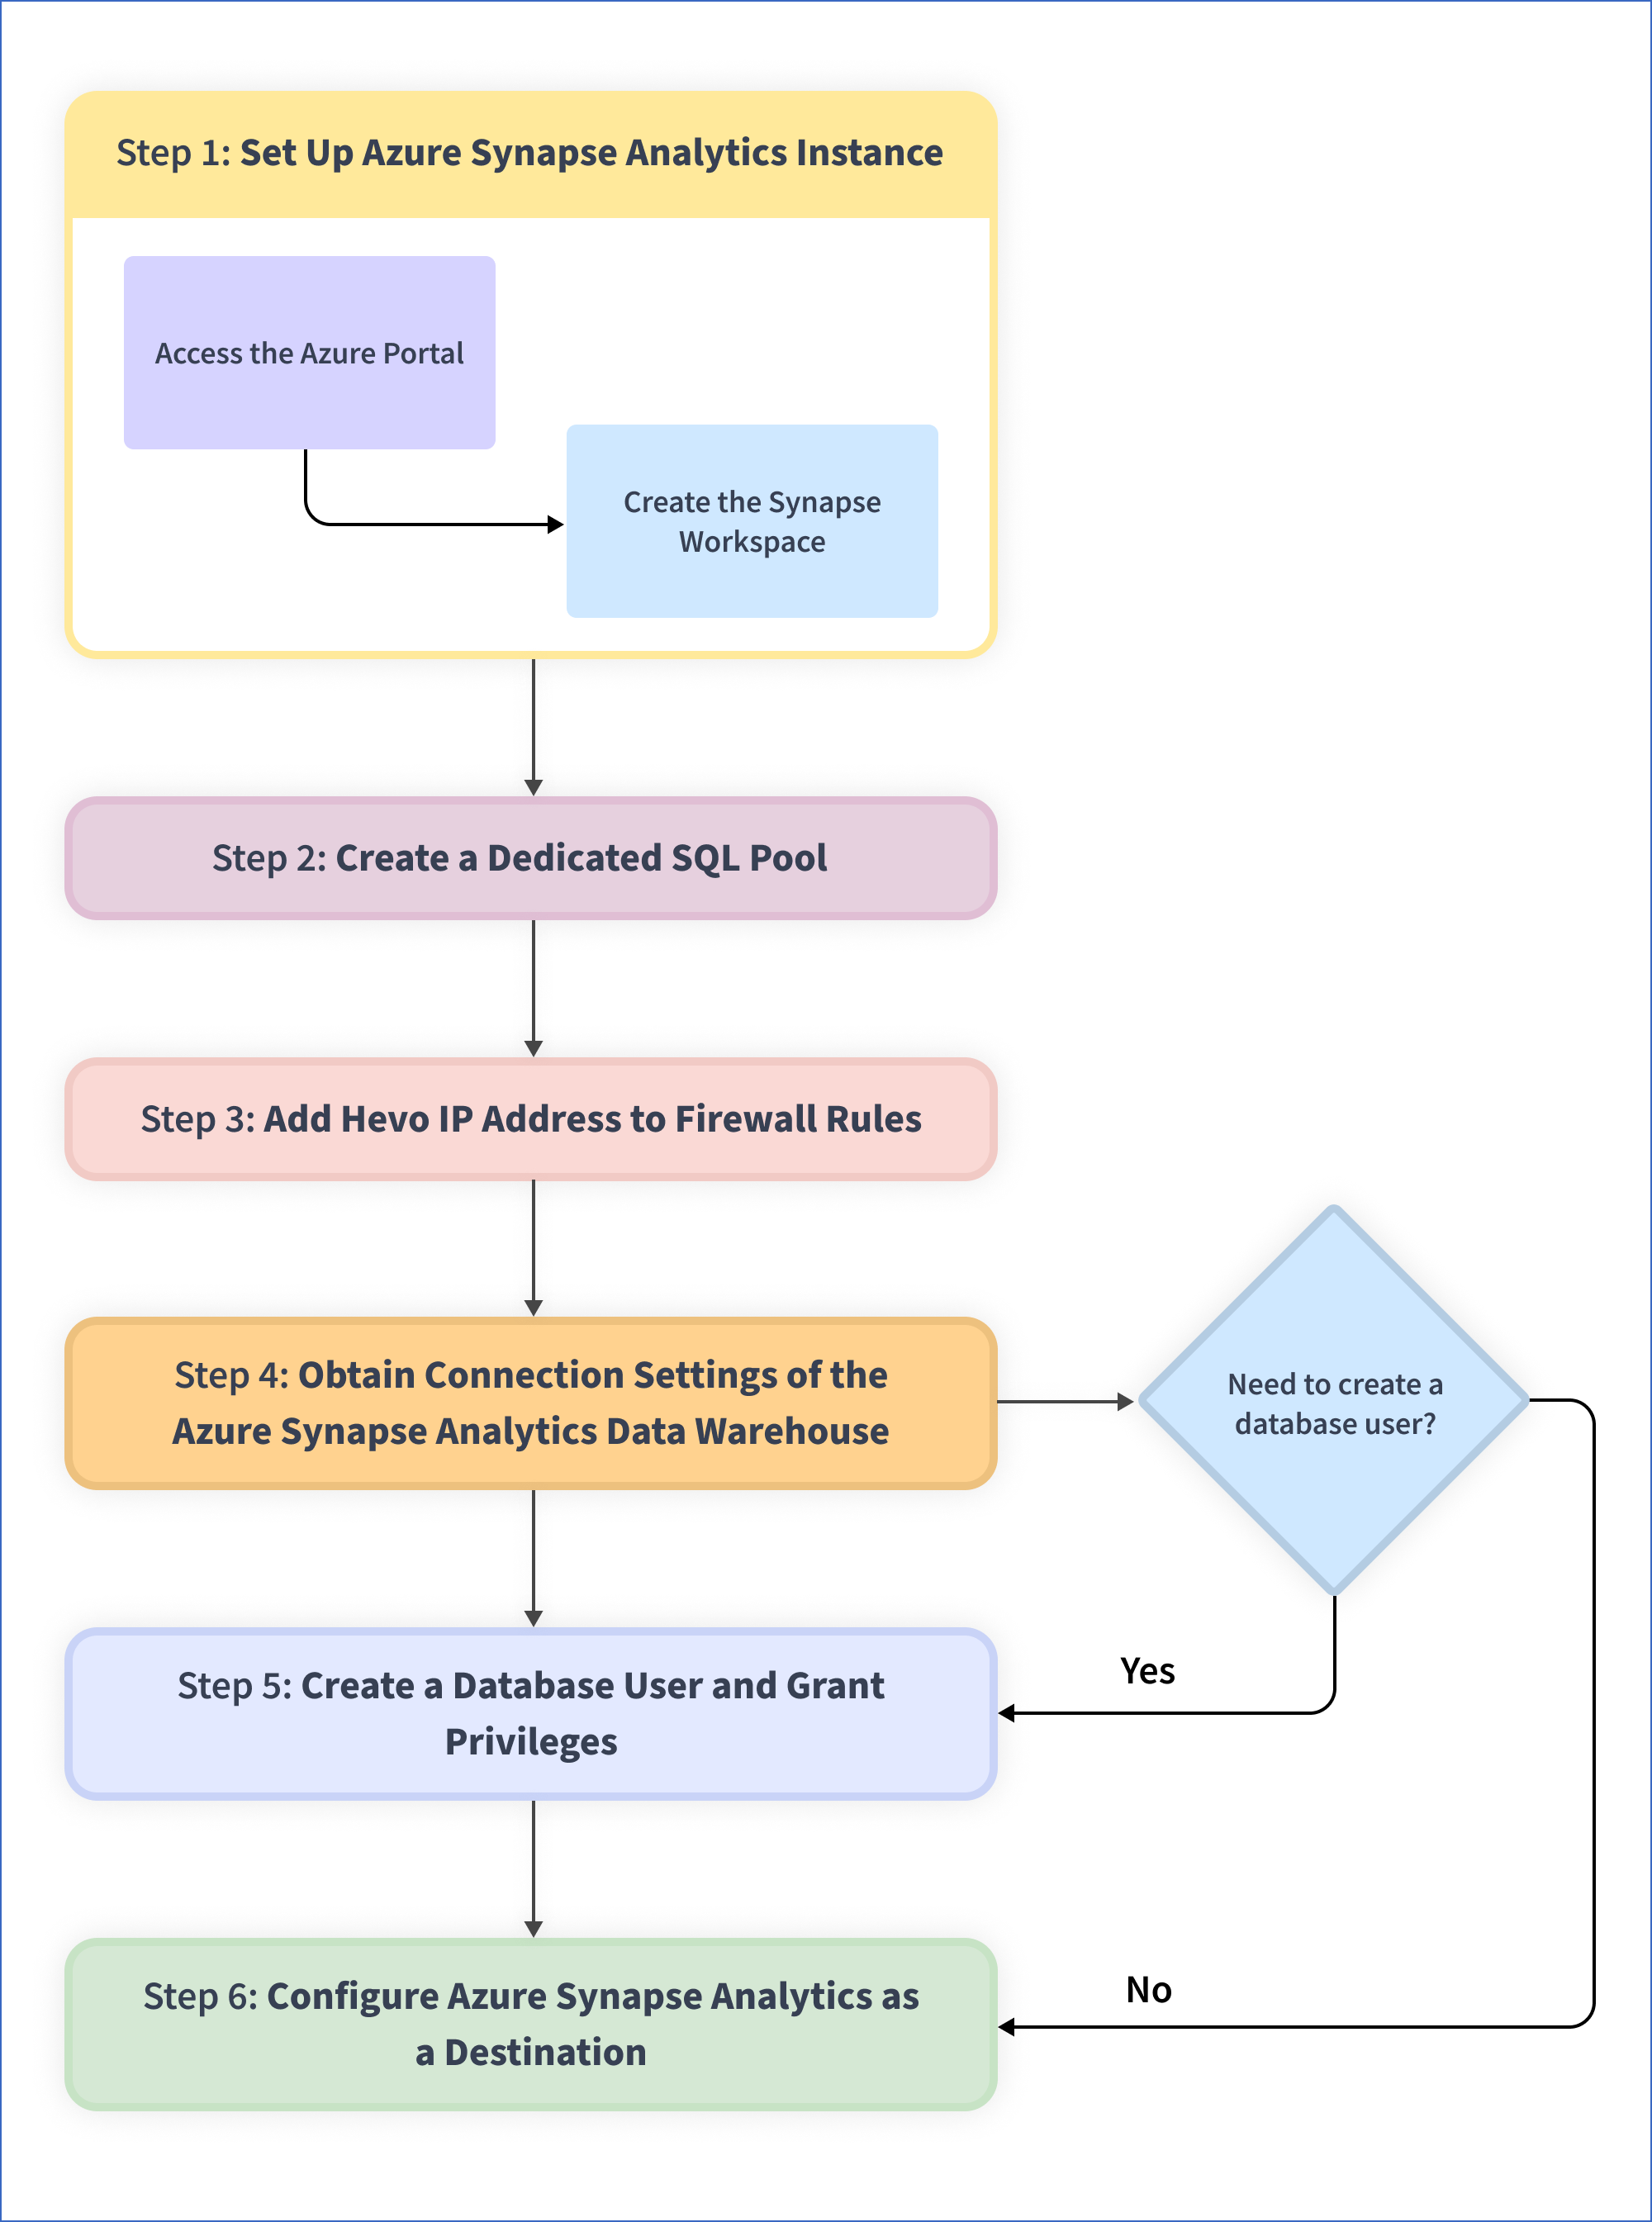
The following image illustrates the key steps that you need to complete to configure Azure Synapse Analytics as a Destination in Hevo:
Prerequisites
-
An Azure account with an active subscription for which billing is enabled exists.
-
A user in your subscription with the Contributor role in Azure RBAC exists, to create the required Synapse resources.
-
The connection settings for the Azure Synapse Analytics data warehouse are available.
-
You are assigned the Team Collaborator, or any administrator role except the Billing Administrator role in Hevo to create the Destination.
Set up Azure Synapse Analytics Instance (Optional)
You need an Azure portal account to set up the Azure Synapse Analytics instance. Once you have an account, you need to create a Synapse workspace.
1. Access the Azure portal in one of the following ways
-
Sign in to an existing Azure account:
-
Navigate to azure.microsoft.com and click Sign in.
-
Specify the email address that has access to the Azure portal.
-
Specify your password and click Sign in.
-
-
Sign up for an Azure free trial, which credits $200 and is valid for 30-days.
Note: A free trial allows you to access Azure services, such as Azure Active Directory (Azure AD) and Synapse Analytics. If you decide to continue using the Azure services, you can move to a pay as you go model.
-
Navigate to azure.microsoft.com and click Start free.
-
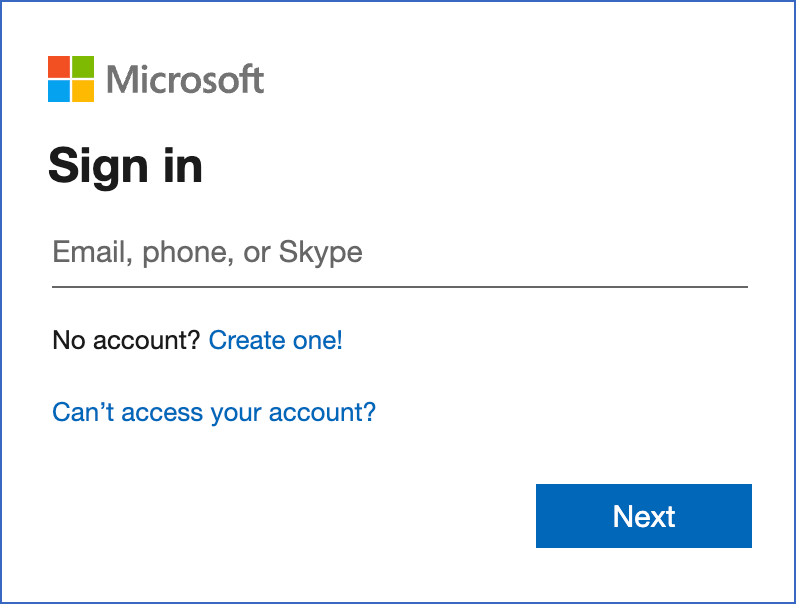
In the Sign in dialog, do one of the following:
-
Log in using an existing Microsoft account, a phone number, or a Skype account.
Note: You should not have already signed up for a free trial with this account.
-
Click Create one! to create an account by performing the following steps:

-
Specify an email address and click Next. You can also set up a new email address at this time.
-
Specify a password and click Next.
-
Complete the required steps to create your Azure account
-
-
-
Log in to the Azure portal and add a subscription to activate your free trial. A subscription must exist to be able to create an Azure Synapse workspace.
-
2. Create a Synapse workspace
Note: You must have an active subscription with billing enabled and a user with the Azure RBAC Contributor role in that subscription to perform the steps listed in this section.
-
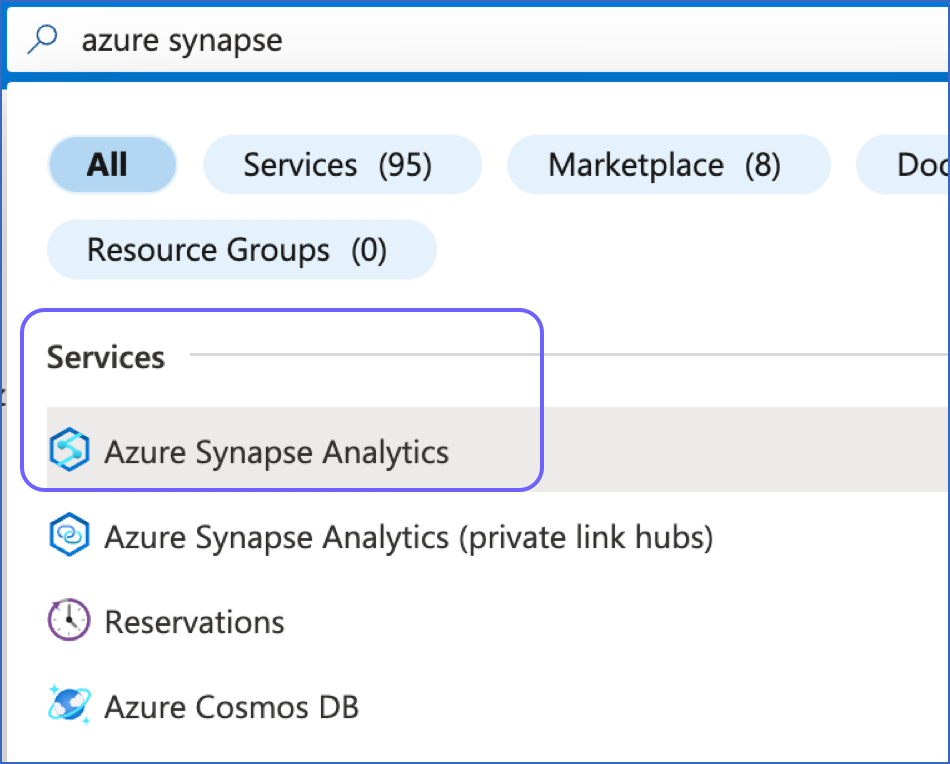
Log in to the Azure portal, and in the Search bar, type azure synapse.
-
In the search results, under Services, click Azure Synapse Analytics.
-
On the Azure Synapse Analytics page, click Create.

-
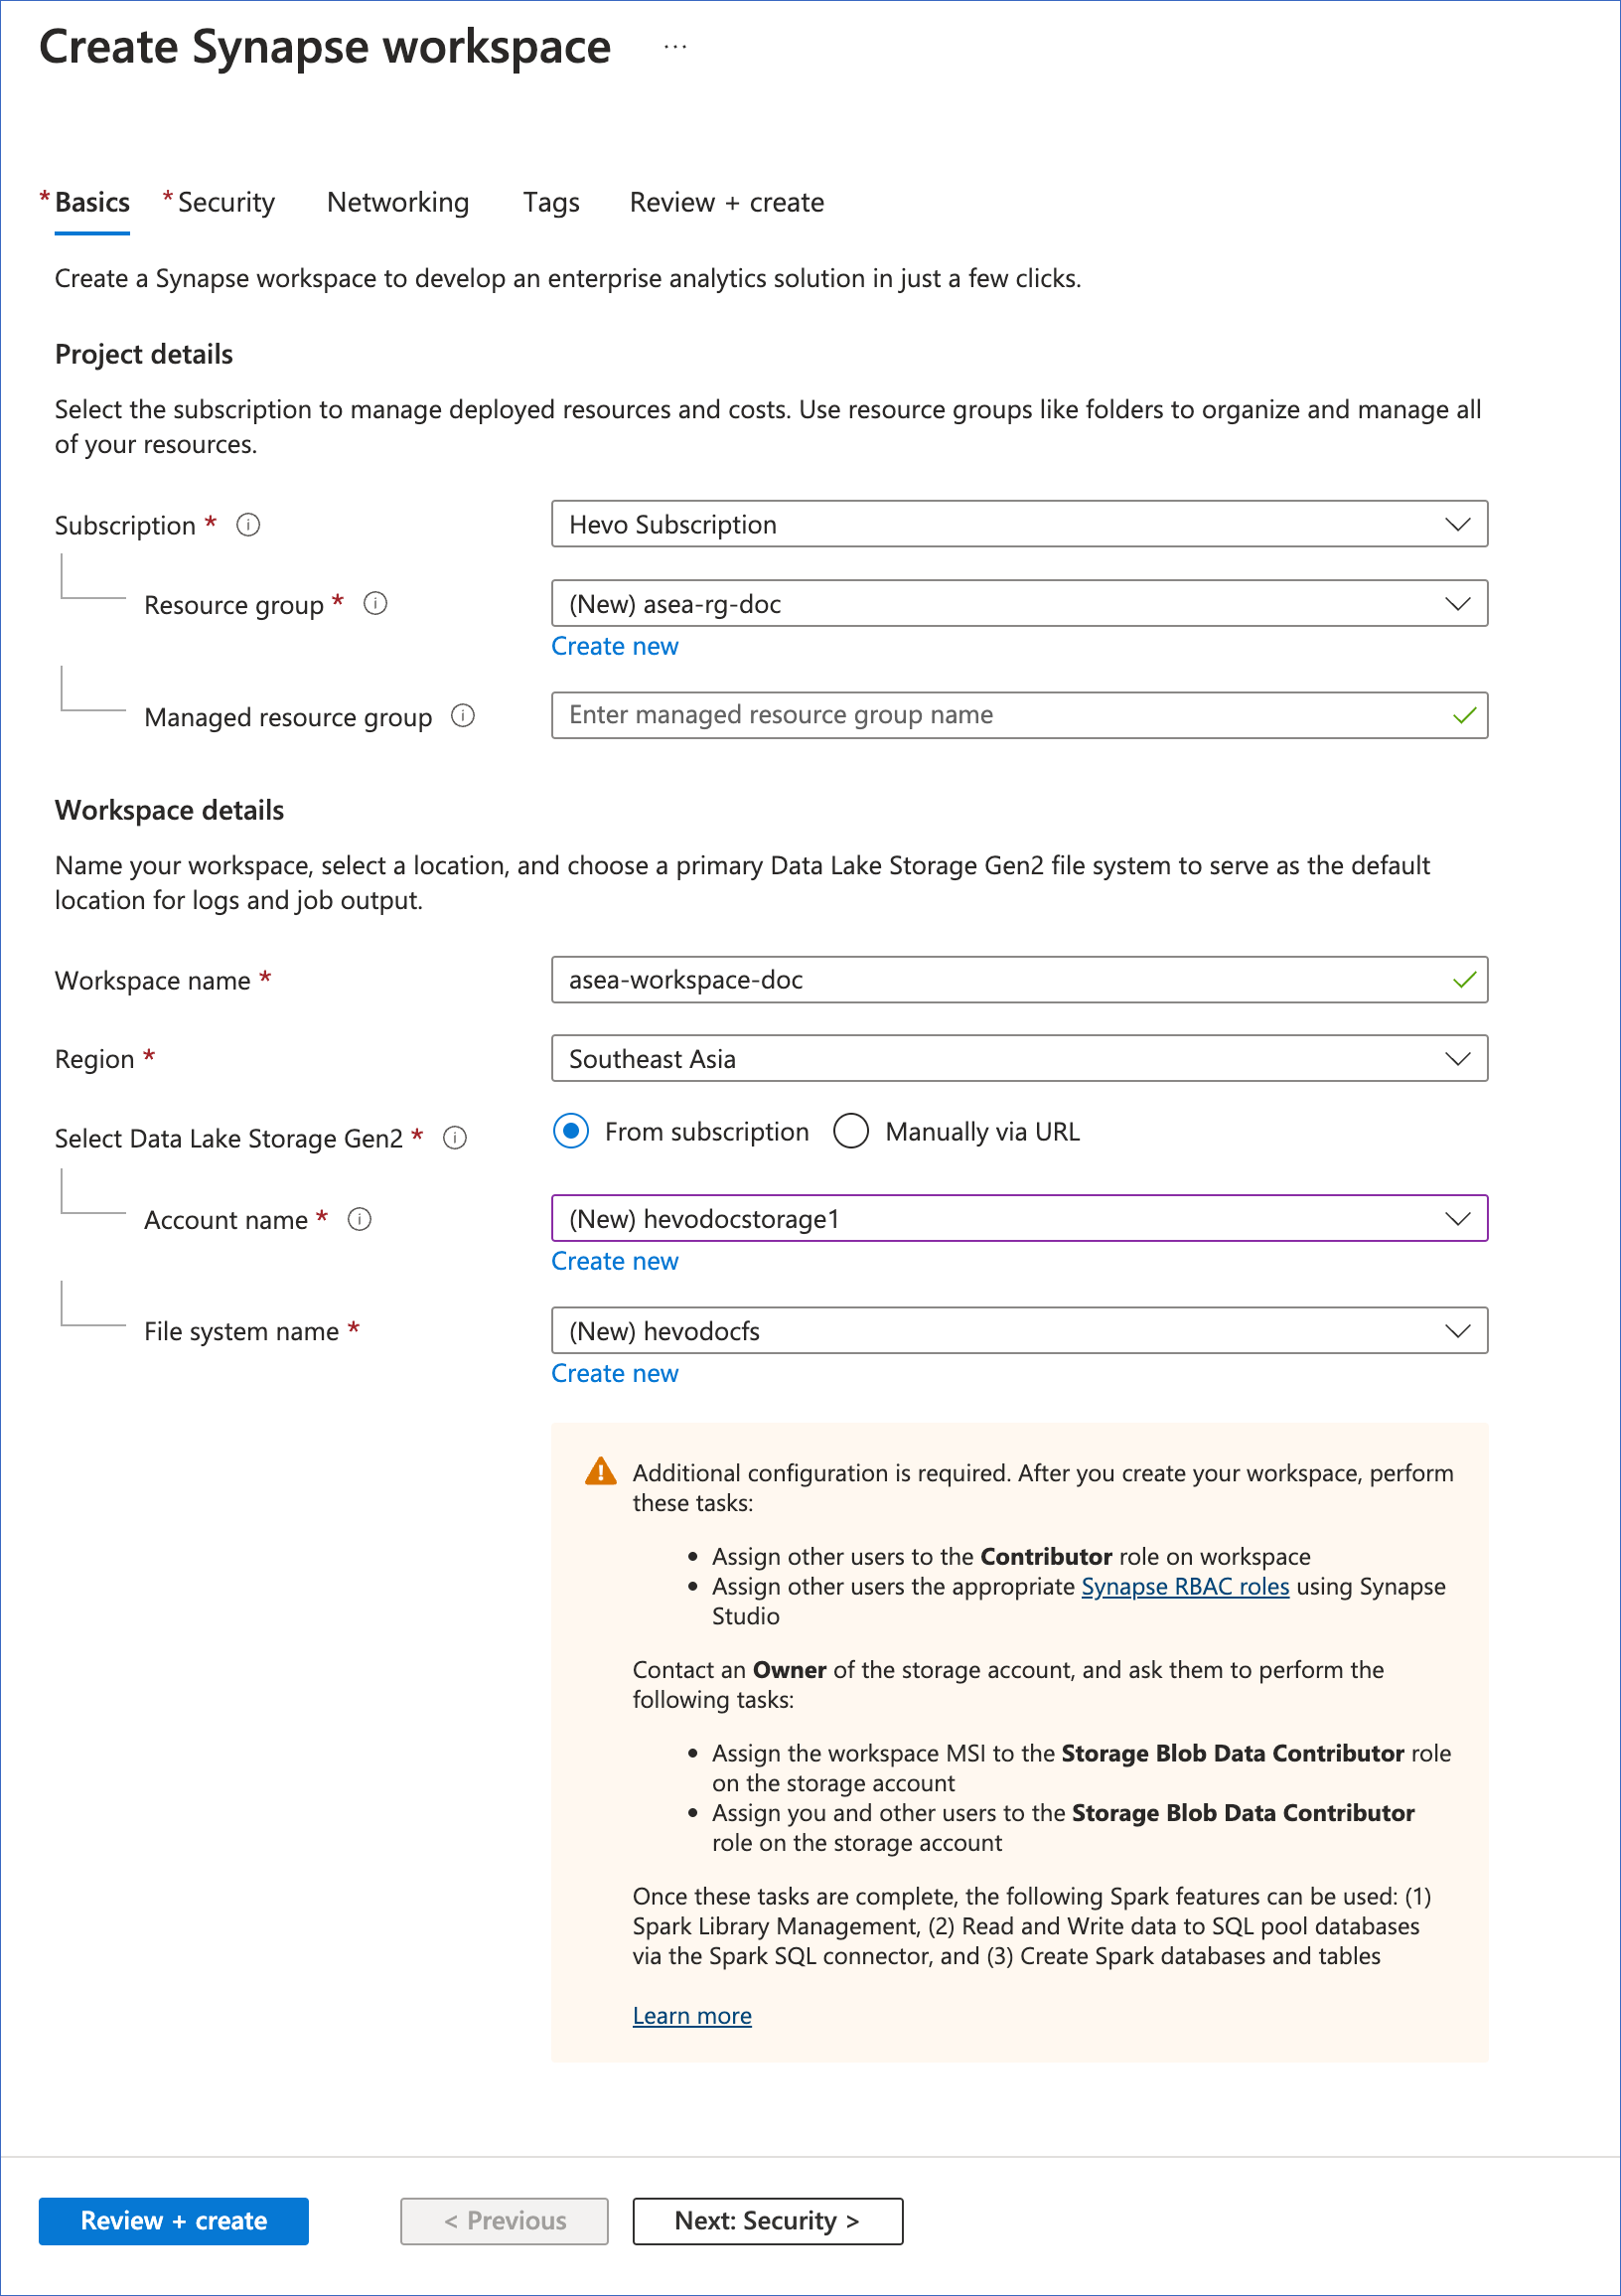
On the Create Synapse Workspace page, Basics tab, specify the following to create your workspace:
-
Subscription: A container comprising related business and technical resources that are used and billed together. Select the Azure subscription in which you want to create your workspace from the drop-down.
-
Resource group: A collection of related resources that may be logically grouped based on factors such as geography or team functions. Select an existing resource group from the drop-down or create one now.
Note: To access an existing resource group, you must have the Azure RBAC Owner or Contributor role.
-
Managed resource group: A container that holds the supporting resources created by Azure Synapse Analytics for your workspace. A managed resource group is created for you and a default name is assigned to it when your workspace is created. You can also specify a name of your choice for it now.
-
Workspace name: A unique name for your workspace.
-
Region: The geographical location in which you want to create your workspace. Select an Azure region from the drop-down list. It is recommended to co-locate your workspace with your data and client applications such as Hevo.
-
Select Data Lake Storage Gen2: The storage account and container that Azure Synapse uses to store the workspace data. Only Azure Data Lake Storage (ADLS) Gen2 accounts for which hierarchical namespace (HNS) is enabled are displayed. In these accounts, data objects and files are organized in a hierarchy of directories for efficient access.
Select your account in one of the following ways:
-
From subscription:
-
Account name: Specify a unique name for your storage account if you are creating one now. Alternatively, you can select an existing storage account available in your subscription from the drop-down list. Read Prepare the existing storage account for information on how to use it with Azure Synapse Analytics.
-
File system name: Specify a unique name for your data storage container if you want to create one. If you select an existing storage account, this field is populated with the name of the storage container associated with it.
-
-
Manually via URL:
-
Account name: Specify the name of an existing HNS-enabled ADLS Gen2 account, which is prefixed to dfs.core.windows.net to create its URL. For example, if the URL of your ADLS Gen2 account is hevodocstorage1.dfs.core.windows.net, the account name is hevodocstorage1. You can obtain this account name from your Azure account administrator.
-
File system name: Specify a unique name for your data storage container.
-
-
-
Click Next: Security >.
-
-
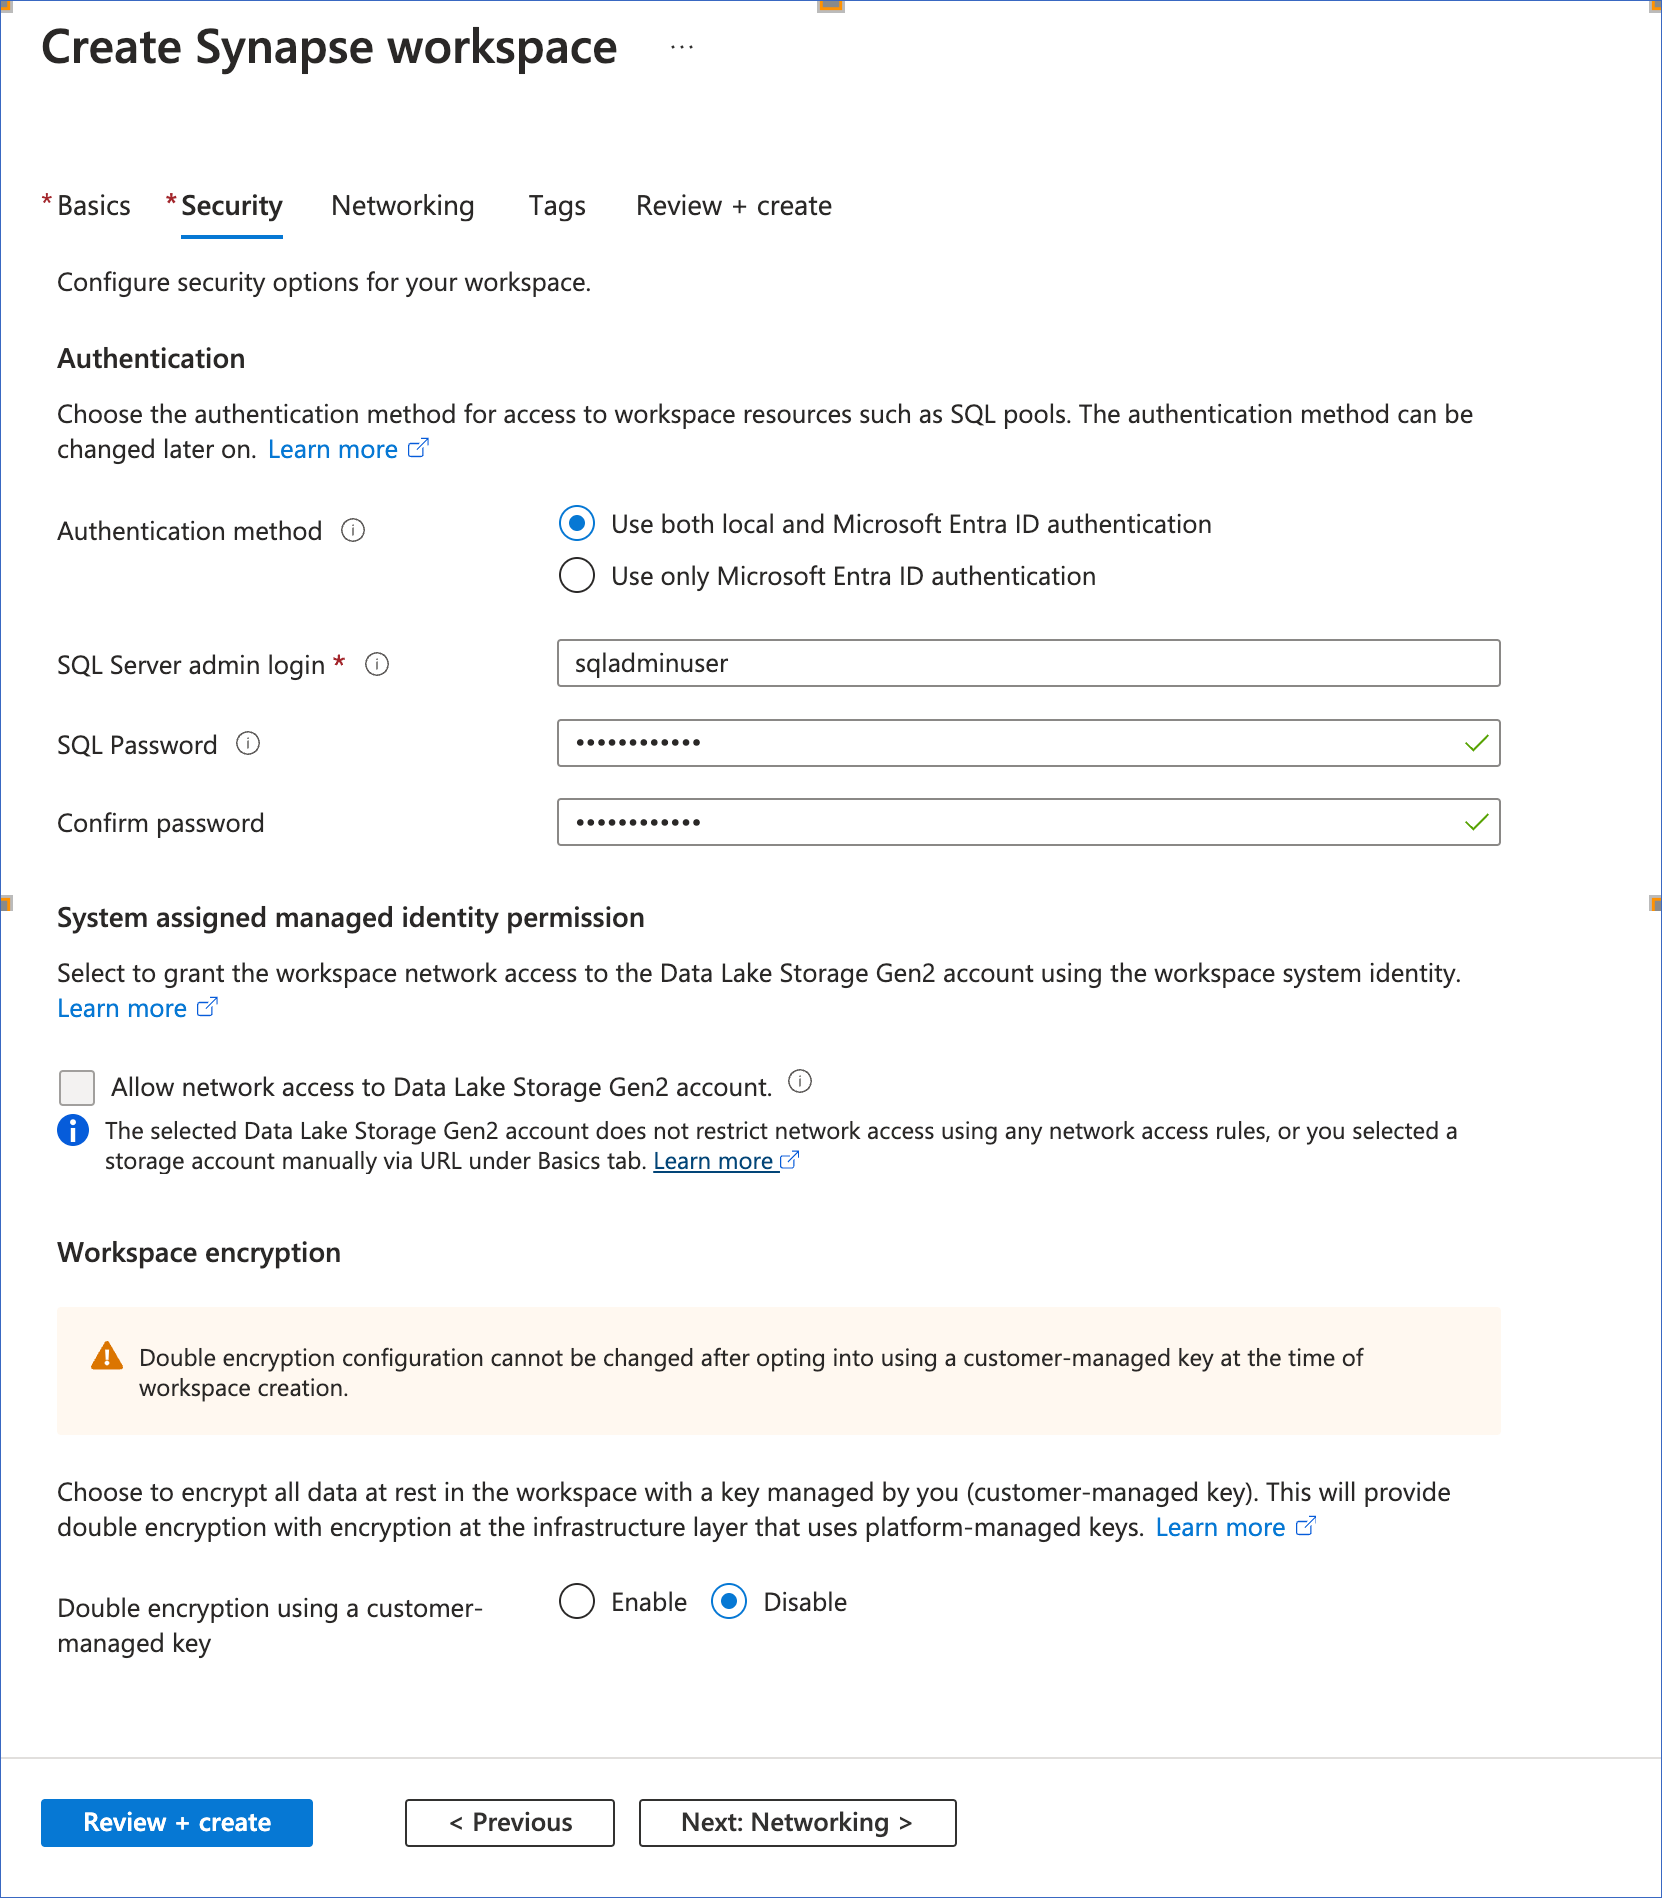
(Required) In the Security tab, configure the options to secure your workspace:
-
Authentication method: Select Use both local and Azure Active Directory (Azure AD) authentication.
-
SQL Server admin login: Specify a unique name for the user with admin access to the workspace’s SQL pools. Default value: sqladminuser.
-
SQL Password and Confirm Password: Specify a strong password for your admin user.
-
Allow network access to Data Lake Storage Gen2 account: If selected, it gives your workspace network access to the ADLS Gen2 account, selected in the Basics tab. The check box is disabled for storage accounts that do not restrict network access.
-
Workspace encryption: An option to double-encrypt your data at rest in the workspace. Default value: Disable.
-
Click Next: Networking >.
-
-
(Optional) In the Networking tab, configure the network connectivity settings for your workspace:

-
Managed virtual network: An option to allow public network access to the workspace through a managed virtual network. Default value: Disable. Perform the additional steps displayed on the screen if you enable this option. Read Create an Azure Synapse workspace with a managed virtual network for more information.
-
Allow connections from all IP addresses: If enabled, it adds a default firewall rule, allowing connections from all IP addresses to your workspace. Default value: Enabled.
Note: This option is only available for Synapse workspaces not managed through a virtual network.
-
Minimum TLS version (Non-editable): The TLS version needed by the workspace to access your storage account’s data. Default selection: TLS 1.2.
-
Click Next: Tags > if you want to categorize your resources, or click Review + create and skip to Step 8.
-
-
(Optional) In the Tags tab: Specify name-value pairs if you want to categorize your resources. Tagging enables you to consolidate resources for purposes such as billing.
-
In the Review + create tab: Review the specified configuration, and click Create to provision your workspace resources. The provisioning may take around 10-15 minutes.
You can use the dedicated SQL endpoint of this workspace as the server name, the SQL Server admin login as the username, and the SQL password as the password, while configuring your Azure Synapse Analytics Destination with the Enter Connection Settings Manually option.
Create a Dedicated SQL Pool (Optional)
Use the steps in this section to create a dedicated SQL pool from within an existing Synapse workspace. A dedicated SQL pool is the data warehouse in Azure Synapse Analytics into which your data is replicated.
-
Log in to the Azure portal, and in the Search bar, type azure synapse.
-
From the search results, under Services, click Azure Synapse Analytics.
-
On the Azure Synapse Analytics page, click on your Synapse workspace name. For example, asea-workspace-doc.

-
On the Overview page, click + New dedicated SQL pool.

-
On the New dedicated SQL pool page, Basics tab, provide the essential information for your dedicated SQL pool:

-
Dedicated SQL pool name: A unique name for your data warehouse.
-
Geo-redundant: An option to replicate your data to another data center in the Azure region of your workspace. Default value: No selection.
Note: This option may not be displayed for certain Azure regions, such as South India. Read Regions with availability zones and no region pair.
-
Performance level: The size of your data warehouse. Use the slider to change the value. Default value: DW1000c. The Estimated price displays the cost based on this size.
-
Click Next Additional settings >.
-
-
(Required) In the Additional settings tab, customize the settings for your dedicated SQL pool:

-
Use existing data: The data source from which your dedicated SQL pool must be populated. Select Backup or Restore point if you want to restore data to your dedicated SQL pool. Default value: None.
-
Collation: The rules to sort and compare data in your dedicated SQL pool. Default value: SQL_Latin1_General_CP1_CI_AS. Read Help collations to obtain a list of all supported collations.
Note: You cannot change this value after the dedicated SQL pool is created.
-
-
Click Review + create to review your configuration, and click Create to provision the resources for your dedicated SQL pool.
You can provide this dedicated SQL pool as your database name while configuring your Azure Synapse Analytics Destination with the Enter Connection Settings Manually option.
Whitelist Hevo’s IP addresses
You must whitelist the Hevo IP address for your region to enable Hevo to connect to your Azure Synapse Analytics instance.
To do this:
-
Log in to your Azure portal.
-
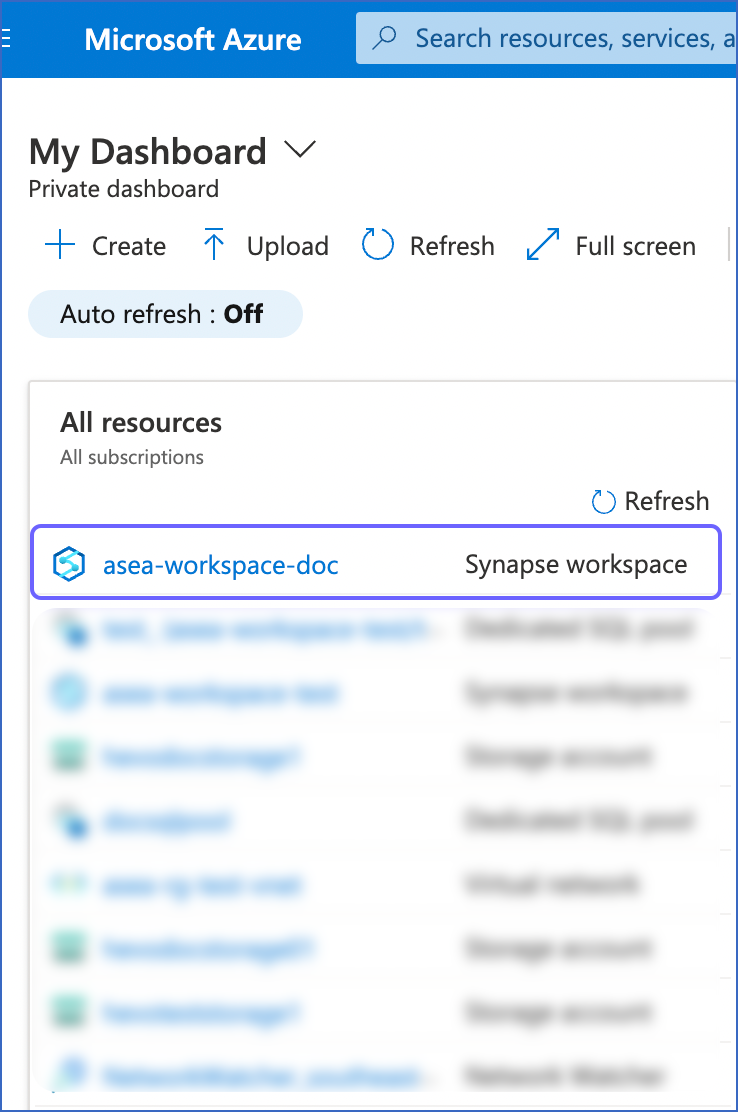
In the All resources pane, click on your Synapse workspace name. For example, asea-workspace-doc.
-
In the right pane of your <Workspace name> page, Essentials section, under Networking, click Show firewall settings.

-
Perform this step if your workspace is created in a managed virtual network, else skip to Step 5. In the Public network access section, ensure that public access to your workspace is Enabled.

-
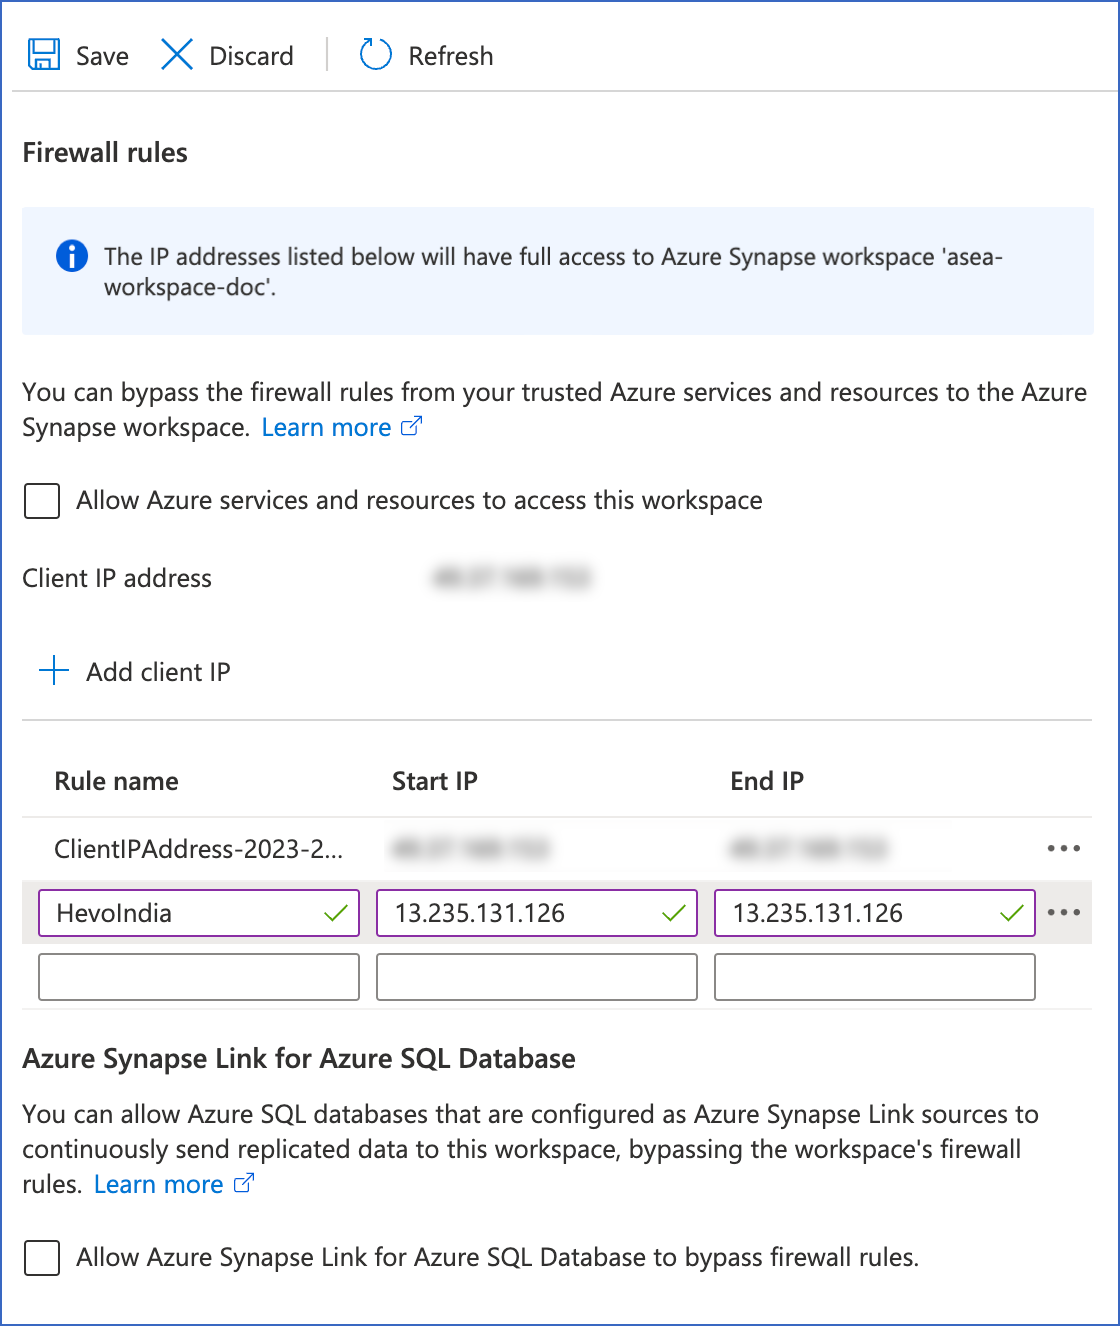
Scroll down to the Firewall rules section, and do the following:
-
Select the Allow Azure services and resources to access this workspace check box if you want to allow connections from your Azure services and resources to your Synapse workspace.
Note: This setting is internal to Azure Synapse Analytics and does not affect the data replication process in Hevo.
-
Click + Add client IP to add your machine’s IP address, to allow connections from your machine to the Azure Synapse Analytics data warehouse.
-
Specify the following to add your firewall rules:
-
Rule name: A name to identify the rule. For example, HevoIndia.
-
Start IP: The starting IP address. This should be Hevo’s IP address for your region. For example, 13.235.131.126 is Hevo’s IP address for the India region.
-
End IP: The ending IP address. This must be the same as your Start IP address. For example, 13.235.131.126.
-
-
Repeat the step above to add all the IP addresses for your Hevo region.
-
-
Click Save.
Obtain the Azure Synapse Analytics Data Warehouse Connection Settings
Hevo connects to your Azure Synapse Analytics data warehouse in one of the following ways:
Connection Method: Using connection string
-
Log in to the Azure portal, and in the Search bar, type azure synapse.
-
In the search results, under Services, click Azure Synapse Analytics.
-
On the Azure Synapse Analytics page, click on your Synapse workspace name. For example, asea-workspace-doc.
-
In the left navigation pane of your <Workspace Name> page, scroll down to the Analytics pools section, and click SQL pools.
-
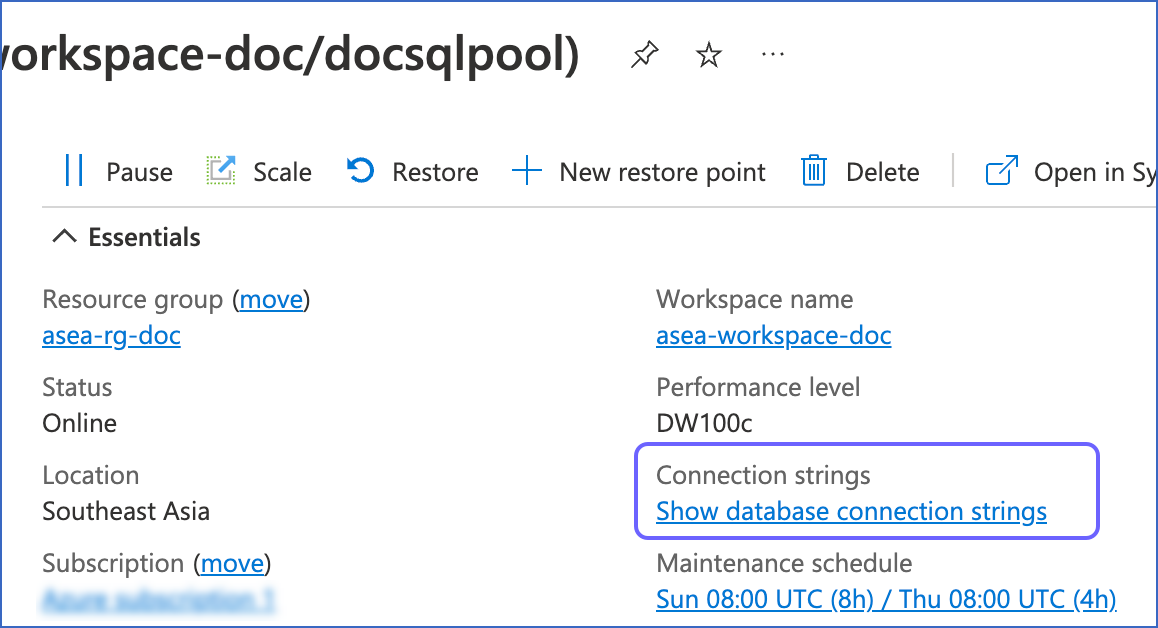
Click the desired dedicated SQL pool name. For example, docsqlpool.

-
On the page that is displayed, view the connection string in one of the following ways:
-
In the right pane of your <Workspace Name/Dedicated SQL Pool Name> page, Essentials section, under Connection strings, click Show database connection strings.
-
In the left navigation pane of your <Dedicated SQL Pool Name> page, scroll down to the Settings section, and click Connection strings.

-
-
On the Connection strings page, click the JDBC tab.
-
In the JDBC (SQL authentication) box, click the Copy (
 ) icon to copy the connection string and save it securely like any other password. Use this string while configuring your Azure Synapse Analytics Destination in Hevo.
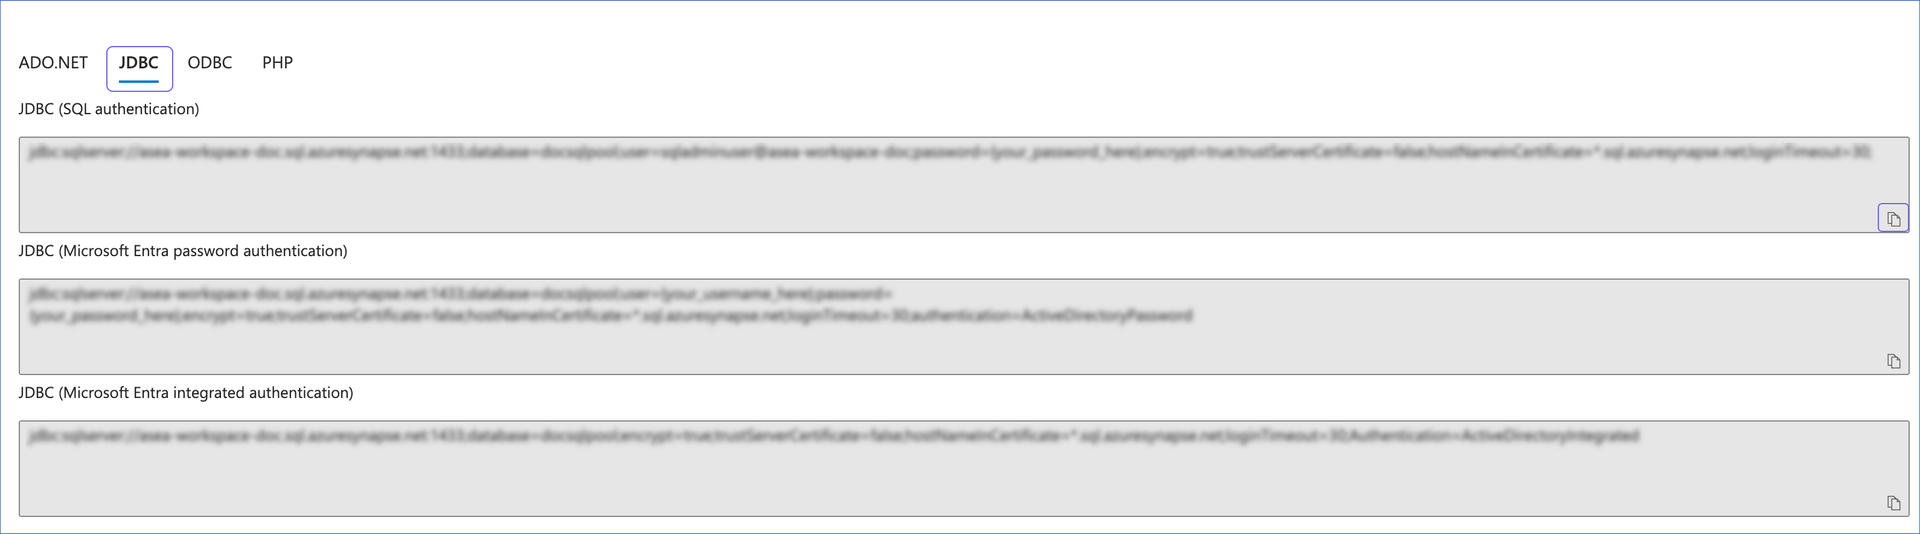
Connection Method: Using individual connection fields
-
Log in to the Azure portal, and in the Search bar, type azure synapse.
-
In the search results, under Services, click Azure Synapse Analytics.
-
On the Azure Synapse Analytics page, click on your Synapse workspace name. For example, asea-workspace-doc.
-
On the page that is displayed, from the Essentials section on the right, make a note of the following:
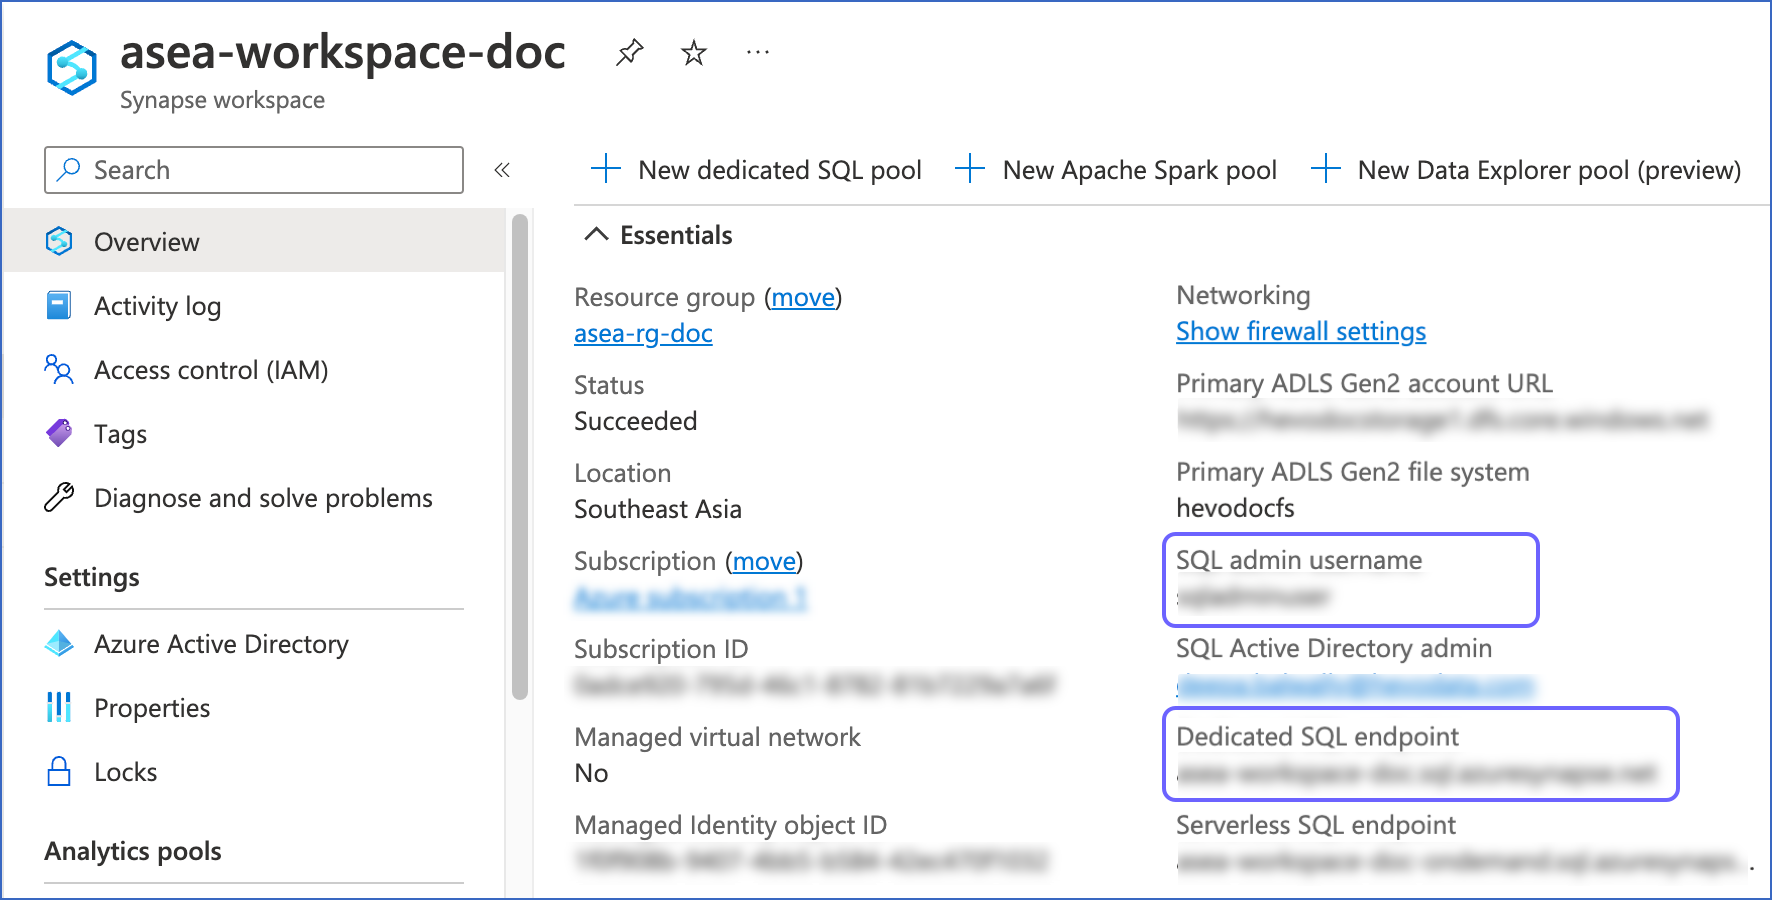
-
SQL admin username: This is your username.
-
Dedicated SQL endpoint: This is your server name.
Use these details while configuring your Azure Synapse Analytics Destination in Hevo.
-
-
In the left navigation pane, scroll down to the Analytics pools section, and click SQL pools.
-
Make a note of the dedicated SQL pool name into which you want to load data, and specify it as your database name while configuring Azure Synapse Analytics as a Destination in Hevo.
Create a Database User and Grant Privileges (Optional)
You can use any SQL tool that allows you to connect to your dedicated SQL pool (data warehouse) to create the database user and grant privileges to it. For example, Azure Data Studio or mssql for Visual Studio Code. In this section, we have used Azure Data Studio.
Perform the following steps:
-
Create a login user and map it to a database user, to connect to your SQL database.
1. Create a connection for your SQL database
-
Obtain the connection settings of your SQL database.
-
Access Azure Data Studio.
-
In the left navigation pane, click Connections, and in the SERVERS sidebar, click the New Connection (
 ) icon.
-
In the Connection Details sidebar, Input type field, select Parameters, and specify the following:
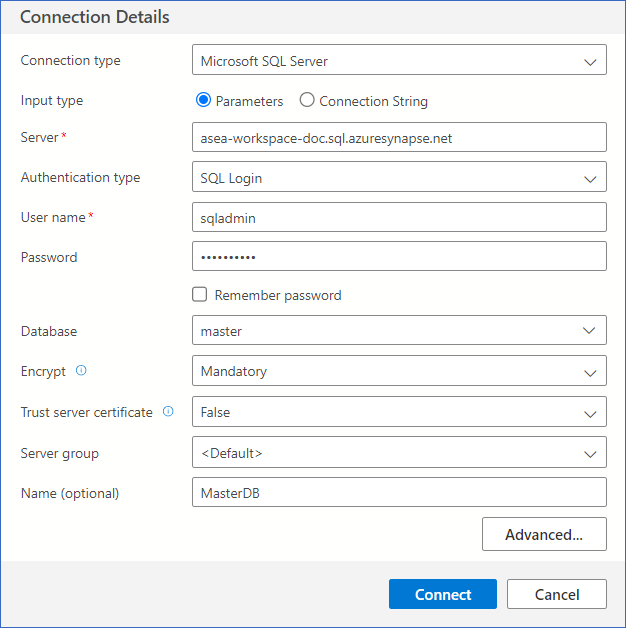
-
Connection type: The type of database. Default value: Microsoft SQL Server.
-
Server: The fully qualified server name. For example, asea-doc-ws.sql.azuresynapse.net.
-
Authentication type: The method with which you want to connect. Default value: SQL Login. Here, we will connect using SQL authentication.
-
User name: The SQL admin user for your database. For example, sqladmin.
-
Password: The password for the specified user name.
-
Database: The database to which you want to connect. For example, master.
-
Name (optional): A name for your connection. For example, MasterDB.
-
-
Click Connect.
2. Create a database user
-
Access Azure Data Studio and in the SERVERS sidebar, select the connection name that you created above.

-
Click the Expand chevron to open Databases, System Databases, and then master.
-
Right-click on master, and click New Query.

-
In the query editor, enter the following command to create a login user and click Run:
CREATE LOGIN [<login_name>] WITH PASSWORD=N'<strong_password>' GONote: Replace the placeholder values in the command above with your own. For example, <login_name> with hevouser.
-
At the top of the query editor, select your SQL database name from the drop-down list. For example, master.

-
In the query editor, enter the following command to create a database user for the login user in the selected database:
CREATE USER [<username>] FOR LOGIN [<login_name>] GONote: Replace the placeholder values in the command above with your own. For example, <username> with jerome.
3. Grant privileges to the database user
The following table lists the privileges that Hevo requires to connect to and load data into your Azure Synapse Analytics Destination:
| Privilege Name | Privilege Description | Applies to |
|---|---|---|
| ALTER | Allows Hevo to create, alter, and drop objects from the schema. | SCHEMA |
| INSERT | Allows Hevo to insert rows, synonyms, tables and columns, and views and columns into the schema or database (dedicated SQL pool), as applicable. | - SCHEMA - DATABASE |
| SELECT | Allows Hevo to select rows, synonyms, tables and columns, and views and columns from the schema or database, as applicable. | - SCHEMA - DATABASE |
| UPDATE | Allows Hevo to update rows, synonyms, tables and columns, and views and columns in the schema or database, as applicable. | - SCHEMA - DATABASE |
| CREATE TABLE | Allows Hevo to create tables in the database. | DATABASE |
| ADMINISTER DATABASE BULK OPERATIONS | Allows Hevo to bulk load data into the database using the COPY INTO command. |
DATABASE |
Perform the following steps to grant the privileges:
-
Access Azure Data Studio and in the SERVERS sidebar, select the connection name that you created above.
-
Click the Expand chevron to open Databases, <your SQL database name>. For example, docsqlpool.
-
Right-click on your SQL database name, and click New Query.

-
In the query editor, enter the following commands to grant privileges to the database user created above and click Run:
GRANT ALTER, SELECT, INSERT, UPDATE ON SCHEMA::<schema_name> TO <username> GO GRANT CREATE TABLE, INSERT, SELECT, UPDATE ON DATABASE::<database_name> to <username> GO GRANT ADMINISTER DATABASE BULK OPERATIONS on DATABASE::<database_name> to <username> GONote: Replace the placeholder values in the commands above with your own. For example, <schema_name> with dbo.
Configure Azure Synapse Analytics as a Destination
Perform the following steps to configure Azure Synapse Analytics as a Destination in Hevo:
-
Click DESTINATIONS in the Navigation Bar.
-
Click + Create Standard Destination in the Destinations List View.
-
On the Add Destination page, select Azure Synapse Analytics.
-
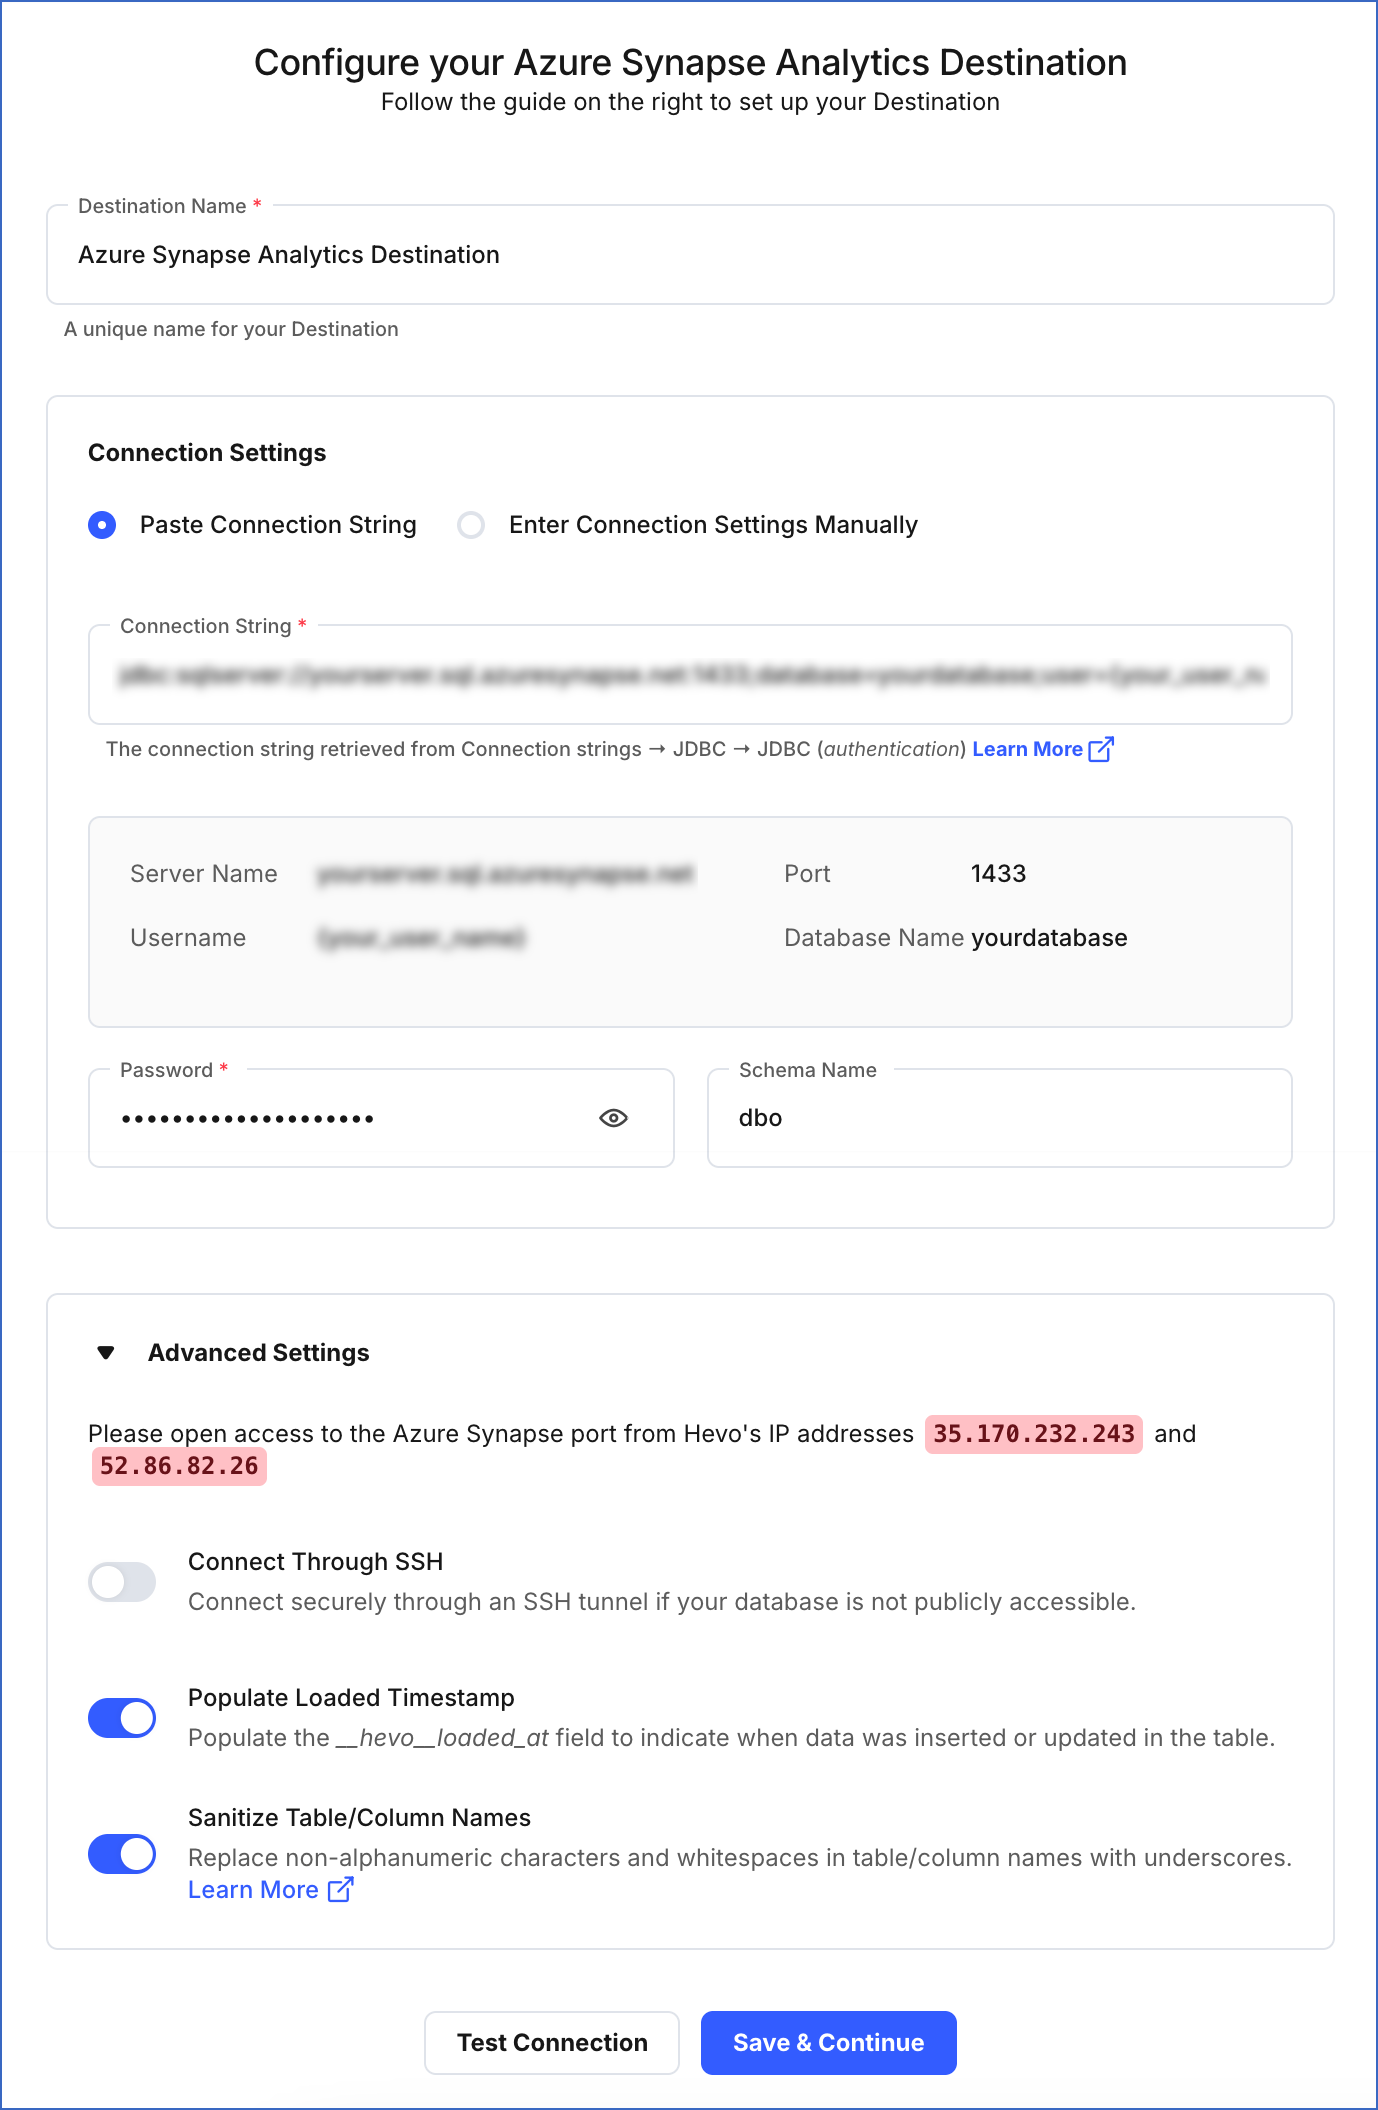
On the Configure your Azure Synapse Analytics Destination page, specify the following:
-
Destination Name: A unique name for your Destination, not exceeding 255 characters.
-
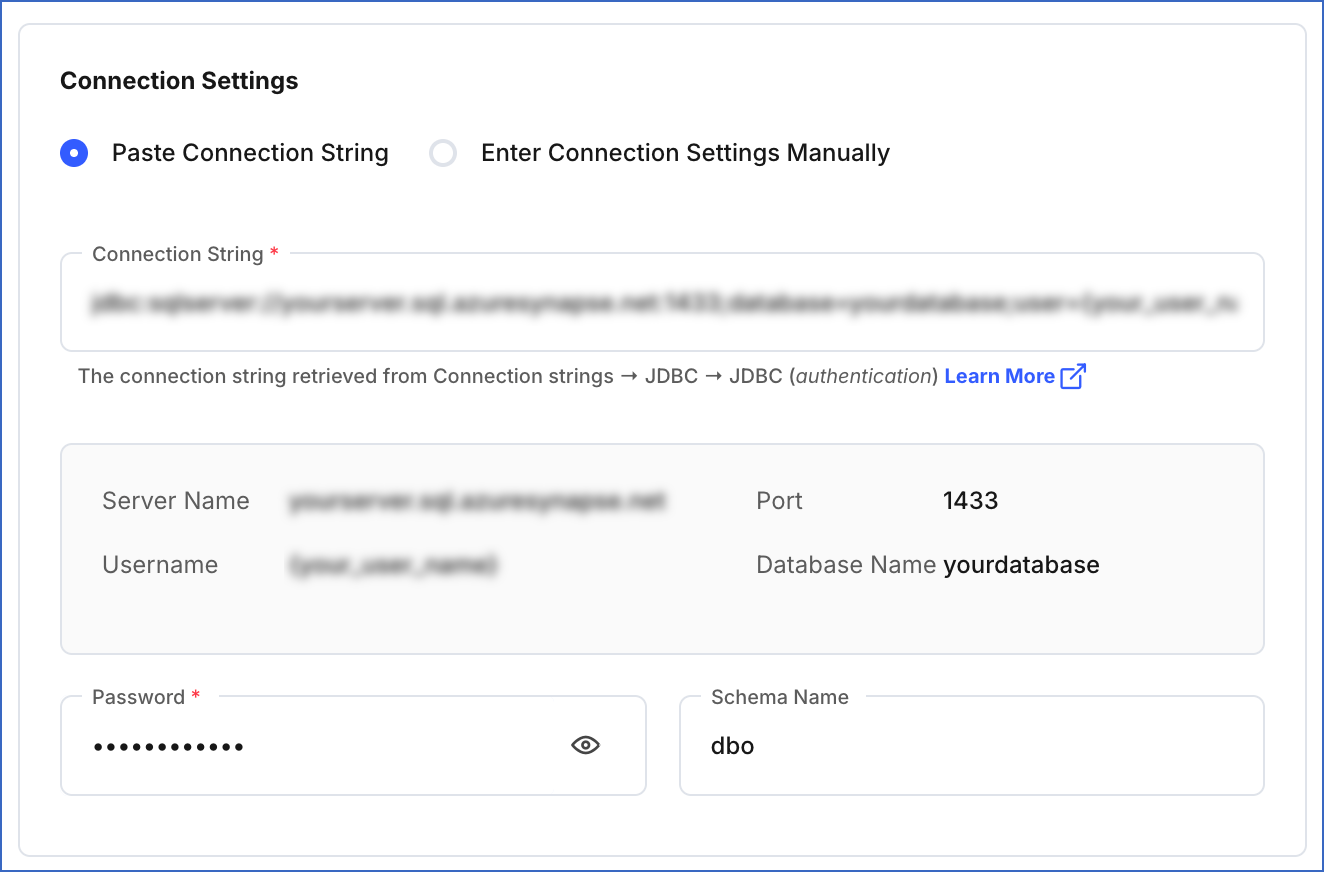
Connection Settings: The method to connect to your Azure Synapse Analytics data warehouse:
-
Paste Connection String: Specify the connection string obtained in the using a connection string method section above.
If you added a login user in Step 5 above, you must edit the obtained connection string, and replace the value of user with your login name. For example, in the following connection string, replace sqladminuser with hevouser:
jdbc:sqlserver://asea-workspace-doc….;user=sqladminuser@…;password={your_password_here};encrypt=true;trustServerCertificate=false; hostNameInCertificate=*.sql.azuresynapse.net;loginTimeout=30;
-
Connection String: The unique identifier for connecting to an Azure Synapse Analytics instance. The connection string automatically fetches details such as the server name, database port, database username, and database name.
-
Password: The password of the database username.
-
Schema Name: The name of the Destination database schema. Default value: dbo.
-
-
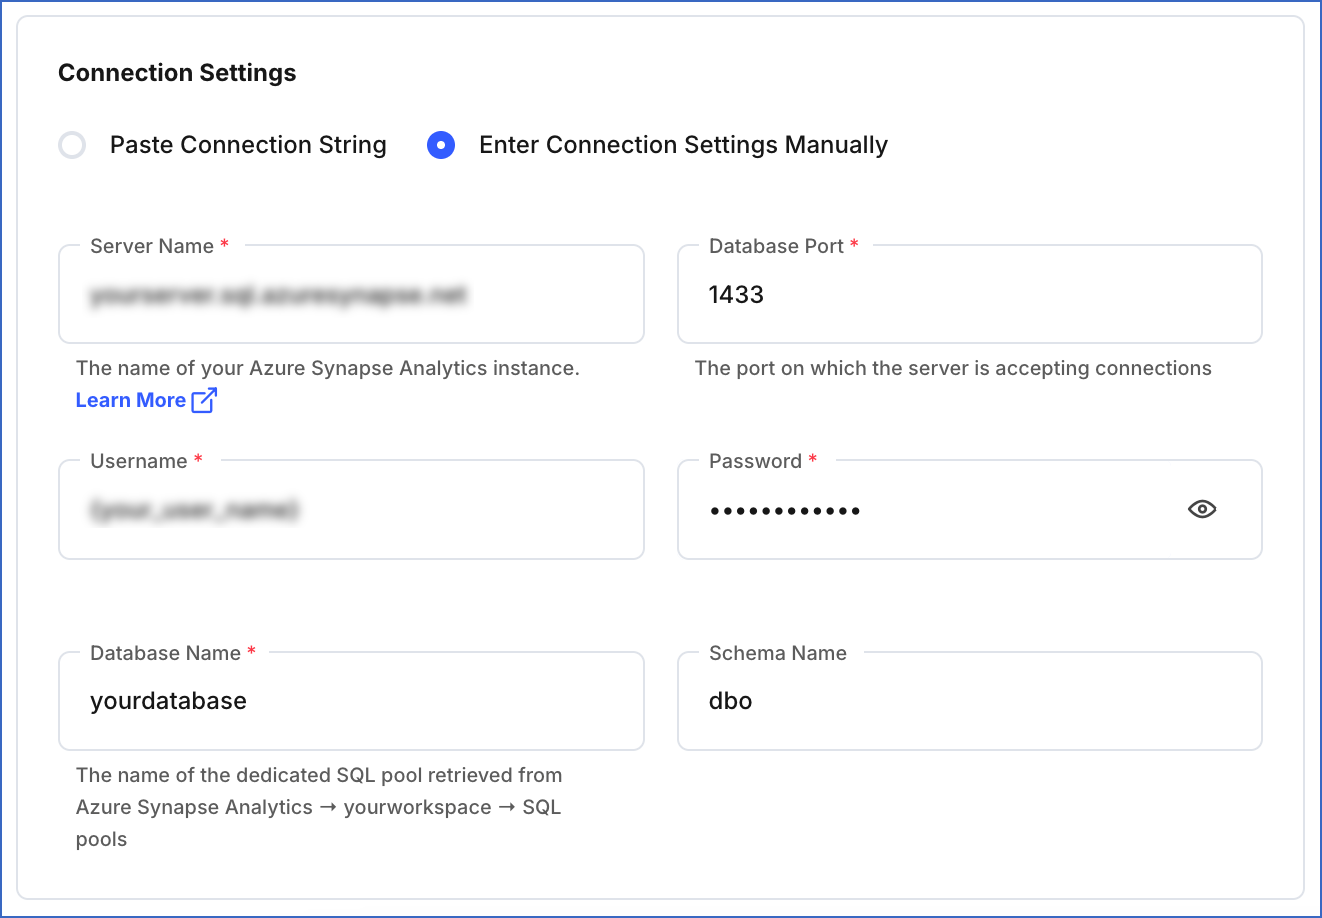
Enter Connection Settings Manually: Specify the connection settings obtained in the manual connection method section above.
-
Server Name: The dedicated SQL endpoint for connecting to your Azure Synapse Analytics data warehouse. For example, asea-test-ws.sql.azuresynapse.net
-
Database Port: The port on which your Azure Synapse Analytics server listens for connections. Default value: 1433.
-
Username: The name of the user with administrator access to your Synapse workspace. For example, sqladminuser. This can be the SQL Server admin login you specified while creating the Synapse workspace, or the login user created in Step 5.
-
Password: The password of the specified username.
-
Database Name: The name of the dedicated SQL pool where the data is to be loaded.
-
Schema Name (Optional): The name of the Destination database schema. Default value: dbo.
-
-
-
Advanced Settings:
-
Connect through SSH: If enabled, Hevo connects using an SSH tunnel, instead of directly connecting your Azure Synapse Analytics database host to Hevo. This provides an additional level of security to your database by not exposing your Synapse setup to the public. Read Connecting Through SSH.
If disabled, you must whitelist Hevo’s IP addresses for your region.
-
Populate Loaded Timestamp: If enabled, Hevo appends the
__hevo_loaded_at_column to the Destination table to indicate when the Event was loaded to the Destination. Read Loading Data to a Data Warehouse. -
Sanitize Table/Column Names: If enabled, Hevo removes all non-alphanumeric characters and spaces in a table or column name, and replaces them with an underscore (_). Read Name Sanitization.
-
-
-
Click Test Connection. This button is enabled once all the mandatory fields are specified.
-
Click Save & Continue. This button is enabled once all the mandatory fields are specified.
Handling Source Data with Different Data Types
Hevo automatically modifies the data type of an Azure Synapse Analytics Destination table column to accommodate Source data with a different data type. Read Handling Different Data Types in Source Data.
Note: Your Hevo release version is mentioned at the bottom of the Navigation Bar.
Handling JSON Fields
Read Parsing Nested JSON Fields in Events to know how Hevo parses the JSON data and makes it available at the Destination. JSON data ingested from the Source is either collapsed into JSON strings or passed as-is to the Destination. Read JSON Functions (Transact-SQL) for information on querying and extracting data from your Azure Synapse Analytics Destination tables using JSON functions.
Destination Considerations
-
In Azure Synapse Analytics, tables in dedicated SQL pools are created with clustered columnstore index by default, as this reduces data storage costs and improves query performance. However, any variable-length column in these tables cannot contain more than 8000 bytes of data. As a result, any Events containing data that exceeds this size limit are sidelined by Hevo. You can use Transformations to reduce the data size of these Events and replay them.
-
Azure Synapse Analytics does not support the ORDER BY clause in Common Table Expressions (CTEs). When creating Models for this Destination, avoid using the ORDER BY clause within a CTE in your SQL query, as Hevo runs a CREATE TABLE AS SELECT (CTAS) command to generate the Model. The ORDER BY clause may cause the Model generation to fail.
Limitations
- Hevo does not support data replication to serverless SQL pools in Azure Synapse Analytics.
Revision History
Refer to the following table for the list of key updates made to this page:
| Date | Release | Description of Change |
|---|---|---|
| Nov-12-2025 | NA | Updated the document as per the latest Hevo UI. |
| Sep-30-2024 | NA | Updated sections, Create a Dedicated SQL Pool (Optional), Whitelist Hevo’s IP addresses and Obtain the Azure Synapse Analytics Data Warehouse Connection Settings as per the latest Azure Synapse Analytics UI. |
| Jul-15-2024 | NA | Updated section, Destination Considerations to add the limitation for using ORDER BY clause in CTEs. |
| Apr-25-2023 | 2.12 | Updated section, Configure Azure Synapse Analytics as a Destination to add information that you must specify all fields to create a Pipeline. |
| Mar-10-2023 | 2.09 | New document. |