On This Page
Edge Pipeline is now available for Public Review. You can explore and evaluate its features and share your feedback.
Amazon Redshift is a fully managed, reliable data warehouse service in the cloud that offers large-scale storage and analysis of data set and performs large-scale database migrations. It is a part of the larger cloud-computing platform Amazon Web Services (AWS).
Hevo can load data from any of your Pipelines into an Amazon Redshift data warehouse. You can set up the Redshift Destination on the fly, as part of the Pipeline creation process, or independently. The ingested data is first staged in Hevo’s S3 bucket before it is batched and loaded to the Amazon Redshift Destination.
If you are new to AWS and Redshift, you can follow the steps listed below to create an AWS account and after that, create an Amazon Redshift database to which the Hevo Pipeline will load the data. Alternatively, you can create users and assign them the required permissions to set up and manage databases within Amazon Redshift. Read AWS Identity and Access Management for more details.
Prerequisites
-
Hevo’s IP address(es) for your region is added to the Amazon Redshift database IP Allowlist.
-
The database hostname and port number of the Amazon Redshift instance are available.
Set up an Amazon Redshift Instance (Optional)
Note: The following steps must be performed by an Admin user or a user with permissions to create an instance on AWS. Permissions and roles are managed through the IAM page in AWS.
1. Log in to your AWS instance
Do one of the following:
-
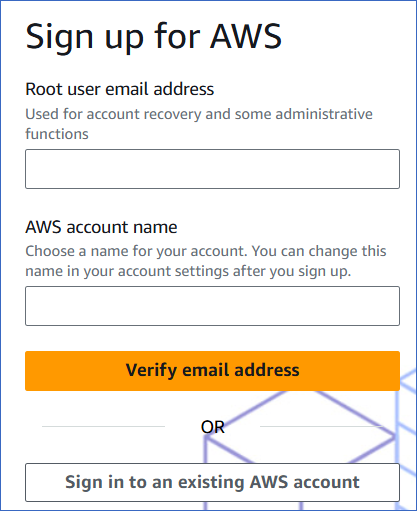
Create an AWS account
Note: You can also use the AWS Free Tier that offers you a two month free trial of Amazon Redshift.
-
Go to aws.amazon.com and click Create an AWS account.

-
On the Sign up for AWS page, specify the following:
-
Root user email address: A valid email address that can be used to manage the AWS account. The root user serves as the account admin.
-
AWS account name: A unique name for your AWS account. You can change this later.
-
-
Click Verify email address and check for a verification email in your inbox.
-
-
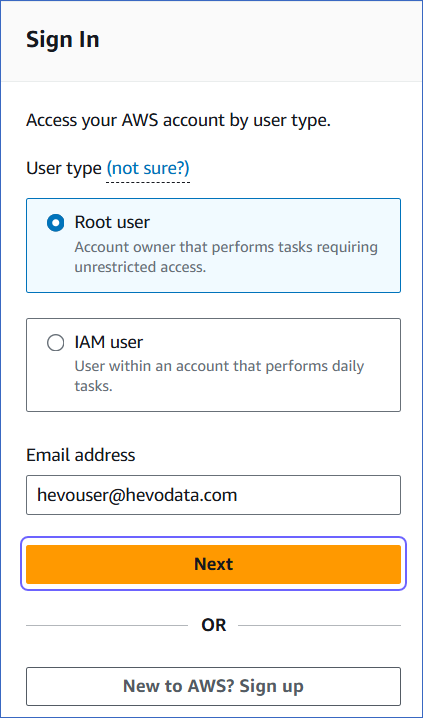
Sign-in to an existing AWS instance
-
Go to aws.amazon.com and click Sign In to the Console.

-
Select the Root user option to log in as the account admin (root user) or the IAM user to log in as a user with IAM role-based permissions. The account admin may create roles based on AWS’ IAM policies to define permissions on a database, and assign these to users.
-
Specify your email address, and then click Next.
-
Provide the root user password.
-
Click Sign in.
-
2. Connect to Amazon Redshift
-
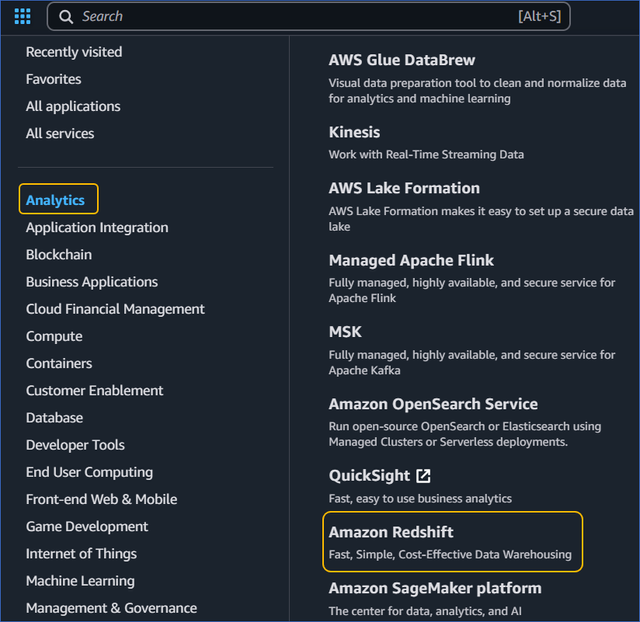
On the AWS Console Home page, click Services icon at the top left.

-
Select Analytics in the left navigation pane, and then select Amazon Redshift in the right navigation pane.
-
On the Complete sign-up page, click Complete your AWS Registration.
-
Complete the required steps to create your AWS account.
Create a Database (Optional)
The core component of the Amazon Redshift data warehouse is a Cluster. Your databases are created within a cluster.
1. Create a Cluster
-
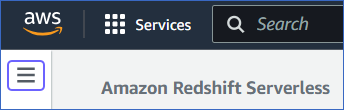
Log in to the Amazon Redshift dashboard.
-
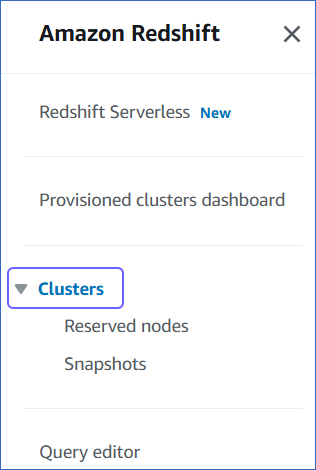
Click the hamburger menu at the top left corner of the dashboard.
-
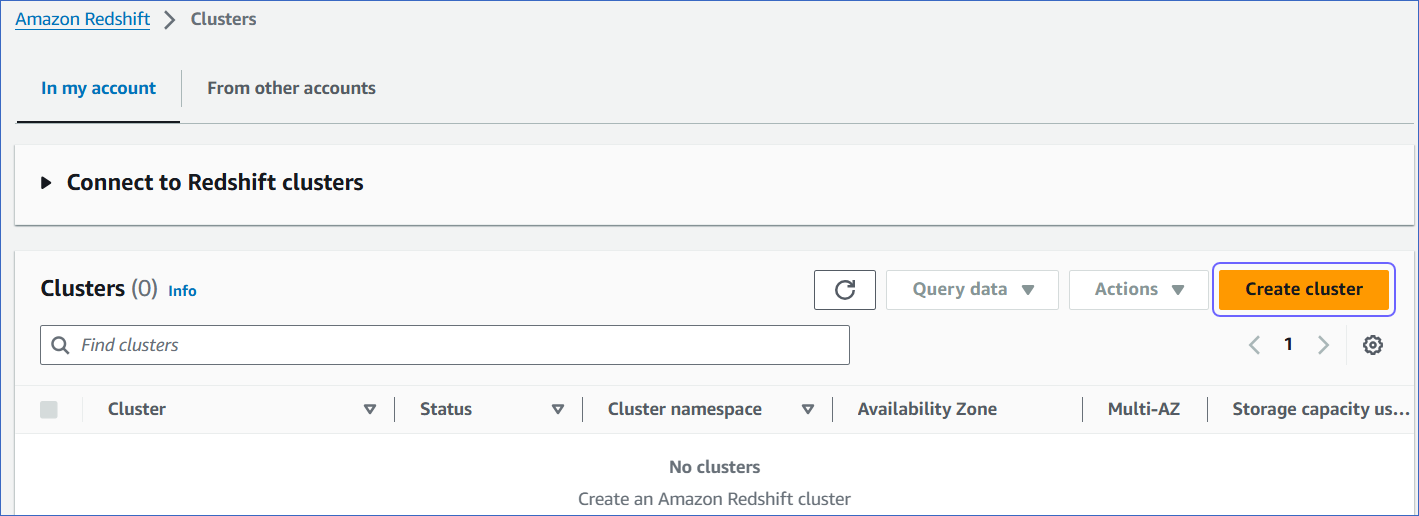
In the left navigation pane, click Clusters.
-
In the In my account tab, Clusters section, click Create cluster.
-
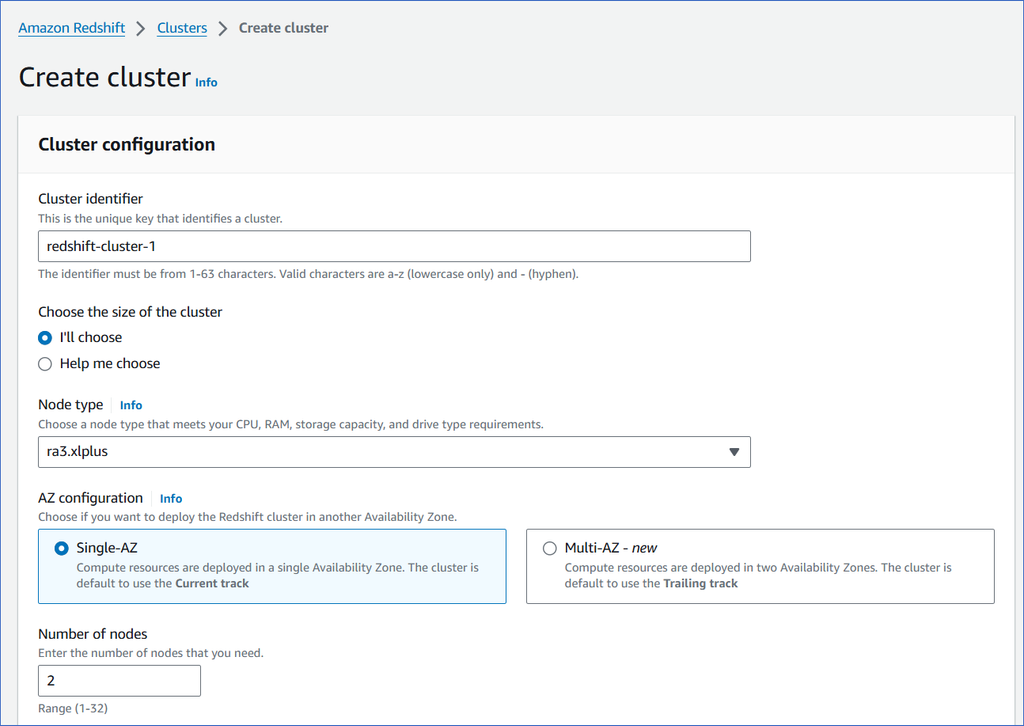
On the Create cluster page, Cluster configuration section, specify the following:
-
Cluster identifier: A unique name for your cluster.
-
Node type: The primary data processing purpose for which the node is to be used.
-
Select RA3 if storage is the priority.
-
Select Dense Compute 2 or DC2 if you want to use more of compute capabilities.
-
Select RA3 for the best of storage and compute capabilities.
Each node type has a different cost depending on the storage and compute resources, as described in the Configuration summary.
-
-
AZ configuration: The deployment setting for your cluster across different availability zones (AZ).
- Select Single-AZ if you want to deploy your cluster in a single availability zone.
- Select Multi-AZ if you want to deploy your cluster in two availability zones.
-
Number of nodes: The number of nodes, based on the amount of data or computational processing you require. Select 1 to start with. You can increase this value later.
Note: For the RA3 node type, you must select at least two nodes.
-
-
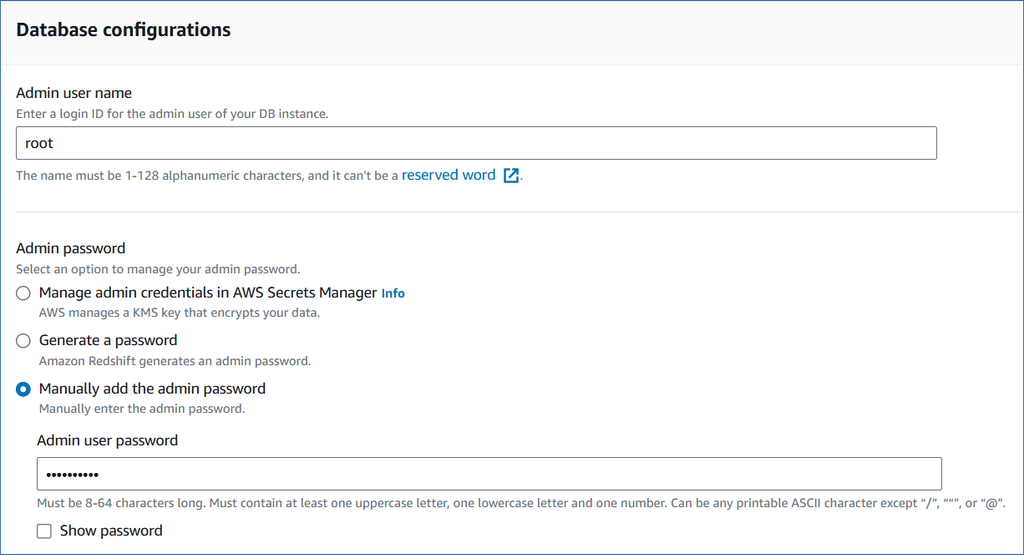
In the Database configurations section, select Manually add the admin password and specify the following:
-
Admin user name: A unique name for the admin of the database you plan to create.
-
Admin user password: The password for the admin user.
-
-
In the Additional configurations section, you can use the default settings provided by AWS or disable the Use defaults option and specify any additional settings you need.
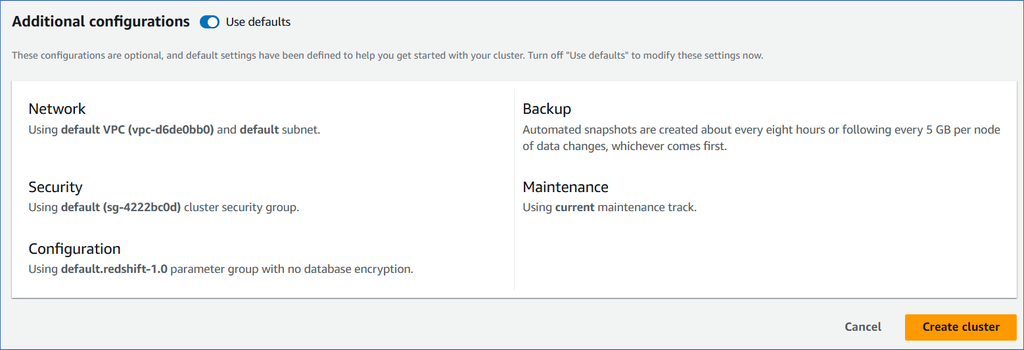
-
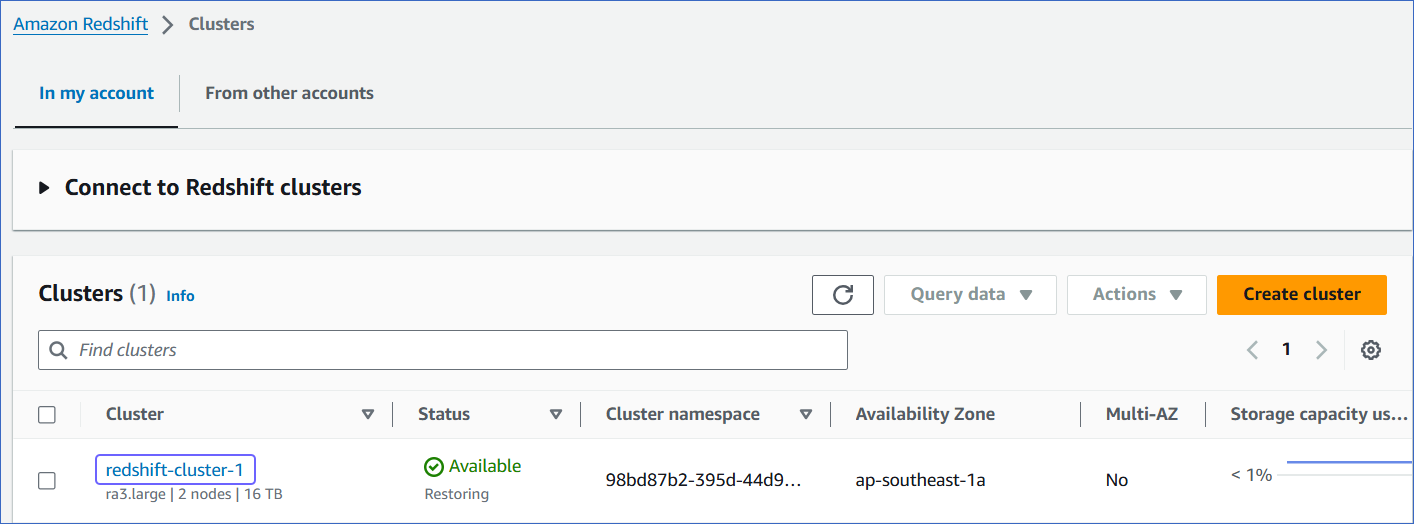
Click Create cluster. You can view the new cluster in the Clusters section. Once the cluster configurations are complete, the status changes to Available.

-
(Optional) Click on the cluster to view its details.
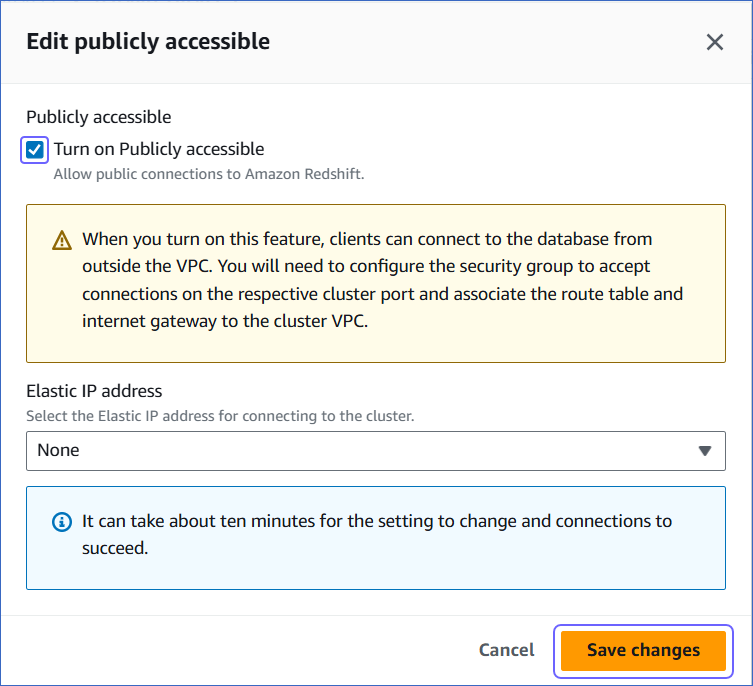
2. Make your Redshift cluster publicly accessible
This is required to be able to connect to your Redshift cluster and create a database.
-
Log in to the Amazon Redshift dashboard.
-
Click the hamburger menu at the top left corner of the dashboard.
-
In the left navigation pane, click Clusters.
-
In the In my account tab, Clusters section, click the cluster you want to connect to Hevo.
-
On the <Cluster Name> page, click the Actions drop-down, and select Modify publicly accessible setting.

-
On the Edit publicly accessible pop-up window, select the Turn on Publicly accessible check box and click Save changes.
3. Connect to the Redshift Warehouse from an external tool
You can use any tool that connects to Amazon Redshift, such as DBeaver or Postico, to create your Redshift database, schemas, and tables. These tools allow you to query your database and manage your data efficiently. Alternatively, use the Amazon Redshift Query Editor V2.
Note: The steps in this section have been performed using DBeaver.
-
On <Cluster Name> page, do the following:
-
Click the copy (
 ) icon corresponding to the Endpoint to copy it.
Remove the :<portnumber>/<databasename> parts from the endpoint to obtain the database host.
For example, if exampleendpoint.abc123xyz789.us-west-2.redshift.amazonaws.com:5439/dev is the endpoint, use exampleendpoint.abc123xyz789.us-west-2.redshift.amazonaws.com as the database host.
-
Navigate to the Properties tab and copy the Port.
-
-
Access DBeaver.
-
Click the New Database Connection (
 ) icon at the top left, and then search and select Redshift.
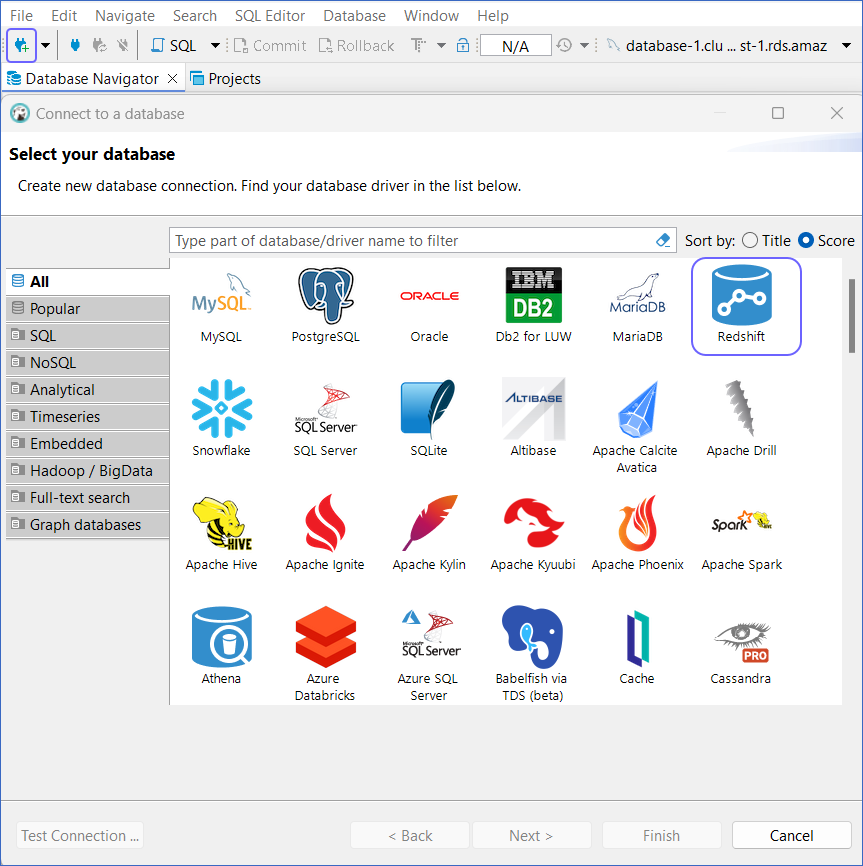
-
Click Next.
-
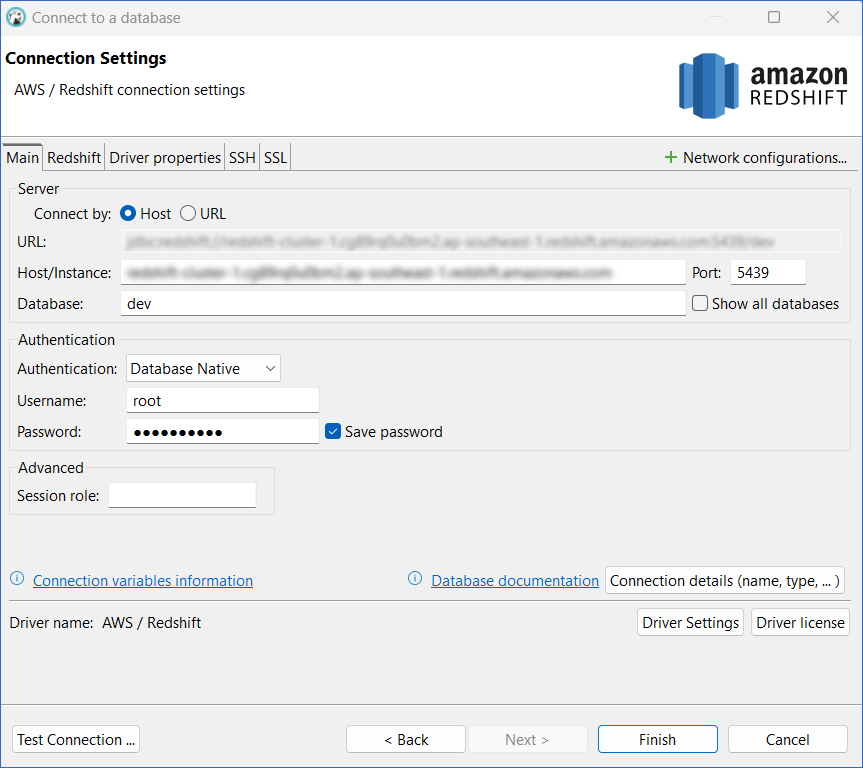
In the Connection Settings window, specify the following:
-
Host/Instance: The endpoint obtained in Step 1 above.
-
Port: The port number obtained in Step 1 above.
-
Database: The Redshift database to which you want to connect. The default database created by AWS for Redshift is dev.
-
Username: The admin user you created for the Redshift database.
-
Password: The password for the admin user.
-
-
Click Finish.
4. Create the Redshift database
-
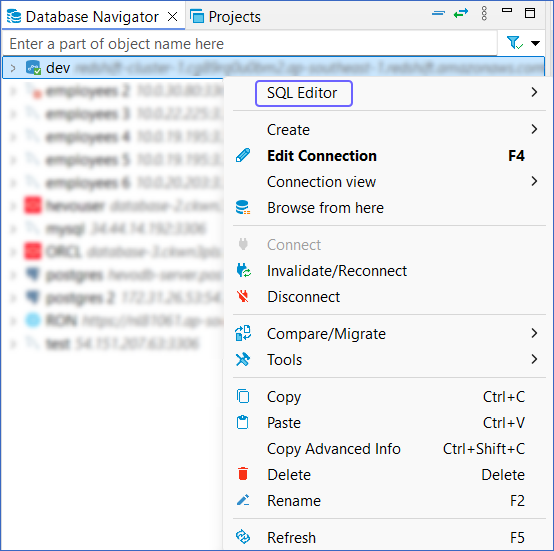
In the left pane under Database Navigator, right-click your Redshift cluster, and click SQL Editor.
-
Enter the following SQL query to create the database:
CREATE DATABASE <database_name>

// Example

CREATE DATABASE test_analytics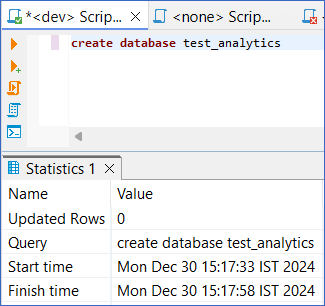
-
Press CMD + Enter (Mac) or CTRL + Enter (Windows) to execute the SQL query.
-
In the left pane, under Database Navigator, right-click your Redshift cluster, and click Edit Connection.
-
Update the Database name to the newly created database, and then click OK.
-
In the Connection changed pop-up dialog, click Yes to access the new database.
-
Run the following SQL query to create tables in the database:
CREATE TABLE <table_name> ( column1_name data_type constraints, column2_name data_type constraints, ... ); // Example CREATE TABLE employees ( employee_id INT PRIMARY KEY, name VARCHAR(100) NOT NULL, department VARCHAR(50), salary DECIMAL(10, 2) ); -
Run the following SQL query to insert a new row:
INSERT INTO <table_name> (column1_name, column2_name, ...) VALUES (value1, value2, ...); -
Run the following SQL query to add a new column to an existing table:
INSERT INTO <table_name> (column1_name, column2_name, ...) VALUES (value1, value2, ...); -
The rows and columns subsequently define the schema of the table. Similarly, create all the tables that you require.
5. View the database in your Amazon Redshift cluster
-
Log in to the Amazon Redshift dashboard.
-
Click the hamburger menu at the top left corner of the dashboard.
-
In the left navigation pane, click Clusters.
-
In the In my account tab, Clusters section, click the cluster you want to connect to Hevo.
-
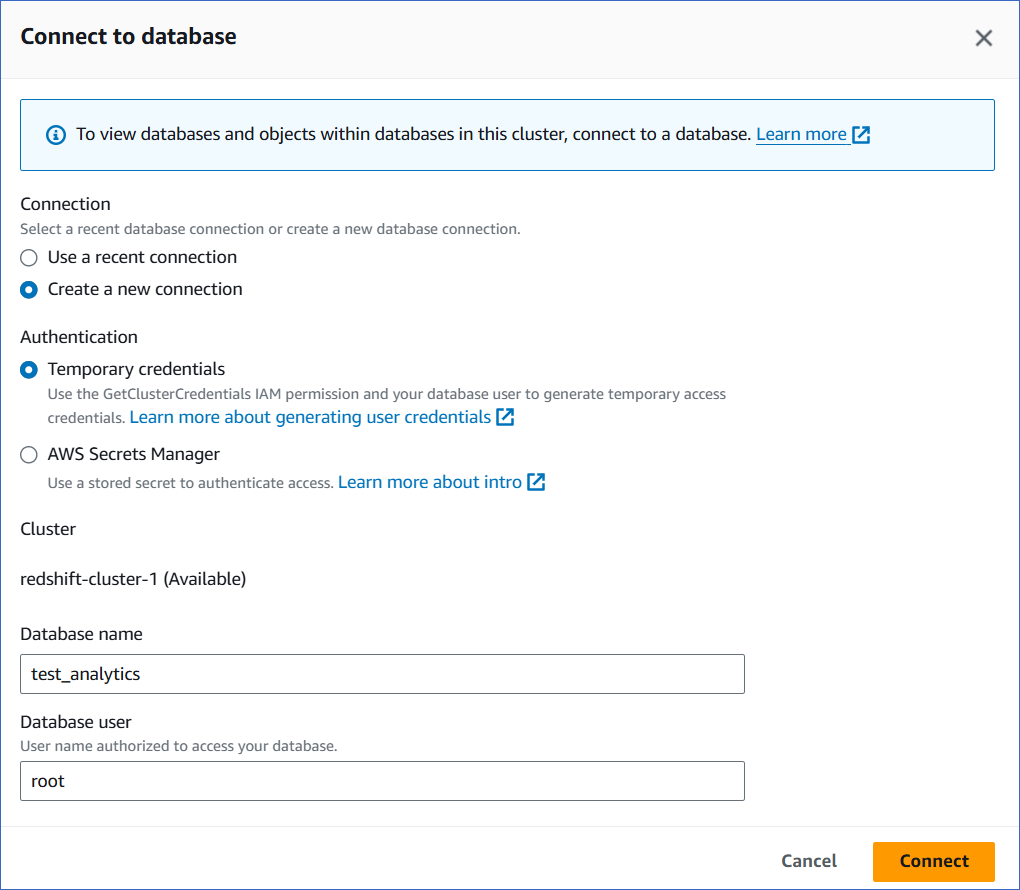
On the <Cluster Name> page, click the Databases tab, and then click Connect to database.

-
On the Connect to database page, specify the following:
-
Connection: Select Create a new connection.
-
Authentication: Select Temporary credentials if you want to generate your access credentials based on your assigned IAM role. Temporary credentials need to be generated each time you connect to the database. To use a previously saved key (password), select AWS Secrets Manager.
-
Database name: The database you are connecting to. For example, test_analytics.
-
Database user: The user you want to connect as. For example, root.
-
-
Click Connect.
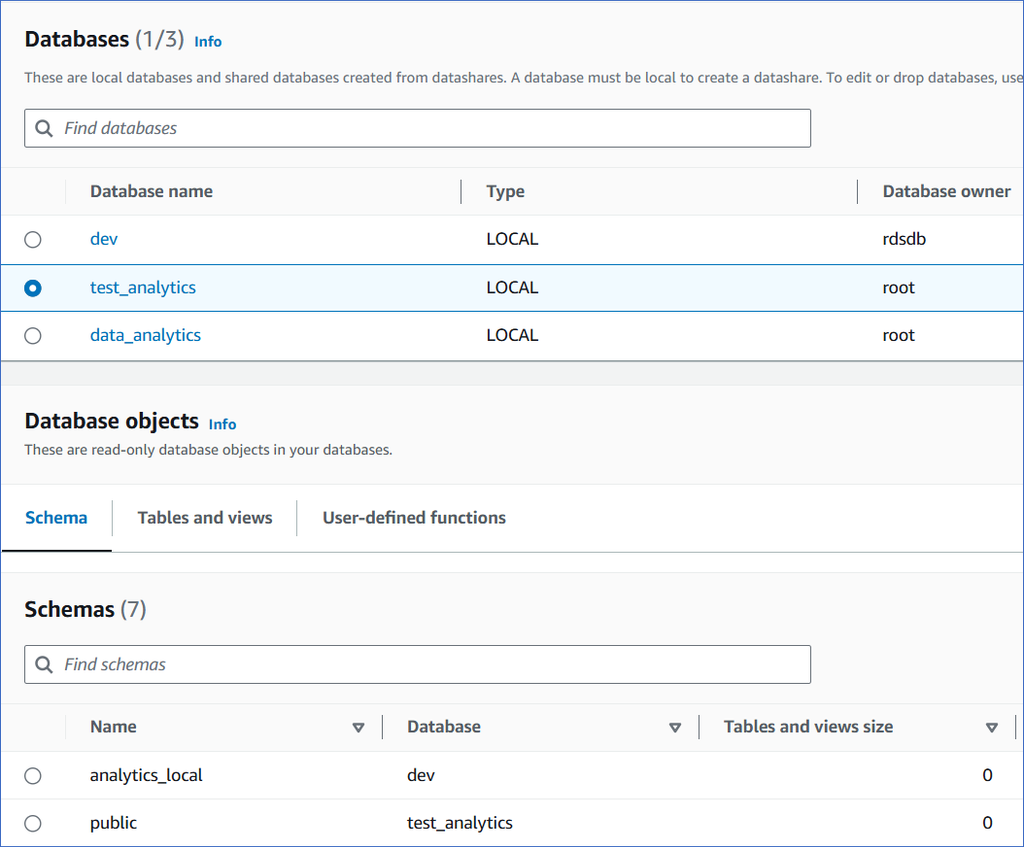
You can access the different tabs of the Database Objects section to view the objects, tables and views within the database:
Allowlist Hevo IP addresses for your region
You need to allowlist the Hevo IP address(es) for your region to enable Hevo to connect to your Amazon Redshift database.
To do this:
-
Log in to the Amazon Redshift dashboard.
-
Click the hamburger menu at the top left corner of the dashboard.
-
In the left navigation pane, click Clusters.
-
In the In my account tab, Clusters section, click the cluster you want to connect to Hevo.
-
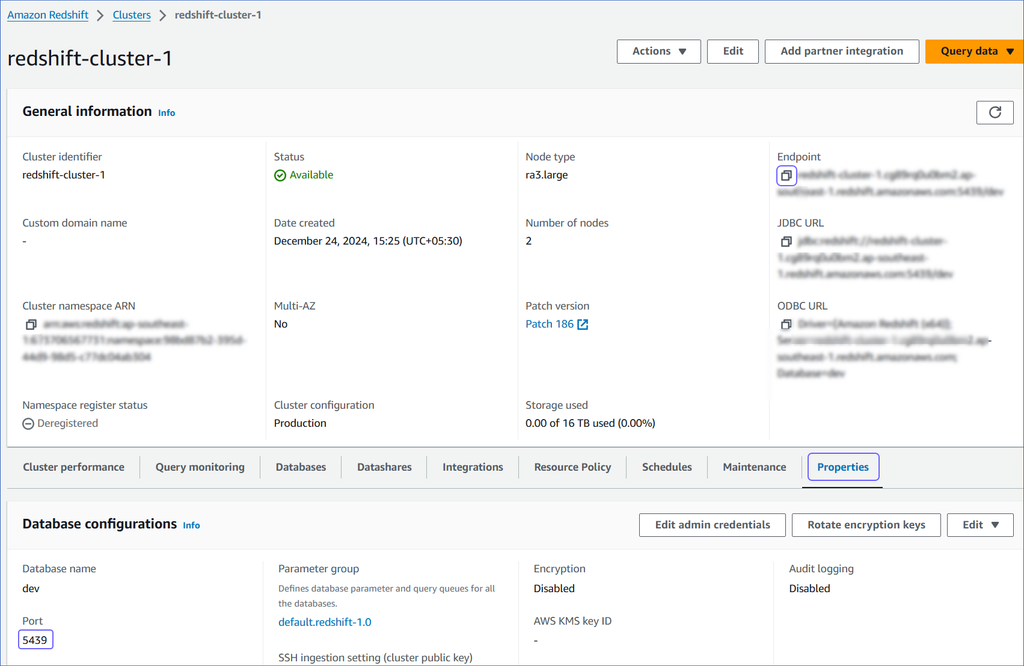
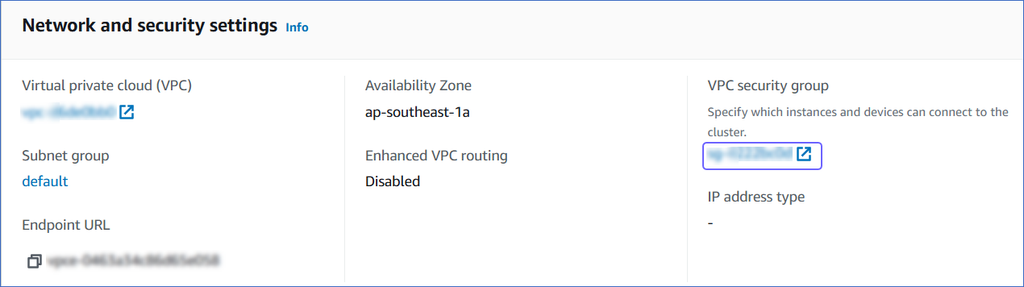
On the <Cluster Name> page, click the Properties tab.
-
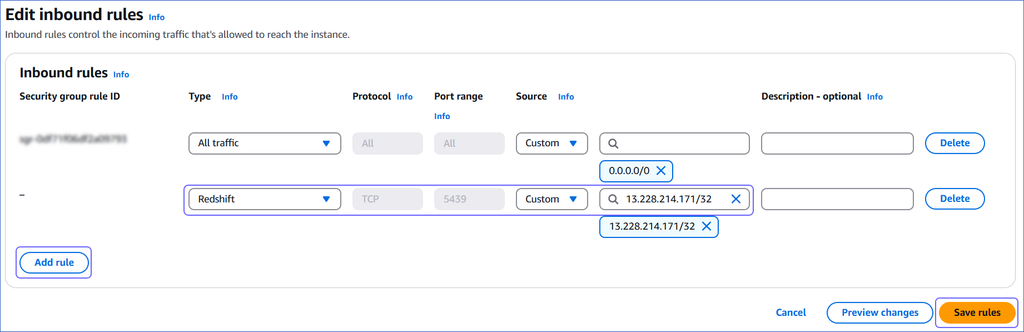
Scroll down to the Network and security settings section and click the link text under VPC security group.
-
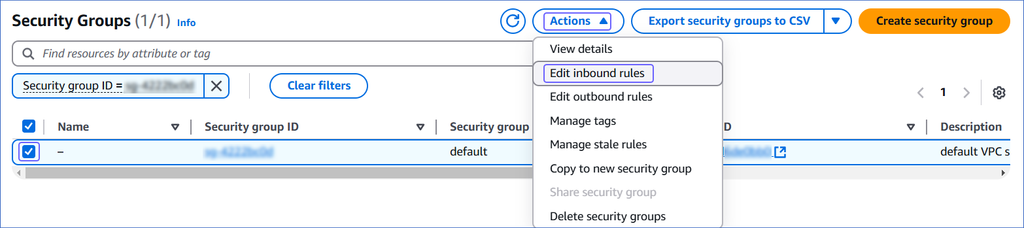
On the Security Groups page, select the check box for your Security group ID, and from the Actions drop-down, click Edit inbound rules.
-
On the Edit inbound rules page:
-
Click Add Rule.
-
In the Type column, select Redshift from the drop-down.
-
In the Source column, select Custom from the drop-down and enter Hevo’s IP addresses for your region. Repeat steps 1-3 to allowlist all the IP addresses.
-
Click Save rules.
-
Create a Database User and Grant Privileges
1. Create a database user (Optional)
-
Connect to your Amazon Redshift database as a
superuseror a user withCREATEprivilege, using any SQL client tool, such as DBeaver or Postico. -
Enter the following command:
CREATE USER <database_username> WITH PASSWORD '<password>';Note: Replace the placeholder values in the command above with your own. For example, <database_username> with hevouser.
2. Grant privileges to the database user
-
Log in to your Amazon Redshift database as a
superuser. -
Run the following command to grant your database user the permission to create schemas in an existing database:
GRANT CREATE ON DATABASE <database_name> TO <database_username>;Note: Replace the placeholder values in the command above with your own. For example, <database_username> with hevouser.
Retrieve the Database Hostname and Port Number (Optional)
-
Log in to the Amazon Redshift dashboard.
-
Click the hamburger menu at the top left corner of the dashboard.
-
In the left navigation pane, click Clusters.
-
In the In my account tab, Clusters section, click the cluster you want to connect to Hevo.
-
On <Cluster Name> page, do the following:
-
Click the copy (
) icon corresponding to the Endpoint to copy it.Remove the :<portnumber>/<databasename> part from the endpoint to obtain the database cluster identifier, and use it while configuring your Destination in Hevo.
For example, if examplecluster.abc123xyz789.us-west-2.redshift.amazonaws.com:5439/dev is the endpoint, use examplecluster.abc123xyz789.us-west-2.redshift.amazonaws.com as the identifier.
-
Navigate to the Properties tab and copy the Port.
-
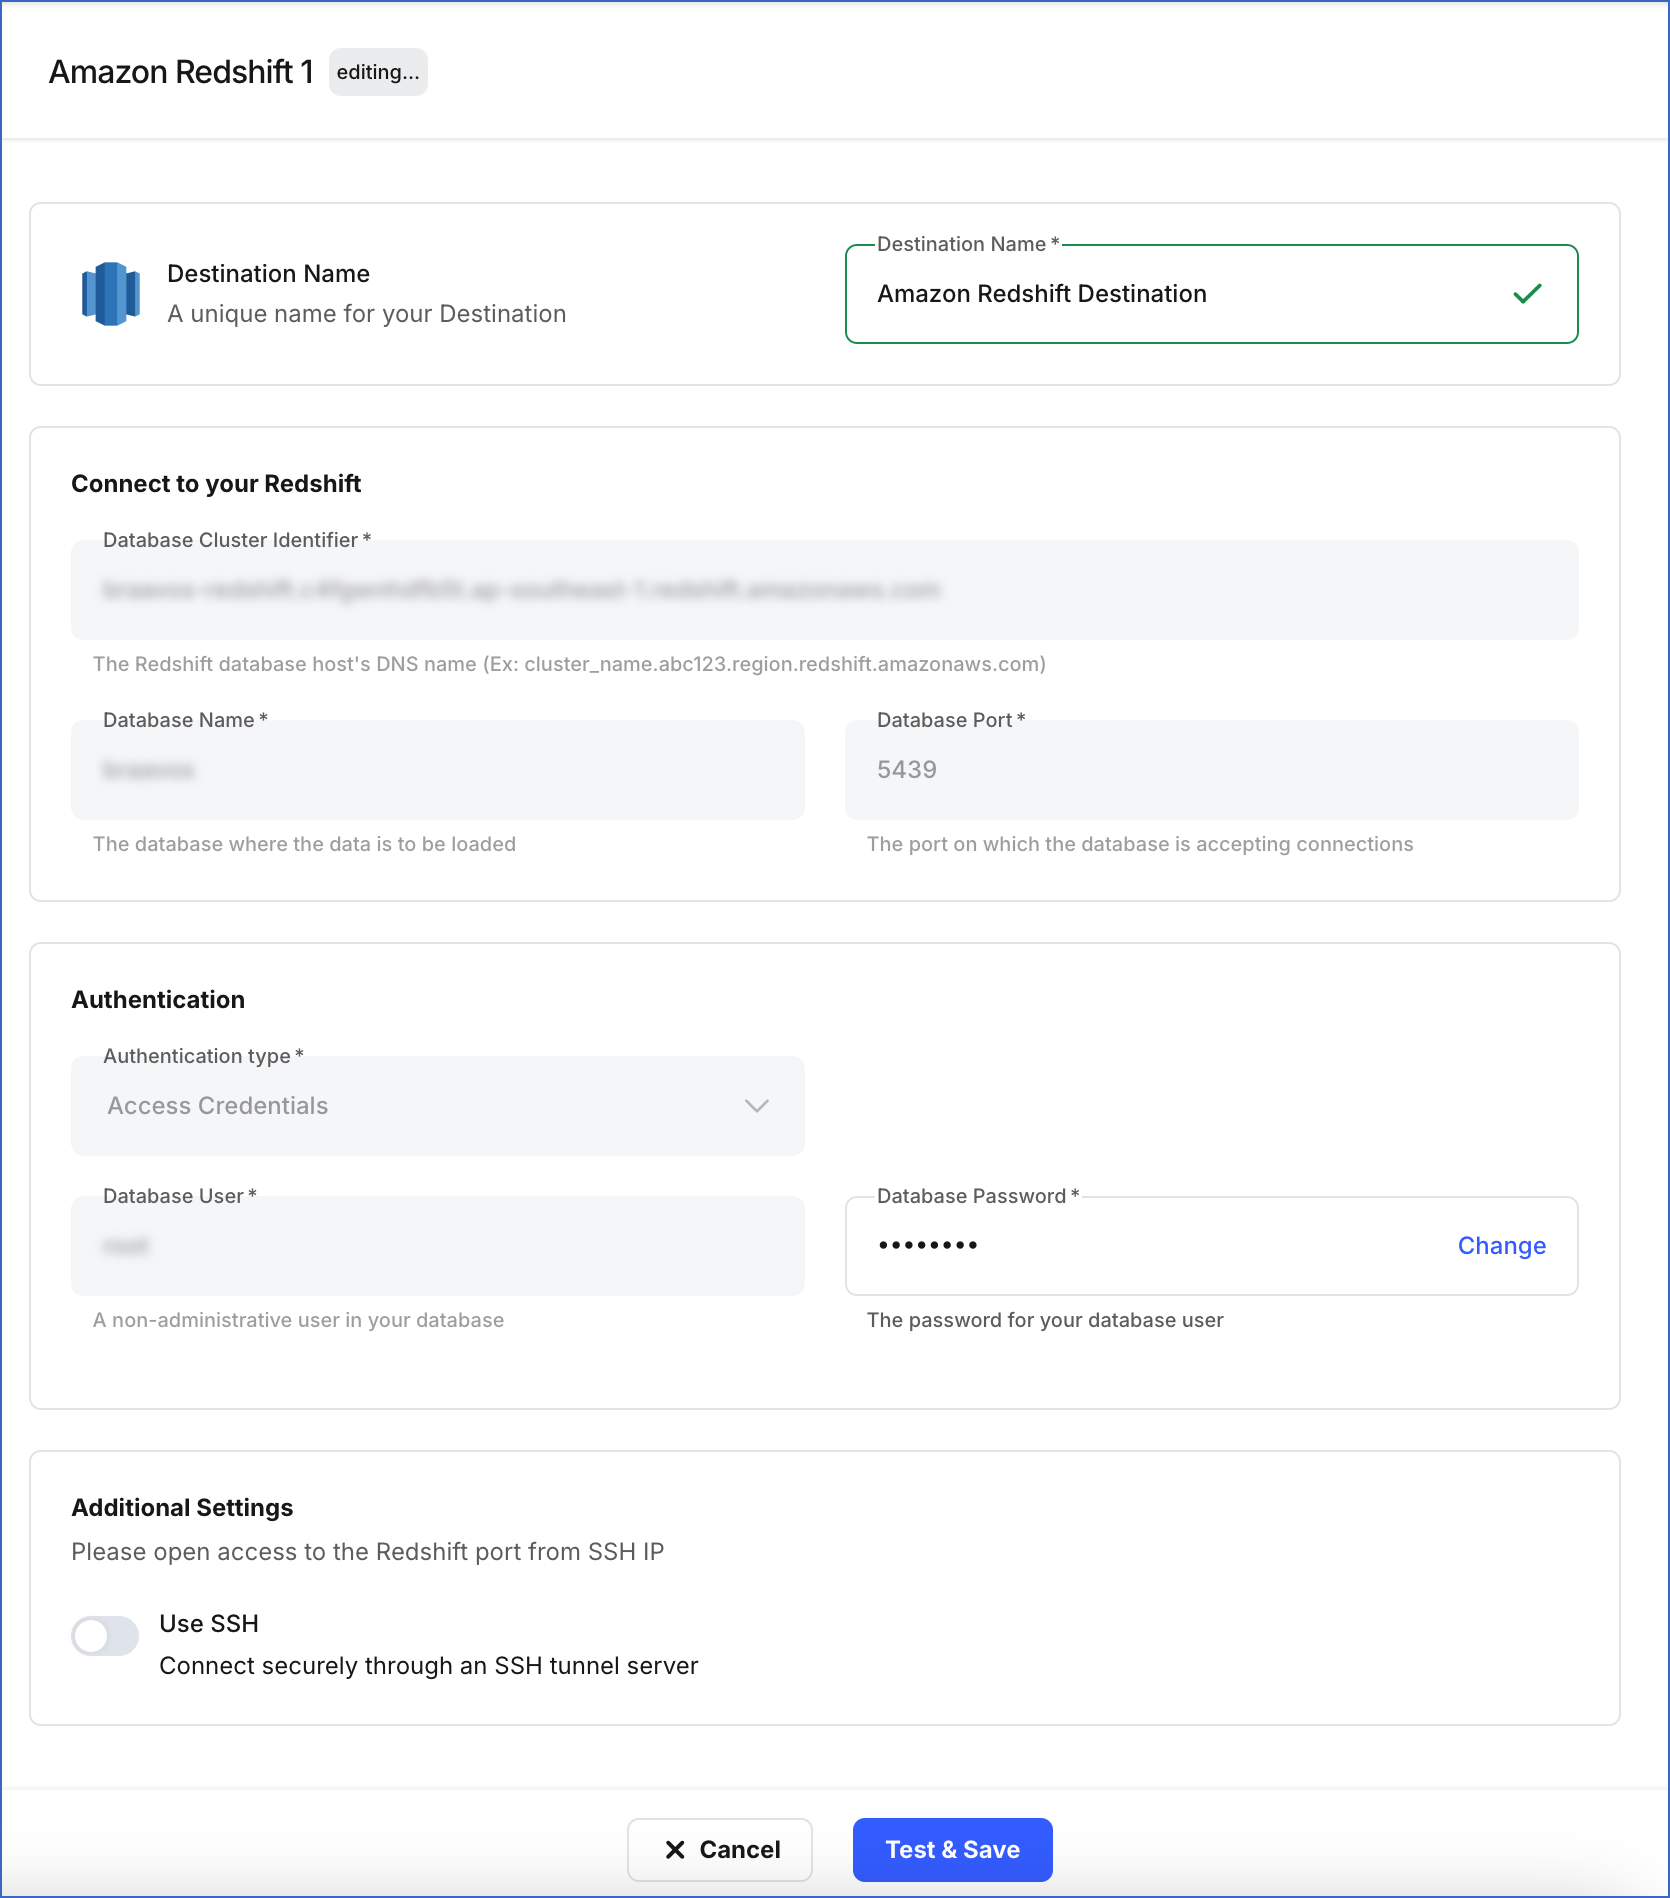
Configure Amazon Redshift as a Destination in Edge
Perform the following steps to configure Amazon Redshift as a Destination in Edge:
-
Click Destinations in the Navigation Bar.
-
Click the Edge tab in the Destinations List View and click + Create Edge Destination.
-
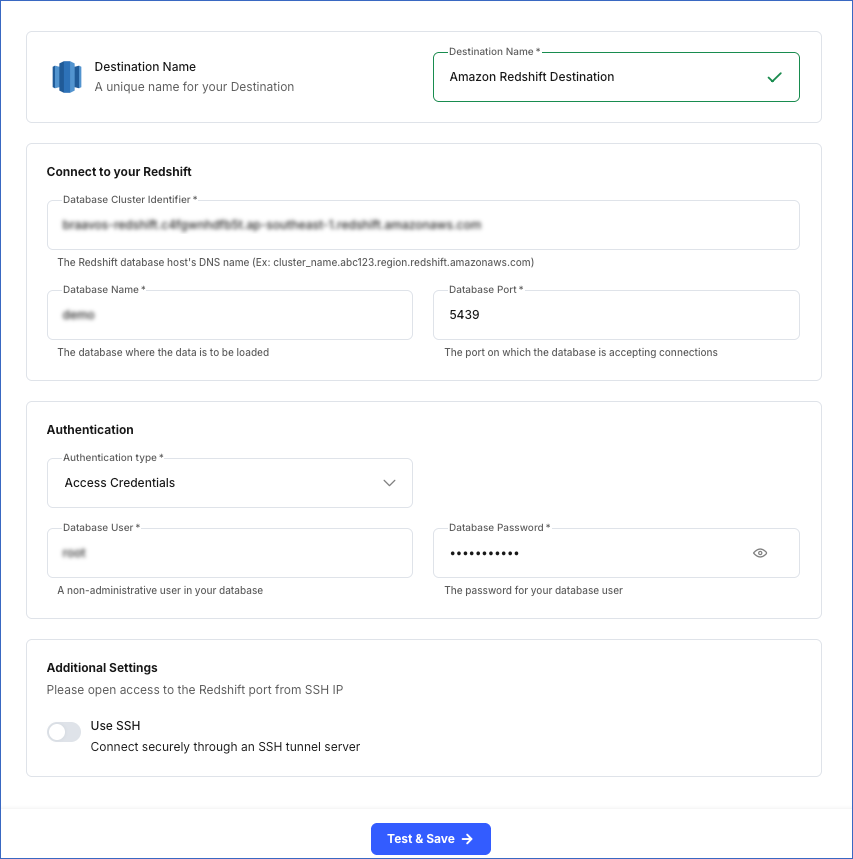
On the Create Destination page, click Amazon Redshift.
-
In the screen that appears, specify the following:
-
Destination Name: A unique name for your Destination, not exceeding 255 characters. For example, Amazon Redshift Destination.
-
In the Connect to your Redshift section:
-
Database Cluster Identifier: Amazon Redshift host’s IP address or DNS name. This is the endpoint that you retrieved in Step 5 above.
-
Database Name: The name of an existing database where the data is to be loaded. This database can be the one you created above or an existing one.
-
Database Port: The port on which your Amazon Redshift server listens for connections. Default value: 5439.
-
-
In the Authentication section:
-
Database User: A user with a non-administrative role created in the Redshift database. This can be the database user that you created above or an existing one.
-
Database Password: The password for the database user specified above.
-
-
In the Additional Settings section:
-
Use SSH: Enable this option to connect to Hevo using an SSH tunnel instead of directly connecting your Amazon Redshift database host to Hevo. This provides an additional level of security to your database by not exposing your Redshift setup to the public.
If this option is turned off, you must configure your Destination to accept connections from Hevo’s IP addresses.
-
-
-
Click Test & Save to test the connection to your Amazon Redshift database.
Once the test is successful, Hevo creates your Amazon Redshift Edge Destination. You can use this Destination while creating your Edge Pipeline.
Additional Information
Read the detailed Hevo documentation for the following related topics:
Modifying Amazon Redshift Destination Configuration
You can modify some settings of your Amazon Redshift Destination after its creation. However, any configuration changes will affect all the Pipelines using that Destination
To modify the configuration of your Amazon Redshift Destination in Edge:
-
In the detailed view of your Destination, do one of the following:
-
Click the More (
 ) icon to access the Destination Actions menu, and then click Edit Destination.
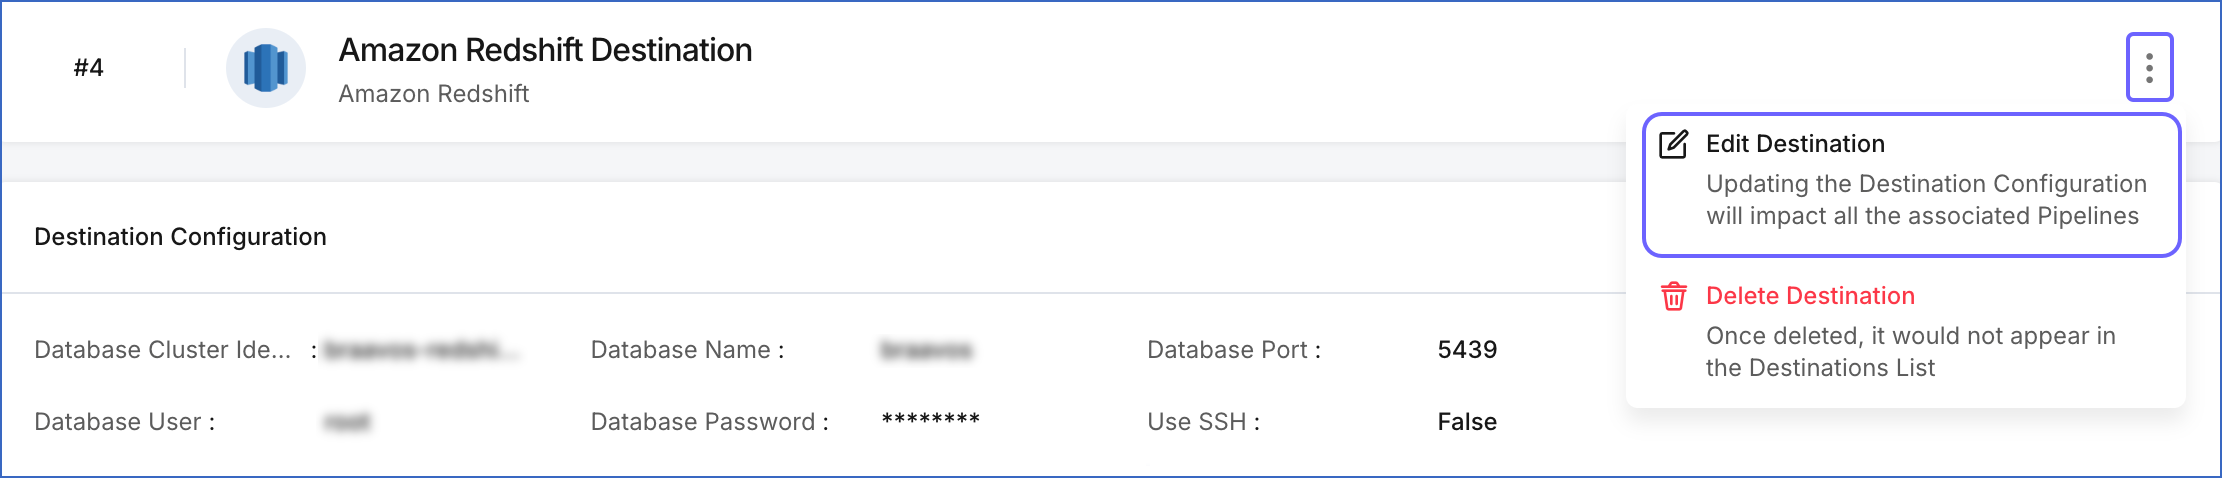
-
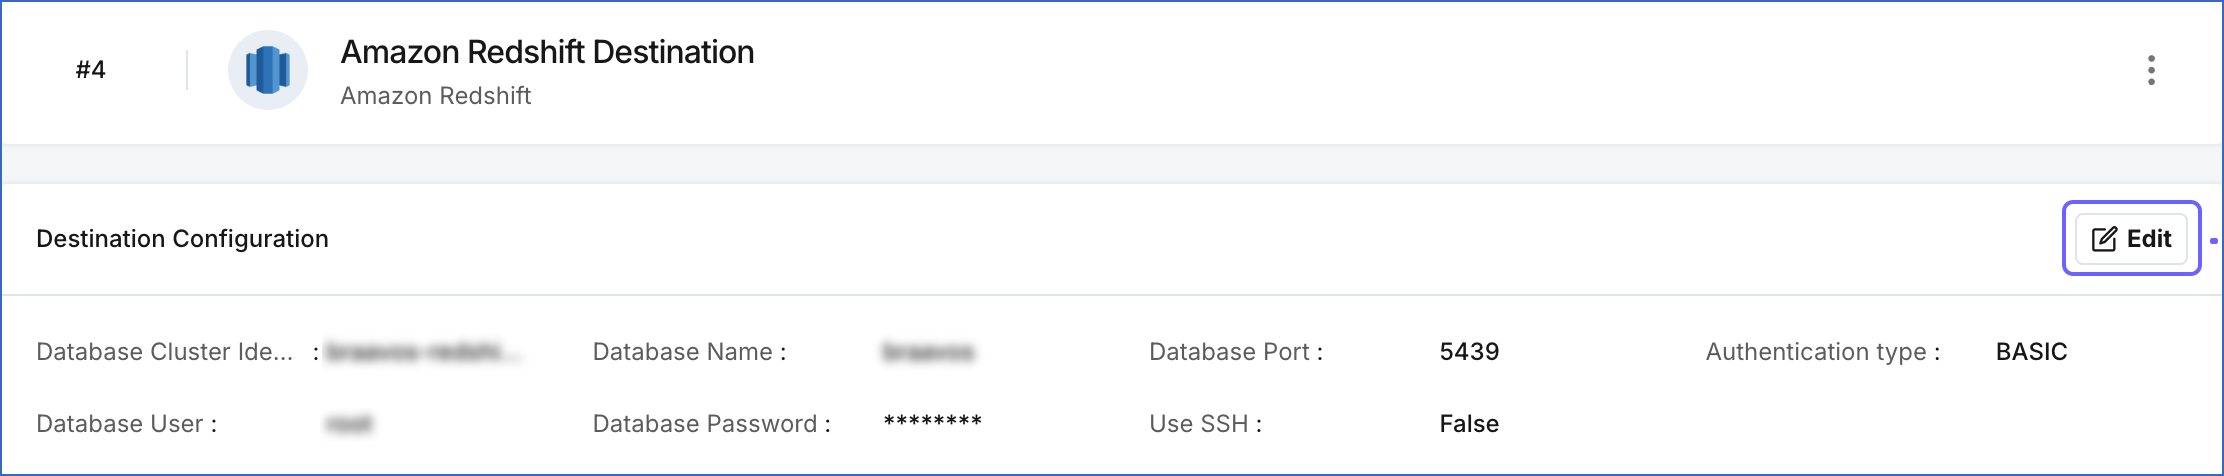
In the Destination Configuration section, click Edit.
-
-
On the <Your Destination Name> editing page:
-
You can specify a new name for your Destination, not exceeding 255 characters.
-
In the Authentication section, you can click Change to update the password for your database user.
-
In the Additional Settings section, based on the current selection, you can enable or disable the Use SSH option for your Destination.
-
-
Click Test & Save to check the connection to your Amazon Redshift Destination and then save the modified configuration.
Sort Keys and Distribution Keys
Sort keys and distribution keys control how Redshift stores, organizes, and distributes data across compute nodes, which directly affects query performance and loading efficiency.
Sort keys define the order in which rows are stored in within a Redshift table. They help Redshift read only the necessary blocks of data, significantly improving query performance. During every Pipeline load, Redshift stores the incoming data according to the sort key defined for that table. If the table has multiple sort keys, Redshift sorts the data in the exact sequence in which the keys are defined.
Distribution keys decide how rows are distributed across the nodes in a Redshift cluster. Distribution keys help reduce the amount of data that needs to be transferred between nodes during query execution. This enables better parallel processing and improves both data-loading efficiency and query performance.
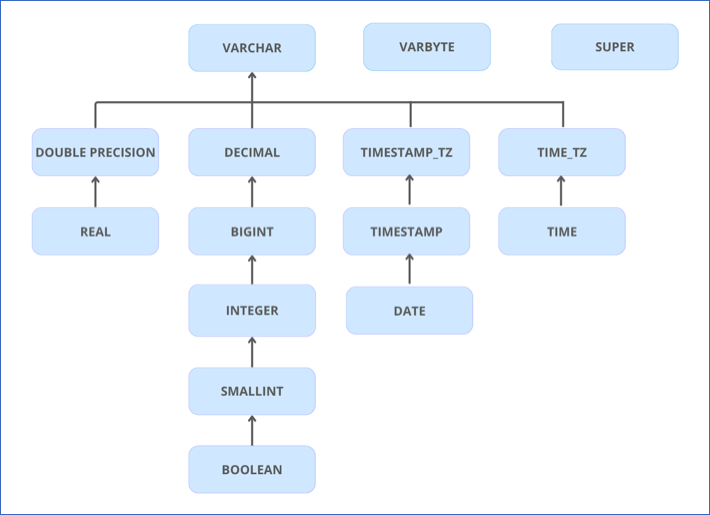
Data Type Evolution in Redshift Destinations
Hevo has a standardized data system that defines unified internal data types, referred to as Hevo data types. During the data ingestion phase, the Source data types are mapped to the Hevo data types, which are then transformed into the Destination-specific data types during the data loading phase. A mapping is then generated to evolve the schema of the Destination tables.
The following image illustrates the data type hierarchy applied to Amazon Redshift Destination tables:
Data Type Mapping
The following table shows the mapping between Hevo data types and Redshift data types:
| Hevo Data Type | Redshift Data Type |
|---|---|
| - ARRAY - JSON - VARCHAR - XML |
VARCHAR |
| BOOLEAN | BOOLEAN |
| BYTEARRAY | VARBYTE |
| - BYTE - SHORT |
SMALLINT |
| DATE | DATE |
| - DATETIME - TIMESTAMP |
TIMESTAMP |
| DATETIME_TZ | TIMESTAMPTZ |
| DECIMAL | - DECIMAL - VARCHAR |
| INTEGER | INTEGER |
| LONG | BIGINT |
| FLOAT | REAL |
| DOUBLE | DOUBLE PRECISION |
| TIME | TIME |
| TIME_TZ | VARCHAR |
Handling the Decimal data type
For Amazon Redshift Destinations, Hevo maps DECIMAL data values with a fixed precision (P) and scale (S) to the DECIMAL (NUMERIC) or VARCHAR data types. This mapping is decided based on the number of significant digits (P) in the numeric value and the number of digits in the numeric value to the right of the decimal point (S). Refer to the table below to understand the mapping:
| Precision and Scale of the Decimal Data Value | Redshift Data Type |
|---|---|
| Precision: >0 and <= 38 Scale: > 0 and <= 37 |
NUMERIC |
For precision and scale values other than those mentioned in the table above, Hevo maps the DECIMAL data type to a VARCHAR data type.
Read Numeric Types to know more about the data types, their range, and the literal representation Amazon Redshift uses to represent various numeric values.
Handling Time and Timestamp data types
Redshift supports fractional seconds up to 6 digits of precision (microseconds) for both TIME and TIMESTAMP data types. Hevo truncates any digits beyond this limit. For example, a Source value 12:00:00.1234567890 will be stored as 12:00:00.123456.
For any variant of SQL Server Source, if a TIME value contains more than 6 digits of fractional seconds, Hevo maps the value as-is to the VARCHAR data type in Redshift instead of truncating it.
Handling of Unsupported Data Types
Hevo does not allow direct mapping of a Source data type to any of the Amazon Redshift data types not listed in the table above. Hence, if the Source object is mapped to an existing Redshift table with columns of unsupported data types, it may become inconsistent. To prevent any inconsistencies during schema evolution, Hevo maps all unsupported data types to the VARCHAR data type in Redshift.
Destination Considerations
-
Hevo converts the table and column names to lowercase during loading. Therefore, if you want to query your Destination irrespective of the case, ensure that the warehouse parameter
enable_case_sensitive_identifierremains set to its default value, FALSE. If this parameter is set to TRUE, you need to use the table and column names in lowercase when querying the Destination. -
Hevo stages the ingested data in an Amazon S3 bucket, from where it is loaded to the Destination tables using the COPY command. Hence, if you have enabled enhanced VPC routing, ensure that your VPC is configured correctly. Enhanced VPC routing affects the way your Amazon Redshift cluster accesses other resources in your AWS network, such as the S3 bucket, specifically for the COPY and UNLOAD commands. Read Enhanced VPC Routing in Amazon Redshift.
-
Hevo uses the Amazon Redshift COPY command to load data into the Destination tables; however, it has the following limitations:
-
If a Source object has a row size exceeding 4 MB, Hevo cannot load the object, as the COPY command supports a maximum row size of 4 MB. For example, an object having a VARBYTE row with 6 MB of data cannot be loaded, even though the VARBYTE data type supports up to 16 MB. To avoid such a scenario, ensure that each row in your Source objects contains less than 4 MB of data.
-
The command does not support Not a Number (NaN) values in FLOAT and DOUBLE columns, so Hevo loads NaN values in these columns as NULL.
-
Amazon Redshift supports a maximum length of 65,535 bytes for VARCHAR field values. To handle this limitation, Hevo utilizes the TRUNCATECOLUMNS parameter in the COPY command when loading data into Destination tables. This ensures that if any VARCHAR field value exceeds the limit, Redshift automatically truncates the excess bytes. For example, if a Source object has an ARRAY, JSON, XML, or VARCHAR field value of 70,000 bytes, Redshift stores only the first 65,535 bytes and truncates the remaining data.
-
-
If a Source object has a floating-point field value that exceeds Amazon Redshift’s supported range, Hevo skips the record when loading data into Destination tables. These skipped records are logged as loading failures for their respective objects. You can check the object to see the failure reason, and from there, you can download the failed Events for further analysis.
Limitations
- Hevo replicates a maximum of 1600 columns to each Amazon Redshift table, of which five are Hevo-reserved metadata columns used during data replication. Therefore, your Pipeline can replicate up to 1595 (1600-5) columns for each table.
Revision History
Refer to the following table for the list of key updates made to this page:
| Date | Release | Description of Change |
|---|---|---|
| Jan-09-2026 | NA | Updated sections, Configure Amazon Redshift as a Destination in Edge and Modifying Amazon Redshift Destination Configuration to add information about SSH connection settings. |