On This Page
Amazon Relational Database Service (RDS) allows you to deploy scalable MySQL servers in minutes with cost-efficient and resizable hardware capacity.
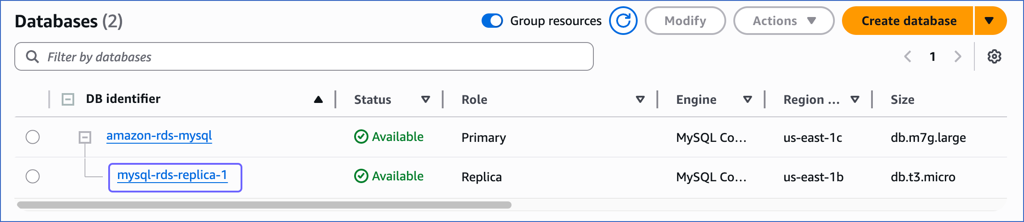
You can ingest data from your Amazon RDS MySQL database using Hevo Pipelines and replicate it to a Destination of your choice. Hevo recommends connecting to a read-replica of your master MySQL database, however, this is not mandatory. A read-replica reflects the changes to your master database in near real-time, and can reduce the load on the master database by serving all “read” requests. The Role attribute of the instance identifies its type.
Prerequisites
-
The Amazon RDS MySQL instance is running.
-
The Amazon RDS MySQL server version is within the supported range for the selected ingestion mode:
Ingestion Mode Supported Version BinLog 5.6 - 8.0 Table or Custom SQL 5.6 - 8.4 -
Binary Log (BinLog) replication is enabled if ingestion mode is BinLog.
-
Hevo is authorized to connect to your database port via IP whitelisting or SSH Tunnel.
-
The SELECT and REPLICATION privileges are granted to the database user.
Note: We recommend that you create a database user for configuring your Amazon RDS MySQL Source in Hevo. However, if you already have a database user, grant the required privileges.
-
The database hostname and port number of the Source instance are available.
-
You are assigned the Team Administrator, Team Collaborator, or Pipeline Administrator role in Hevo, to create the Pipeline.
Perform the following steps to configure your Amazon RDS MySQL Source:
Create a Read Replica (Optional)
To use an existing read replica or connect Hevo to your master database, skip to Set up MySQL Binary Logs for Replication section.
Perform the following steps to create a read replica:
-
Log in to the Amazon RDS console.
-
In the left navigation pane, click Databases.
-
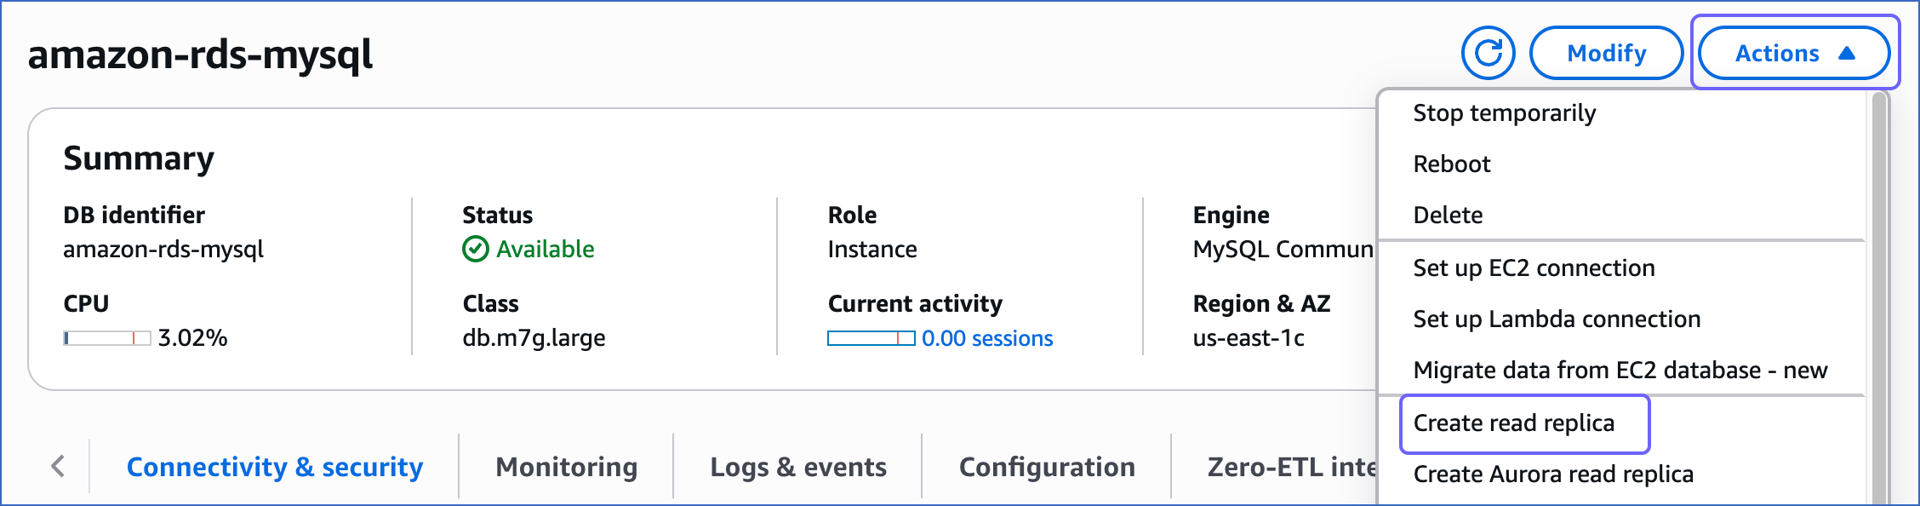
In the Databases section on the right, click the DB identifier of the Amazon RDS MySQL database instance you want to replicate. For example, amazon-rds-mysql, in the image below.

-
Click the Actions drop-down, and then click Create read replica.
-
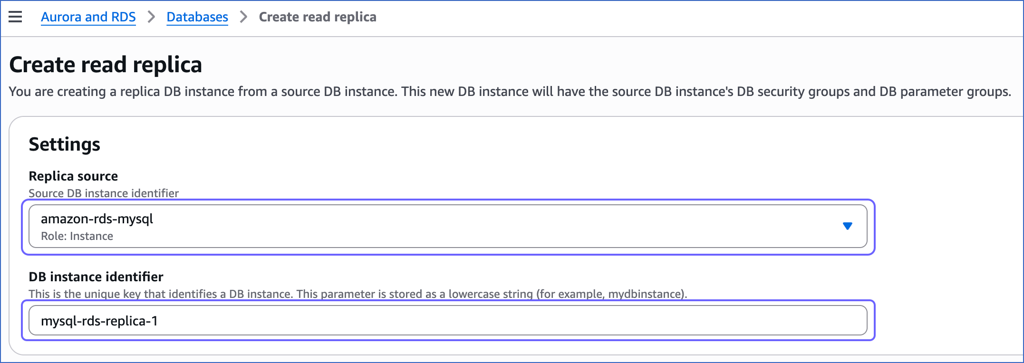
On the Create read replica page, specify the following:
-
Replica source: The master or primary database instance being replicated.
-
DB instance identifier: The replica instance you are creating.
-
-
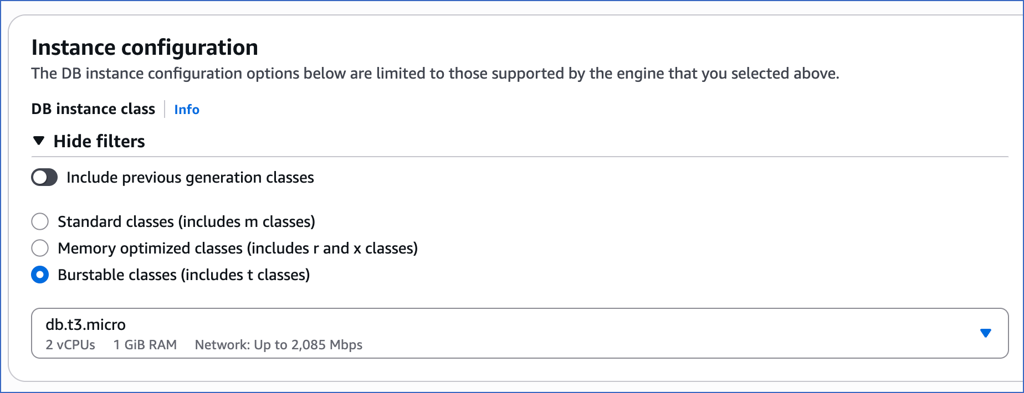
Select the instance specifications relevant to your requirements.
-
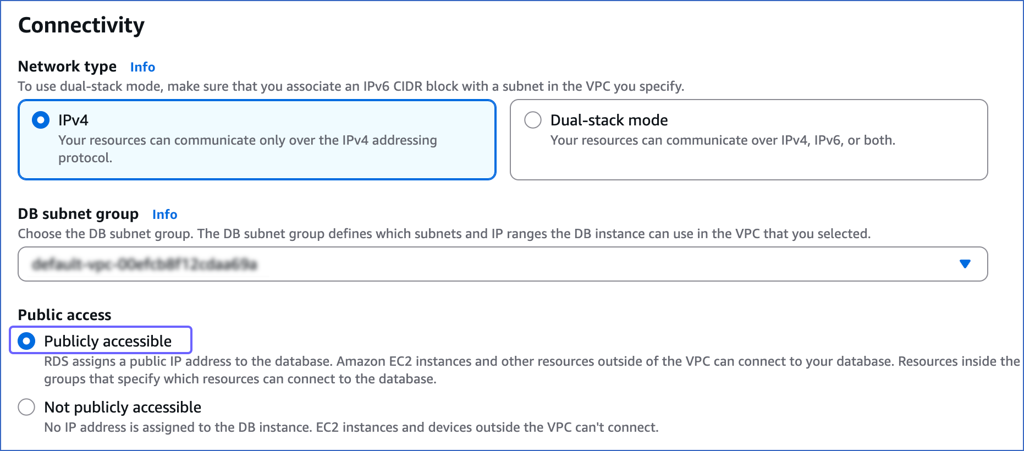
Under the Connectivity section, set the Public access option to Publicly accessible to allow connection to the DB instance via a public IP address, such as, Hevo’s IP address.
-
Scroll down to the bottom and click Create read replica. It takes a few minutes for the read replica to be created during which it show the status as Creating. The status changes to Available when the replica is created.
You can now see the read replica instance in the Databases section.
Set up MySQL Binary Logs for Replication
This step is required only for Pipelines with BinLog mode.
A binary log is a collection of log files that records information about data modifications and data object modifications made on a MySQL server instance. Typically binary logs are used for data replication and data recovery.
In order for the binary log to record the data modifications, automatic backups must be enabled with a duration of at least 1 day.
Note: To use BinLog replication, your Amazon RDS MySQL database must be running on MySQL version between 5.6 and 8.0
To enable binary logging, follow these steps:
1. Configure the parameter group
-
Log in to the Amazon RDS console.
-
In the left navigation pane, click Databases.
-
In the Databases section on the right, click the database instance that you want to connect.
-
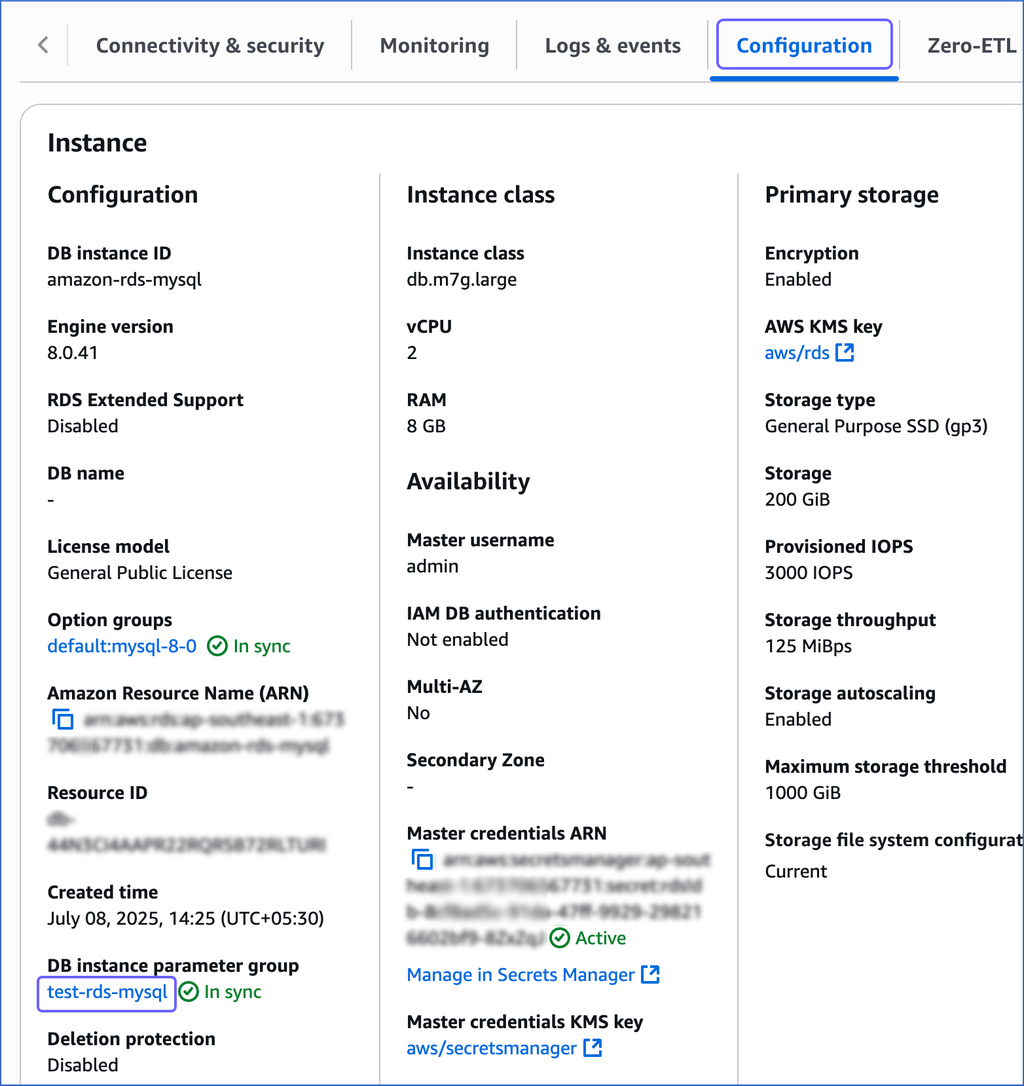
Click the Configuration tab, and then click the link text under DB instance parameter group. If you have created the parameter group with Type as DB cluster parameter group, click the link text under DB cluster parameter group.
-
Click Edit.

-
On the Modifiable parameters page, search for and update the values of the following parameters:
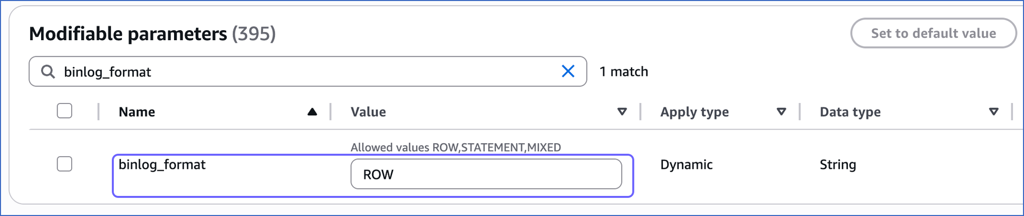
Parameter Name Value binlog_formatROW binlog_row_imagefull log_slave_updates1 Note: The
log_slave_updatessetting is required only if you are connecting to a read replica. When it is set to 1, the replica logs any updates received from the main database, maintaining a record of those changes in its log. -
Click Save Changes.
-
Reboot the database instance that you are using to connect to Hevo, to apply the above changes.
To do this:
-
In the left navigation pane, click Databases.
-
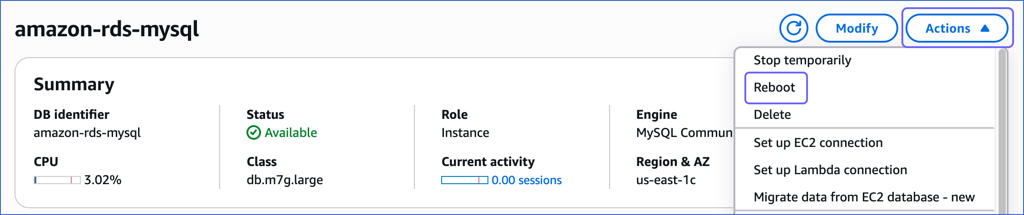
In the Databases section on the right, click the DB identifier of the MySQL instance you are replicating.
-
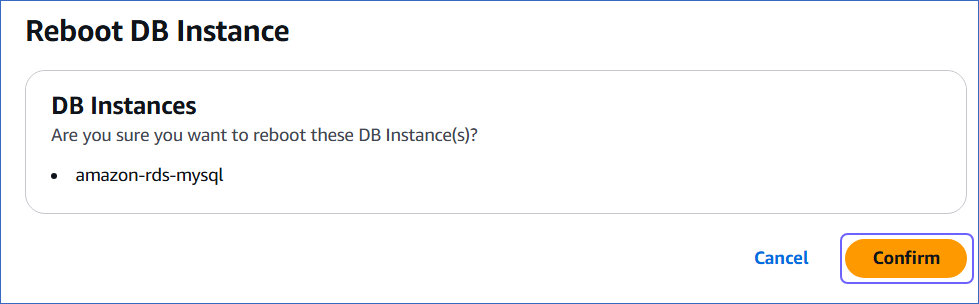
Click the Actions drop-down, and then click Reboot.
-
In the Reboot DB Instance section, click Confirm to reboot your DB instance.
-
After restarting, connect to your MySQL instance as the root user with a SQL client tool, such as MySQL Workbench. Then, verify that the binlog_format setting has persisted after the restart. If this setting is not correct, Hevo cannot replicate data using binary logs.
To verify, run the following command:
SHOW VARIABLES LIKE '%binlog_format%';
The expected output should be:
+---------------+------+
| Variable_name | Value|
+---------------+------+
| binlog_format | ROW |
+---------------+------+
The replication reference guide on MySQL’s documentation portal provides a complete reference of the options available for replication and binary logging.
2. Enable Automatic Backups
-
In the left navigation pane of the Amazon RDS console, click Databases.
-
In the Databases section on the right, select the instance for which you want to enable automatic backups, and then click Modify.

-
On the Modify DB Instance: <Your Instance Name> page, scroll down to the Backup section and do the following:
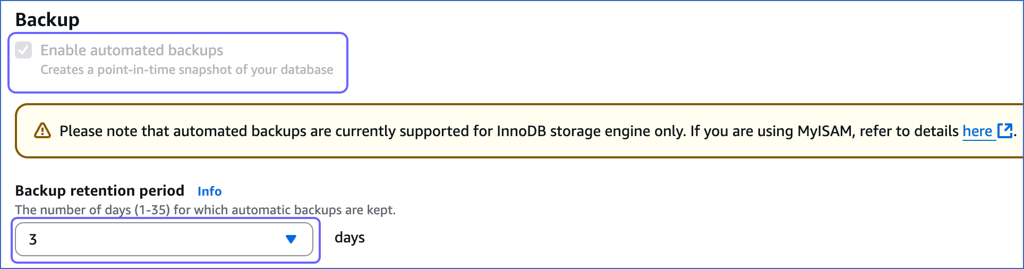
-
Select the Enable automated backups check box.
-
Set the Backup retention period to any value greater than or equal to 1 day. A backup retention period of at least 3 days is recommended.
-
-
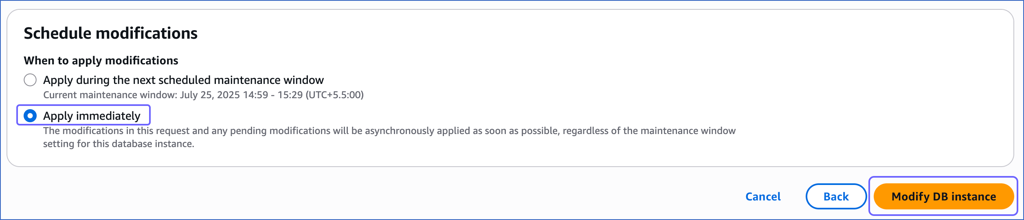
Scroll down to the bottom and click Continue.
-
Under the Schedule modifications panel, select Apply immediately, and then click Modify DB instance.
3. Configure the BinLog retention period
-
Log in to your Amazon RDS MySQL database instance with
ADMINprivileges. -
Run the following command to view the current BinLog retention period (in hours):
call mysql.rds_show_configuration; -
If the BinLog retention period is less than 72 hours, run the following command to set it to at least 72 hours (three days).
call mysql.rds_set_configuration('binlog retention hours', 72);
Whitelist Hevo’s IP Addresses
You need to whitelist the Hevo IP address for your region to enable Hevo to connect to your Amazon RDS MySQL database.
To do this:
-
Log in to the Amazon RDS console.
-
In the left navigation pane, click Databases.
-
In the Databases section on the right, click the DB identifier of the Amazon RDS MySQL database instance to configure a security group.
Note: The instance does not necessarily have to be a replica as long as it whitelists the region’s IP addresses.
-
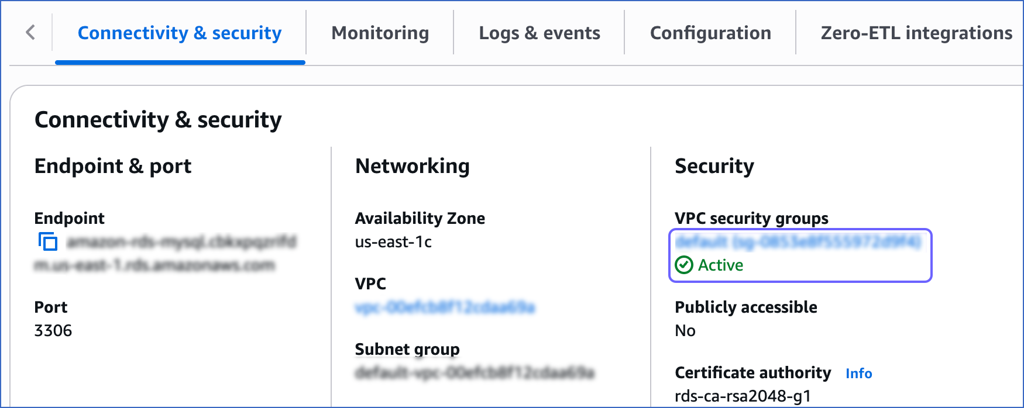
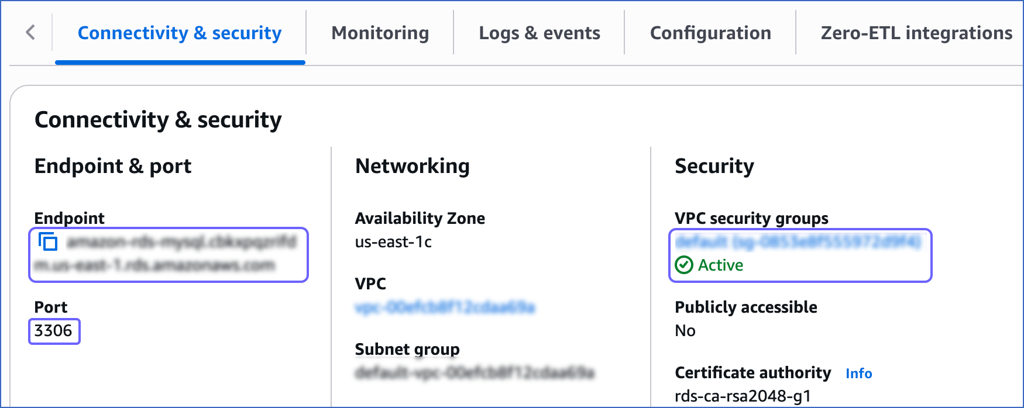
In the Connectivity & security tab, click the link text under Security, VPC security groups.
-
On the Security Groups page, select the check box for your Security group ID, and from the Actions drop-down, click Edit inbound rules.

-
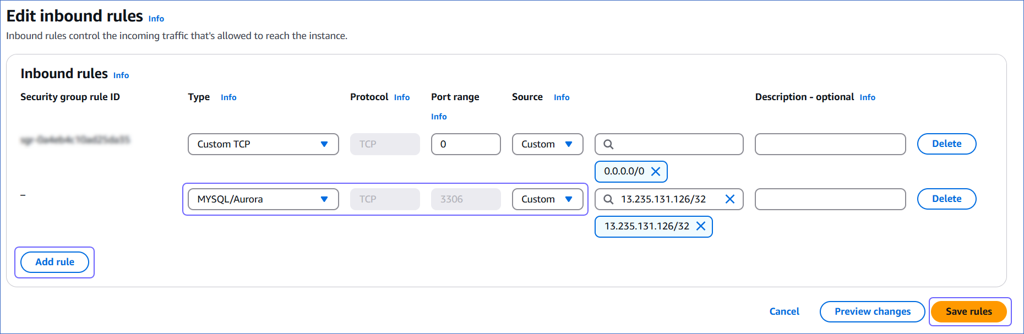
On the Edit inbound rules page, do the following:
-
Click Add rule.
-
In the Type column, select MySQL/Aurora from the drop-down.
-
In the Source column, select Custom from the drop-down and enter Hevo’s IP addresses for your region. Repeat steps 1-3 to whitelist all the IP addresses.
-
Click Save rules.
-
Create a Database User and Grant Privileges
1. Create a database user (Optional)
Perform the following steps to create a database user in your Amazon RDS MySQL database:
-
Connect to your Amazon RDS MySQL database as a root user with an SQL client tool, such as MySQL Workbench.
-
Based on your MySQL database version, run one of the following commands to create a database user:
-
Versions 5.6 up to 8.0
CREATE USER <database_username>@'%' IDENTIFIED BY '<password>'; -
Versions 8.0 up to 8.4
CREATE USER <database_username>@'%' IDENTIFIED WITH mysql_native_password BY '<password>';
Note: Replace the placeholder values in the command above with your own. For example, <database_username> with hevouser.
-
2. Grant privileges to the user
The database user specified in the Hevo Pipeline must have the following global privileges:
-
SELECT -
SUPERor (REPLICATION CLIENTandREPLICATION SLAVE)
Perform the following steps to set up these privileges:
-
Connect to your Amazon RDS MySQL database as a root user with an SQL client tool, such as MySQL Workbench.
-
Grant
SELECTandREPLICATIONprivileges to the user:GRANT SELECT, REPLICATION CLIENT, REPLICATION SLAVE ON *.* TO <database_username>@'%'; -
Allow Hevo to access your database:
GRANT SELECT ON <database_name>.* TO <database_username>; -
Grant privileges to the database user to read BinLog settings if ingestion mode is Binlog:
GRANT EXECUTE ON PROCEDURE mysql.rds_show_configuration TO <database_username>@'%';
Note: Replace the placeholder values in the commands above with your own. For example, <database_username> with hevouser.
Retrieve the Hostname and Port Number (Optional)
Note: The Amazon RDS hostnames start with your database name and end with rds.amazonaws.com. For example, amazon-rds-mysql.xxxxxxxxx.rds.amazonaws.com
-
In the left navigation pane of the Amazon RDS console, click Databases.
-
In the Databases section on the right, click the DB identifier of the Amazon RDS MySQL database instance.
-
In the Connectivity & security tab, copy the values under Endpoint and Port as the hostname and port number. You will specify these while creating your Hevo Pipeline.
Specify Amazon RDS MySQL Connection Settings
Perform the following steps to configure Amazon RDS MySQL as a Source in Hevo:
-
Click PIPELINES in the Navigation Bar.
-
Click + Create Pipeline in the Pipelines List View.
-
On the Select Source Type page, select Amazon RDS MySQL.
-
On the Select Destination Type page, select the type of Destination you want to use.
-
On the page that appears, do the following:

-
Select Pipeline Mode: Choose the mode for ingesting data from the Source. Default value: BinLog. The available modes are BinLog, Table, and Custom SQL.
Depending on the Pipeline mode you select, you must configure the objects to be replicated. Refer to section, Object and Query Mode Settings for the steps to do this.
Note: For Custom SQL Pipeline mode, all Events loaded to the Destination are billable.
-
Select Pipeline Type: Choose the type of Pipeline you want to create based on your requirements, and then click Continue.
-
If you select Edge, read Amazon RDS MySQL to configure your Edge Pipeline.
-
If you select Standard, skip to step 6 below.
This section is displayed only if all the following conditions are met:
-
The selected Destination type is supported in Edge.
-
The Pipeline mode is set to BinLog.
-
Your Team was created before September 15, 2025, and has an existing Pipeline created with the same Destination type and Pipeline mode.
For Teams that do not meet the above criteria, if the selected Destination type is supported in Edge and the Pipeline mode is set to BinLog, you can proceed to create an Edge Pipeline. Read Amazon RDS MySQL to configure your Edge Pipeline. Otherwise, you can proceed to create a Standard Pipeline.
-
-
-
On the Configure your Amazon RDS MySQL Source page, specify the following:

-
Pipeline Name: A unique name for your Pipeline, not exceeding 255 characters.
-
Database Host: The MySQL host’s IP address or DNS.
The following table lists a few examples of MySQL hosts:
Variant Host Amazon RDS MySQL mysql-rds-1.xxxxx.rds.amazonaws.com Azure MySQL mysql.database.windows.net Generic MySQL 10.123.10.001 or mysql-replica.westeros.inc Google Cloud MySQL 35.220.150.0 Note: For URL-based hostnames, exclude the http:// or https:// part. For example, if the hostname URL is http://mysql-replica.westeros.inc, enter mysql-replica.westeros.inc.
-
Database Port: The port on which your Amazon RDS MySQL server listens for connections. Default value: 3306.
-
Database User: The authenticated user who has the permissions to read tables in your database.
-
Database Password: The password for the database user.
-
Database Name: The database you want to load data from if the Pipeline mode is Table or Custom SQL.
-
Connection Settings
-
Connect Through SSH: Enable this option to connect to Hevo using an SSH tunnel, instead of directly connecting your MySQL database host to Hevo. This provides an additional level of security to your database by not exposing your MySQL setup to the public. Read Connecting Through SSH. To set up an SSH tunnel for your Amazon RDS MySQL database hosted on Amazon Web Services (AWS), read Configuring an SSH Tunnel.
If this option is disabled, you must whitelist Hevo’s IP addresses. Refer to the content for your MySQL variant for steps to do this.
-
Use SSL: Enable it to use SSL encrypted connection. To enable this, specify the following:
-
CA File: The file containing the SSL server certificate authority (CA).
-
Load all CA Certificates: If selected, Hevo loads all CA certificates (up to 50) from the uploaded CA file, else it loads only the first certificate.
Note: Select this check box if you have more than one certificate in your CA file.
-
-
Client Certificate: The client public key certificate file.
-
Client Key: The client private key file.
-
-
-
Advanced Settings
-
Load All Databases: This option applies to log-based Pipelines. If enabled, Hevo loads the data from all databases on the selected host and fetches the schema for all the tables within these databases. If disabled, specify a comma-separated list of database names from which you want to load data. Hevo fetches the schema of tables only from the specified databases.
Note:
-
Hevo cannot access or read any tables that are not part of databases active in the Pipeline.
-
Hevo requires read access to the specified databases.
-
If access is restricted to certain databases, Hevo fetches the schema only of tables within those databases. For example, if Load All Databases option is enabled, but Hevo has permission to access only one database, it cannot fetch schemas from the others. This may lead to issues when the data required for queries or Transformations resides outside the accessible database. To avoid such cases, ensure that Hevo has permission to access all active databases.
-
-
Load Historical Data: Applicable for Pipelines created with BinLog or Table mode. If this option is enabled, the entire table data is fetched during the first run of the Pipeline. If disabled, Hevo loads only the records written to your database after the Pipeline was created.
-
Merge Tables: Applicable for Pipelines with BinLog mode. If this option is enabled, Hevo merges tables with the same name from different databases while loading the data to the warehouse. Hevo loads the Database Name field with each record. If disabled, the database name is prefixed to each table name. Read How does the Merge Tables feature work?.
-
Include New Tables in the Pipeline: Applicable for all ingestion modes except Custom SQL.
If enabled, Hevo automatically ingests data from tables created in the Source after the Pipeline has been built. These may include completely new tables or previously deleted tables that have been re-created in the Source. All data for these tables is ingested using database logs, making it incremental and therefore billable.
If disabled, new and re-created tables are not ingested automatically. They are added in SKIPPED state in the objects list, on the Pipeline Overview page. You can update their status to INCLUDED to ingest data.
You can change this setting later.
-
-
-
Click Test Connection. This button is enabled once you specify all the mandatory fields. Hevo’s underlying connectivity checker validates the connection settings you provide.
-
Click Test & Continue to proceed for setting up the Destination. This button is enabled once you specify all the mandatory fields.
Object and Query Mode Settings
Once you have specified the Source connection settings in Step 6 above, do one of the following:
-
For Pipelines with Table or BinLog mode:
-
On the Select Objects page, select the objects you want to replicate and click Continue.

Note: Each object represents a table in your database.
-
On the Configure Objects page, specify the query mode you want to use for each selected object.

-
Click Continue.
-
-
For Pipelines with Custom SQL mode:
-
On the Provide Query Settings page, enter the custom SQL query to fetch data from the Source.
-
In the Query Mode drop-down, select the query mode, and click Continue.

-
Data Replication
| For Teams Created | Ingestion Mode | Default Ingestion Frequency | Minimum Ingestion Frequency | Maximum Ingestion Frequency | Custom Frequency Range (in Hrs) |
|---|---|---|---|---|---|
| Before Release 2.21 | Table | 15 Mins | 15 Mins | 24 Hrs | 1-24 |
| Log-based | 5 Mins | 5 Mins | 1 Hr | NA | |
| After Release 2.21 | Table | 6 Hrs | 30 Mins | 24 Hrs | 1-24 |
| Log-based | 30 Mins | 30 Mins | 12 Hrs | 1-24 |
Note: The custom frequency must be set in hours as an integer value. For example, 1, 2, or 3 but not 1.5 or 1.75.
-
Historical Data: In the first run of the Pipeline, Hevo ingests all available data for the selected objects from your Source database.
-
Incremental Data: Once the historical load is complete, data is ingested as per the ingestion frequency.
Additional Information
Read the detailed Hevo documentation for the following related topics:
Source Considerations
-
MySQL does not generate log entries for cascading deletes. So, Hevo cannot capture these deletes for log-based Pipelines.
-
In log-based Pipelines, when a new column with default values is added to the Source table, the database does not generate log entries for it, as it is not treated as a row-level data change. As a result, Hevo cannot replicate this column to the Destination. To ensure that the Source schema and data are reflected accurately in the Destination, you must restart the historical load for that object.
-
If your Pipeline uses BinLog ingestion mode, MySQL replicates timestamp fields such as created_at and updated_at in Coordinated Universal Time (UTC). As BinLogs do not include time zone metadata, Hevo and the Destination interpret these values in UTC. Due to this, you may observe a time difference if the Source database uses a different timezone. For example, if the Source timezone is US Eastern Time (UTC-4) and the timestamp for created_at in MySQL is 2024-05-01 10:00:00, it appears as 2024-05-01 14:00:00 in BigQuery. This behavior applies only to incremental loads via BinLogs. Any data replicated using historical load retains the original timestamp values from the Source.
As a workaround, you can adjust the UTC timestamps to your local timezone using Python code-based Transformations by adding or subtracting the appropriate offset in the timestamp fields. For example, to convert UTC to UTC+7, add a 7-hour offset to the relevant fields before loading the data into the Destination.
-
In MySQL, the value of the
max_connectionssystem variable determines the maximum number of simultaneous connections allowed for an application. If the number of active connections exceeds this value, Hevo might not be able to connect to your Source. In such cases, you should increase the value of themax_connectionsvariable. You can modify this setting in the MySQL configuration file, which is my.cnf or my.ini, depending on your MySQL platform.To do this:
-
Log in to your MySQL server host as a root user or a user with administrative privileges.
-
Navigate to the MySQL configuration directory. For example, /etc/mysql.
-
Open the MySQL server configuration file with any text editor.
-
Scroll to the
[mysqld]section and add or update the max_connections variable:max_connections = <new_value>Note: Replace the placeholder value in the command above with your own, for example, <new_value> with 500.
-
Save the file and restart the MySQL server for the changes to take effect.
After restarting, MySQL uses the updated value for
max_connections. -
-
In MySQL, the
max_user_connectionssystem variable limits the maximum number of simultaneous connections that a single MySQL user, such as the one created for Hevo, can make to the Source database. By default,max_user_connectionsis set to 0, which means there is no limit on the number of connections. However, if this value is set to a non-zero number for the database user configured in your Pipeline and the user exceeds that value, Hevo may fail to connect to the Source database. In such cases, themax_user_connectionsvariable should either be increased or reset to 0.To modify this setting for the database user configured in your Pipeline, do the following:
-
Log in to your MySQL database instance as the root user or a user with administrative privileges. For example, mysql -u root -p.
-
Run the following command to set or modify the limit
ALTER USER '<username>'@'<hostname>' WITH MAX_USER_CONNECTIONS <new_value>;Note: Replace the placeholder values in the command above with your own, for example, <new_value> with 15.
The changed value takes effect immediately and persists after server restarts.
-
Limitations
-
Currently, Hevo does not support transaction-based replication using Global Transaction Identifiers (GTIDs).
-
Hevo only fetches tables from the MySQL database. It does not fetch other entities such as functions, stored procedures, views, and triggers.
To fetch views, you can create individual Pipelines in Custom SQL mode. However, some limitations may arise based on the type of data synchronization, the query mode, or the number of Events. Contact Hevo Support for more details.
-
During the historical load, Hevo reads table definitions directly from the MySQL database schema, whereas for incremental updates, Hevo reads from the BinLog. As a result, certain fields, such as nested JSON, are parsed differently during historical and incremental loads. In the Destination tables, nested JSON fields are parsed as a struct or JSON during historical loads, but as a string during incremental loads. This leads to a data type mismatch between the Source and Destination data, causing Events to be sidelined.
To ensure JSON fields are parsed correctly during the historical load, you can apply transformations to every table containing nested JSON fields. Contact Hevo Support for more details.
-
Hevo Pipelines may fail to process transactions in the BinLog if the size of the transaction exceeds 4GB. This problem is due to a MySQL bug that affects the library used by Hevo to stream Events, resulting in ingestion failures. In such cases, Hevo attempts to restart the ingestion process from the beginning of the transaction, skipping already processed Events. If the problem of transaction processing persists and the BinLog remains stuck, contact Hevo Support for assistance.
-
Hevo does not load data from a column into the Destination table if its size exceeds 16 MB, and skips the Event if it exceeds 40 MB. If the Event contains a column larger than 16 MB, Hevo attempts to load the Event after dropping that column’s data. However, if the Event size still exceeds 40 MB, then the Event is also dropped. As a result, you may see discrepancies between your Source and Destination data. To avoid such a scenario, ensure that each Event contains less than 40 MB of data.
-
For MySQL versions 8.0.4 and above, based on the value of the
default_authentication_pluginsystem variable, connecting database users are authenticated using thecaching_sha2_passwordplugin by default. However, Hevo does not currently support this plugin, and you may see the Public Key Retrieval is not allowed error. In that case, you can change the authentication plugin tomysql_native_passwordfor the user.To do this, connect to your MySQL server as a root user and run the following command:
ALTER USER '<database_username>'@'%' IDENTIFIED WITH mysql_native_password BY '<password>';Note: Replace the placeholder values in the command above with your own. For example, <database_username> with hevouser.
See Also
Revision History
Refer to the following table for the list of key updates made to this page:
| Date | Release | Description of Change |
|---|---|---|
| Nov-06-2025 | NA | Updated the document as per the latest Hevo UI. |
| Oct-13-2025 | NA | Updated section, Specify Amazon RDS MySQL Connection Settings to clarify when the Select Pipeline Type section is displayed during Pipeline configuration. |
| Oct-09-2025 | NA | Updated section, Specify Amazon RDS MySQL Connection Settings to mention that the Load Historical Data option is also applicable for Pipelines created with Table mode. |
| Sep-18-2025 | NA | Updated section, Specify Amazon RDS MySQL Connection Settings as per the latest UI. |
| Aug-12-2025 | NA | Updated section, Set up MySQL Binary Logs for Replication to add information on verifying binlog_format after restart. |
| Aug-01-2025 | NA | - Added Source Considerations to update the values of max_connections and max_user_connections.- Added clarification that data ingested from new and re-created tables is billable. |
| Jul-25-2025 | NA | Updated the document as per the latest Amazon RDS MySQL UI. |
| Jul-07-2025 | NA | - Updated section, Source Considerations to add information about columns with default values not being replicated. - Updated the Limitations section to inform about the max record and column size in an Event. |
| Jun-30-2025 | NA | Updated section, Source Considerations to add a point about UTC replication of timestamp fields in BinLog mode. |
| Jun-23-2025 | NA | - Updated the Create a database user section to add the commands for creating a user with the mysql_native_password authentication.- Added a limitation about Hevo not supporting the caching_sha2_password authentication plugin. |
| May-19-2025 | NA | Updated section, Limitations to add note about GTID based replication. |
| Mar-13-2025 | NA | Updated section, Prerequisites to mention the supported MySQL versions for each ingestion mode. |
| Jan-20-2025 | NA | Added a note for Load All Databases in the Pipeline Advanced Settings in the Specify Amazon RDS MySQL Connection Settings section. |
| Jan-07-2025 | NA | Updated the Limitations section to add information on Event size. |
| Dec-18-2024 | NA | Updated section, Limitations to add information about Hevo handling transaction failures in the BinLog due to a MySQL bug affecting transactions exceeding 4GB. |
| Nov-18-2024 | NA | Updated sections, Create a Read Replica (Optional) and Set up MySQL Binary Logs for Replication as per the latest Amazon RDS MySQL UI. |
| Jul-31-2024 | NA | Updated section, Limitations to add information about Hevo reading table definitions differently during historical and incremental loads. |
| Apr-29-2024 | NA | Updated section, Specify Amazon RDS MySQL Connection Settings to include more detailed steps. |
| Mar-18-2024 | 2.21.2 | Updated section, Specify Amazon RDS MySQL Connection Settings to add information about the Load all CA certificates option. |
| Mar-05-2024 | 2.21 | Added the Data Replication section. |
| Nov-03-2023 | NA | Renamed section, Object Settings to Object and Query Mode Settings. |
| Oct-27-2023 | NA | Updated section, Create a Database User and Grant Privileges with the latest steps. |
| Jul-25-2023 | NA | Updated section, Create a Database User and Grant Privileges for more clarity. |
| Jun-26-2023 | NA | Added section, Source Considerations. |
| Apr-21-2023 | NA | Updated section, Specify Amazon RDS MySQL Connection Settings to add a note to inform users that all loaded Events are billable for Custom SQL mode-based Pipelines. |
| Mar-09-2023 | 2.09 | Updated section, Specify Amazon RDS MySQL Connection Settings to mention about SEE MORE in the Select an Ingestion Mode section. |
| Dec-19-2022 | 2.04 | Updated section, Specify Amazon RDS MySQL Connection Settings to add information that you must specify all fields to create a Pipeline. |
| Dec-07-2022 | 2.03 | Updated section, Specify Amazon RDS MySQL Connection Settings to mention about including skipped objects post-Pipeline creation. |
| Dec-07-2022 | 2.03 | Updated section, Specify Amazon RDS MySQL Connection Settings to mention about the connectivity checker. |
| Oct-13-2022 | 1.99 | Updated section, Specify Amazon RDS MySQL Connection Settings to reflect the latest UI changes. |
| Aug-24-2022 | NA | Updated sections, Create a Read Replica (Optional) and Set up MySQL Binary Logs for Replication to reflect the latest UI changes. |
| Apr-21-2022 | 1.86 | Updated section, Specify Amazon RDS MySQL Connection Settings. |
| Feb-07-2022 | 1.81 | Updated section, Whitelist Hevo’s IP Address to remove details about Outbound rules as they are not required. |
| Jan-03-2022 | 1.79 | Updated the description of the Include New Tables in the Pipeline advance setting in the Specify Amazon RDS MySQL Connection Settings section. |
| Aug-23-2021 | 1.70 | Added the section, Enable Automatic Backups. |
| Aug-09-2021 | NA | Added a note in Step 2 of section, Create a Database User and Grant Privileges section. |
| Jul-26-2021 | 1.68 | Added a note for the Database Host field. |
| Jul-12-2021 | NA | Added the section, Specify Amazon RDS MySQL Connection Settings. |