Snowflake
On This Page
Collaborated with Snowflake to provide support for configuring Snowflake in Hevo using the Snowflake Partner Connect feature. Hevo can now be accessed from within the Snowflake platform, through which you can seamlessly set up an account and create data Pipelines with Snowflake as your Destination.
Snowflake offers a cloud-based data storage and analytics service, generally termed as data warehouse-as-a-service. Companies can use it to store and analyze data using cloud-based hardware and software.
In Snowflake, you can create both data warehouses and databases to store your data. Each data warehouse can further have one or more databases, although this is not mandatory. Snowflake provides you one data warehouse automatically when you create an account.
The Snowflake data warehouse may be hosted on any of the following Cloud providers:
-
Amazon Web Services (AWS)
-
Google Cloud Platform (GCP)
-
Microsoft Azure (Azure)
For Hevo to access your data, you must assign the required permissions. Snowflake uses Roles to assign permissions to users. You need ACCOUNTADMIN, SECURITYADMIN, or SYSADMIN privileges to create the required roles for Hevo. Read more about Roles in Snowflake.
The data from your Pipeline is staged in Hevo’s S3 bucket before being finally loaded to your Snowflake warehouse.
To connect your Snowflake instance to Hevo, you can either use a private link which directly connects to your Cloud provider through Virtual Private Cloud (VPC) or connect via a public network using your Snowflake account URL.
A private link enables communication and network traffic to remain exclusively within the cloud provider’s private network while maintaining direct and secure access across VPCs. It allows you to transfer data to Snowflake without going through the public internet or using proxies to connect Snowflake to your network. Note that even with a private link, the public endpoint is still accessible and Hevo uses that to connect to your database cluster.
Note: The private link is supported only for the Hevo platform regions.
Please reach out to Hevo Support to retrieve the private link for your cloud provider.
Prerequisites
-
An active Snowflake account.
-
The user has either ACCOUNTADMIN or SECURITYADMIN role in Snowflake to create a new role for Hevo.
-
The user must have ACCOUNTADMIN or SYSADMIN role in Snowflake, if a warehouse is to be created.
-
Hevo is assigned USAGE permissions on data warehouses.
-
Hevo is assigned USAGE and CREATE SCHEMA permissions on databases.
-
Hevo is assigned USAGE, MONITOR, CREATE TABLE, CREATE EXTERNAL TABLE, and MODIFY permissions on the current and future schemas.
-
You are assigned the Team Collaborator, or any administrator role except the Billing Administrator role in Hevo to create the Destination.
Refer to section, Create and Configure your Snowflake Warehouse to create a Snowflake warehouse with adequate permissions for Hevo to access your data.
Connect Using Snowflake Partner Connect (Recommended Method)
Perform the following steps to configure Snowflake as a Destination using Snowflake Partner Connect:
Note: Setting up a Destination using Snowflake Partner Connect is unavailable for existing Hevo users. Read Connect Using the Snowflake Credentials.
-
Log in to your Snowflake account.
Note: You must have an ACCOUNTADMIN role to connect.
-
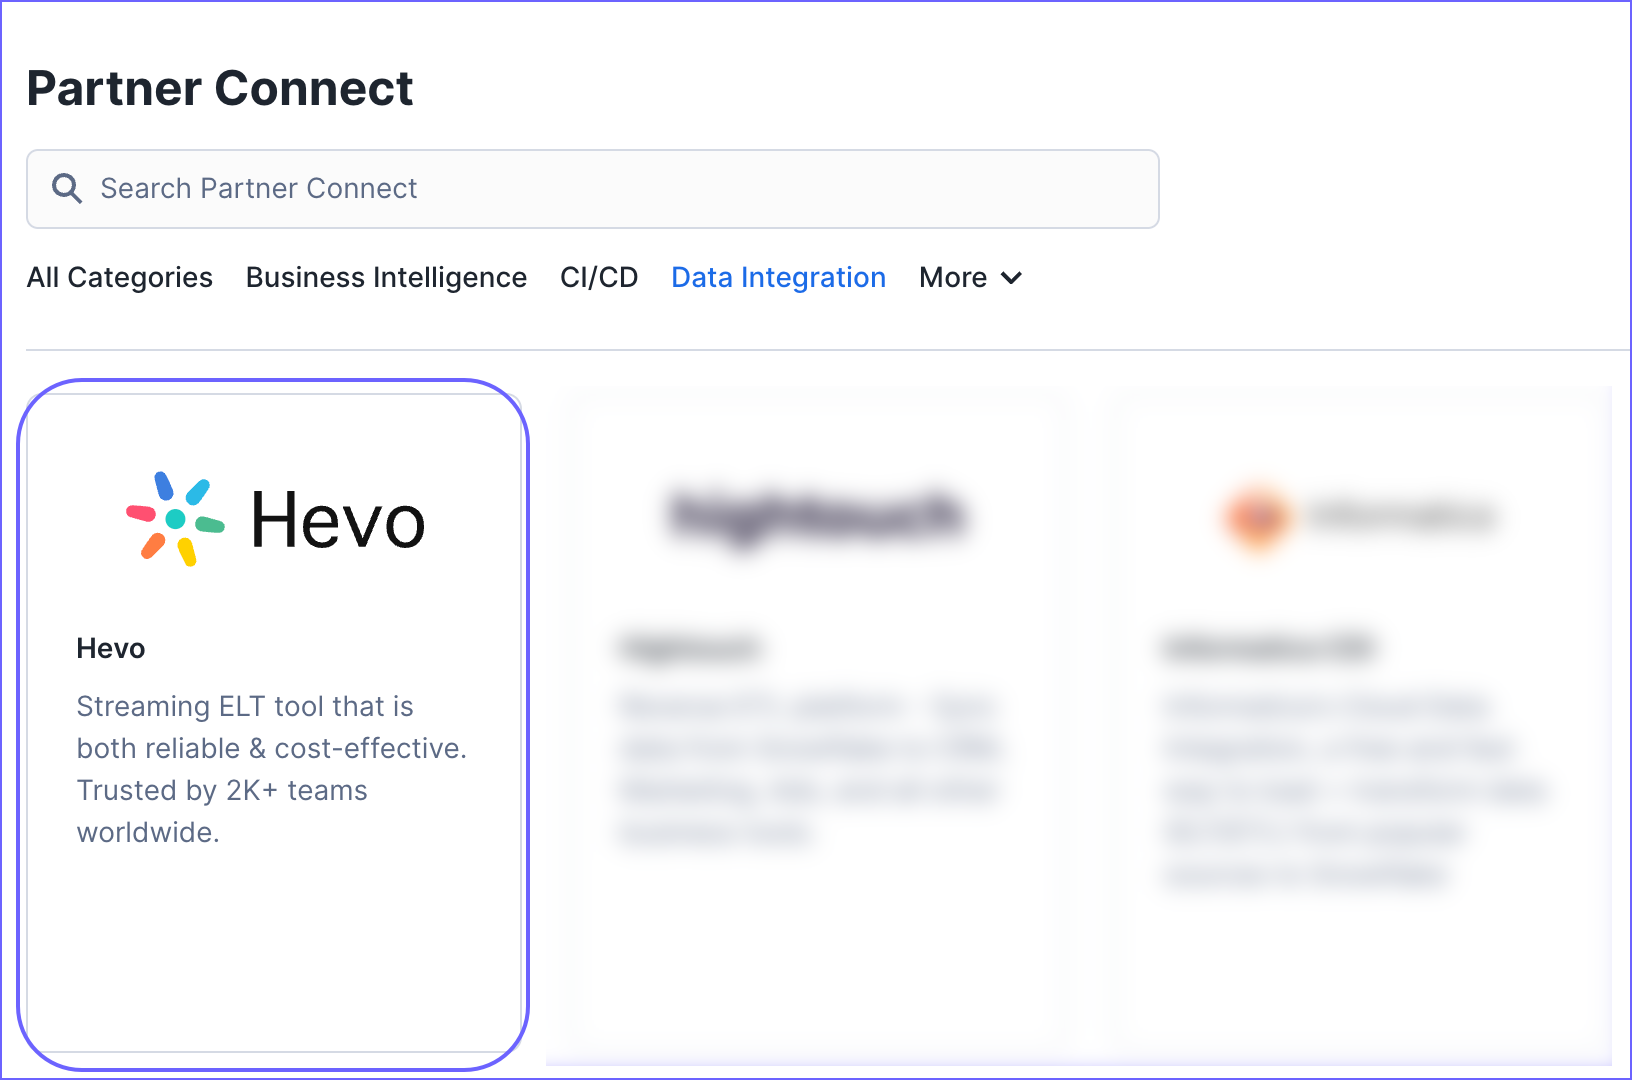
In the left navigation pane, click Data Products and then click Partner Connect.

-
In the search field, enter Hevo and then click the Hevo tile.
-
In the pop-up window that appears, do one of the following:
-
If your organization’s domain is registered, but you are not an existing user of Hevo:
-
Click Launch.

-
Specify your email address and click Continue.

-
Specify the password associated with your registered email address and click LOG IN.

-
Perform one of the following steps in Hevo:
-
To create a new workspace, click + CREATE WORKSPACE.

-
Alternatively, you can join an existing workspace by requesting access from the workspace owner.
-
-
Skip to Step 5 to configure your Source.
-
-
If your organization’s domain is not registered, and you are a new user of Hevo:
-
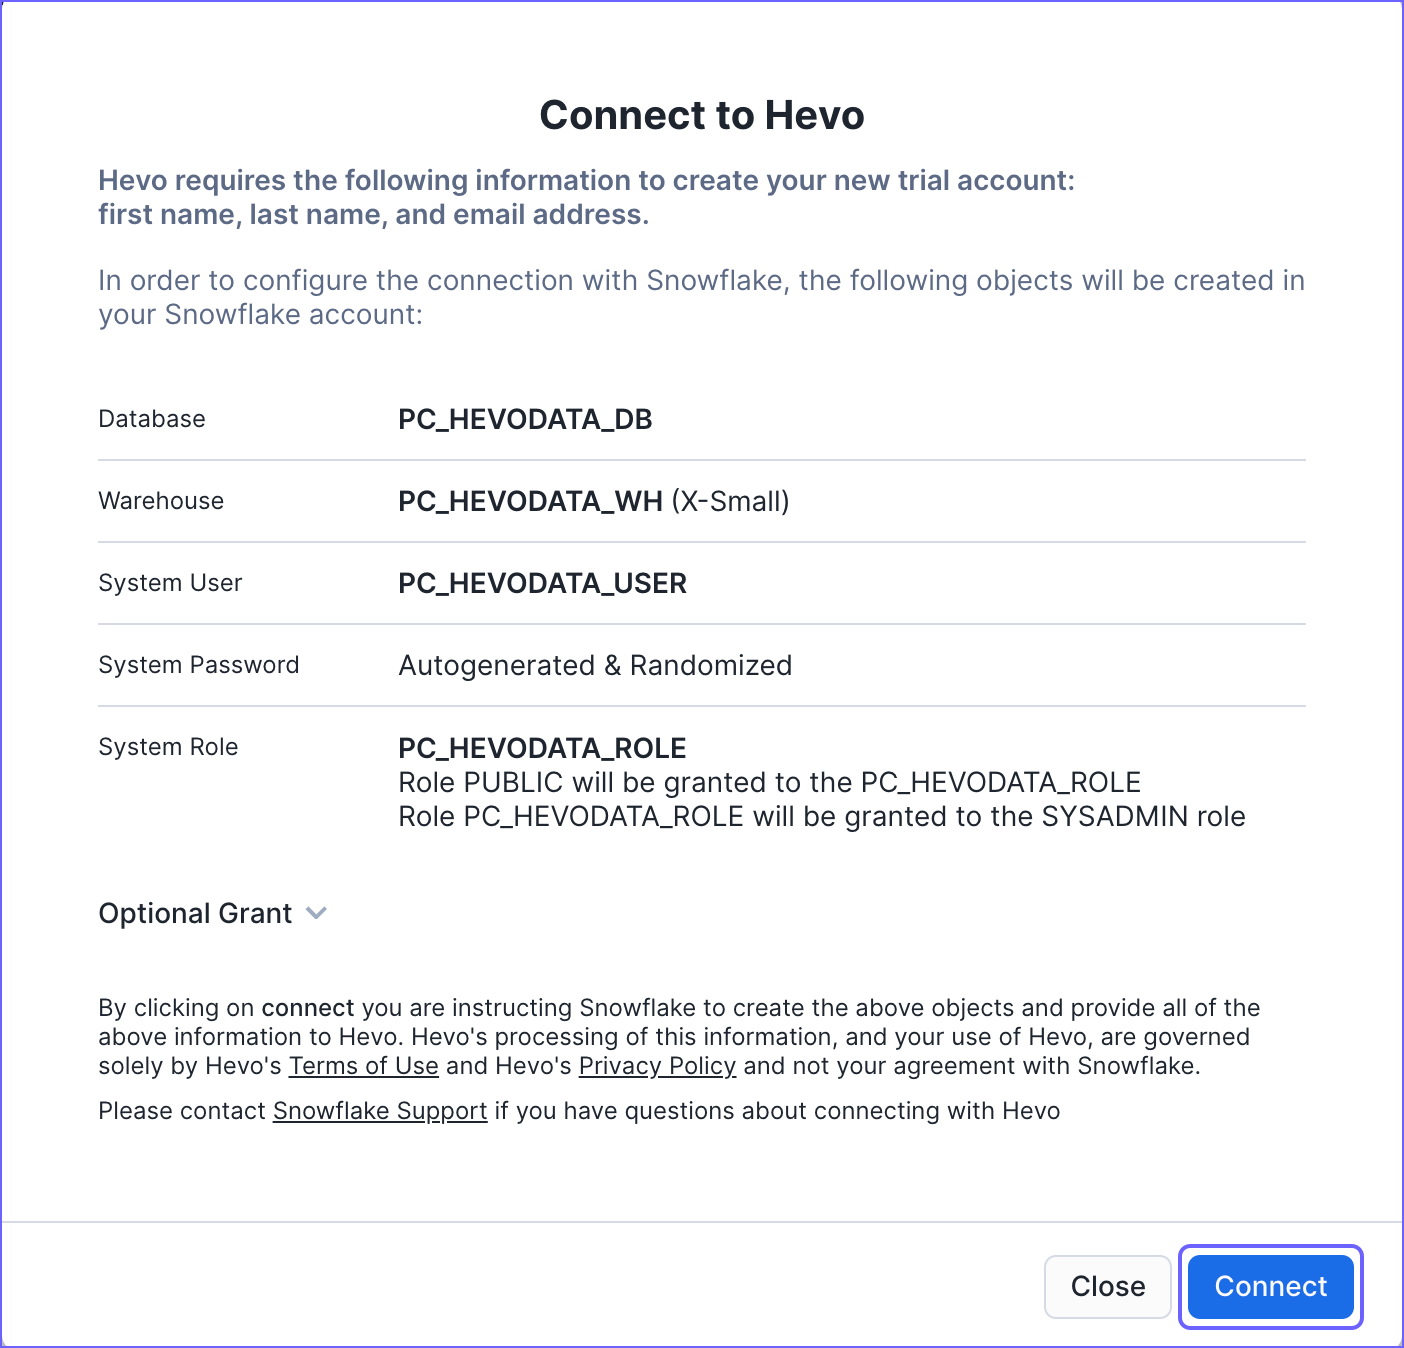
Click Connect.
-
In the Your partner account… pop-up window, click Activate.

-
In the Set up your Password page, specify a password to create a Hevo account and then click Continue.

-
-
-
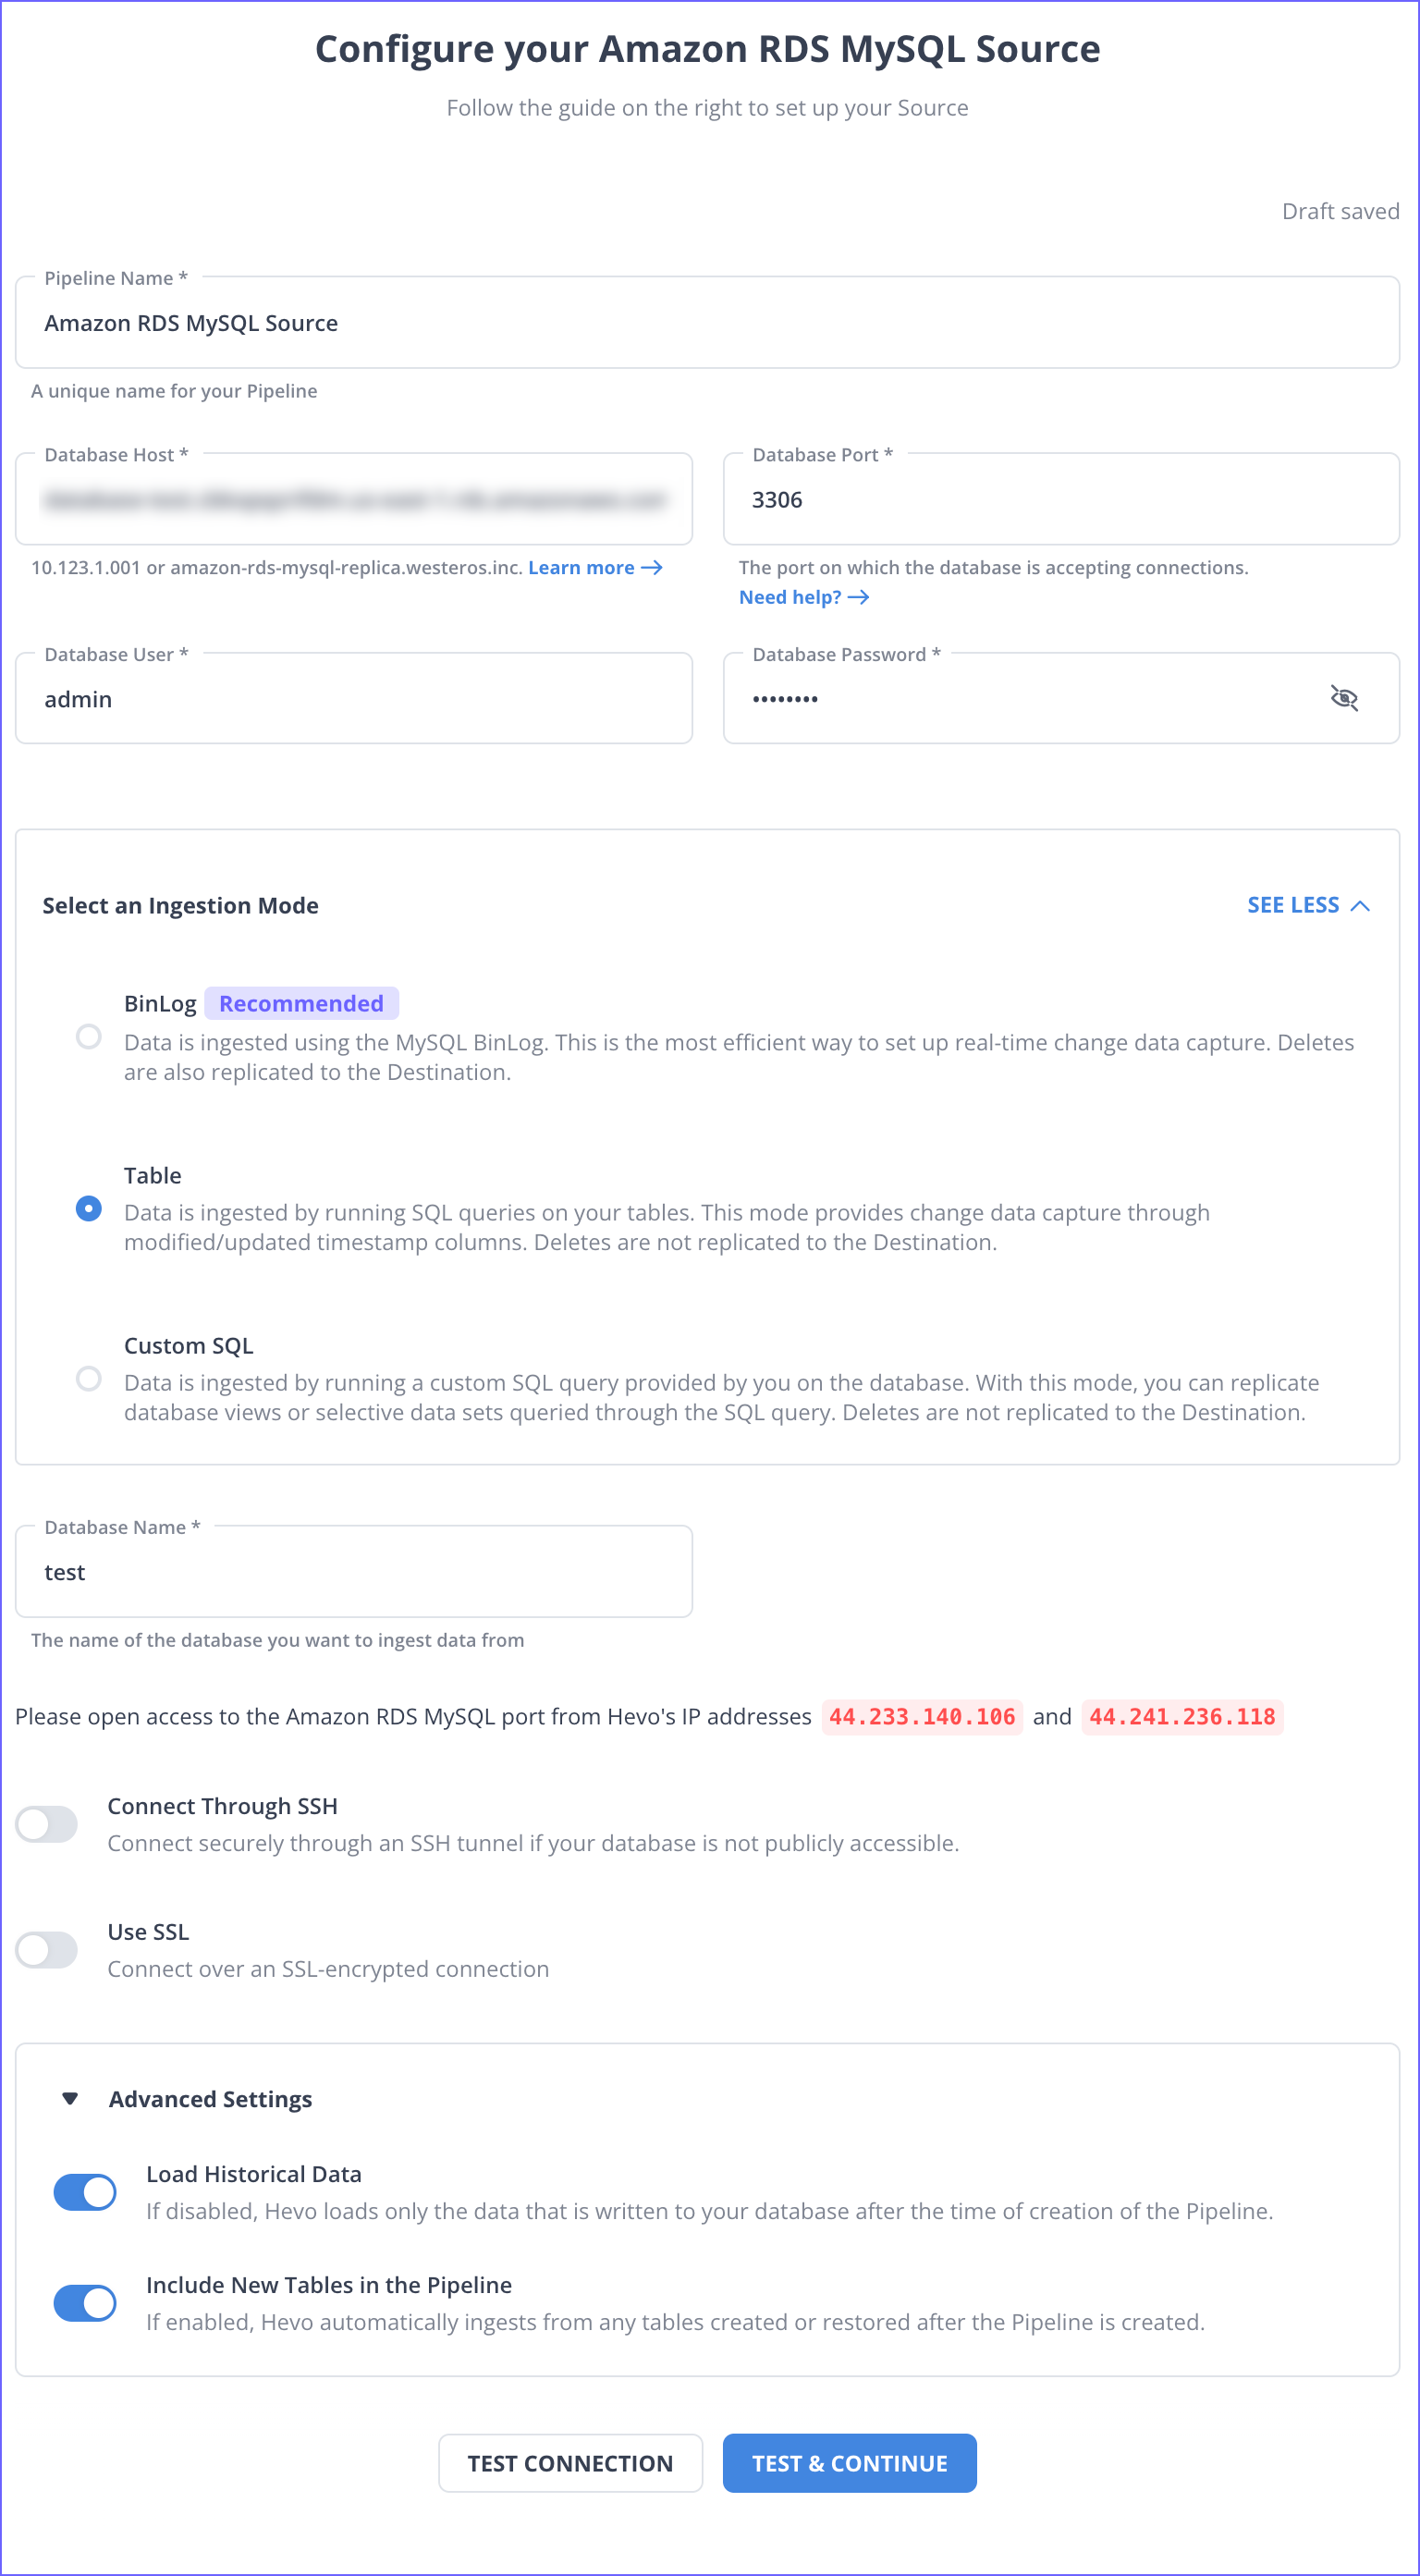
On the Select Source Type page, select and configure your Source, and then click TEST & CONTINUE. For example, here, we have selected Amazon RDS MySQL.
-
On the Select Destination page, select Snowflake.

-
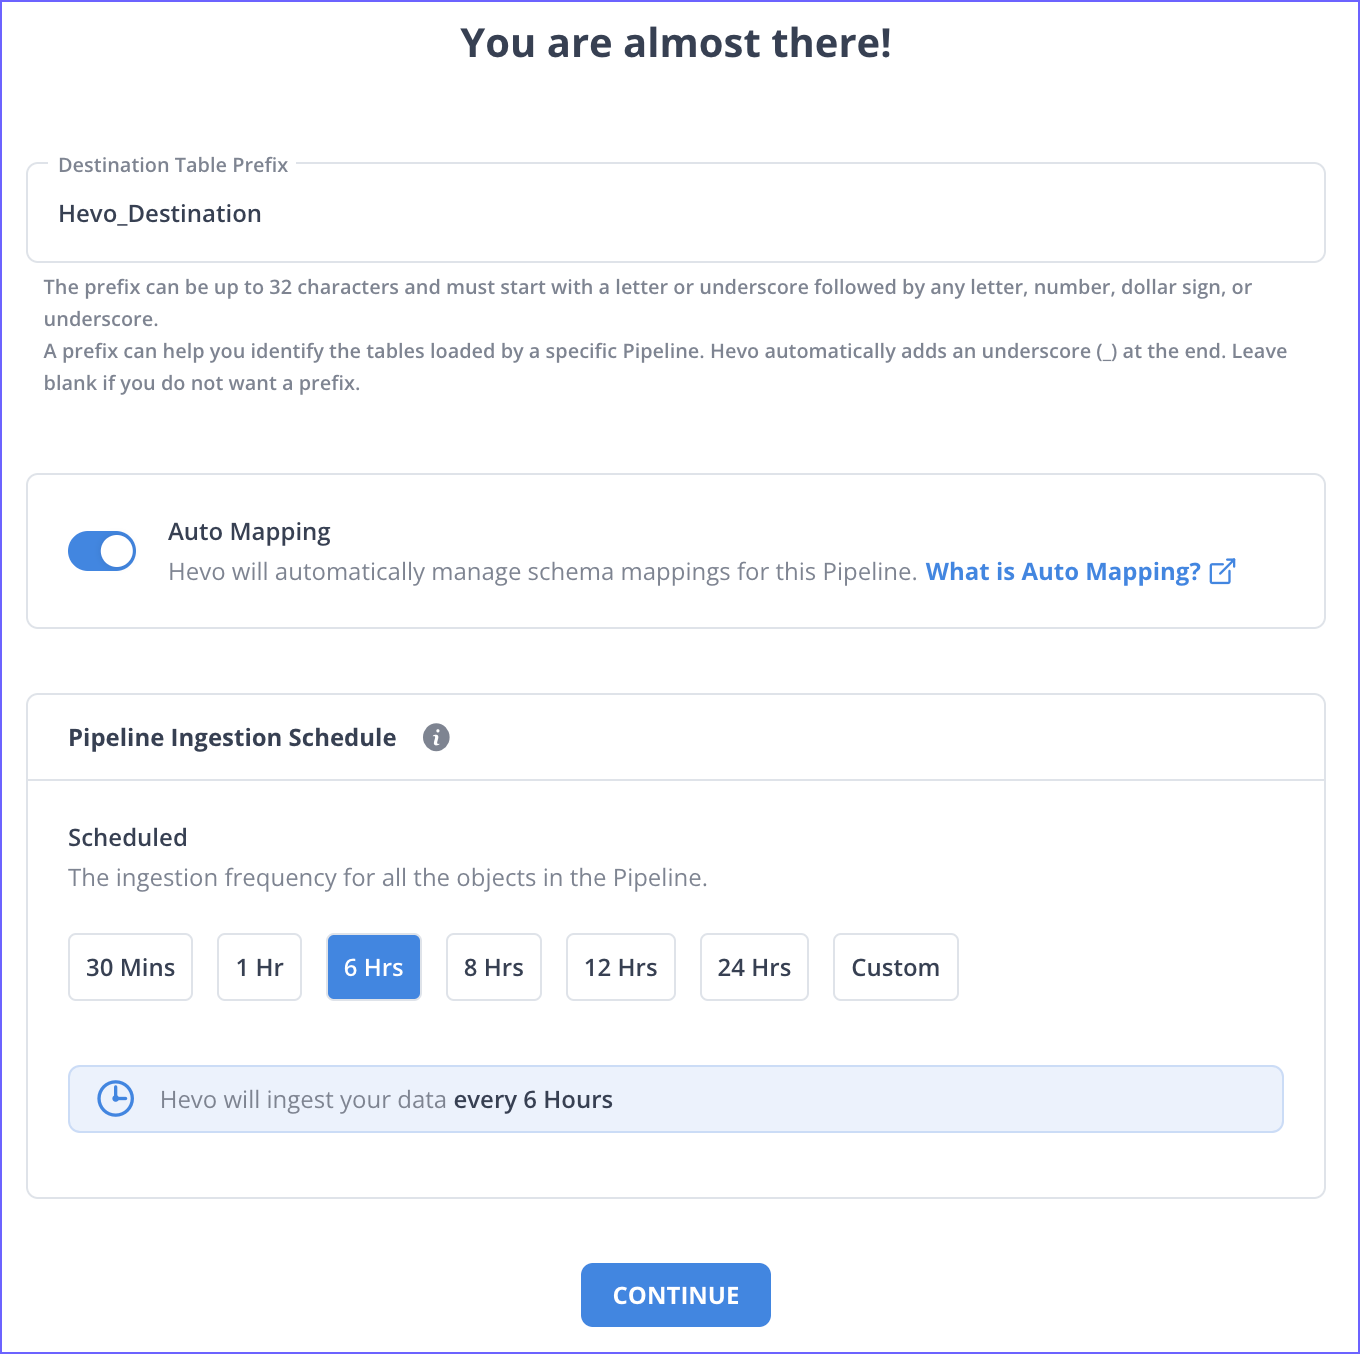
Specify the Destination Table Prefix.
-
Ensure that Auto Mapping is enabled if you want to automatically map Source Event Types to the Destination table.
-
Select the ingestion frequency at which Hevo must ingest data from the Source. You can select Custom and define the ingestion frequency by specifying an integer value in hours.
-
Click CONTINUE.
Connect Using the Snowflake Credentials
Refer to the steps in this section to create a Snowflake account, connect to a warehouse, and obtain the Snowflake credentials.
(Optional) Creating a Snowflake Account
In Snowflake, when you sign up for the account, you get 30 days of free access with $400 credits. Beyond this limit, it is chargeable. The free trial starts from the day you complete the sign up and activate the account. In case you end up using the $400 credits before the 30 days, the free trial gets over and the account is suspended. You can still log in to your account, however, you cannot use any features, such as running a virtual warehouse, loading data, or performing queries.
Perform the following steps to create a Snowflake account:
-
Navigate to https://signup.snowflake.com/.
-
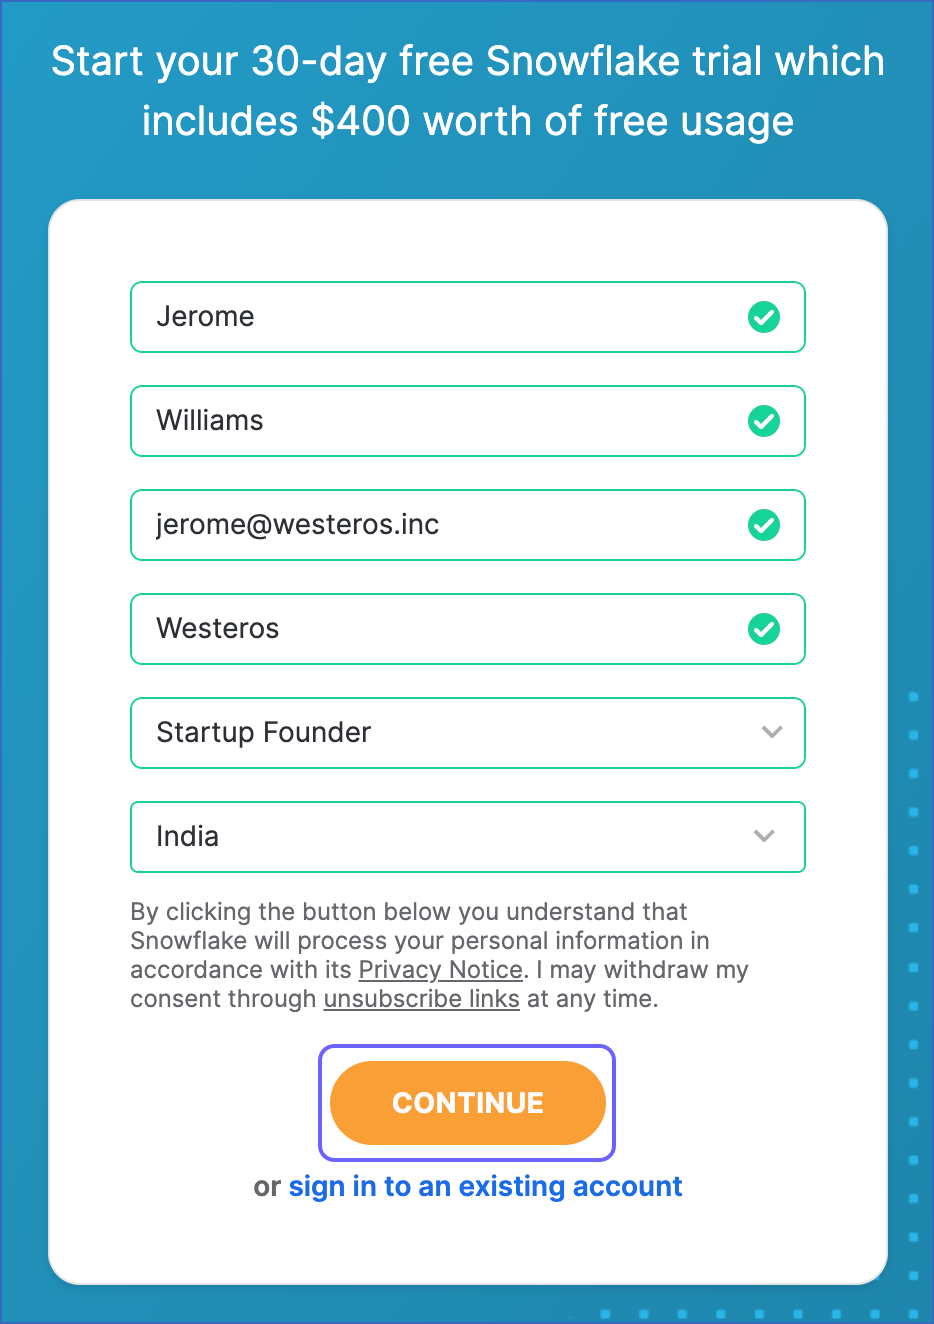
In the Sign up page, specify the following and click CONTINUE:
-
First Name and Last Name: The first and last name of the account user.
-
Email: A valid email address that can be used to manage the Snowflake account.
-
Company: The name of your organization.
-
Country: The organization’s country or region.
-
-
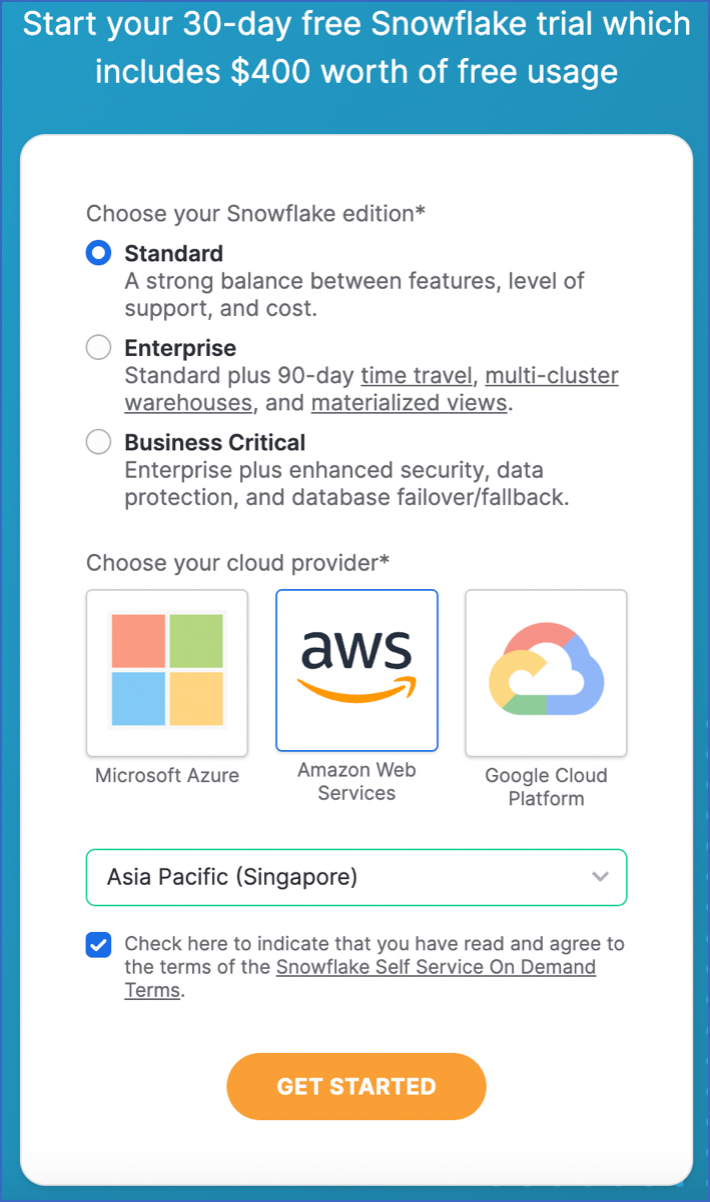
Select the Snowflake editions you want to use.
Note: There are multiple editions of Snowflake, so you can choose the one that meets your organization’s needs. Read Snowflake Editions to learn about the different editions available.
-
Select the desired cloud platform. You can choose to host your Snowflake account on any of the following cloud platforms.
-
Amazon Web Services (AWS)
-
Google Cloud Platform (GCP)
-
Microsoft Azure (Azure)
To learn about the details and pricing on each cloud platform, read Supported Cloud Platforms.
-
-
Select the region for your cloud platform. In each platform, Snowflake provides one or more regions where the account can be provisioned.
-
Click GET STARTED.
That’s it! An email to activate your account is sent to your registered email address. Click the link in the email to sign-in to your Snowflake account.
Create and Configure your Snowflake Warehouse
Hevo provides you with a ready-to-use script to configure the Snowflake warehouse you intend to use as the Destination.
Follow these steps to run the script:
-
Log in to your Snowflake account.
-
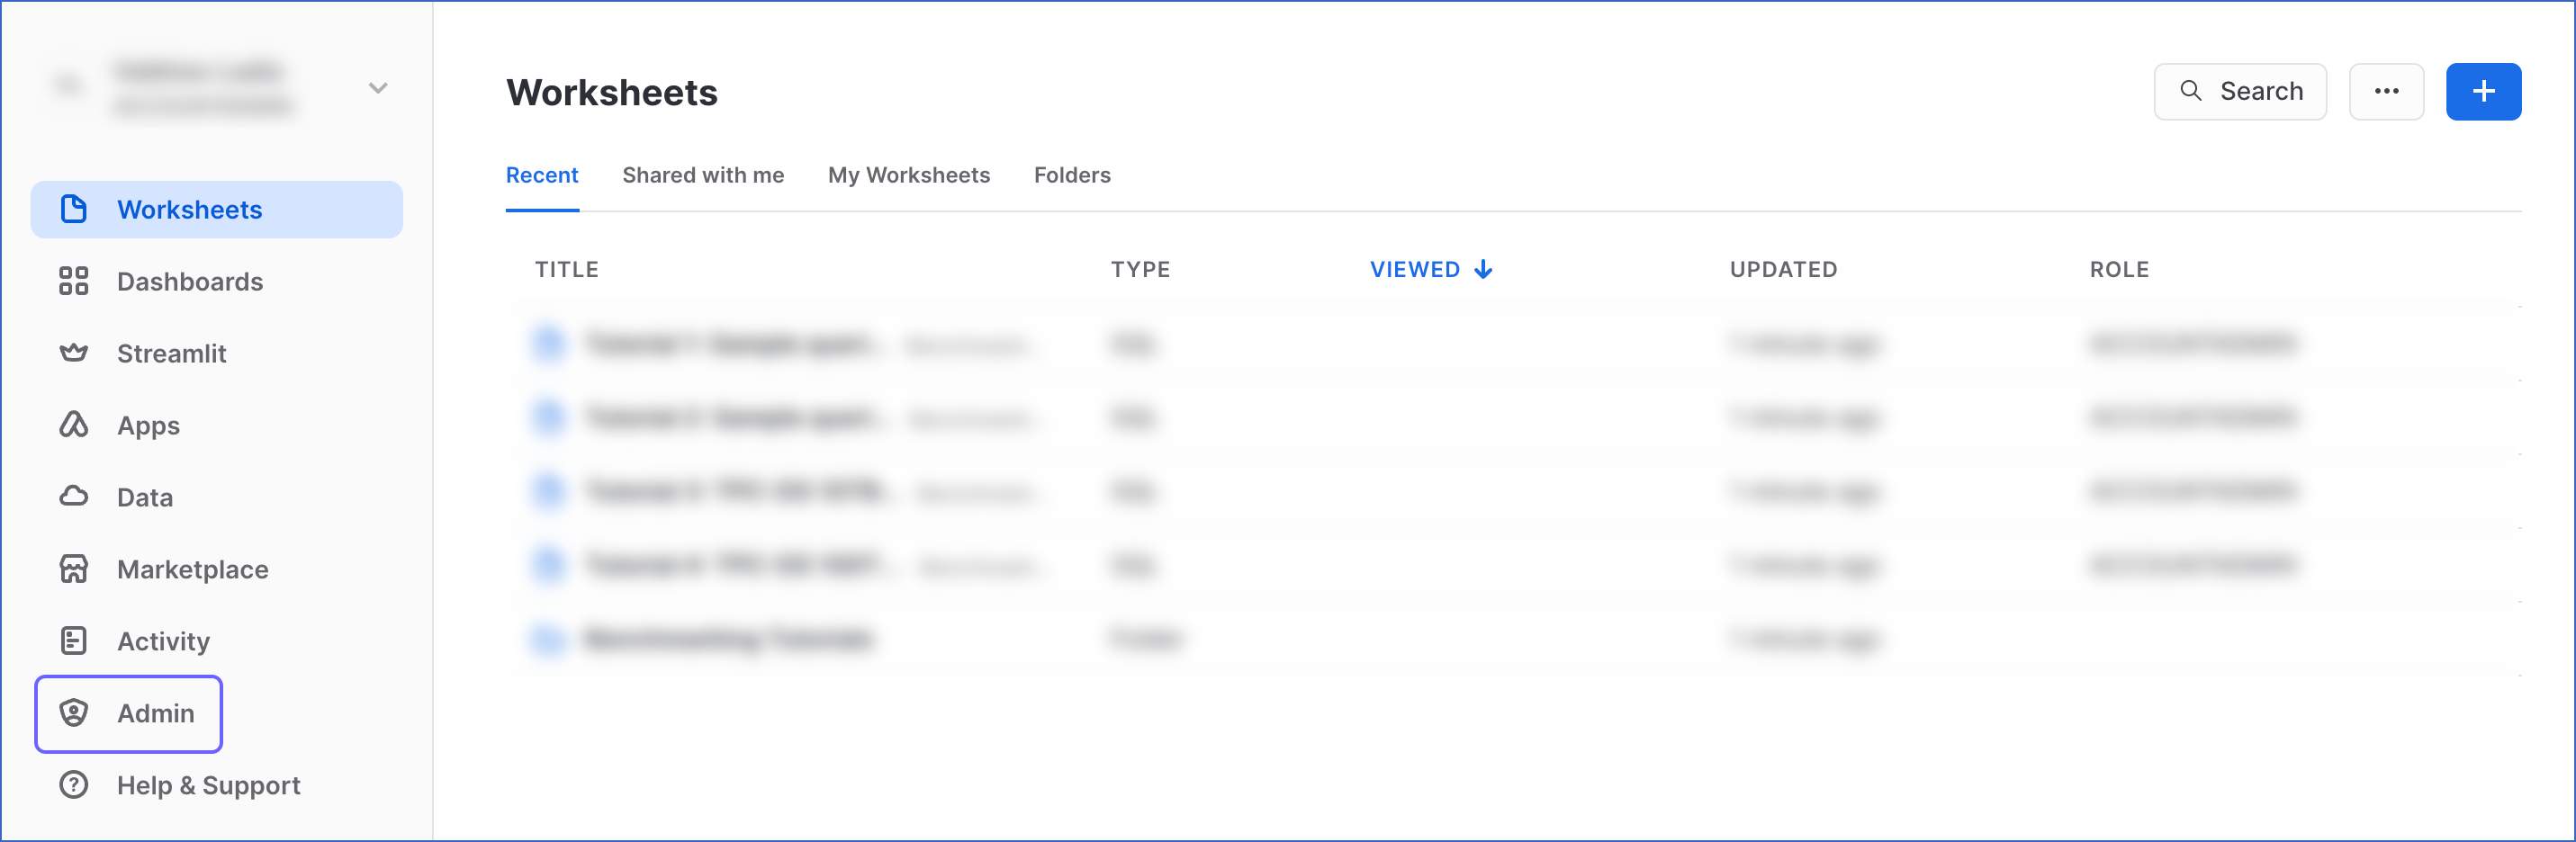
In the top right corner of the Worksheets tab, click the + icon to create a new worksheet.

-
Paste the following script in the worksheet. The script creates a new role for Hevo in your Snowflake Destination. Keeping your privacy in mind, the script grants only the bare minimum permissions required by Hevo to load the data in your Destination.
-- create variables for user / password / role / warehouse / database (needs to be uppercase for objects) set role_name = 'HEVO'; -- Replace "HEVO" with your role name set user_name = 'HARRY_POTTER'; -- Replace "HARRY_POTTER" with your username set user_password = 'Gryffindor'; -- Replace "Gryffindor" with the user password set warehouse_name = 'HOGWARTS'; -- Replace "HOGWARTS" with the name of your warehouse set database_name = 'RON'; -- Replace "RON" with the name of your database set schemaName = 'DARK_ARTS'; -- Replace "DARK_ARTS" with the database schema name set db_schema = concat($database_name, '.', $schemaName); begin; -- change role to securityadmin for user / role steps use role securityadmin; -- create role for HEVO create role if not exists identifier($role_name); grant role identifier($role_name) to role SYSADMIN; -- create a user for HEVO create user if not exists identifier($user_name) password = $user_password default_role = $role_name default_warehouse = $warehouse_name; -- Grant access to the user grant role identifier($role_name) to user identifier($user_name); -- change role to sysadmin for warehouse / database steps use role sysadmin; -- create a warehouse for HEVO, if it does not exist create warehouse if not exists identifier($warehouse_name) warehouse_size = xsmall warehouse_type = standard auto_suspend = 60 auto_resume = true initially_suspended = true; -- create database for HEVO create database if not exists identifier($database_name); -- grant HEVO role access to warehouse grant USAGE on warehouse identifier($warehouse_name) to role identifier($role_name); -- grant HEVO access to current schemas use role accountadmin; grant CREATE SCHEMA, MONITOR, USAGE, MODIFY on database identifier($database_name) to role identifier($role_name); -- grant Hevo access to future schemas use role accountadmin; grant SELECT on future tables in database identifier($database_name) to role identifier($role_name); grant MONITOR, USAGE, MODIFY on future schemas in database identifier($database_name) to role identifier($role_name); use role accountadmin; CREATE SCHEMA IF not exists identifier($db_schema); GRANT USAGE, MONITOR, CREATE TABLE, CREATE EXTERNAL TABLE, MODIFY ON SCHEMA identifier($db_schema) TO ROLE identifier($role_name); commit; -
Replace the sample values provided in lines 2-7 of the script with your own to create your warehouse. These are the credentials that you will be using to connect your warehouse to Hevo. You can specify a new warehouse, role, and or database name to create these now, or use pre-existing ones to load data into.
Note: The values for
role_name,user_name,warehouse_name,database_nameandschemaNamemust be in upper case. -
Press CMD + A (Mac) or CTRL + A (Windows) inside the worksheet area to select the script.
-
Press CMD+return (Mac) or CTRL + Enter (Windows) to run the script.
-
Once the script runs successfully, you can use the credentials from lines 2-7 of the script to connect your Snowflake warehouse to Hevo.
Obtain your Snowflake Account URL
The Snowflake data warehouse may be hosted on any of the following Cloud providers:
-
Amazon Web Services (AWS)
-
Google Cloud Platform (GCP)
-
Microsoft Azure (Azure)
The account name, region, and cloud service provider are visible in your Snowflake web interface URL.
For most accounts, the URL looks like https://account_name.region.snowflakecomputing.com.
For example, https://westeros.us-east-2.aws.snowflakecomputing.com. Here, westeros is your account name, us-east-2 is the region, and aws is the service provider.
Similarly, if your Snowflake instance is hosted on AWS, US West region, the URL looks like https://account_name.snowflakecomputing.com.
Perform the following steps to obtain your Snowflake Account URL:
-
Log in to your Snowflake instance. Click Admin in the left panel.
-
Under the Admin tab, click Accounts.

-
Hover the mouse on the LOCATOR field corresponding to the account for which you want to obtain the URL.

-
Click on the link icon to copy your account URL.
Configure Snowflake as a Destination
Perform the following steps to configure Snowflake as a Destination in Hevo:
-
Click DESTINATIONS in the Navigation Bar.
-
Click + CREATE in the Destinations List View.
-
In the Add Destination page, select Snowflake as the Destination type.
-
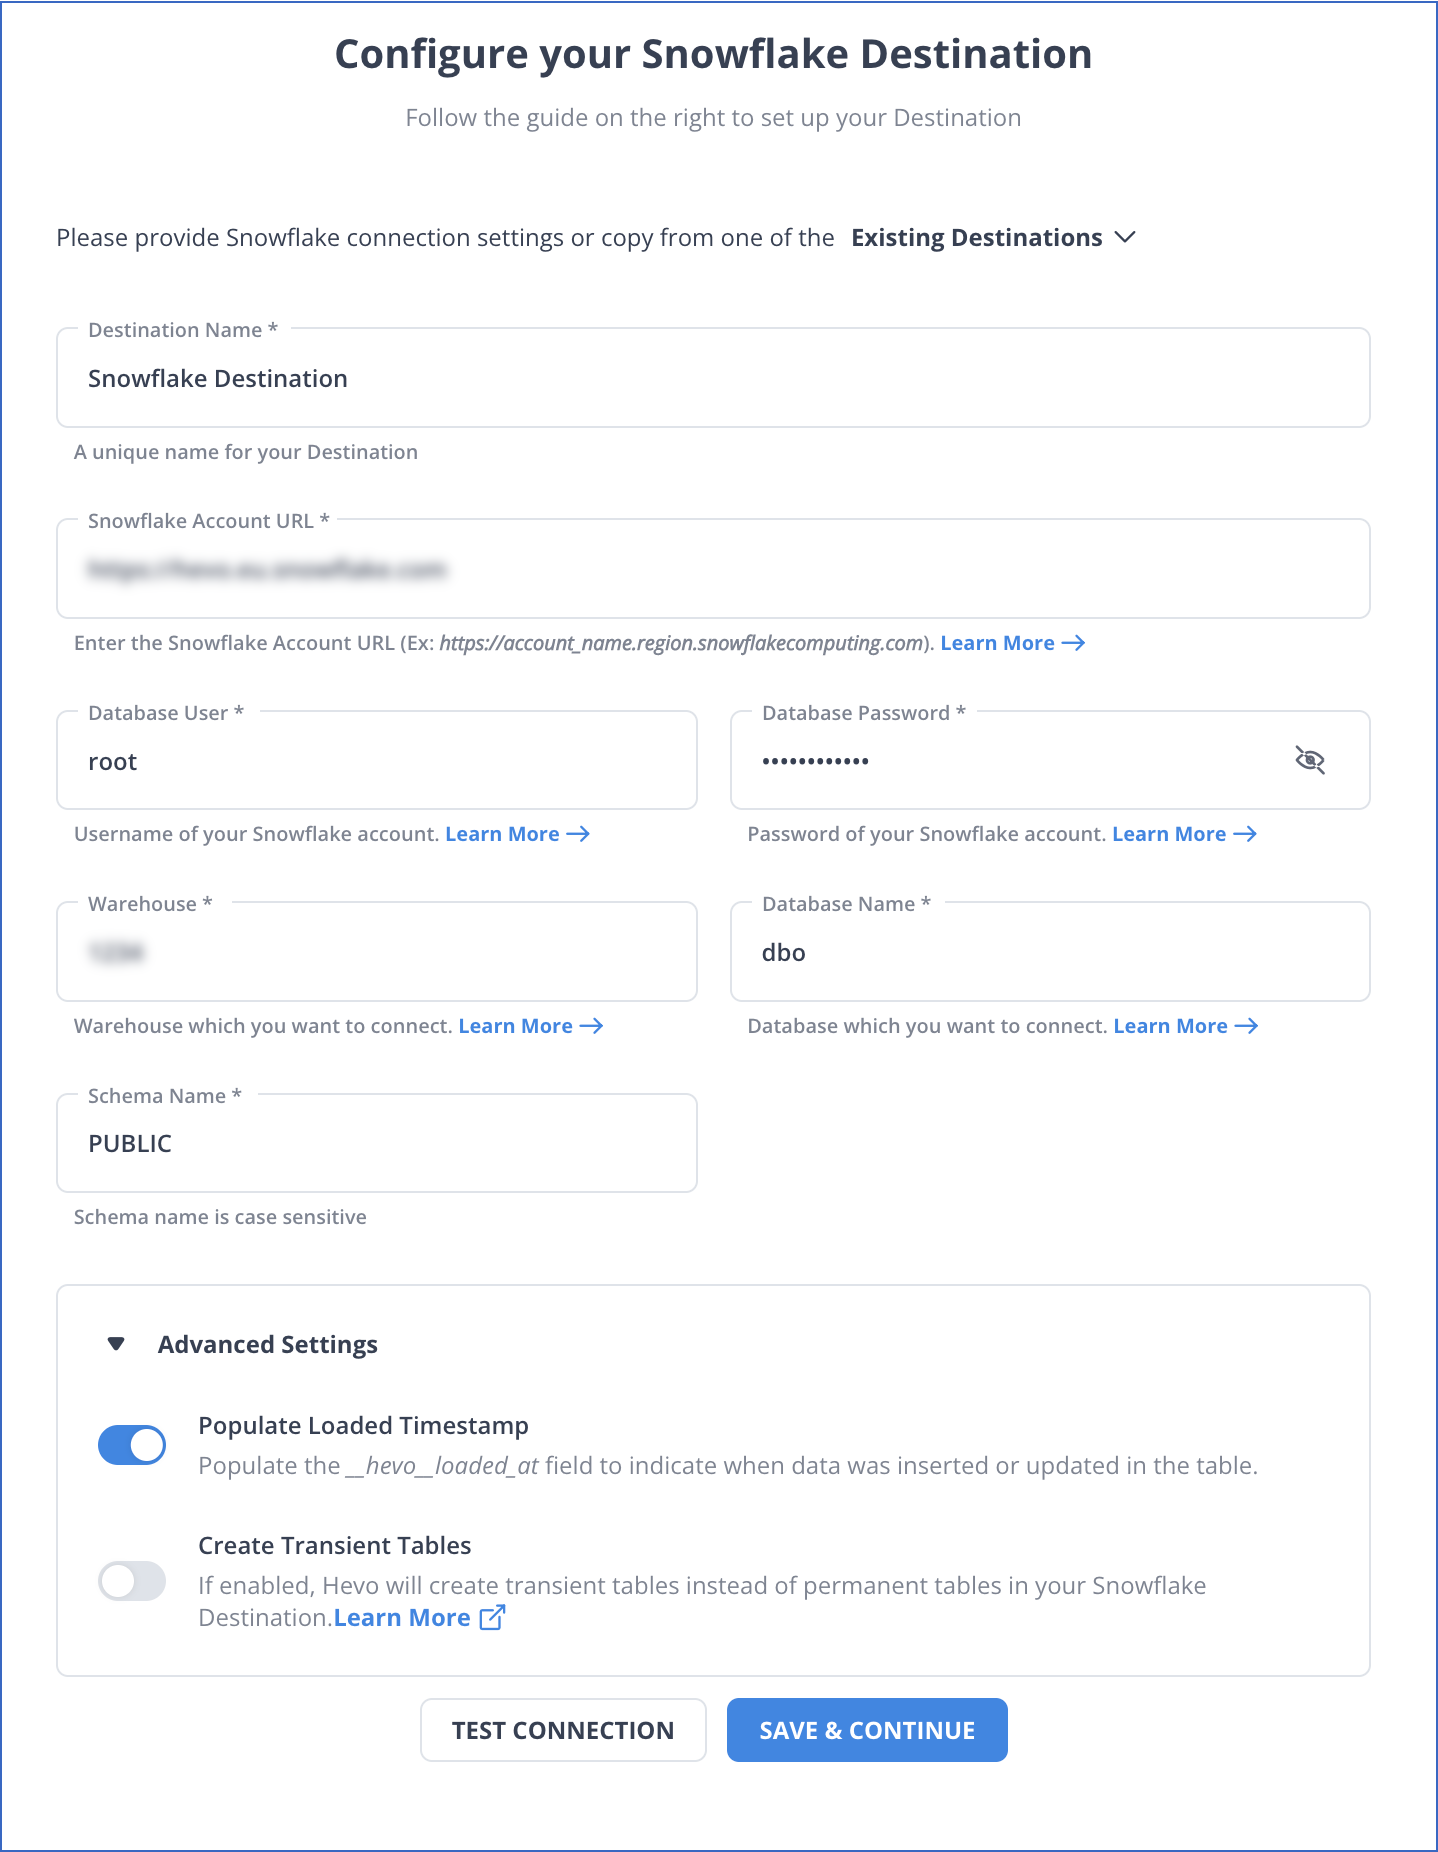
In the Configure your Snowflake Warehouse page, specify the following:
-
Destination Name: A unique name for your Destination.
-
Snowflake Account URL: The account URL that you retrieved in Step 3 above.
-
Database User: The Hevo user that you created. This user has a non-administrative role in the Snowflake database.
-
Database Password: Password of the database user.
-
Database Name: Name of the Destination database where the data is to be loaded.
-
Database Schema: Name of the schema in the Destination database where the data is to be loaded.
Note: Schema name is case-sensitive.
-
Warehouse: The Snowflake warehouse associated with your database, where the SQL queries and DML operations are performed.
-
Advanced Settings:
-
Populate Loaded Timestamp: Enable this option to append the
__hevo_loaded_atcolumn to the Destination table to indicate the time when the Event was loaded to the Destination. Read Loading Data to a Data Warehouse. -
Create Transient Tables: Enable this option to create transient tables. Transient tables have the same features as permanent tables minus the Fail-safe period. The fail-safe feature allows Snowflake to recover the table if you were to lose it, for up to seven days. Transient tables allow you to avoid the additional storage costs for the backup, and are suitable if your data does not need the same level of data protection and recovery provided by permanent tables, or if it can be reconstructed outside of Snowflake. Read Transient Tables.
-
-
-
Click TEST CONNECTION. This button is enabled once all the mandatory fields are specified.
-
Click SAVE & CONTINUE. This button is enabled once all the mandatory fields are specified.
Additional Information
Read the detailed Hevo documentation for the following related topics:
Handling Source Data with Different Data Types
For teams created in or after Hevo Release 1.58, Hevo automatically modifies the data type of a Snowflake table column to accommodate Source data with a different data type. Data type promotion is performed on tables that are less than 50GB in size. Read Handling Different Data Types in Source Data.
Note: Your Hevo release version is mentioned at the bottom of the Navigation Bar.
Destination Considerations
- In Snowflake, when you use the conversion functions TO_VARCHAR() and TO_DATE() on a high-precision timestamp column, it returns the same output values for similar inputs. For example, both functions return the same output for the timestamp values 2023-01-01 12:00:00.000001 and 2023-01-01 12:00:00.000002. As a result, when you run a query containing any one of these conversion functions, you may see duplicate records in your Destination table.
Limitations
- Hevo replicates a maximum of 4096 columns to each Snowflake table, of which six are Hevo-reserved metadata columns used during data replication. Therefore, your Pipeline can replicate up to 4090 (4096-6) columns for each table. Read Limits on the Number of Destination Columns.
See Also
Revision History
Refer to the following table for the list of key updates made to this page:
| Date | Release | Description of Change |
|---|---|---|
| Apr-18-2024 | 2.22.2 | Added sections: - Connect Using Snowflake Partner Connect. - Connect Using the Snowflake Credentials |
| Apr-11-2024 | NA | Added section, Destination Considerations. |
| Oct-03-2023 | NA | Updated sections, Creating a Snowflake Account and Create and Configure your Snowflake Warehouse as per the latest Snowflake UI. |
| Aug-11-2023 | NA | Fixed broken links. |
| Apr-25-2023 | 2.12 | Updated section, Configure Snowflake as a Destination to add information that you must specify all fields to create a Pipeline. |
| Dec-19-2022 | 2.04 | Updated section, Configure Snowflake as a Destination to reflect the latest Hevo UI. |
| Dec-19-2022 | 2.04 | Updated the page overview to add information about Hevo supporting private links for Snowflake. |
| Nov-24-2022 | NA | Added a step in section, Create and Configure your Snowflake Warehouse. |
| Oct-10-2022 | NA | Added the section (Optional) Creating a Snowflake Account. |
| Jun-16-2022 | NA | Modified section, Prerequisites to update the permissions required by Hevo to access data on your schema. |
| Jun-09-2022 | NA | Updated the page to provide a script containing all the user commands for creating a Snowflake warehouse. |
| Mar-31-2022 | NA | Updated the screenshots to reflect the latest Snowflake UI. |
| Feb-07-2022 | 1.81 | Updated the page to add the step, Create and Configure Your Snowflake Warehouse, and other permission related content. |
| Mar-09-2021 | 1.58 | Added section, Handling Source Data with Different Data Types. |
| Feb-22-2021 | NA | - Updated the page overview to state that the Pipeline stages the ingested data in Hevo’s S3 bucket, from where it is finally loaded to the Destination. - Formatting-related edits. |