Google BigQuery (Edge)
On This Page
Activate is currently available for Early Access. Please contact your Hevo account executive or the Support team to enable it for your team. Alternatively, request for early access to try out one or more such features.
Google BigQuery is Google Cloud’s fully managed, serverless data warehouse that lets you store and query large volumes of data using SQL. In Activate, BigQuery acts as the Source that your datasets read from before the data is sent to your business applications.
Activate reads your data from BigQuery without modifying the tables your datasets read from. It connects through a Google Cloud service account and runs its BigQuery jobs in the project that you specify. Activate keeps a record of each sync in a dedicated BigQuery dataset named HEVO in the same project. Activate also exports your data to a Google Cloud Storage (GCS) bucket that you own and reads it from there before sending it to your Target.
If your Pipelines already load data into BigQuery, you can use that same project as your Source. Activate then sends the data that your Pipelines have already loaded and your Transformations have already prepared.
Prerequisites
-
A Google Cloud project that contains the BigQuery datasets you want to send data from is available.
-
You have the Owner role in the project, or the following roles:
-
Service Account Admin and Service Account Key Admin, to create the service account and its key.
-
Project IAM Admin, to grant roles on the project.
-
BigQuery Admin, to create the HEVO BigQuery dataset and grant access to it.
-
Storage Admin, to create the GCS bucket and grant access to it.
-
-
A service account with a JSON key is available for Activate.
-
A GCS bucket is available for Activate to store the exported data temporarily.
-
A BigQuery dataset named HEVO is available in the same project and location as your BigQuery datasets. Activate records the progress of each sync there.
-
The service account is assigned the following roles:
-
BigQuery Job User on the project.
-
BigQuery Data Viewer on the project, or on each BigQuery dataset that your datasets read from.
-
BigQuery Data Editor on the HEVO BigQuery dataset.
-
Storage Object User on the GCS bucket.
-
-
The Project ID of your Google Cloud project is available.
Perform the following steps to configure your BigQuery Source in Activate:
(Optional) Create a Service Account
Note: If you are using an existing service account, skip to the Download the Service Account Key section.
Activate connects to BigQuery and to your GCS bucket as a Google Cloud service account. Creating a separate service account for Activate lets you grant it only the roles that Activate requires.
Perform the following steps to create a service account:
-
Log in to the Google Cloud console.
-
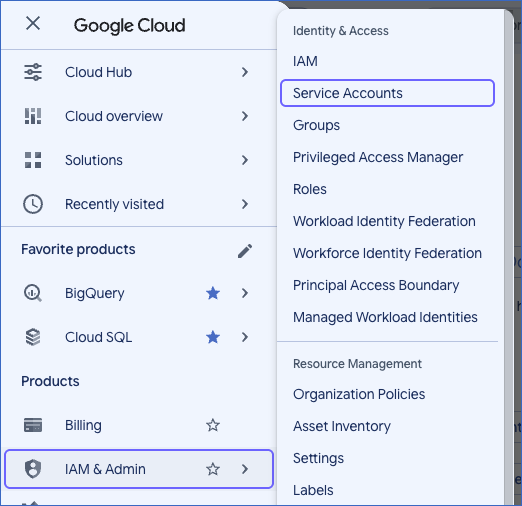
In the left navigation pane, click IAM & Admin, and then click Service Accounts.
-
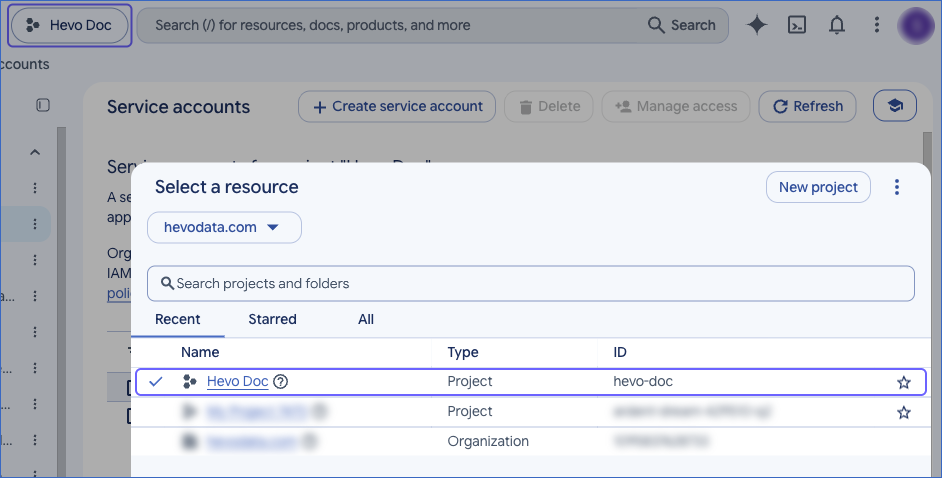
From the drop-down at the top of the page, select the project that contains your BigQuery datasets.
-
Click + Create service account.

-
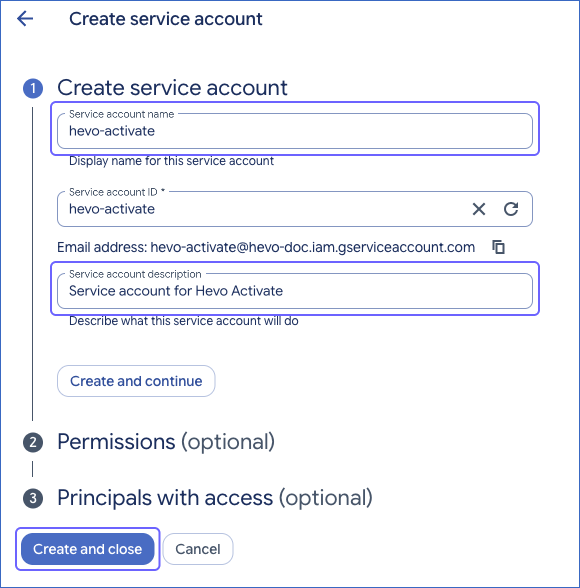
On the Create service account page, do the following:
-
Specify the following:
-
Service account name: A name for the service account. For example, hevo-activate. The Service account ID is generated from this name.
-
Service account description: A description of the service account. For example, Service account for Hevo Activate.
-
-
Click Create and close.
-
The service account is created and is displayed on the Service accounts page.
Download the Service Account Key
Activate authenticates as your service account using a key file in JSON format. Google Cloud stores the public key, and you download the private key once, when you create it.
Perform the following steps to create and download the key:
-
Log in to the Google Cloud console.
-
In the left navigation pane, click IAM & Admin, and then click Service Accounts.
-
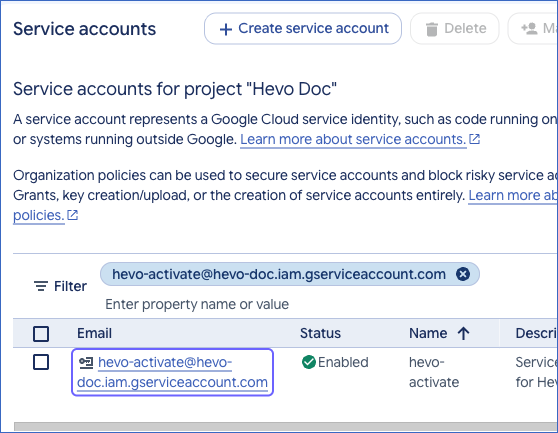
On the Service accounts page, click the service account that you created in the Create a Service Account section, or an existing one.
-
On the <Your service account> page, click the Keys tab.
-
Click Add key, and then click Create new key.
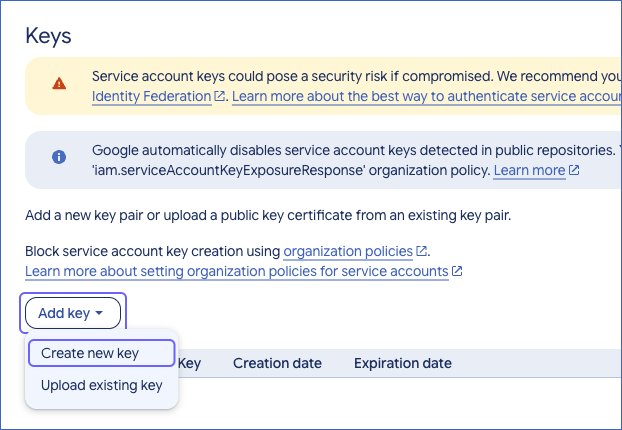
Note: If an organization policy, such as
iam.disableServiceAccountKeyCreation, blocks service account key creation in your project, creating the key fails with an error. Contact your organization administrator to allow key creation for this project. -
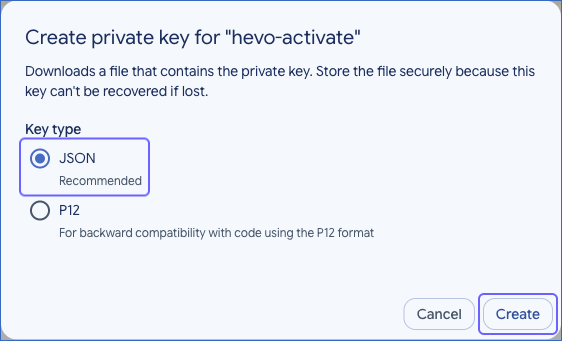
In the Create private key for <your service account> window, do the following:
-
Select JSON as the Key type.
-
Click Create.
The key file is downloaded to your computer. Store it in a secure location, as it cannot be downloaded again.
Note: Activate supports only the JSON key type.
-
Upload this key file while configuring your BigQuery Source in Activate.
(Optional) Create a GCS Bucket
Note: If you are using an existing GCS bucket, skip to the Grant Permissions and Create the HEVO Dataset section.
During each sync, Activate exports the data returned by your dataset from BigQuery to a GCS bucket and reads it from there. The bucket stores this data only temporarily, and Activate deletes the objects it creates. You can use an existing bucket or create one specifically for Activate. You can also use one bucket for more than one Source.
Perform the following steps to create a bucket:
-
Log in to the Google Cloud console and go to the Cloud Storage Buckets page.
-
On the Buckets page, click + Create.

-
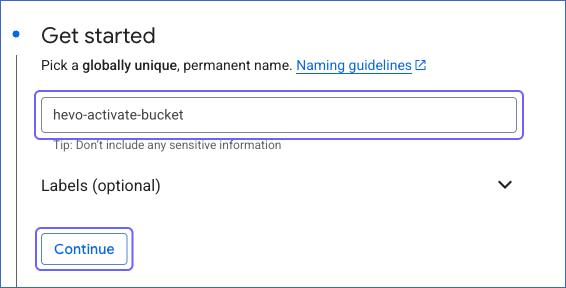
On the Create a bucket page, in the Get started section, do the following:
-
Specify a globally unique name for your bucket. For example, hevo-activate-bucket. Read Bucket names for the naming requirements.
-
Click Continue.
-
-
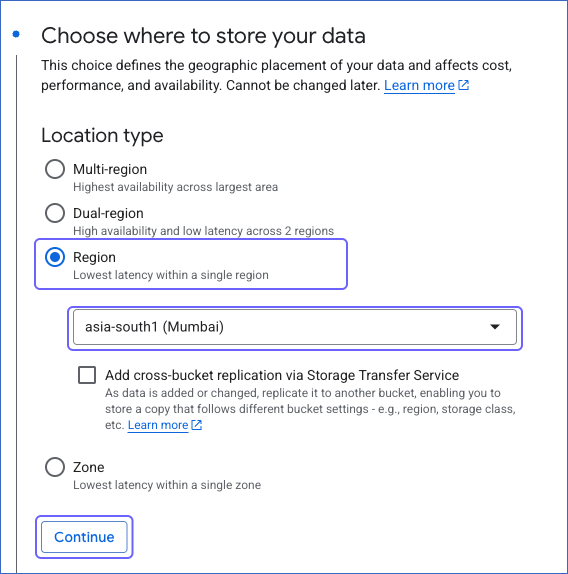
In the Choose where to store your data section, do the following:
-
Select a Location type and a location. Hevo recommends selecting the same location as your BigQuery datasets. For example, select Region and asia-south1 (Mumbai). You cannot change the location of a bucket after it is created.
-
Click Continue.
-
-
Keep the default values in the other sections, and click Create.
The bucket is created. You specify its name while configuring your Source in Activate.
Grant Permissions and Create the HEVO Dataset
Activate records the progress of each sync in a dedicated BigQuery dataset named HEVO, in the project and the location that your Source specifies. This BigQuery dataset helps Activate identify and send only the rows that changed since the last successful run, and stores the records that failed to sync. Read bookkeeping for more information.
The HEVO BigQuery dataset must be in the same location as your BigQuery datasets, and its name must be in uppercase. Do not set a default table expiration on it, and do not store your own data in it. Activate reserves it for bookkeeping and manages the tables inside it, so anything you store there can be changed.
Activate does not create the HEVO BigQuery dataset for you, and it does not grant any roles to the service account. If the HEVO BigQuery dataset is missing or has a default table expiration, or the service account does not have the BigQuery Job User, BigQuery Data Editor, or Storage Object User role, the connection test fails.
The following table lists the roles that the service account requires:
| Role | Granted On | Allows Hevo to |
|---|---|---|
| BigQuery Job User | Project | Run the queries and the export jobs for your datasets in the project. |
| BigQuery Data Viewer | Project, or each BigQuery dataset that your datasets read from | Read the tables and views that your datasets read from. |
| BigQuery Data Editor | HEVO BigQuery dataset | Create, read, update, and delete its own bookkeeping tables. |
| Storage Object User | GCS bucket | Write, read, and delete the temporary objects it creates in the bucket. |
Perform the following steps to grant the roles and create the HEVO BigQuery dataset:
Note: Replace the placeholder values in the commands with your own. For example, <location> with asia-south1, and <service_account_email> with the email address of the service account, which is also the client_email value in your key file.
-
Log in to the Google Cloud console as a user with the Owner role in the project, or with the permissions to grant IAM roles on the project.
-
From the drop-down at the top of the page, select the project that contains your BigQuery datasets.
-
Click the Activate Cloud Shell (
 ) icon at the top of the page. A Cloud Shell terminal opens at the bottom of the page, set to the project you selected. Paste each command in the following steps into this terminal, and press Enter to run it.
-
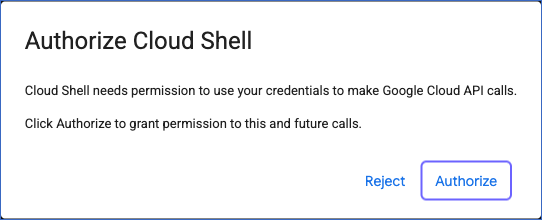
If the Authorize Cloud Shell dialog is displayed, click Authorize.
-
Run the following command to allow the service account to run BigQuery jobs in the project:
gcloud projects add-iam-policy-binding "<project_id>" \ --member="serviceAccount:<service_account_email>" \ --role="roles/bigquery.jobUser" -
Run the following command to allow the service account to read your data:
gcloud projects add-iam-policy-binding "<project_id>" \
  --member="serviceAccount:<service_account_email>" \
  --role="roles/bigquery.dataViewer"
This command grants read access to every BigQuery dataset in the project. To limit access, run the following command instead, once for each BigQuery dataset that your datasets read from:
bq query --project_id="<project_id>" --location="<location>" --use_legacy_sql=false \ 'GRANT `roles/bigquery.dataViewer` ON SCHEMA `<project_id>.<bigquery_dataset_name>` TO "serviceAccount:<service_account_email>";' -
Run the following commands to create the HEVO BigQuery dataset and allow the service account to manage its tables:
bq --location="<location>" mk --dataset --force=true "<project_id>:HEVO" bq query --project_id="<project_id>" --location="<location>" --use_legacy_sql=false \ 'GRANT `roles/bigquery.dataEditor` ON SCHEMA `<project_id>.HEVO` TO "serviceAccount:<service_account_email>";' -
Run the following command to allow the service account to use your GCS bucket:
gcloud storage buckets add-iam-policy-binding "gs://<bucket_name>" \
  --member="serviceAccount:<service_account_email>" \
  --role="roles/storage.objectUser"
After you upload the key file while configuring your Source, Activate displays the same commands with your values filled in, except the command that limits read access to specific BigQuery datasets.
Obtain your Project ID
Activate runs its BigQuery jobs in the Google Cloud project that you specify while configuring your BigQuery Source, and your datasets read from the BigQuery datasets in that project. The project ID is different from the project name. Your key file also contains a project_id value, which identifies the project in which the service account was created. If your BigQuery datasets are in a different project, use the ID of that project instead.
Perform the following steps to obtain your project ID:
-
Log in to the Google Cloud console and go to the Manage resources page.
-
On the Manage resources page, find the project that contains your BigQuery datasets, and copy its ID. For example, hevo-doc.
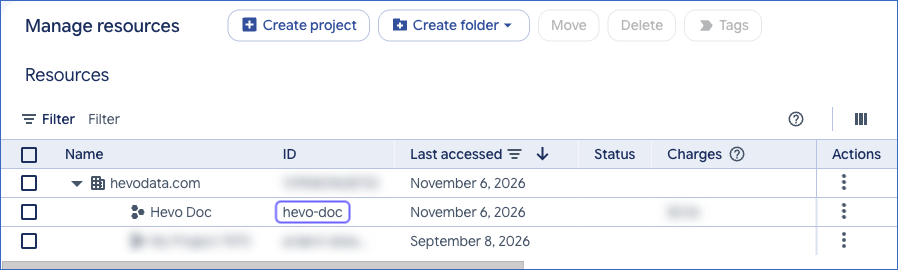
Specify this project ID while configuring your BigQuery Source in Activate.
Configure BigQuery as a Source in Activate
Perform the following steps to configure BigQuery as a Source in Activate:
-
In the Navigation Bar, click Activate.
-
On the Activate page, click the Sources tab, and then click + Create Source.

-
On the Select Source Type page, click BigQuery.
-
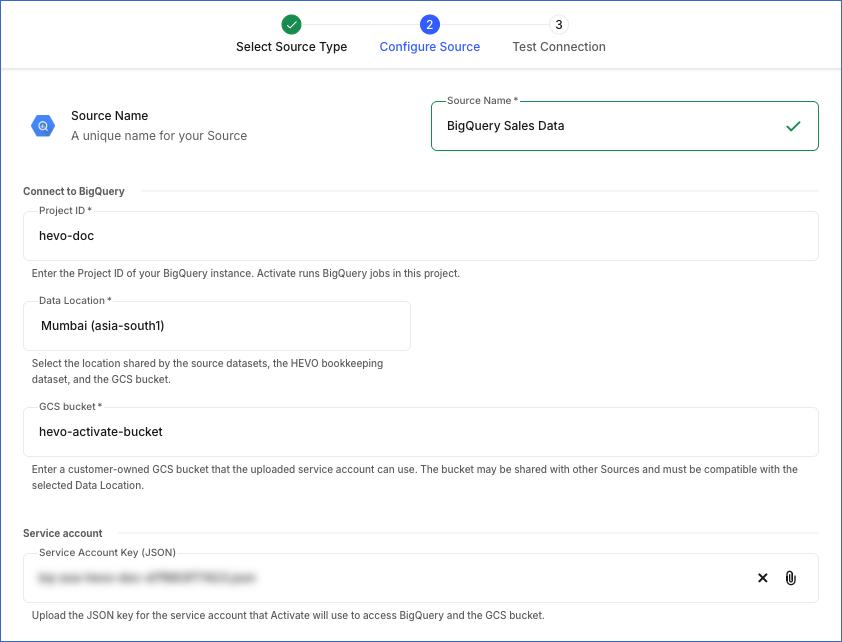
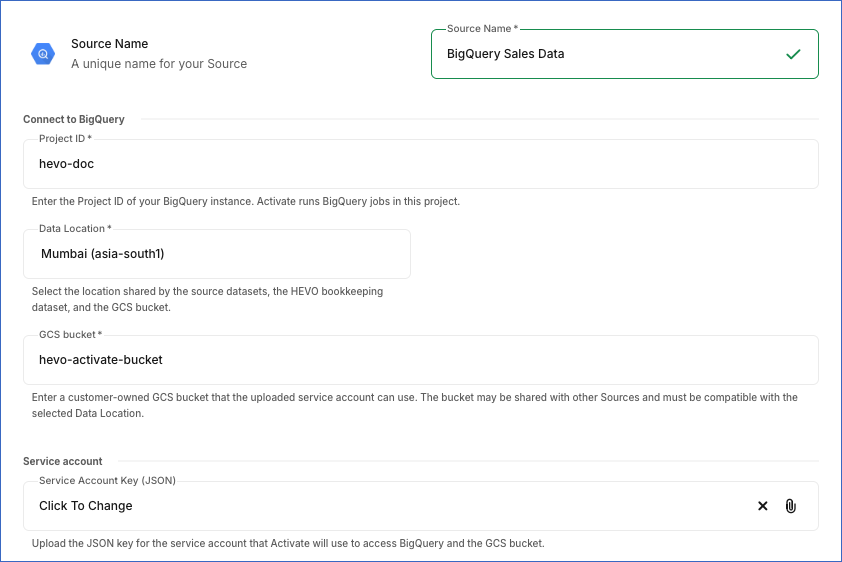
On the Configure Source page, specify the following:
-
Source Name: A unique name for your Source, not exceeding 255 characters. For example, BigQuery Sales Data.
-
In the Connect to BigQuery section:
-
Project ID: The ID of the Google Cloud project that you obtained in the Obtain your Project ID section. Activate runs its BigQuery jobs in this project.
-
Data Location: The location of the BigQuery datasets that your datasets read from. The HEVO BigQuery dataset must be in this location as well. Select a location from the drop-down. For example, Mumbai (asia-south1). While creating a dataset, only the BigQuery datasets in this location are available.
-
GCS bucket: The name of the GCS bucket that you created in the Create a GCS Bucket section, or an existing one. Specify only the name, without the gs:// prefix. For example, hevo-activate-bucket.
-
-
In the Service account section:
-
Service Account Key (JSON): The key file that you downloaded in the Download the Service Account Key section. Click the attach (
 ) icon to upload it. If the file is not a service account key, an error is displayed below the field.
-
Service Account Key (JSON): The key file that you downloaded in the Download the Service Account Key section. Click the attach (
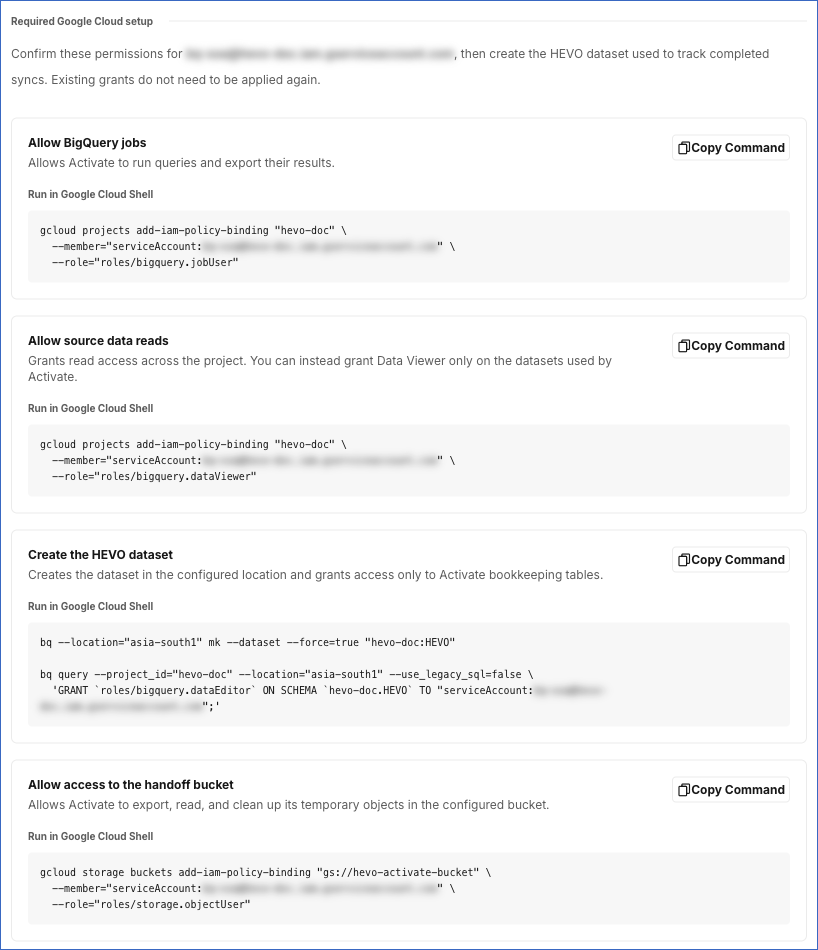
After you upload the key file, Activate displays the Required Google Cloud setup panel. The panel lists the commands from the Grant Permissions and Create the HEVO Dataset section, with your project ID, location, bucket name, and service account email address filled in. Click Copy Command to copy a command, and then paste it into Cloud Shell and press Enter to run it. Read Grant Permissions and Create the HEVO Dataset for the steps to open Cloud Shell. You can skip any role that the service account already has.
-
-
Click Continue.
-
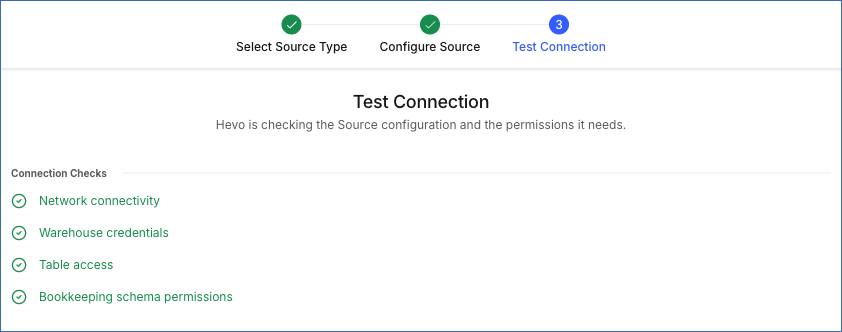
On the Test Connection page, Hevo tests the connection using the configured service account. The test confirms the following:
-
The HEVO BigQuery dataset exists in the selected location, is visible to the service account, and has no default table expiration.
-
The service account can write, read, list, and delete an object in the GCS bucket.
-
The service account can create, query, and drop a table in the HEVO BigQuery dataset, and export it to the GCS bucket.
The connection test does not run your dataset queries, so it cannot confirm read access to every BigQuery dataset that your datasets read from. Activate validates that access when you create a dataset or preview its query. If a dataset query fails with a permission error after the Source connects successfully, grant the BigQuery Data Viewer role on that BigQuery dataset.
-
-
Click Finish. This button is available only after the connection test succeeds.
The Source is created and appears in the Sources List View with the Active status, and you can create datasets from it. The Default Database/Project column displays the project ID of the Source.
Troubleshooting the Connection Test
Missing HEVO dataset
The HEVO BigQuery dataset must exist in the project that you specified, and the service account must be able to view it. Creating it in another project, or under a different name, causes this failure. Read Grant Permissions and Create the HEVO Dataset for the steps.
HEVO dataset in a different location
The HEVO BigQuery dataset must be in the location that you select in the Data Location field. You cannot change the location of an existing BigQuery dataset, so either select the location of the HEVO BigQuery dataset, or delete it and create it again in the location of your BigQuery datasets.
Default table expiration on the HEVO dataset
Activate keeps its bookkeeping tables across runs, so the HEVO BigQuery dataset must not delete them automatically. Remove the default table expiration from the BigQuery dataset’s settings, and test the connection again.
Insufficient permissions
The service account must have the BigQuery Job User, BigQuery Data Editor, and Storage Object User roles listed in the Grant Permissions and Create the HEVO Dataset section. The BigQuery Job User role is granted on the project, so only a user with the permission to change the project’s IAM policy can grant it.
Invalid service account key
The uploaded file must be the complete JSON key of a service account. If the file is not a service account key, the Configure Source page displays an error below the Service Account Key (JSON) field. If the file has the structure of a key but contains incomplete or invalid key material, the connection test fails. A key that was deleted in Google Cloud also fails the connection test. Download a new key and upload it again. Read Download the Service Account Key for the steps.
GCS bucket not accessible
The bucket must exist and the service account must have the Storage Object User role on it. Specify only the bucket name in the GCS bucket field, without the gs:// prefix or a folder path.
Modifying BigQuery Source Configuration
You can modify the configuration of your BigQuery Source after its creation. However, any configuration changes affect all the datasets built on that Source and all the Activations that use those datasets. If a Source shows the Failed status, its credentials are no longer valid, and every Activation that depends on it fails until the credentials are corrected.
Perform the following steps to modify the configuration of your BigQuery Source in Activate:
-
In the Navigation Bar, click Activate.
-
On the Activate page, click the Sources tab.
-
Click the Source you want to modify to open it in the Detailed View.
-
In the Source Header, click Edit.

-
On the <Your Source Name> page, you can do the following:
-
Specify a new name for your Source, not exceeding 255 characters.
-
In the Connect to BigQuery section, you can update the Project ID, the Data Location, and the GCS bucket.
-
In the Service account section, click the attach (
) icon in the Service Account Key (JSON) field to upload a different key file. Activate displays the Required Google Cloud setup panel only after you upload a new key file.
-
-
Click Test & Save.
-
In the Need your attention dialog, click Yes, Go Ahead.
Hevo tests the connection with the updated configuration and saves it. A notification is displayed to confirm that the Source has been updated successfully.
Source Considerations
-
A BigQuery Source does not specify a default BigQuery dataset, so a dataset query that names only the table fails with an invalid source query error, which does not mention the missing BigQuery dataset name. Reference each table in the <BIGQUERY_DATASET_NAME>.<TABLE_NAME> format, which Activate resolves in the project that your Source specifies. You can also name the project, using the <PROJECT_ID>.<BIGQUERY_DATASET_NAME>.<TABLE_NAME> format enclosed in backticks. For example,
SELECT email FROM `my-project.marketing.customers`. -
A Table dataset lists only the BigQuery datasets in the location that your Source specifies. The HEVO BigQuery dataset is not listed.
Limitations
-
Activate supports only service account key authentication for BigQuery. You cannot connect using a user account or workload identity federation.
-
A BigQuery Source works with the BigQuery datasets in one location. To send data from BigQuery datasets in another location, create a separate Source for that location.
Revision History
Refer to the following table for the list of key updates made to this page:
| Date | Release | Description of Change |
|---|---|---|
| Nov-18-2026 | 2.54 | New document. |