Snowflake Iceberg (Edge)
On This Page
This Destination is currently available for Early Access. Please contact your Hevo account executive or the Support team to enable it for your team. Alternatively, request for early access to try out one or more such features.
Snowflake is deprecating password-based authentication and enforcing Multi-factor Authentication (MFA). As a result, a Snowflake Iceberg Destination configured with Access Credentials may stop connecting at any time, even if data is currently being loaded.
Hevo recommends connecting to your Snowflake warehouse using key pair authentication, as it is not affected by these changes. Read Obtain a Private and Public Key Pair to create a key pair, and Modifying Snowflake Iceberg Destination Configuration to update an existing Destination.
Snowflake Iceberg combines Snowflake’s data management and query capabilities with the open Apache Iceberg table format. Snowflake offers a cloud-based data storage and analytics service, generally termed as data warehouse-as-a-service. It creates and manages the tables in your Amazon S3 bucket and provides the SQL interface for querying the data. The Iceberg format keeps the table data and the information used to manage it in a standard format, allowing other query engines, such as Apache Spark and Trino, to read the same tables.
Apache Iceberg is an open-source table format designed for managing and querying large datasets. It does the following:
-
Keeps information about a table separate from its data files, allowing query engines to find and read only the files they need.
-
Tracks changes to the table over time, allowing the schema and data partitions to evolve without disrupting existing data.
-
Records each change as a snapshot, enabling transactions and allowing you to view the table as it existed at an earlier point in time or roll it back to that state.
-
Scales to very large datasets by organizing data files into manifests and manifest lists.
Structure of an Iceberg Table
An Iceberg table architecture consists of the table data files and metadata files, with a catalog used to locate and manage the table. The following describes each of these:
-
Catalog: A centralized system that manages and organizes information about tables. Query engines use the catalog to discover, create, update, and drop tables.
-
Metadata: The information that describes an Iceberg table, such as its schema, partitions, and history. This information is stored separately from the actual data files, in the following files:
-
Metadata file: A JSON file that typically contains the table schema, partitions, and snapshot history. A snapshot records the files that make up the table at a specific point in time.
-
Manifest: An immutable Avro file that contains information about a group of data files, including file paths, partition values, and statistics such as row counts and minimum and maximum values.
-
Manifest list: An index that points to a collection of manifest files.
-
-
Data: The actual records in the table. Iceberg data files can use formats such as Parquet or Avro.
Snowflake-managed Iceberg Tables
Hevo loads your data into Snowflake-managed Iceberg tables. In this configuration, Snowflake manages the Iceberg catalog and the table lifecycle, while the table data and metadata files are stored in your Amazon S3 bucket through the external volume that you configure.
-
External volume: The Snowflake object that specifies the Amazon S3 location where the table data and metadata files are stored, along with the identity that Snowflake uses to access that location.
-
Horizon Catalog: The Snowflake catalog and governance layer for Iceberg interoperability. External query engines such as Apache Spark and Trino can access Snowflake-managed Iceberg tables through the Horizon Iceberg REST Catalog API.
Prerequisites
-
An active Snowflake account is available.
-
An Amazon S3 bucket is available, and an IAM policy that grants Snowflake access to the bucket is created.
-
An IAM role that Snowflake can use to access your S3 bucket is created, and its ARN is available.
-
An external volume that specifies your S3 location is created in your Snowflake account.
-
The required permissions are granted to the Snowflake user that Hevo can use to connect to your account.
Perform the following steps to configure your Snowflake Iceberg Destination:
(Optional) Create a Snowflake Account
Note: If you already have a Snowflake account, skip this step. Otherwise, create a Snowflake account and select AWS as the cloud provider. Select the AWS region that you plan to use for the S3 bucket and Snowflake account.
When you sign up for a Snowflake account, you get 30 days of free access with $400 credits. The free trial continues for 30 days from the sign-up date, or until you consume the credits, whichever occurs first. Credits are consumed only by the warehouses in your account, and only while they are running. At the end of the trial, the account is suspended. You can still log in to a suspended account, however, you cannot use any features, such as running a warehouse, loading data, or performing queries, until you upgrade your account or add more credits.
Perform the following steps to create a Snowflake account:
-
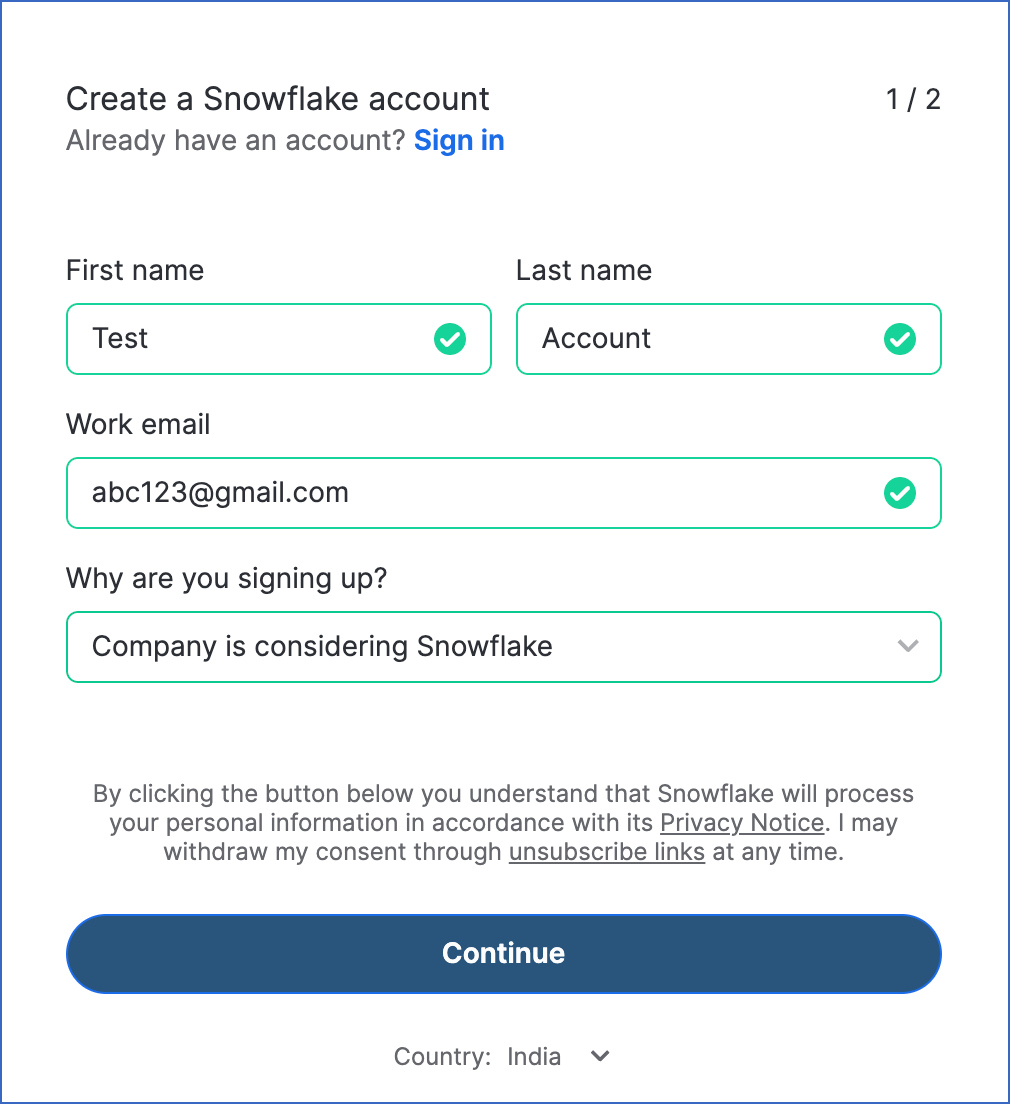
In the Create a Snowflake account form, do the following:
-
Specify the following:
-
First name and Last name: The first and last name of the account user.
-
Work email: A valid email address that can be used to manage the Snowflake account.
-
Why are you signing up?: From the drop-down, select the reason for creating the account. For example, Company is considering Snowflake.
-
Country: Your organization’s country or region. Snowflake detects this value automatically based on your location.
-
-
Click Continue.
-
-
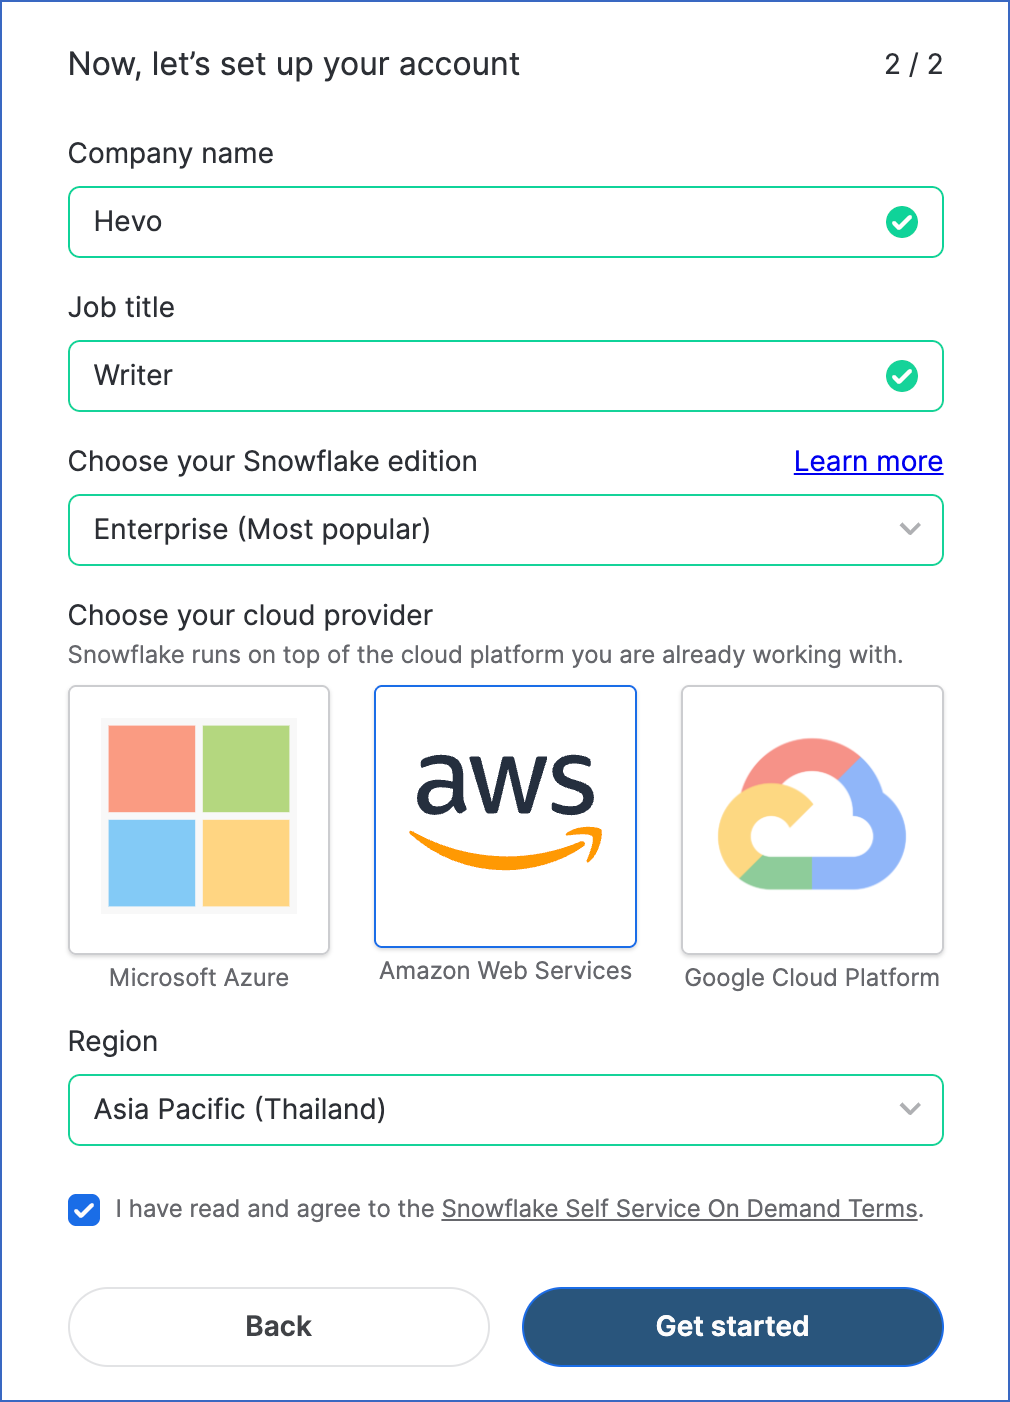
In the Now, let’s set up your account form, do the following:
-
Specify the following:
-
Company name: The name of your organization.
-
Job title: The account user’s role in the organization.
-
Choose your Snowflake edition: From the drop-down, select the Snowflake edition that you want to use.
Note: Iceberg tables are available on all Snowflake accounts, so you can select the edition that meets your organization’s needs. Read Snowflake Editions to know more about the different editions available.
-
Choose your cloud provider: Select Amazon Web Services, as Snowflake stores your Iceberg table files in an Amazon S3 bucket. Read Supported Cloud Platforms to know more about the details and pricing of each cloud platform.
Note: Snowflake can also write to an S3 bucket from an account hosted on Microsoft Azure or Google Cloud Platform. However, it charges you for the data transfer when your account and the bucket are on different cloud platforms.
-
Region: From the drop-down, select the region in which your account is provisioned. In each cloud platform, Snowflake provides one or more regions.
Note: Select the same region as the Amazon S3 bucket that you want to use for your Iceberg tables. Snowflake charges you for the data transfer if they are in different regions, and your data takes longer to load.
-
-
Select the I have read and agree to the Snowflake Self Service On Demand Terms check box.
-
Click Get started.
-
-
Snowflake displays two Almost there… screens with optional questions about your preferred programming languages and your intended use of Snowflake. Answer them, or click Skip on each screen. Snowflake then sends an activation email to your registered email address.
-
Click the link in the activation email to activate and sign in to your Snowflake account.
Your Snowflake account is now active and ready to use.
Create and Configure your Snowflake Warehouse
Hevo provides you with a ready-to-use script to create the warehouse and the database that your Snowflake Iceberg Destination uses.
Perform the following steps to run the script:
-
Log in to your Snowflake account.
-
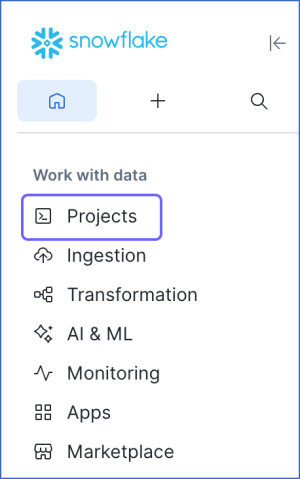
In the left navigation pane, click Projects.
-
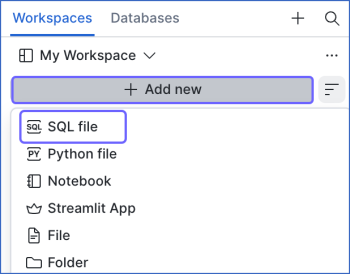
In the Workspaces tab, click + Add new, and then click SQL file to create a SQL worksheet.
-
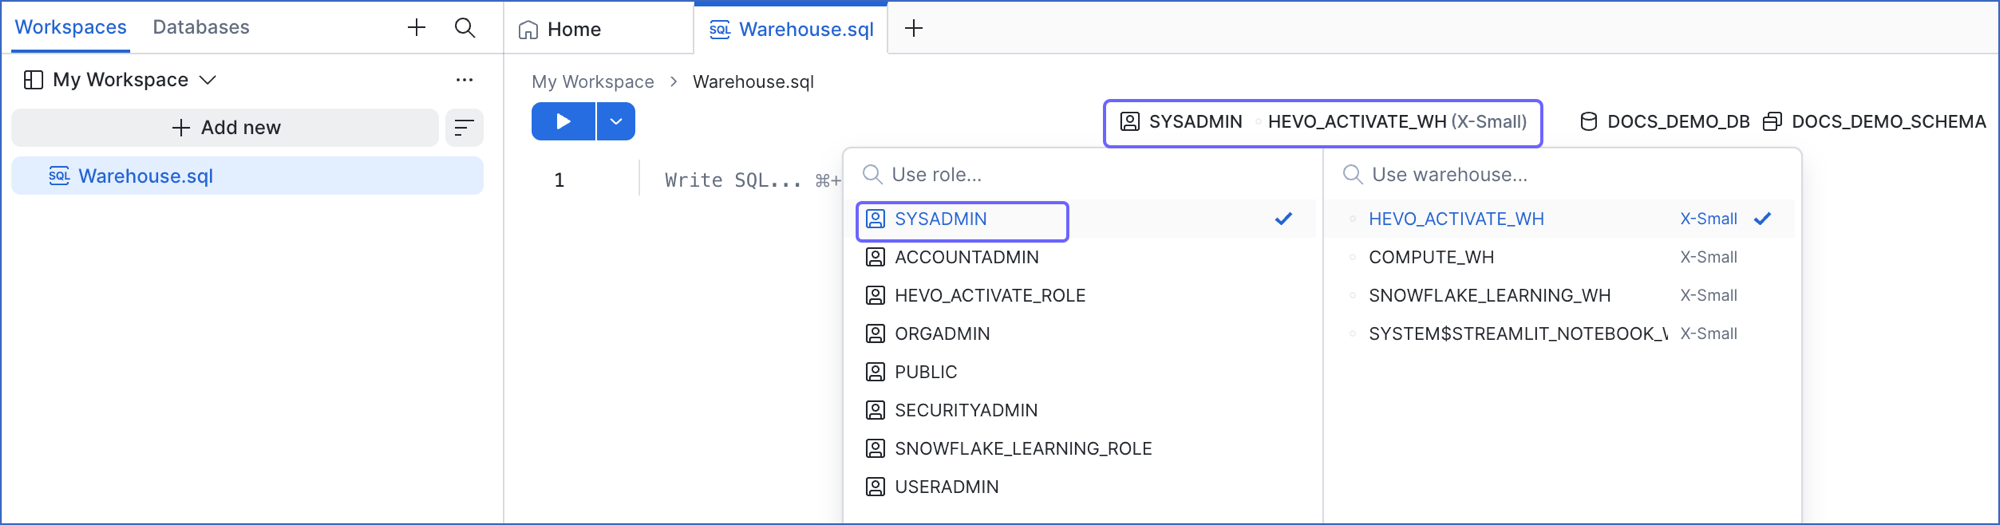
In the role selector at the top right of the worksheet, ensure that the SYSADMIN role or a higher role is selected. If it is not, click the drop-down and select that role.
-
Copy the following script and paste it into the worksheet. Replace the sample values provided for warehouse_name and database_name (in lines 2-3 of the script) with your own. If the names that you specify do not exist, the script creates the warehouse and database for you. If they already exist, the script leaves them unchanged.
-- Create variables for the warehouse and database names (must be in uppercase) set warehouse_name = 'HOGWARTS'; -- Replace "HOGWARTS" with the name of your warehouse set database_name = 'RON'; -- Replace "RON" with the name of your database begin; -- Create a warehouse for Hevo only if it does not exist create warehouse if not exists identifier($warehouse_name) warehouse_size = xsmall warehouse_type = standard auto_suspend = 60 auto_resume = true initially_suspended = true; -- Create a database for Hevo only if it does not exist create database if not exists identifier($database_name); commit;Note:
-
Specify the values for warehouse_name and database_name in uppercase. Snowflake stores and resolves unquoted identifiers in uppercase, and the Warehouse and Database Name values that you specify while configuring your Destination are case-sensitive and must match the names that Snowflake creates.
-
The script sets
auto_resumetotrue, as Hevo cannot load data into a suspended warehouse. If you are using an existing warehouse, ensure that it is configured to resume automatically.
-
-
Click the Run icon to execute the script.
Once the script runs successfully, use the warehouse and database names (from lines 2-3 of the script) while configuring Snowflake Iceberg as a Destination.
Create an IAM Policy for the S3 Bucket
Snowflake writes the data and metadata files of your Iceberg tables to your S3 bucket. To allow this, you must create an IAM policy with the following permissions:
| Permission Name | Allows Snowflake to |
|---|---|
| s3:GetObject | Read the data and metadata files of your Iceberg tables. |
| s3:GetObjectVersion | Read a specific version of these files. |
| s3:PutObject | Write the data and metadata files of your Iceberg tables. |
| s3:DeleteObject | Delete the files of your Iceberg tables. |
| s3:DeleteObjectVersion | Delete a specific version of these files. |
| s3:ListBucket | List the objects in the bucket. |
| s3:GetBucketLocation | Identify the AWS region of the bucket. |
If you do not have an S3 bucket, refer to Create an Amazon S3 Bucket to create one.
Perform the following steps to create the IAM policy:
-
Log in to the AWS IAM Console.
-
In the left navigation pane, under Access management, click Policies.
-
On the Policies page, click Create policy.

-
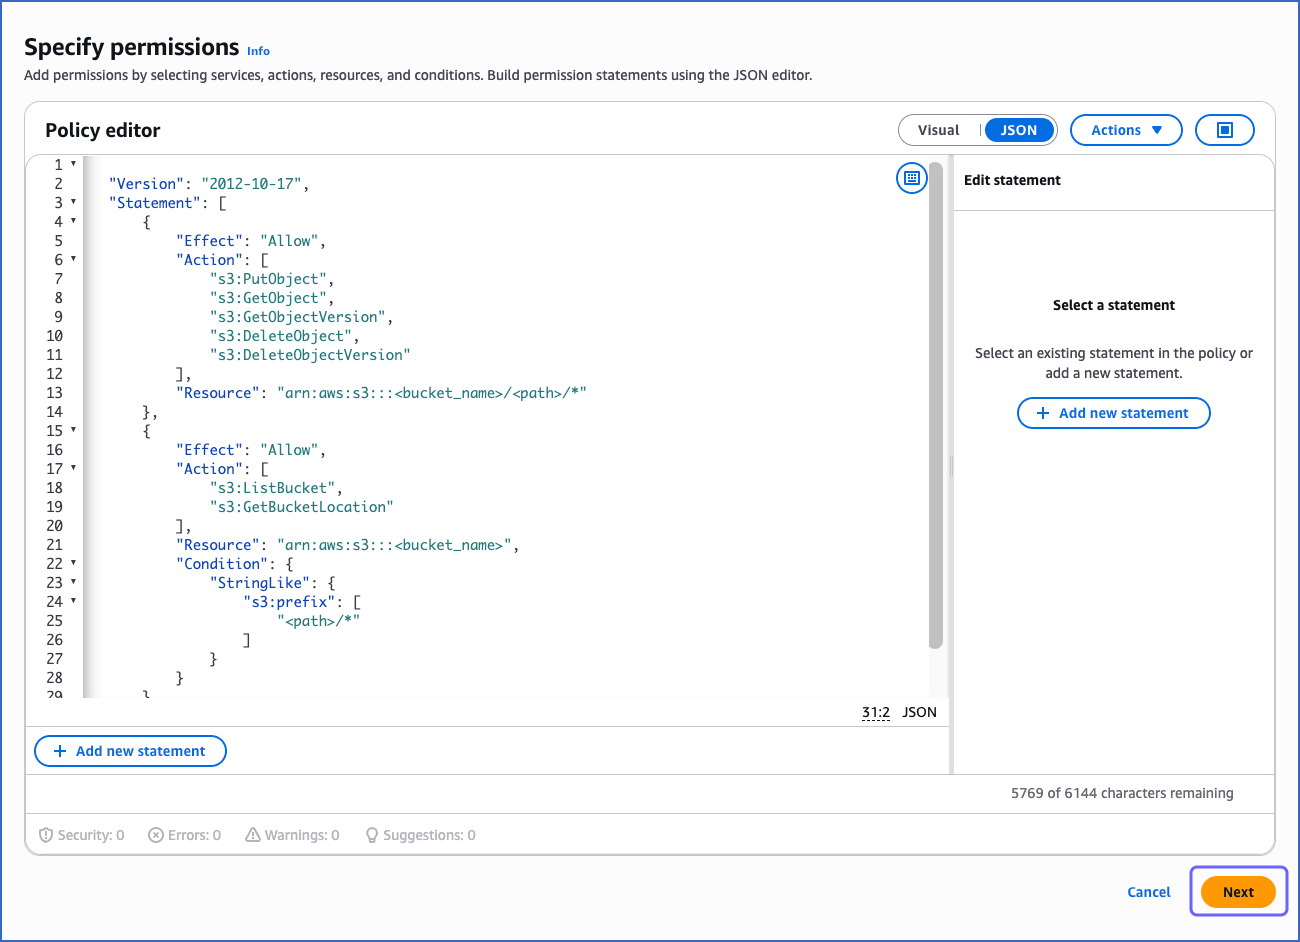
On the Specify permissions page, click JSON.

-
Paste the following JSON statements in the Policy editor:
{ "Version": "2012-10-17", "Statement": [ { "Effect": "Allow", "Action": [ "s3:PutObject", "s3:GetObject", "s3:GetObjectVersion", "s3:DeleteObject", "s3:DeleteObjectVersion" ], "Resource": "arn:aws:s3:::<bucket_name>/<path>/*" }, { "Effect": "Allow", "Action": [ "s3:ListBucket", "s3:GetBucketLocation" ], "Resource": "arn:aws:s3:::<bucket_name>", "Condition": { "StringLike": { "s3:prefix": [ "<path>/*" ] } } } ] }Note:
-
Replace the placeholder values in the statements above with your own. For example, <bucket_name> with iceberg-docs, and <path> with the folder in which you want Snowflake to store your table files.
-
Note the bucket name and path that you specify, as you must use the same values while creating the external volume.
-
-
At the bottom of the page, click Next.
-
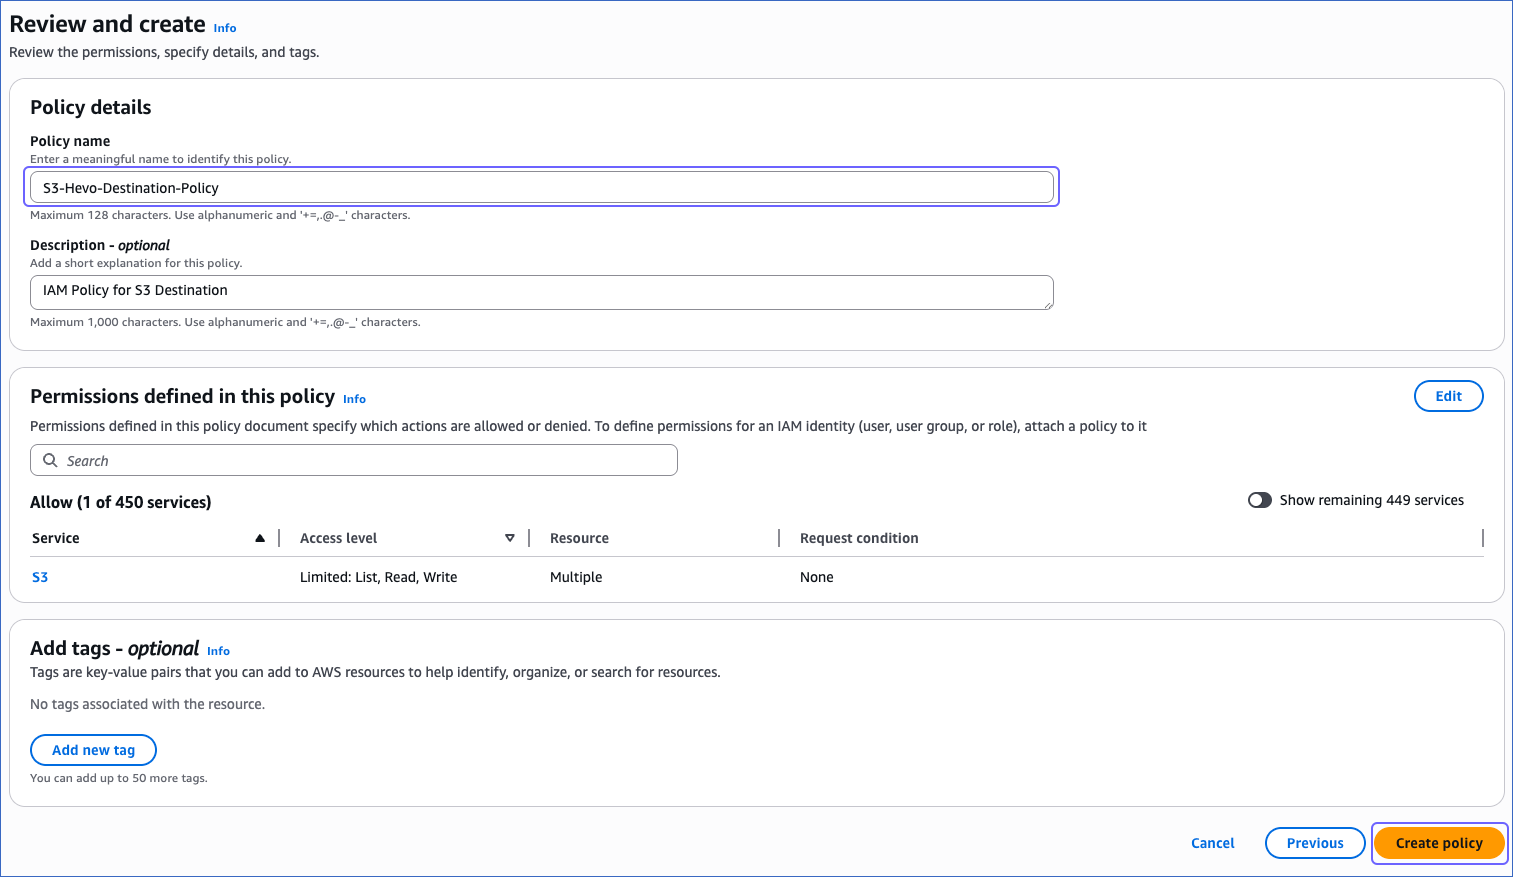
On the Review and create page, specify a Policy name and a Description, and then click Create policy.
You must assign this policy to the IAM role that you create for Snowflake so that it can access your S3 bucket.
Create an IAM Role and Obtain its ARN
Snowflake uses an IAM role in your AWS account to access your S3 bucket. Perform the following steps to create this role:
-
Log in to the AWS IAM Console.
-
In the left navigation pane, under Access management, click Roles.
-
On the Roles page, click Create role.

-
In the Select trusted entity section, choose AWS account.

-
In the An AWS account section, choose This account.
-
In the Options section, select the Require external ID check box, specify an External ID of your choice, and then click Next.

-
On the Add Permissions page, search and select the policy that you created in the Create an IAM Policy for the S3 Bucket section, and at the bottom of the page, click Next.

-
On the Name, review, and create page, specify a Role name and a Description.

-
At the bottom of the page, click Create role.
You are redirected to the Roles page.
-
Search for and click the role that you created.

-
In the Summary section, click the copy icon below the ARN field and save the value securely.

Use this ARN while creating the external volume.
Create an External Volume
An external volume is the Snowflake object that holds the S3 location of your Iceberg table files, along with the identity that Snowflake uses to access that location. Snowflake writes both the data and the metadata files of your tables to this location.
Perform the following steps to create the external volume:
-
Follow steps 1-3 from the Create and Configure your Snowflake Warehouse section to open a SQL worksheet.
-
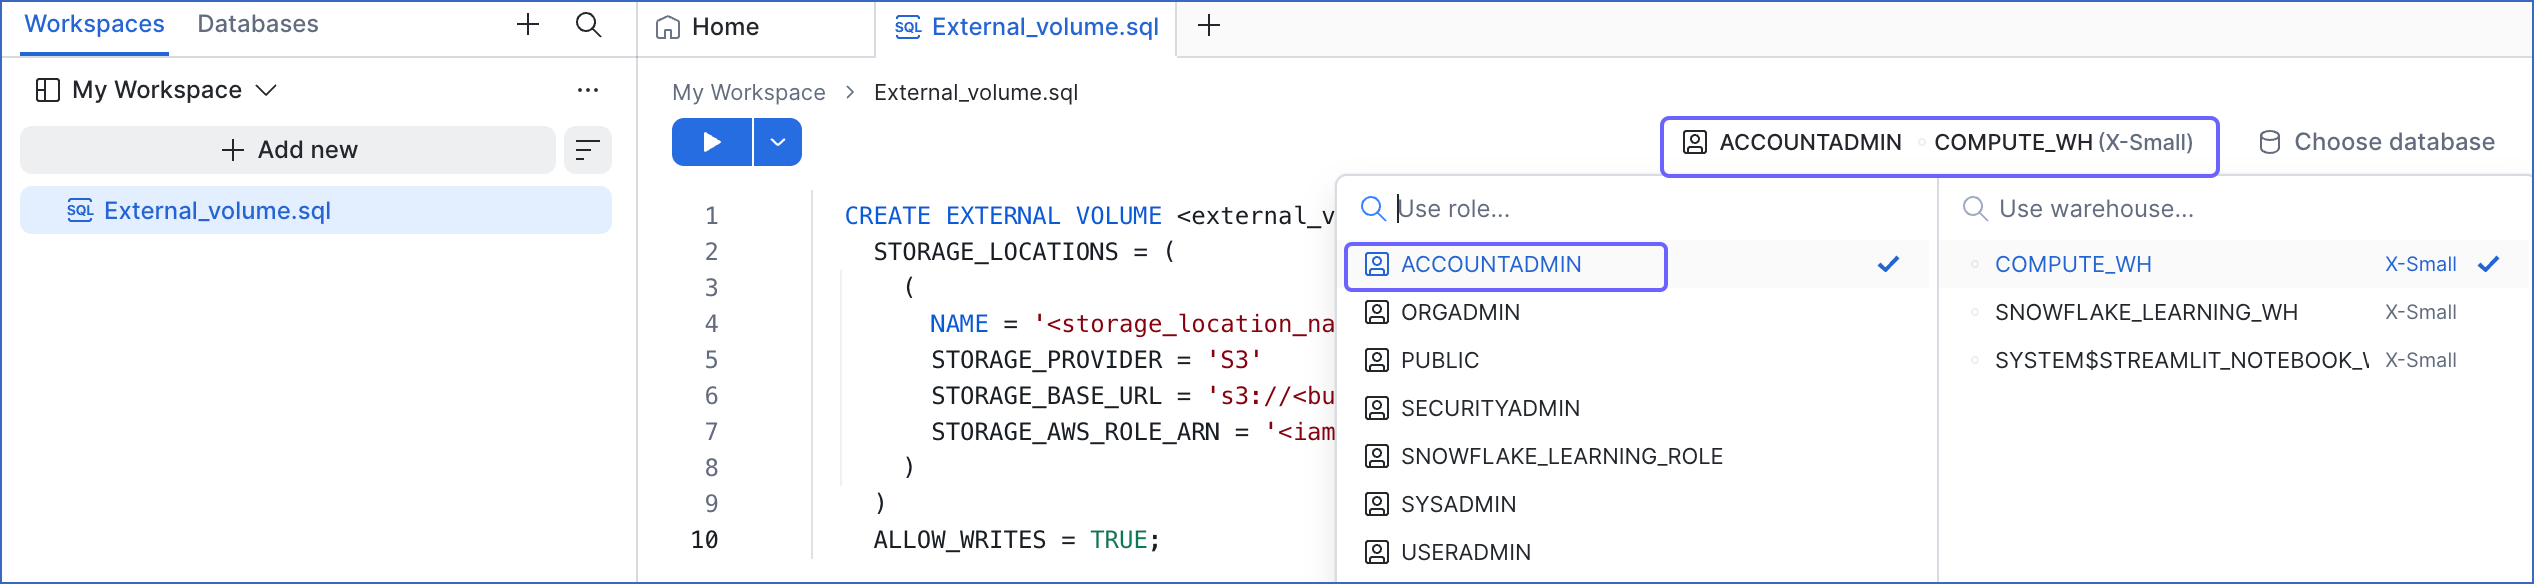
In the role selector at the top right of the worksheet, ensure that the ACCOUNTADMIN role or a role that has the CREATE EXTERNAL VOLUME privilege on the account is selected. If it is not, click the drop-down and select that role.
-
Run the following command to create the external volume:
CREATE EXTERNAL VOLUME <external_volume_name> STORAGE_LOCATIONS = ( ( NAME = '<storage_location_name>' STORAGE_PROVIDER = 'S3' STORAGE_BASE_URL = 's3://<bucket_name>/<path>/' STORAGE_AWS_ROLE_ARN = '<iam_role_arn>' ) ) ALLOW_WRITES = TRUE;Note:
-
Replace the placeholder values in the command above with your own. For example, <external_volume_name> with hevo_iceberg_volume.
-
Specify the same bucket name and path in
STORAGE_BASE_URLthat you used in the Create an IAM Policy for the S3 Bucket section. Snowflake cannot access your table files if these values do not match. -
The command sets
ALLOW_WRITEStoTRUE, as Hevo cannot load data into a read-only external volume. If you are using an existing external volume, ensure that this option is enabled.
-
-
Run the following command to retrieve the identity that Snowflake uses to access your S3 bucket:
DESC EXTERNAL VOLUME <external_volume_name>;The command returns output similar to the following:
parent_property property property_type property_value property_default ALLOW_WRITES Boolean true true STORAGE_LOCATIONS STORAGE_LOCATION_1 String {"NAME":"hevo-iceberg-s3","STORAGE_PROVIDER":"S3", ...}STORAGE_LOCATIONS ACTIVE String hevo-iceberg-s3 -
In the property_value column of the
STORAGE_LOCATION_1row, copy and save the values of theSTORAGE_AWS_IAM_USER_ARNandSTORAGE_AWS_EXTERNAL_IDproperties. A sample output is shown below:{ "NAME": "hevo-iceberg-s3", "STORAGE_PROVIDER": "S3", "STORAGE_BASE_URL": "s3://iceberg-docs/hevo/", "STORAGE_ALLOWED_LOCATIONS": ["s3://iceberg-docs/hevo/*"], "STORAGE_REGION": "ap-south-1", "PRIVILEGES_VERIFIED": true, "STORAGE_AWS_ROLE_ARN": "arn:aws:iam::123456789012:role/hevo-iceberg-role", "STORAGE_AWS_IAM_USER_ARN": "arn:aws:iam::987654321098:user/abc1-a-self1234", "STORAGE_AWS_EXTERNAL_ID": "iceberg_table_external_id", "ENCRYPTION_TYPE": "NONE", "ENCRYPTION_KMS_KEY_ID": "" }Note: The
PRIVILEGES_VERIFIEDproperty indicates whether Snowflake can successfully use the IAM role to access your S3 bucket.
Snowflake has now created the external volume and generated its own identity for accessing your S3 bucket. This identity is not yet trusted by your IAM role, so Snowflake cannot write to the bucket. To grant it access, update the trust policy of your IAM role with the STORAGE_AWS_IAM_USER_ARN and STORAGE_AWS_EXTERNAL_ID values that you saved.
Perform the following steps to update the trust policy:
-
On the Roles page of the AWS IAM Console, click the IAM role that you specified in
STORAGE_AWS_ROLE_ARNwhile creating the external volume. -
Click the Trust relationships tab, and then click Edit trust policy.

-
Replace the existing policy with the following JSON statements:
{ "Version": "2012-10-17", "Statement": [ { "Sid": "", "Effect": "Allow", "Principal": { "AWS": "<storage_aws_iam_user_arn>" }, "Action": "sts:AssumeRole", "Condition": { "StringEquals": { "sts:ExternalId": "<storage_aws_external_id>" } } } ] }Note: Replace <storage_aws_iam_user_arn> and <storage_aws_external_id> with the values you saved from the
DESC EXTERNAL VOLUMEoutput. These values replace the external ID you specified when creating the IAM role. -
Click Update policy.
Verify that Snowflake can access the external volume before you proceed. In a SQL worksheet, run the following command:
SELECT SYSTEM$VERIFY_EXTERNAL_VOLUME('<external_volume_name>');
Use this external volume while configuring Snowflake Iceberg as a Destination.
Create a Snowflake User and Grant Permissions
Hevo connects to your Snowflake account as a database user with a non-administrative role. The following table lists the privileges that this role requires:
| Object | Privileges | Allows Hevo to |
|---|---|---|
| Warehouse | USAGE | Run the queries that load your data. The warehouse must be running or configured to resume automatically. |
| Database | - USAGE - MONITOR - CREATE SCHEMA |
- Access and list the database. - Create the schemas that hold your Destination tables. |
| Schemas created by Hevo | - MODIFY - MONITOR - CREATE TABLE - CREATE STAGE |
Create and alter the Iceberg tables, and create the temporary tables and stages in which Hevo stores your data before loading it. The script grants these privileges on every schema that Hevo creates in your database. |
| Tables created by Hevo | - SELECT - INSERT - UPDATE - DELETE |
Read the table schema and apply the inserts, updates, and deletes from your Source. |
| External volume | USAGE | Specify the external volume while creating your Iceberg tables, and write the table files to it. |
Perform the following steps to create the user and the role:
-
Follow steps 1-3 from the Create and Configure your Snowflake Warehouse section to open a SQL worksheet.
-
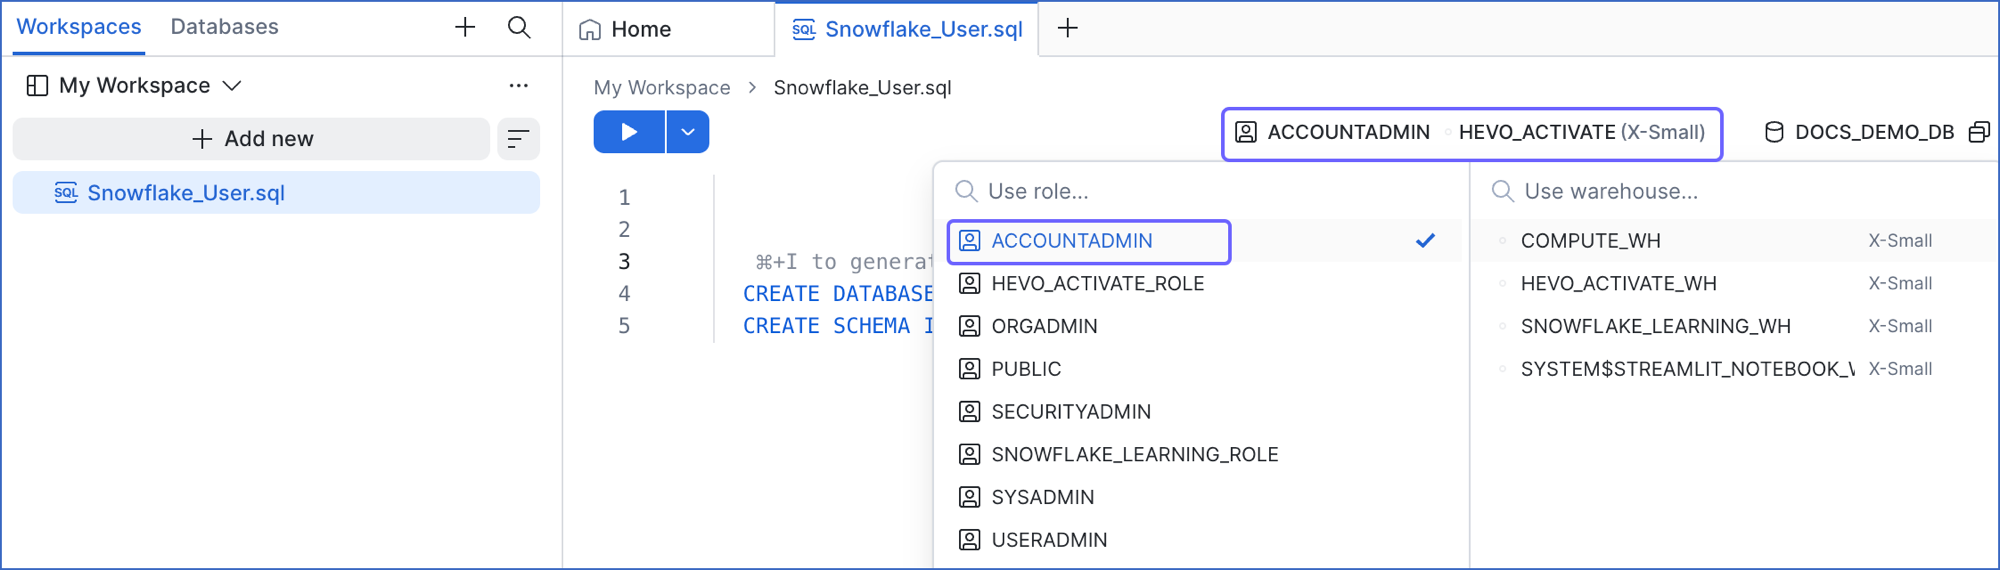
In the role selector at the top right of the worksheet, ensure that the ACCOUNTADMIN or SECURITYADMIN role is selected. If it is not, click the drop-down and select that role.
-
Copy the following script and paste it into the worksheet:
-- Create a role for Hevo CREATE ROLE <hevo_role>; -- Grant access to the warehouse and the database GRANT USAGE ON WAREHOUSE <warehouse_name> TO ROLE <hevo_role>; GRANT USAGE, MONITOR, CREATE SCHEMA ON DATABASE <database_name> TO ROLE <hevo_role>; -- Grant access to the schemas and tables that Hevo creates GRANT ALL ON FUTURE SCHEMAS IN DATABASE <database_name> TO ROLE <hevo_role>; GRANT ALL ON FUTURE TABLES IN DATABASE <database_name> TO ROLE <hevo_role>; -- Grant access to the external volume GRANT USAGE ON EXTERNAL VOLUME <external_volume_name> TO ROLE <hevo_role>; -- Create a user for Hevo and assign the role to it CREATE USER <hevo_user> PASSWORD = '<password>' DEFAULT_ROLE = <hevo_role>; GRANT ROLE <hevo_role> TO USER <hevo_user>;Note: Replace the placeholder values in the commands above with your own values. For example, replace <hevo_user> with hevo_iceberg_user.
-
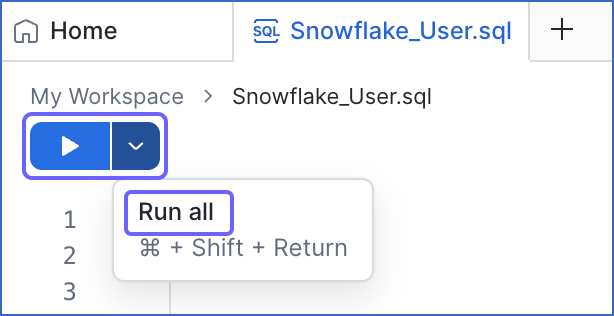
Click the Run options drop-down, and then click Run all to run every command in the script.
Use this user while configuring Snowflake Iceberg as a Destination.
Obtain a Private and Public Key Pair (Recommended Method)
You can authenticate Hevo’s connection to your Snowflake account using a public-private key pair. For this, you need to:
-
Generate a public key for your private key.
1. Generate a private key
Hevo supports private keys in Public-Key Cryptography Standards (PKCS) #8-based triple DES algorithm format. You can use either an encrypted or an unencrypted private key, as supported by the Destination configuration.
Open a terminal window, and on the command line, do one of the following:
-
To generate an unencrypted private key, run the command:
openssl genrsa 2048 | openssl pkcs8 -topk8 -inform PEM -out <unencrypted_key_name> -nocrypt -
To generate an encrypted private key, run the command:
openssl genrsa 2048 | openssl pkcs8 -topk8 -v2 des3 -inform PEM -out <encrypted_key_name>You will be prompted to set an encryption password. This passphrase is required when you connect to your Snowflake Iceberg Destination using key pair authentication. The encrypted private key is stored in the PKCS #8 format and protected with this passphrase.
Note: Replace the placeholder values in the commands above with your own. For example, <encrypted_key_name> with encrypted_rsa_key.p8.
The private key is generated in the PEM format.
-----BEGIN ENCRYPTED PRIVATE KEY-----
MIIFJDBWBg...
-----END ENCRYPTED PRIVATE KEY-----
Open the private key file and remove the extra blank space or empty line at the bottom of the file. Save the private key file in a secure location and provide it while connecting to your Snowflake Iceberg Destination using key pair authentication.
2. Generate a public key
To use a key pair for authentication, you must generate a public key for the private key that you created in the Generate a private key section. For this:
Open a terminal window, and on the command line, run the following command:
openssl rsa -in <private_key_file> -pubout -out <public_key_file>
Note:
-
Replace the placeholder values in the command above with your own. For example, <private_key_file> with encrypted_rsa_key.p8.
-
If you are generating a public key for an encrypted private key, you will need to provide the encryption password used to create the private key.
The public key is generated in the PEM format.
-----BEGIN PUBLIC KEY-----
MIIBIjANBgk...
-----END PUBLIC KEY-----
Save the public key file in a secure location. You must associate this public key with the Snowflake user that you created for Hevo.
3. Assign the public key to a Snowflake user
To authenticate Hevo’s connection to your Snowflake account using a key pair, you must associate the public key that you generated in the Generate a public key section with the user that you created for Hevo. Perform the following steps to assign the public key:
-
Follow steps 1-3 from the Create and Configure your Snowflake Warehouse section to open a SQL worksheet.
-
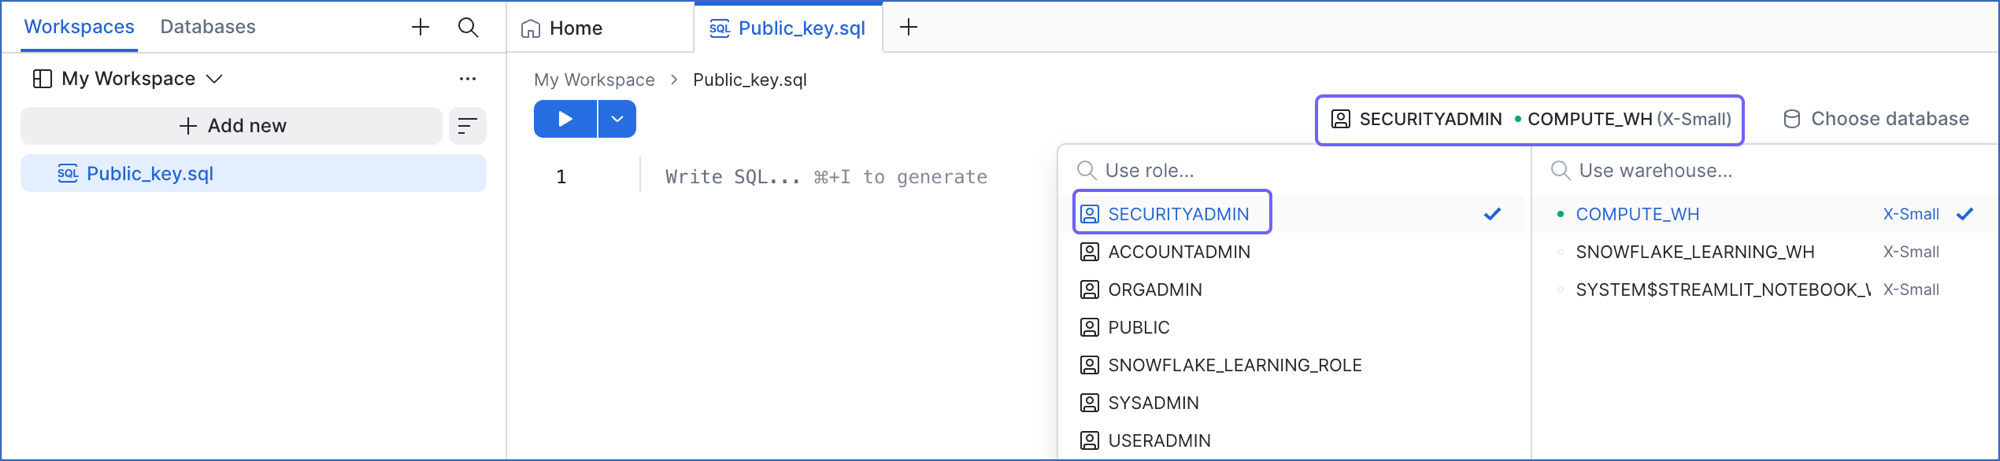
In the role selector at the top right of the worksheet, ensure that the SECURITYADMIN role or a higher role is selected. If it is not, click the drop-down and select that role.
-
Run the following command to assign the public key to your Snowflake user:
ALTER USER <your_snowflake_user> SET RSA_PUBLIC_KEY='<public_key>'; -- Example ALTER USER HARRY_POTTER set RSA_PUBLIC_KEY='MIIBIjANBgk...';Note:
-
Replace the placeholder values in the command above with your own values. For example, replace <your_snowflake_user> with HARRY_POTTER.
-
Set the public key value to the content between
-----BEGIN PUBLIC KEY-----and-----END PUBLIC KEY-----.
-
To check whether the public key is configured correctly, you can follow the steps provided in the verify the user’s public key fingerprint section.
Obtain your Snowflake Account URL
Hevo identifies your Snowflake account using its account URL, which is in the https://<account_identifier>.snowflakecomputing.com format.
Perform the following steps to obtain your Snowflake account URL:
-
Log in to your Snowflake account.
-
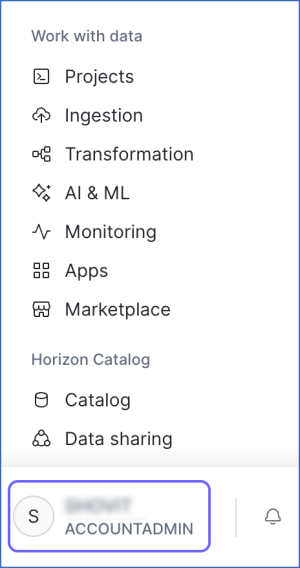
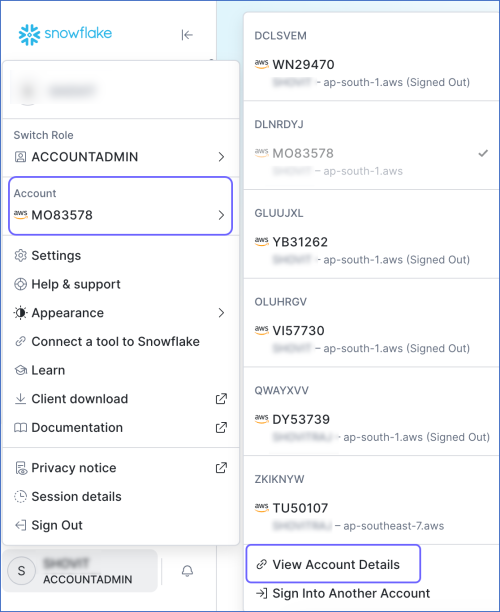
In the bottom left corner, click your account name to open the account menu.
-
Hover over Account, and then click View Account Details.
-
In the Account Details dialog, click the Copy icon corresponding to the Account/Server URL value, and save it securely.
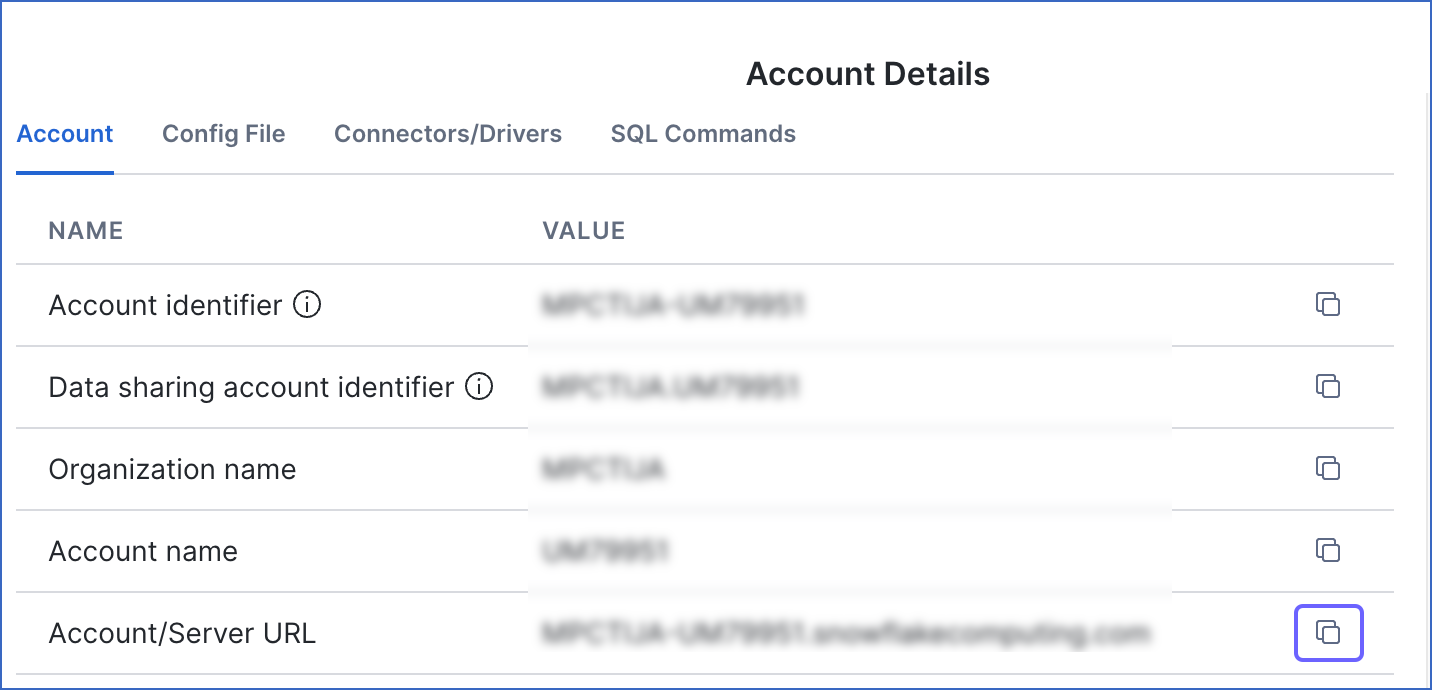
Note: Snowflake displays this value without the https:// prefix. Add the prefix to obtain your account URL. For example, if the copied value is HEVODATA-ABCDXYZ.snowflakecomputing.com, your account URL is https://HEVODATA-ABCDXYZ.snowflakecomputing.com.
Use this URL while configuring Snowflake Iceberg as a Destination.
Configure S3 Bucket for Staging Data
Note: This section is applicable only if you enable the Use your S3 Bucket option while configuring the Destination.
By default, Hevo stores your data temporarily in a Hevo-managed S3 bucket before loading it into your Destination. This allows Hevo to transfer a large volume of data to Snowflake in bulk. However, you may need to use your own S3 bucket in the following cases:
-
Your Snowflake account has organization-level or account-level security controls, such as
REQUIRE_STORAGE_INTEGRATION_FOR_STAGE_CREATIONandREQUIRE_STORAGE_INTEGRATION_FOR_STAGE_OPERATIONenabled. -
You want to manage data staging within your own AWS environment.
In such cases, you can configure Hevo to use a bucket you own. To set this up, perform the following steps:
If you do not have an S3 bucket, refer to Create an Amazon S3 Bucket to create one.
Tip: It is recommended to create the bucket in the same AWS region as your Snowflake account to avoid slower load times.
1. Create an IAM Policy for your S3 Bucket
To allow Hevo to access your S3 bucket and load data into it, you must create an IAM policy with the following permissions and attach it to the IAM role or user:
| Permission Name | Allows Hevo to |
|---|---|
| s3:ListBucket | Check if the S3 bucket: - Exists - Can be accessed - Lists all the objects |
| s3:GetObject | Read staged files from the bucket. |
| s3:PutObject | Write staged files to the bucket. |
| s3: DeleteObject | Delete objects from the S3 bucket. Hevo requires this permission to delete the file it creates in your S3 bucket while testing the connection. Note: This permission is scoped to Hevo’s own staged files, not your existing bucket contents. However, Hevo recommends using a dedicated staging bucket or prefix rather than a bucket that also stores other data. |
Perform the following steps to create the IAM policy:
-
Log in to the AWS IAM Console.
-
In the left navigation pane, under Access Management, click Policies.
-
On the Policies page, click Create policy.
-
On the Specify permissions page, click JSON.
-
In the Policy editor section, paste the following JSON statements:
{ "Version": "2012-10-17", "Statement": [ { "Sid": "VisualEditor0", "Effect": "Allow", "Action": [ "s3:ListBucket", "s3:GetObject", "s3:PutObject", "s3:DeleteObject" ], "Resource": [ "arn:aws:s3:::<your_bucket_name>", "arn:aws:s3:::<your_bucket_name>/*" ] } ] }Note: Replace the placeholder values in the commands above with your own values. For example, replace <your_bucket_name> with s3-destination1.
-
At the bottom of the page, click Next.
-
On the Review and create page, specify the Policy name, and at the bottom of the page, click Create policy.
You must assign this policy to the IAM role or the IAM user that you create for Hevo to access your S3 bucket. Without this, the connection will fail.
2. Create and Retrieve the Amazon S3 Connection Settings
Hevo connects to your S3 bucket using an IAM role. To set this up, you need to create an IAM role for Hevo, attach the policy that you created in the Create an IAM Policy for your S3 Bucket section, and then retrieve the following credentials:
-
Amazon Resource Name (ARN): A unique address that identifies your IAM role in AWS.
-
External ID: A unique token that ensures only Hevo can access your AWS account.
1. Create an IAM role and assign the IAM policy
-
Log in to the AWS IAM Console.
-
In the left navigation pane, under Access Management, click Roles.
-
On the Roles page, click Create role.
-
In the Select trusted entity section, choose AWS account.
-
In the An AWS account section, choose Another AWS account, and in the Account ID field, specify Hevo’s Account ID, 393309748692.

-
In the Options section, select the Require external ID check box, specify an External ID of your choice, and click Next.
-
On the Add Permissions page, search and select the policy that you created in the Create an IAM Policy for your S3 Bucket section, and at the bottom of the page, click Next.
-
On the Name, review, and create page, specify a Role name and a Description.
-
At the bottom of the page, click Create role.
You are redirected to the Roles page.
2. Retrieve the ARN and External ID
-
On the Roles page, click the role that you created in the Create an IAM role and assign the IAM policy section.
-
On the <Role name> page, Summary section, click the copy icon below the ARN field and save it securely like any other password.
-
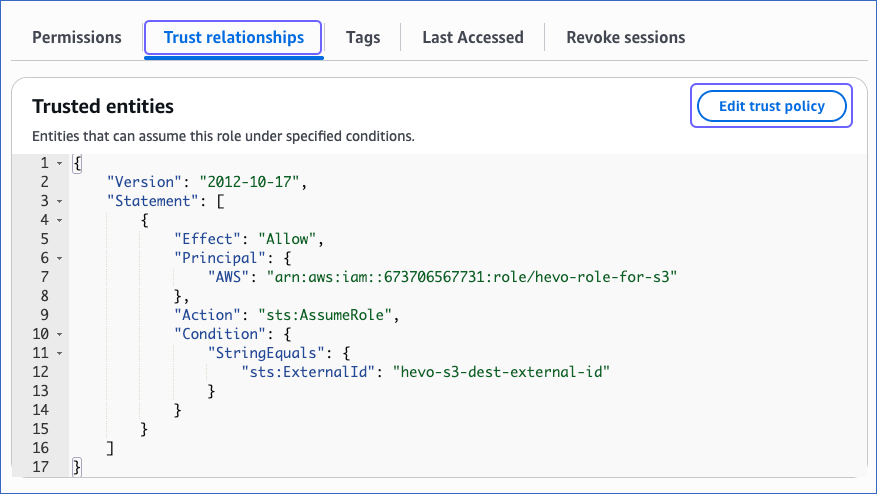
In the Trust relationships tab, copy the external ID corresponding to the sts:ExternalID field. For example, hevo-s3-dest-external-id in the image below.

Use the ARN and the external ID while creating a Snowflake storage integration and configuring your Destination in Hevo.
3. Create a Snowflake Storage Integration
A storage integration allows Snowflake to read data from your S3 bucket. To create a Snowflake storage integration, you must have the following credentials of your S3 bucket:
-
Folder path where the files are staged
Perform the following steps to create a Snowflake storage integration:
-
Log in to your Snowflake account.
-
In the left navigation pane, click Projects.
-
In the Workspaces tab, click + Add new, and then click SQL file to create a SQL worksheet.
-
In the role selector at the top right of the worksheet, ensure that the ACCOUNTADMIN role or a role that has the CREATE INTEGRATION privilege on the account is selected. If it is not, click the drop-down and select that role.
-
Copy the following script and paste it into the worksheet. The script creates a storage integration that allows Snowflake to access your S3 bucket.
CREATE STORAGE INTEGRATION IF NOT EXISTS '<storage_integration_name>' TYPE = EXTERNAL_STAGE STORAGE_PROVIDER = 'S3' STORAGE_AWS_ROLE_ARN = '<your_iam_role_arn>' STORAGE_AWS_EXTERNAL_ID = '<your_external_id>' ENABLED = TRUE STORAGE_ALLOWED_LOCATIONS = ('s3://<your_bucket_name>/<your_folder_path>/'); GRANT USAGE ON INTEGRATION '<storage_integration_name>' TO ROLE '<snowflake_role_name>'; DESC STORAGE INTEGRATION '<storage_integration_name>';Note: Replace the placeholder values in the script above with your own values. For example, replace <storage_integration_name> with HEVO-INTEGRATION.
-
Click the Run icon to execute the script.
Once the script runs successfully, your storage integration will be created. Make a note of the STORAGE_AWS_IAM_USER_ARN and STORAGE_AWS_EXTERNAL_ID. Use them to add your Snowflake account as a trusted entity in your S3 bucket.
4. Add Snowflake as a Trusted Entity in your S3 bucket
To allow Snowflake to access the data in your S3 bucket, you must update the IAM role created in the Create and Retrieve the Amazon S3 Connection Settings section and add Snowflake as a trusted entity. To do so, perform the following steps:
-
On the Roles page of your IAM console, click the role that you created in the Create and Retrieve the Amazon S3 Connection Settings section .
-
In the Trust relationships tab, click Edit trust policy.
-
In the Edit trust policy section, paste the following JSON statements and do the following:
{ "Version": "2012-10-17", "Statement": [ { "Effect": "Allow", "Principal": { "AWS": [ "<your_iam_role_arn>", "<snowflake-aws-iam-user-arn>" ] }, "Action": "sts:AssumeRole", "Condition": { "StringEquals": { "sts:ExternalId": "<storage_aws_external-id>" } } } ] }-
Replace <your_iam_role_arn> with the ARN of your IAM role that you retrieved in the Retrieve the ARN and External ID section.
-
Replace <snowflake-aws-iam-user-arn> and <storage_aws_external-id> with the
STORAGE_AWS_IAM_USER_ARNandSTORAGE_AWS_EXTERNAL_IDvalues that you retrieved in the Create a Snowflake Storage Integration section.
-
-
Click Update policy.
The IAM role trust policy has been successfully updated, allowing your Snowflake account to access data in your S3 bucket.
Configure Snowflake Iceberg as a Destination
Perform the following steps to configure Snowflake Iceberg as a Destination:
-
Click Destinations in the Navigation Bar.
-
Click the Edge tab in the Destinations List View and click + Create Edge Destination.
-
On the Create Destination page, click Snowflake Iceberg.
-
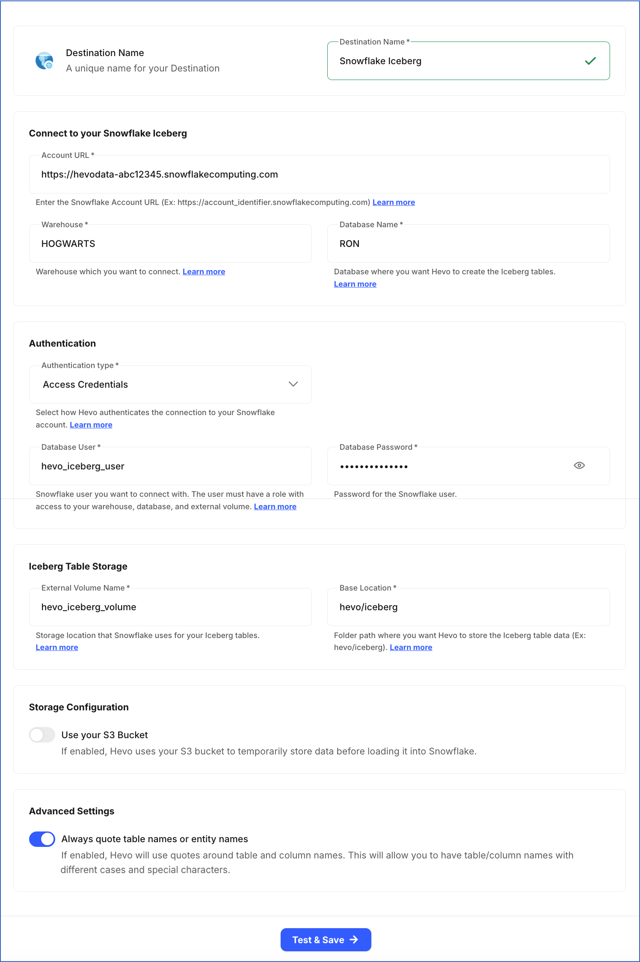
In the screen that appears, specify the following:
-
Destination Name: A unique name for your Destination, not exceeding 255 characters.
-
In the Connect to your Snowflake Iceberg section:
-
Account URL: The Snowflake account URL that you retrieved in the Obtain your Snowflake Account URL section.
-
Warehouse: The Snowflake warehouse associated with your database where the data is managed. This can be the warehouse that you created in the Create and Configure your Snowflake Warehouse section or an existing one. The name must start with a letter and can contain only letters, digits, and underscores.
-
Database Name: The name of the database where the data is to be loaded. This can be the database that you created in the Create and Configure your Snowflake Warehouse section or an existing one. The name must start with a letter and can contain only letters, digits, and underscores.
Note: All the field values are case-sensitive.
-
-
In the Authentication section, from the drop-down, select the Authentication type for authenticating Hevo’s connection to your Snowflake account:
-
Access Credentials: Connect to your Snowflake account using a password.
-
Database User: A user with a non-administrative role created in the Snowflake database. This user can be the one that you created in the Create a Snowflake User and Grant Permissions section or an existing one.
-
Database Password: The password of the Snowflake user that you specified in the Database User field.
-
-
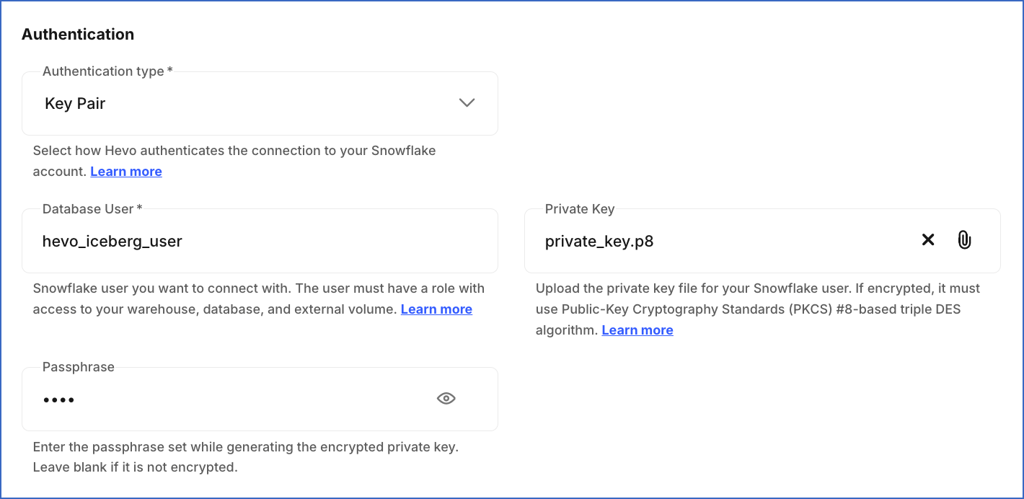
Key Pair: Connect to your Snowflake account using a public and private key pair.
-
Database User: A user with a non-administrative role created in the Snowflake database. This user must be the one to whom the public key is assigned.
-
Private Key: A cryptographic password used along with a public key to generate digital signatures. Click the attach icon to upload the private key file that you generated in the Generate a private key section.
-
Passphrase: The password given while generating the encrypted private key. Leave this field blank if you have attached a non-encrypted private key.
-
Note: All the field values are case-sensitive.
-
-
In the Iceberg Table Storage section:
-
External Volume Name: The name of the external volume that holds the S3 location where your Iceberg table files are stored.
-
Base Location: The path inside your S3 bucket where your table files are stored.
-
-
Storage Configuration:
-
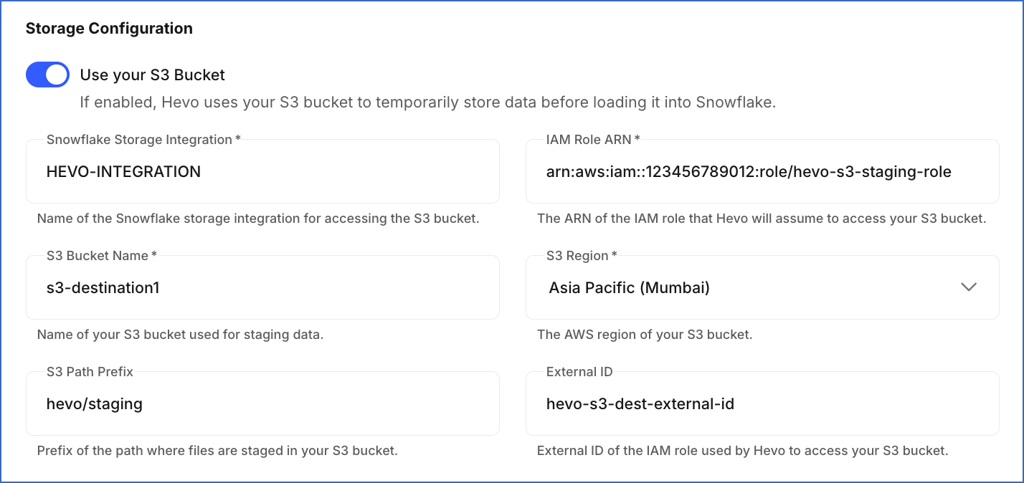
Use your S3 Bucket: Enable this option if your Snowflake account requires a storage integration, or you want to stage data in your S3 bucket instead of Hevo’s before loading it into the Destination.
Note: This option cannot be changed after the Destination is created.
This bucket is only a staging location, where Hevo holds your data before loading it. It is separate from the S3 location of your external volume, which is where your Iceberg table data and metadata files are stored.
-
Snowflake Storage Integration: The name of the storage integration that you created in the Create a Snowflake Storage Integration section to allow Snowflake to access your S3 bucket. This is separate from the external volume, which is used to store your Iceberg table data and metadata.
-
IAM Role ARN: The unique identifier assigned by AWS to the IAM role that grants Hevo access to your S3 bucket. You retrieved this value in the Retrieve the ARN and External ID section.
-
S3 Bucket Name: The name of your S3 bucket where you want Hevo to stage data before loading it into your Destination. For example, my-s3-bucket.
-
S3 Region: The AWS region where your S3 bucket is located. For example, Asia Pacific (Singapore).
-
S3 Path Prefix (Optional): A prefix added to the directory path in your S3 bucket where you want Hevo to stage data.
-
External ID (Optional): The external ID of the IAM role that Hevo can use to access your S3 bucket. You retrieved this value in the Retrieve the ARN and External ID section.
-
-
-
Advanced Settings:
-
Always quote table names or entity names:
If enabled, Hevo puts double quotes around the Source table and column names while creating them in your Destination. This setting preserves the case of your table and column names. Further, if the names contain any special characters, these are retained as well. You need to use quotes while accessing your tables and columns in Snowflake.
For example,
SELECT "Column 1", "name" from RON.DARK_ARTS."test1_Table namE 05";If disabled, Hevo sanitizes your Source table and column names, replacing each non-alphanumeric (special) character with an underscore and removing trailing underscores. Hence, you are not required to use quotes while accessing them.
For example,
SELECT COLUMN_1, NAME from RON.DARK_ARTS.TEST1_TABLE_NAME_05;
-
-
-
Click Test & Save to test the connection to your Snowflake account. Hevo verifies your privileges on the warehouse, database, and schema, checks that it can write to the external volume, and creates a temporary Iceberg table to validate the load path.
Once the test is successful, Hevo creates your Snowflake Iceberg Destination. You can use this Destination while creating your Edge Pipeline.
Additional Information
Read the detailed Hevo documentation for the following related topics:
Modifying Snowflake Iceberg Destination Configuration
You can modify some settings of your Snowflake Iceberg Destination after its creation. However, any configuration changes will affect all the Pipelines using that Destination.
To modify the configuration of your Snowflake Iceberg Destination:
-
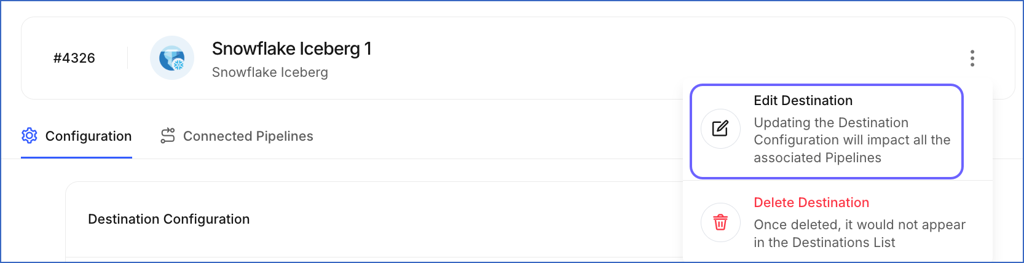
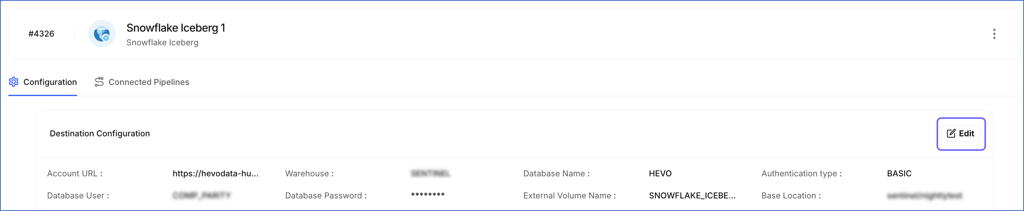
In the detailed view of your Destination, do one of the following:
-
Click the Destination Actions icon, and then click Edit Destination.
-
In the Destination Configuration section, click Edit.
-
-
On the Edit Destination page:
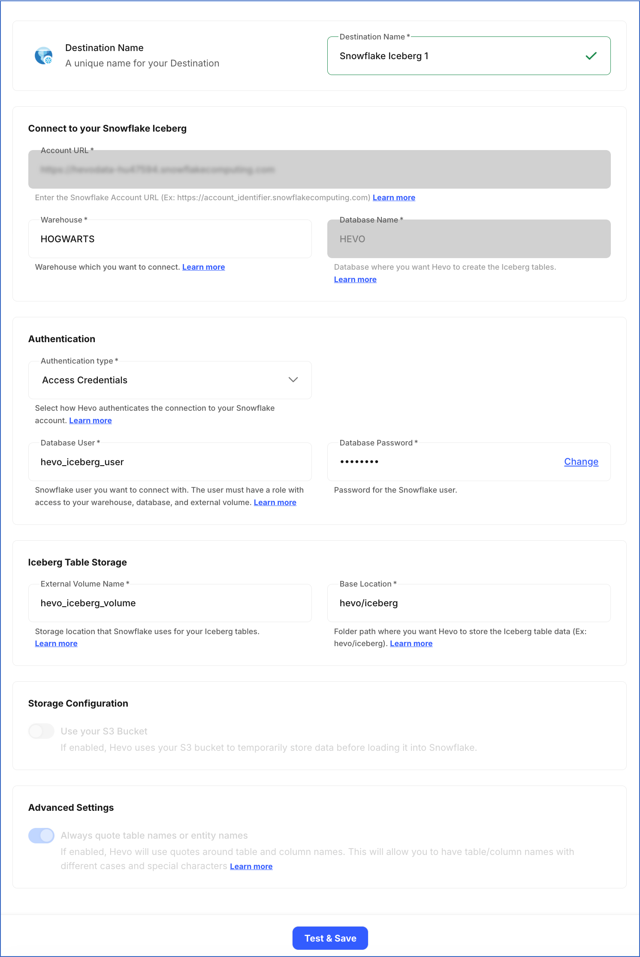
Note: The settings that cannot be changed are grayed out.
-
You can specify a new name for your Destination, not exceeding 255 characters.
-
You can modify the Warehouse that runs the queries loading your data.
-
In the Authentication section, you can modify the Authentication type, the Database User, and the fields required by the selected type:
-
Key Pair:
-
Private Key: Click the attach icon to upload your encrypted or non-encrypted private key file. Ensure that the public key corresponding to the uploaded private key is assigned to the database user configured in your Destination.
-
Passphrase: Click Change to clear the field. If you uploaded an encrypted private key, provide the password used to generate it; otherwise, leave the field blank.
-
-
Access Credentials:
- Database Password: Click Change to update the password for the user configured in your Destination.
-
-
In the Iceberg Table Storage section, you can modify the following:
-
External Volume Name: The external volume that holds the S3 location of your Iceberg table files.
-
Base Location: The path inside your S3 bucket where your table files are stored.
-
-
In the Storage Configuration section, if you enabled the Use your S3 Bucket option while creating the Destination, you can modify the following:
-
Snowflake Storage Integration: The storage integration that allows Snowflake to access your S3 bucket.
-
IAM Role ARN: The ARN of the IAM role that grants Hevo access to your S3 bucket.
-
S3 Bucket Name: The bucket where Hevo stages your data before loading it into the Destination.
-
S3 Region: The AWS region of your S3 bucket.
-
S3 Path Prefix: The prefix added to the directory path where Hevo stages your data.
-
External ID: The external ID of the IAM role that Hevo uses to access your S3 bucket.
-
-
-
Click Test & Save to check the connection to your Snowflake Iceberg Destination and then save the modified configuration.
The following settings cannot be changed after the Destination is created:
-
Account URL
-
Database Name
-
Use your S3 Bucket
-
Always quote table names or entity names
Data Type Evolution in Snowflake Iceberg Destinations
Hevo has a standardized data system that defines unified internal data types, referred to as Hevo data types. During the data ingestion phase, the Source data types are mapped to the Hevo data types, which are then transformed into the Destination-specific data types during the data loading phase. A mapping is then generated to evolve the schema of the Destination tables.
The following image illustrates the data type hierarchy applied to Snowflake Iceberg Destination tables:

When two Source data types map to columns on different paths, Hevo evolves the column to the STRING data type. For example, if a column receives both INT and FLOAT values, it is evolved to STRING.
Data Type Mapping
The following table shows the mapping between Hevo data types and the Iceberg data types that Hevo uses to create your Destination tables:
| Hevo Data Type | Iceberg Data Type |
|---|---|
| BOOLEAN | BOOLEAN |
| BYTEARRAY | BINARY |
| - BYTE - SHORT - INTEGER |
INT |
| LONG | LONG |
| DATE | DATE |
| DATE_TIME | TIMESTAMP |
| DATE_TIME_TZ | TIMESTAMPTZ |
| DECIMAL | - DECIMAL - STRING |
| - FLOAT - DOUBLE |
DOUBLE |
| VARCHAR | STRING |
| - JSON - XML - ARRAY |
STRING |
| TIME | TIME |
| TIMETZ | STRING |
| GEOGRAPHY | STRING |
Handling the Decimal data type
For Snowflake Iceberg Destinations, Hevo maps DECIMAL data values with a fixed precision (P) and scale (S) to the DECIMAL data type. This mapping is decided based on the number of significant digits (P) in the numeric value and the number of digits to the right of the decimal point (S). Refer to the table below to understand the mapping:
| Precision and Scale of the Decimal Data Value | Iceberg Data Type |
|---|---|
| Precision: >0 and <= 38 Scale: >= 0 and <= 37 Scale: <= Precision |
DECIMAL |
For precision and scale values other than those mentioned in the table above, Hevo maps the DECIMAL data type to a STRING data type.
Handling Time and Timestamp data types
Hevo creates the TIME, TIMESTAMP, and TIMESTAMPTZ columns of your Iceberg tables with a fixed precision of six digits, which corresponds to microsecond precision. Hevo truncates any fractional seconds beyond this limit. For example, a Source value 12:00:00.1234567890 is stored as 12:00:00.123456.
Handling of Unsupported Data Types
Hevo does not allow the direct mapping of a Source data type to any of the following Iceberg data types:
-
LIST
-
MAP
-
STRUCT
-
UUID
-
Any other data type not listed in the table above.
Hence, if the Source object is mapped to an existing Iceberg table with columns of unsupported data types, it may become inconsistent. To prevent any inconsistencies during schema evolution, Hevo maps the semi-structured Source data types, such as JSON, XML, and ARRAY, to the STRING data type in Iceberg.
Destination Considerations
-
Iceberg does not allow a FLOAT or DOUBLE column in the primary key of a table, because such columns cannot be used as identifier fields. If a Source object has such a column in its primary key, Hevo does not load the data for that object, and marks it as Skipped in subsequent Pipeline runs.
-
Iceberg reserves the _file, _pos, _partition, _spec_id, and _deleted column names for its own metadata columns. Hevo prefixes an underscore to any Source column with one of these names to avoid a conflict. For example, a column named _file is created as __file in your Destination. This match is not case-sensitive.
-
If you drop a Snowflake-managed Iceberg table that uses a customer-managed external volume, Snowflake manages the associated data and metadata files in the external storage and deletes them after the applicable retention period. The deletion is asynchronous and may take several days.
Limitations
-
Hevo replicates a maximum of 4096 columns to each Iceberg table, of which six are Hevo-reserved metadata columns used during data replication. Therefore, your Pipeline can replicate up to 4090 (4096-6) columns for each table.
-
Hevo does not support transient Iceberg tables for this Destination. Snowflake supports transient Iceberg tables only when they use Snowflake-provided storage (
EXTERNAL_VOLUME = SNOWFLAKE_MANAGED), and not a customer-managed external volume such as the one configured in this Destination. -
Hevo does not currently support publishing the Iceberg tables created by this Destination through Snowflake Open Catalog. Horizon Catalog is the catalog supported by this Destination.
Revision History
Refer to the following table for the list of key updates made to this page:
| Date | Release | Description of Change |
|---|---|---|
| Sep-24-2026 | NA | New document. |