On This Page
Activate is currently available for Early Access. Please contact your Hevo account executive or the Support team to enable it for your team. Alternatively, request for early access to try out one or more such features.
Snowflake offers a cloud-based data storage and analytics service, generally termed as data warehouse-as-a-service. In Activate, a Snowflake warehouse acts as the Source that your datasets read from before the data is sent to your business applications.
Activate reads your data from Snowflake without modifying the tables your datasets read from. It keeps a record of each sync in a dedicated HEVO database in the same Snowflake account, so the user you configure needs read access to your data, write access to that one database, and the use of a warehouse to run the queries. Activate also temporarily stores your data in a Hevo-managed Amazon S3 bucket before sending it to your Target. Snowflake writes to this bucket using credentials that Activate supplies, so you do not need to configure any storage access.
If your Pipelines already load data into Snowflake, you can use that same warehouse as your Activate Source. Activate then sends the data that your Pipelines have already loaded and your Transformations have already prepared.
Prerequisites
-
An active Snowflake account is available.
-
You have either the ACCOUNTADMIN or SYSADMIN role in Snowflake to create a warehouse.
-
A dedicated database and schema, both named HEVO, are available in your Snowflake account. Activate records the progress of each sync there.
-
You have either the ACCOUNTADMIN or SECURITYADMIN role in Snowflake to create a new role for Hevo.
-
Hevo is assigned the USAGE, OPERATE, and MONITOR permissions on the warehouse that runs your dataset queries.
-
Hevo is assigned the USAGE permission on each database and schema that your datasets read from.
-
Hevo is assigned the USAGE permission on the HEVO database, and the USAGE and CREATE TABLE permissions on the HEVO.HEVO schema.
-
Hevo is assigned the SELECT permission on the current and future tables, views, and dynamic tables that your datasets read from, and the USAGE permission on the current and future functions those queries call.
Perform the following steps to configure your Snowflake Source in Activate:
(Optional) Create a Snowflake Warehouse
Note: If you are using an existing Snowflake warehouse, skip to the Create the Bookkeeping Database section.
Activate uses a Snowflake warehouse to provide the compute that runs your dataset queries. You can use an existing warehouse or create one specifically for Activate. Creating a separate warehouse makes it easier to track what Activate consumes and to size it independently of your other workloads.
Perform the following steps to create a warehouse for Activate:
-
Log in to your Snowflake account.
-
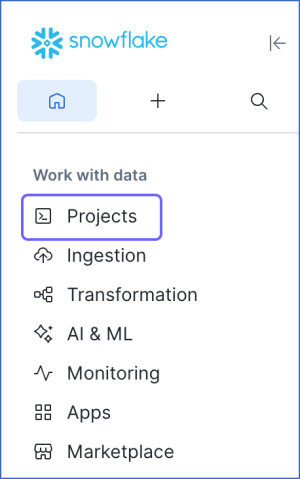
In the left navigation pane, click Projects.
-
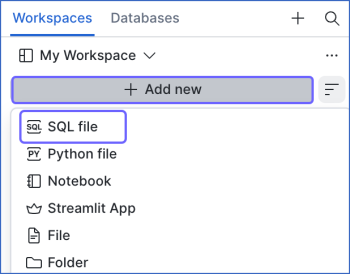
In the Workspaces tab, click + Add new, and then click SQL file to create a SQL worksheet.
-
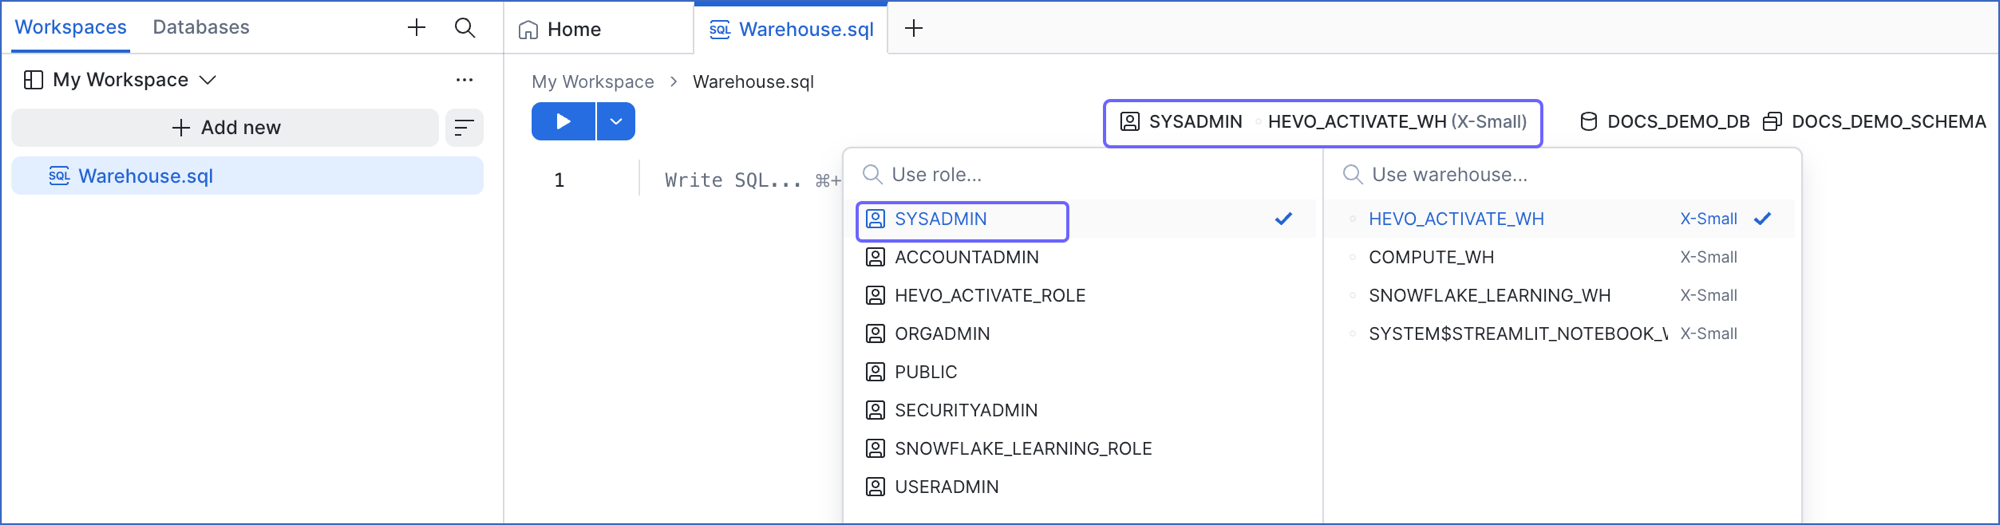
In the role selector at the top right of the worksheet, ensure that the SYSADMIN role or a higher role is selected. If it is not, click the drop-down and select that role.
-
Copy the following script into the worksheet and replace the sample values with your own:
-- Create a warehouse for Activate to use for compute CREATE WAREHOUSE IF NOT EXISTS HEVO_ACTIVATE_WH WAREHOUSE_SIZE = 'XSMALL' AUTO_SUSPEND = 60 AUTO_RESUME = TRUE INITIALLY_SUSPENDED = TRUE;Note: An XSMALL warehouse is sufficient for most datasets. Increase the size only if your queries return very large result sets and take longer than your sync interval to run.
-
Click the Run icon to execute the command.
-
Note the name of the warehouse. Specify this value in the Warehouse Name field while configuring your Source in Activate.
A warehouse provides compute resources, while storage is provided separately through a database. Activate needs a separate database for its bookkeeping, so proceed to create one.
Create the Bookkeeping Database
Activate records the progress of each sync in a dedicated database in your Snowflake account, named HEVO, and a schema inside it, also named HEVO. This database helps Activate identify and send only the rows that changed since the last successful run and stores records that failed to sync. Your own data is never stored here. Read bookkeeping for more information.
Activate does not create the database and the schema for you. If either is missing, the connection test fails and reports that they must be created first.
Perform the following steps to create the bookkeeping database and schema:
-
Follow steps 1-3 from the Create a Snowflake Warehouse section to open a SQL worksheet.
-
Copy the following script into the worksheet:
CREATE DATABASE IF NOT EXISTS HEVO; CREATE SCHEMA IF NOT EXISTS HEVO.HEVO; -
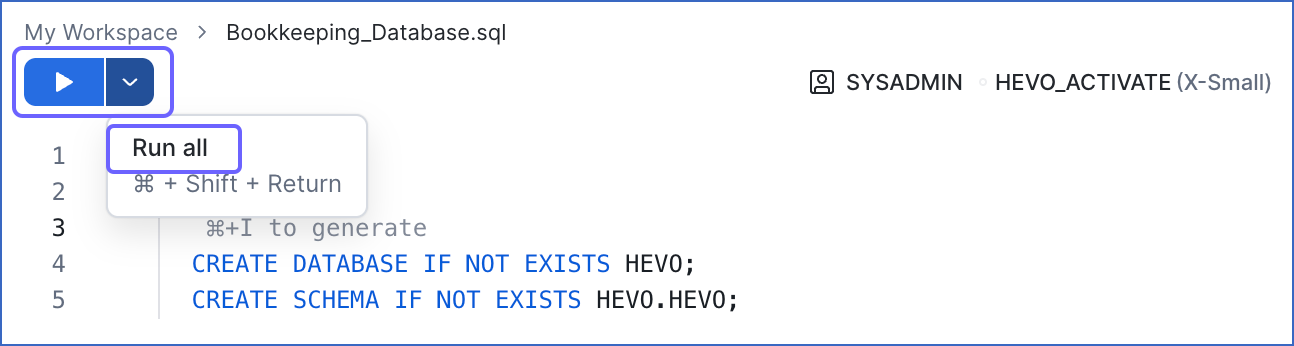
Click the Run options drop-down, and then click Run all to run every command in the script.
Note: Do not place your own data in the HEVO database. Activate reserves it for bookkeeping and manages the tables inside it, so anything you store there can be changed.
Create a Snowflake User and Grant Permissions
Hevo does not need a user with the ACCOUNTADMIN role to connect to your Snowflake warehouse. You can create a non-administrative user and assign a custom role to it. Hevo provides you with a ready-to-use script that creates the role and the user. The script grants only the permissions that Activate requires, which are read access to the data your datasets return and write access to the HEVO bookkeeping schema.
The following table lists the permissions that the role for Hevo requires:
| Permission Name | Granted On | Allows Hevo to |
|---|---|---|
| USAGE | Warehouse | Use the warehouse to run your dataset queries. |
| OPERATE | Warehouse | Resume the warehouse when it is suspended. |
| MONITOR | Warehouse | View the queries that Activate runs on the warehouse. |
| USAGE | Database and schema | Access the objects in the database and the schema that your datasets read from. |
| SELECT | Tables, views, and dynamic tables | Select rows from the objects that your datasets read from, including the objects created later through the FUTURE grants. |
| USAGE | Functions | Call the user-defined functions that your dataset queries use. |
| USAGE, CREATE TABLE | HEVO.HEVO schema | Create and manage its own bookkeeping tables. |
The script follows Snowflake’s recommended practice of placing the new role inside the existing role hierarchy, so that the SYSADMIN role inherits anything granted to it.
Perform the following steps to run the script:
-
Follow steps 1-3 from the Create a Snowflake Warehouse section to open a SQL worksheet.
-
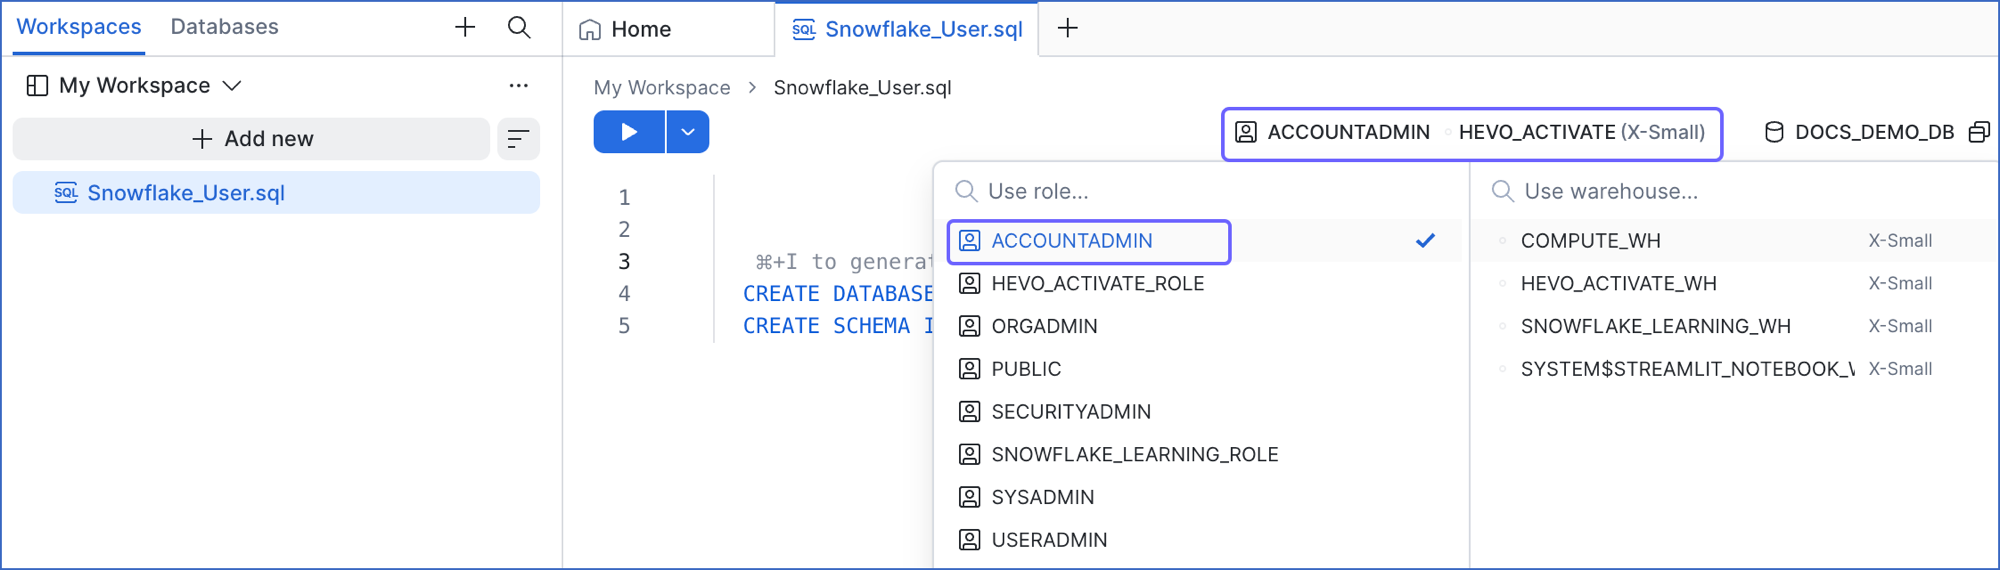
In the role selector at the top right of the worksheet, ensure that the ACCOUNTADMIN or SECURITYADMIN role is selected. If it is not, click the drop-down and select that role.
-
Copy the following script and paste it into the worksheet. Replace the sample values for <database_name>, <schema_name>, and <password> with your own. If you are using an existing warehouse, also replace HEVO_ACTIVATE_WH with its name.
Note: The script creates the role and the user, and grants them access to the warehouse you created in the Create a Snowflake Warehouse section. It grants read access to one of your data schemas and write access to the HEVO bookkeeping schema.
-- Create a role for the Hevo user CREATE ROLE HEVO_ACTIVATE_ROLE; -- Ensure the SYSADMIN role inherits any permissions granted to the Hevo role. -- This does not grant SYSADMIN permissions to the Hevo role. GRANT ROLE HEVO_ACTIVATE_ROLE TO ROLE SYSADMIN; -- Let the Hevo role use the warehouse you created for Activate GRANT USAGE ON WAREHOUSE HEVO_ACTIVATE_WH TO ROLE HEVO_ACTIVATE_ROLE; GRANT OPERATE ON WAREHOUSE HEVO_ACTIVATE_WH TO ROLE HEVO_ACTIVATE_ROLE; GRANT MONITOR ON WAREHOUSE HEVO_ACTIVATE_WH TO ROLE HEVO_ACTIVATE_ROLE; -- Create the Hevo user CREATE USER HEVO_ACTIVATE WITH DEFAULT_ROLE = HEVO_ACTIVATE_ROLE DEFAULT_WAREHOUSE = HEVO_ACTIVATE_WH PASSWORD = '<password>'; GRANT ROLE HEVO_ACTIVATE_ROLE TO USER HEVO_ACTIVATE; -- Let the Hevo user read the data you want to activate GRANT USAGE ON DATABASE "<database_name>" TO ROLE HEVO_ACTIVATE_ROLE; GRANT USAGE ON SCHEMA "<database_name>"."<schema_name>" TO ROLE HEVO_ACTIVATE_ROLE; GRANT SELECT ON ALL TABLES IN SCHEMA "<database_name>"."<schema_name>" TO ROLE HEVO_ACTIVATE_ROLE; GRANT SELECT ON FUTURE TABLES IN SCHEMA "<database_name>"."<schema_name>" TO ROLE HEVO_ACTIVATE_ROLE; GRANT SELECT ON ALL VIEWS IN SCHEMA "<database_name>"."<schema_name>" TO ROLE HEVO_ACTIVATE_ROLE; GRANT SELECT ON FUTURE VIEWS IN SCHEMA "<database_name>"."<schema_name>" TO ROLE HEVO_ACTIVATE_ROLE; GRANT SELECT ON ALL DYNAMIC TABLES IN SCHEMA "<database_name>"."<schema_name>" TO ROLE HEVO_ACTIVATE_ROLE; GRANT SELECT ON FUTURE DYNAMIC TABLES IN SCHEMA "<database_name>"."<schema_name>" TO ROLE HEVO_ACTIVATE_ROLE; GRANT USAGE ON ALL FUNCTIONS IN SCHEMA "<database_name>"."<schema_name>" TO ROLE HEVO_ACTIVATE_ROLE; GRANT USAGE ON FUTURE FUNCTIONS IN SCHEMA "<database_name>"."<schema_name>" TO ROLE HEVO_ACTIVATE_ROLE; -- Let the Hevo user record the progress of each sync in the bookkeeping schema GRANT USAGE ON DATABASE HEVO TO ROLE HEVO_ACTIVATE_ROLE; GRANT USAGE, CREATE TABLE ON SCHEMA HEVO.HEVO TO ROLE HEVO_ACTIVATE_ROLE;Note:
-
Do not set a default namespace on the Hevo user. Doing so changes the tables that are visible to Activate and can hide objects your datasets need.
-
If your datasets read from more than one schema, run the USAGE and SELECT grants again for each additional schema. The
FUTUREgrants cover objects created later in a schema you have already granted, but they do not cover a schema you have not granted at all.
-
-
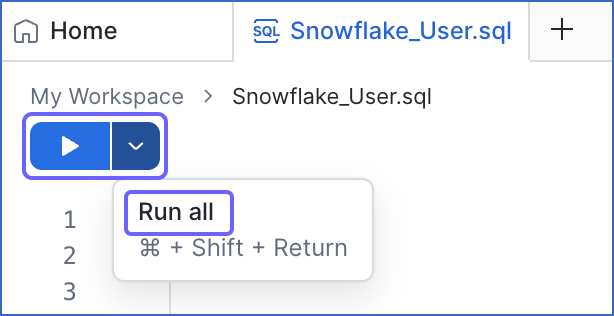
Click the Run options drop-down, and then click Run all to run every command in the script.
-
Once the script runs successfully, you can specify the user name and password while configuring your Snowflake Source using Access Credentials.
Note: Hevo recommends connecting to the Snowflake warehouse using key pair authentication. Read Obtain a Private and Public Key Pair for the steps.
Obtain a Private and Public Key Pair (Recommended Method)
Snowflake is deprecating password-based authentication and enforcing Multi-factor Authentication (MFA). As a result, a Snowflake Source configured with Access Credentials may stop connecting at any time, even if data is currently being sent.
Hevo recommends connecting to your Snowflake warehouse using key pair authentication, as it is not affected by these changes. Perform the following steps to create a key pair, and read Modifying Snowflake Source Configuration to update an existing Source.
You can authenticate Hevo’s connection to your Snowflake warehouse using a public-private key pair. For this, you need to:
-
Generate a public key for your private key.
1. Generate a private key
You can connect to Hevo using an encrypted or unencrypted private key.
Note: Hevo supports only private keys encrypted using the Public-Key Cryptography Standards (PKCS) #8-based triple DES algorithm.
Open a terminal window, and on the command line, do one of the following:
-
To generate an unencrypted private key, run the command:
openssl genrsa 2048 | openssl pkcs8 -topk8 -inform PEM -out <unencrypted_key_name> -nocrypt -
To generate an encrypted private key, run the command:
openssl genrsa 2048 | openssl pkcs8 -topk8 -v2 des3 -inform PEM -out <encrypted_key_name>You will be prompted to set an encryption password. This is the passphrase that you need to provide while connecting to your Snowflake Source using key pair authentication.
Note: Replace the placeholder values in the commands above with your own. For example, <encrypted_key_name> with encrypted_rsa_key.p8.
The private key is generated in the PEM format.
-----BEGIN ENCRYPTED PRIVATE KEY-----
MIIFJDBWBg...
----END ENCRYPTED PRIVATE KEY-----
Open the private key file and remove the extra blank space or empty line at the bottom of the file. Save the private key file in a secure location and provide it while connecting to your Snowflake Source using key pair authentication.
2. Generate a public key
To use a key pair for authentication, you must generate a public key for the private key created in the Generate a private key section. For this:
Open a terminal window, and on the command line, run the following command:
openssl rsa -in <private_key_file> -pubout -out <public_key_file>
Note:
-
Replace the placeholder values in the command above with your own. For example, <private_key_file> with encrypted_rsa_key.p8.
-
If you are generating a public key for an encrypted private key, you will need to provide the encryption password used to create the private key.
The public key is generated in the PEM format.
-----BEGIN PUBLIC KEY-----
MIIBIjANBgk...
-----END PUBLIC KEY-----
Save the public key file in a secure location. You must associate this public key with the Snowflake user that you created for Hevo.
3. Assign the public key to a Snowflake user
To authenticate Hevo’s connection to your Snowflake warehouse using a key pair, you must associate the public key generated in the Generate a public key section with the user that you created in the Create a Snowflake User and Grant Permissions section. To do this:
-
Follow steps 1-3 from the Create a Snowflake Warehouse section to open a SQL worksheet.
-
In the role selector at the top right of the worksheet, ensure that the SECURITYADMIN role or a higher role is selected. If it is not, click the drop-down and select that role.
-
Run the following command in the worksheet:
ALTER USER <your_snowflake_user> SET RSA_PUBLIC_KEY='<public_key>'; // Example ALTER USER HARRY_POTTER set RSA_PUBLIC_KEY='MIIBIjANBgk...';Note:
-
Replace the placeholder values in the command above with your own. For example, <your_snowflake_user> with HARRY_POTTER.
-
Set the public key value to the content between
-----BEGIN PUBLIC KEY-----and-----END PUBLIC KEY-----.
-
To check whether the public key is configured correctly, read Verify the user’s public key fingerprint in the Snowflake documentation.
Obtain your Snowflake Account Identifier
Activate identifies your Snowflake account using either its account identifier or its account URL. Both are accepted in the same field.
Perform the following steps to obtain your account identifier:
-
Log in to your Snowflake account.
-
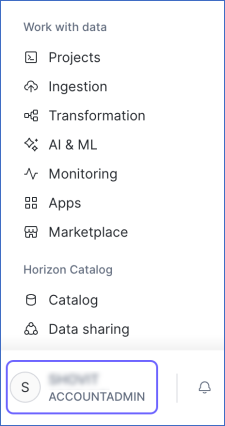
In the bottom left corner, click your account name to open the account menu.
-
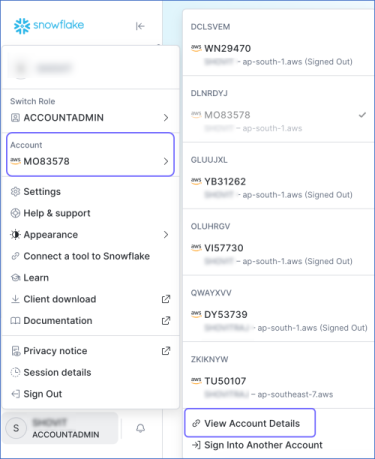
Hover over Account, and then click View Account Details.
-
In the Account Details dialog, copy the Account identifier value. It is in the <organization_name>-<account_name> format. For example, HEVODATA-ABCDXYZ.
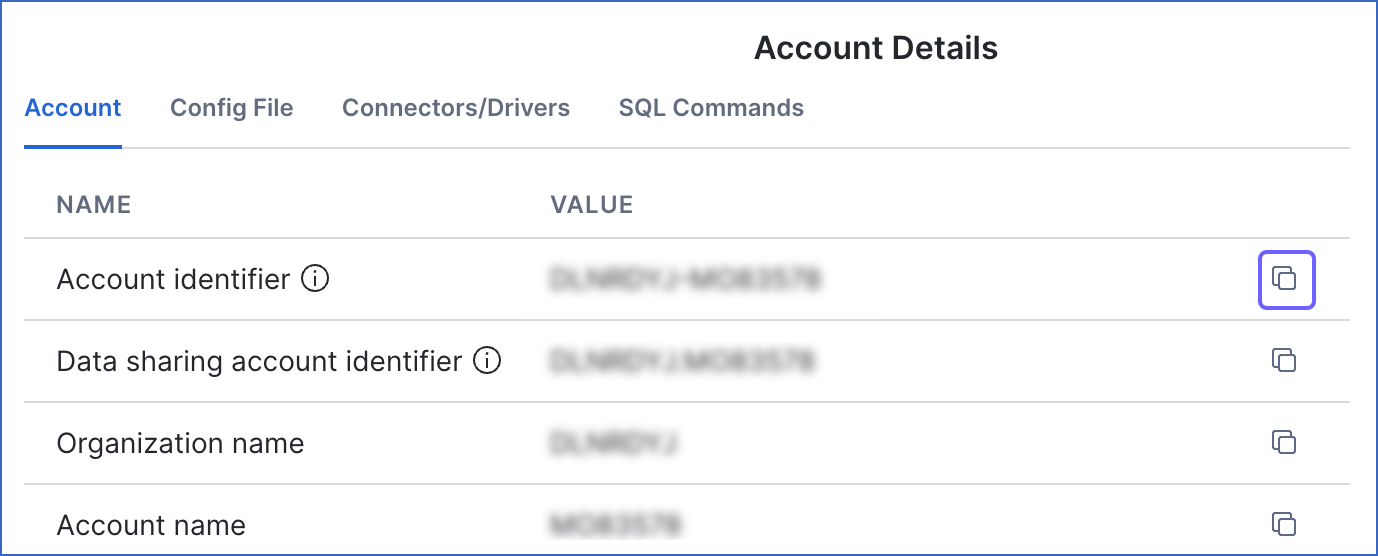
Specify this value in the Account Identifier/URL field while configuring your Source in Activate.
Configure Snowflake as a Source in Activate
Perform the following steps to configure Snowflake as a Source in Activate:
-
In the Navigation Bar, click Activate.
-
On the Activate page, click the Sources tab, and then click + Create Source.

-
On the Select Source Type page, click Snowflake.
-
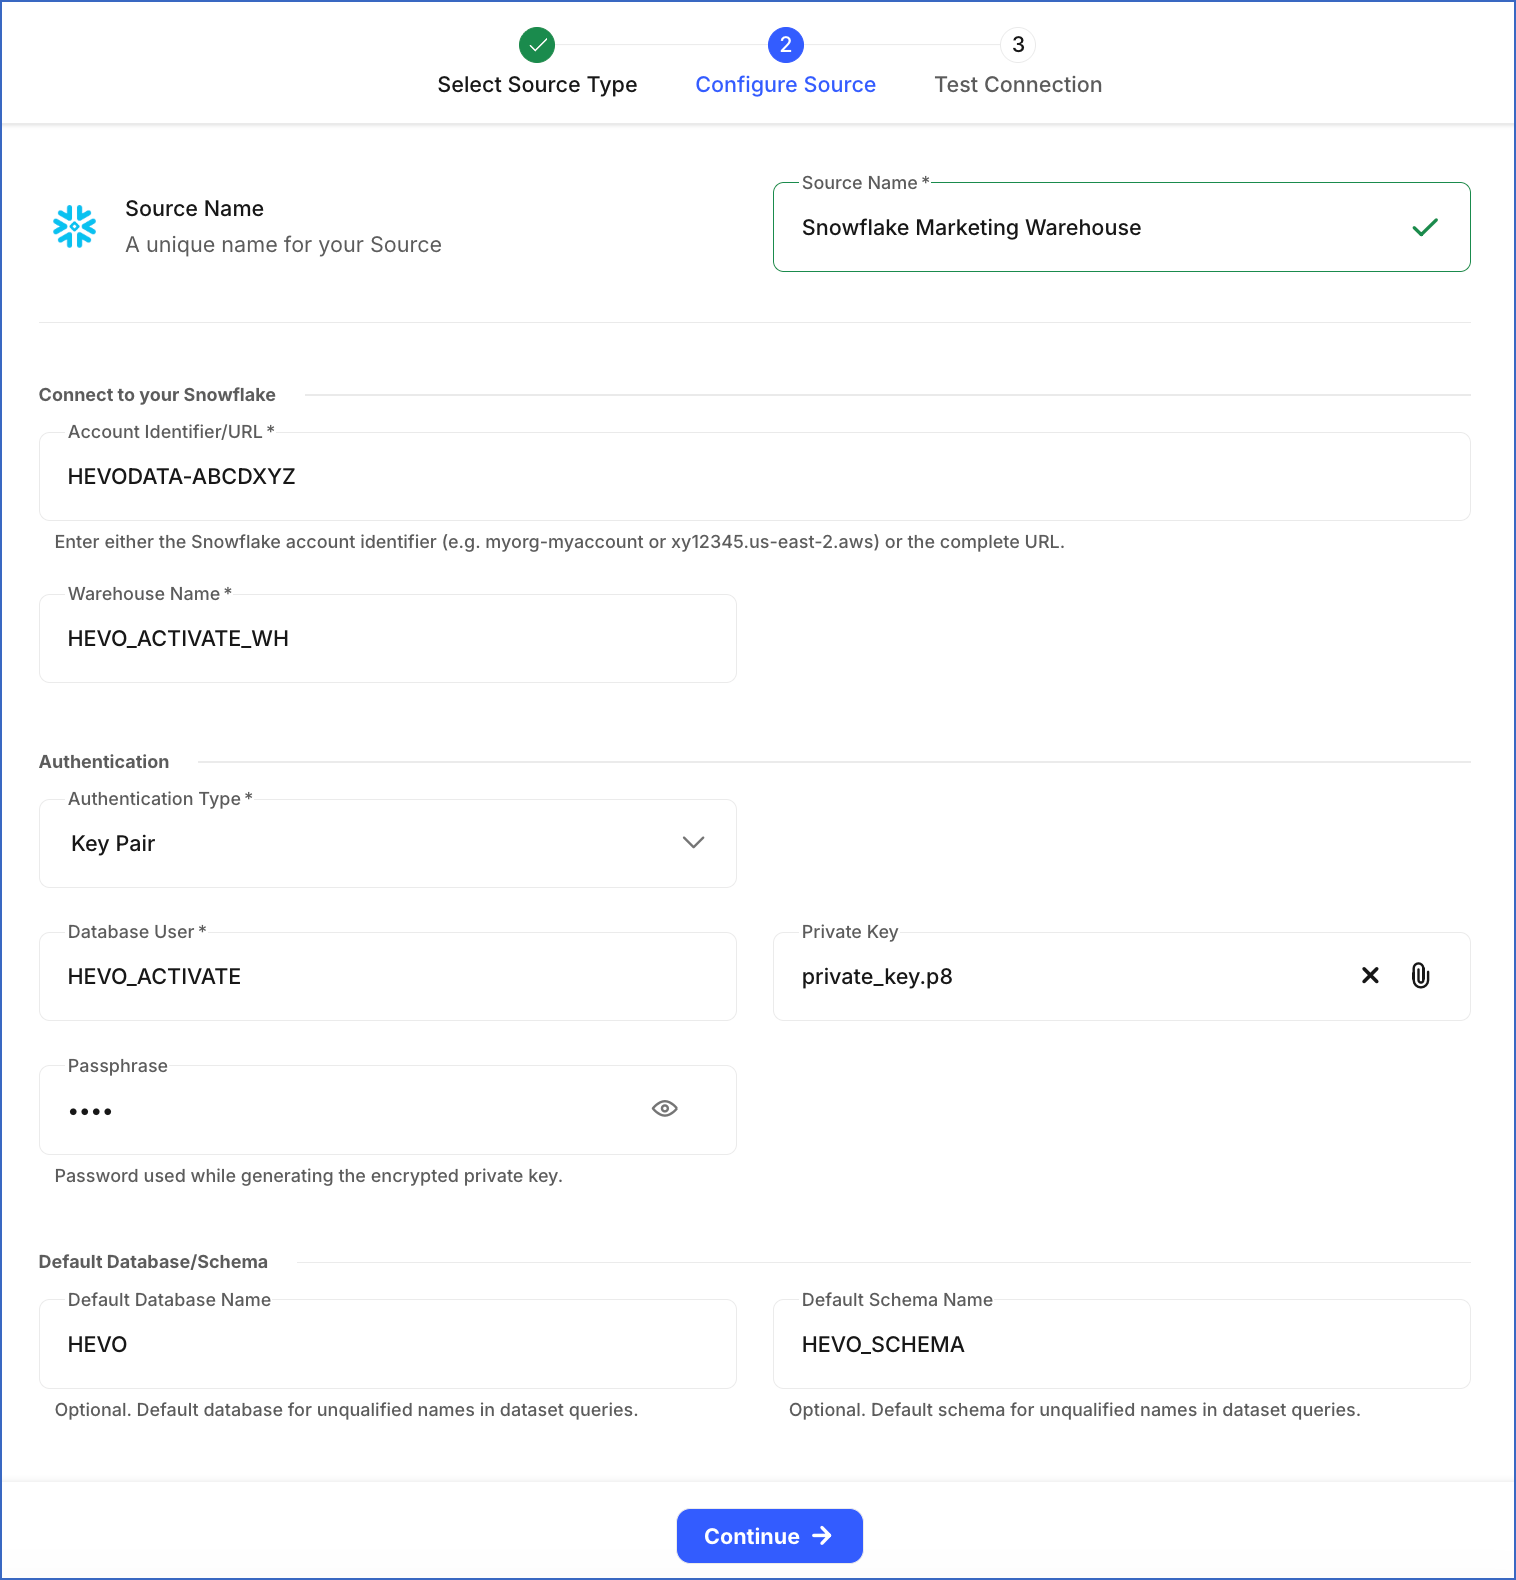
On the Configure Source page, specify the following:
-
Source Name: A unique name for your Source, not exceeding 255 characters. For example, Snowflake Marketing Warehouse.
-
In the Connect to your Snowflake section:
-
Account Identifier/URL: The Snowflake account identifier that you retrieved in the Obtain your Snowflake Account Identifier section. You can also specify the account URL, in the https://<organization_name>-<account_name>.snowflakecomputing.com format.
-
Warehouse Name: The Snowflake warehouse that provides the compute for your dataset queries. This warehouse can be the one you created in the Create a Snowflake Warehouse section or an existing one.
-
-
In the Authentication section:
-
Authentication Type: The method used to authenticate Hevo’s connection to your Snowflake warehouse. Select Key Pair to connect using a public and private key pair, or Access Credentials to connect using a password. Hevo recommends Key Pair, and it is selected by default.
-
Database User: A user with a non-administrative role created in the Snowflake database. For the Key Pair authentication type, this user must be the one to whom the public key is assigned. For the Access Credentials authentication type, this user can be the one you created in the Create a Snowflake User and Grant Permissions section or an existing one.
For the Key Pair authentication type, specify the following:
-
Private Key: A cryptographic password used along with a public key to generate digital signatures. Click the attach (
 ) icon to upload the private key file that you generated in the Generate a private key section.
 -
Passphrase: The password given while generating the encrypted private key. Leave this field blank if you have attached a non-encrypted private key.
For the Access Credentials authentication type, specify the following:
- Database Password: The password for the database user.
-
-
In the Default Database/Schema section:
-
Default Database Name: The database that dataset queries run against when they refer to a table without naming a database. Leave this blank if you prefer every dataset query to name its database explicitly.
-
Default Schema Name: The schema that dataset queries run against when they refer to a table without naming a schema.
The way you write a table name in your dataset query depends on which fields you leave blank:
-
If you leave the default database blank, use the <DATABASE_NAME>.<SCHEMA_NAME>.<TABLE_NAME> format for every table.
-
If you specify the default database but leave the default schema blank, use the <SCHEMA_NAME>.<TABLE_NAME> format for every table.
Note:
-
The default schema applies only when you also specify the default database.
-
Both field values are case-sensitive.
-
-
-
Click Continue.
-
On the Test Connection page, Hevo runs the following checks:
-
Network connectivity: Confirms that the account identifier or URL is valid and that Hevo can access your Snowflake account.
-
Warehouse credentials: Confirms that the configured database user and the authentication details for the selected authentication type are valid.
-
Table access: Confirms that the configured database user can see at least one database other than HEVO and SNOWFLAKE. This check fails if the user does not have the USAGE permission on any database that your datasets read from.
-
Bookkeeping schema permissions: Confirms that the HEVO database and the HEVO schema exist, and that the configured database user can create and drop tables in that schema.
-
Amazon S3 access: Confirms that your account can export a single row of data to the Hevo-managed Amazon S3 bucket and read it back.
The test also confirms that the default database and the default schema you specified are valid.
Note: If the test fails and your Snowflake account uses a network policy, read Allowlist Hevo IP Addresses for Your Region.
-
-
Click Finish.
The Source is created and appears in the Sources List View with the Active status, and you can create datasets from it.
(Optional) Allowlist Hevo IP Addresses for your region
Note: Skip this step if your Snowflake account does not use a network policy.
A network policy restricts the IP addresses that can connect to your Snowflake account. If your account uses one, you must allowlist the Hevo IP addresses for your region, or the connection test fails even when the credentials are correct.
Perform the following steps to allowlist the Hevo IP addresses:
-
Log in to your Snowflake account as a user with the SECURITYADMIN role or a higher role.
-
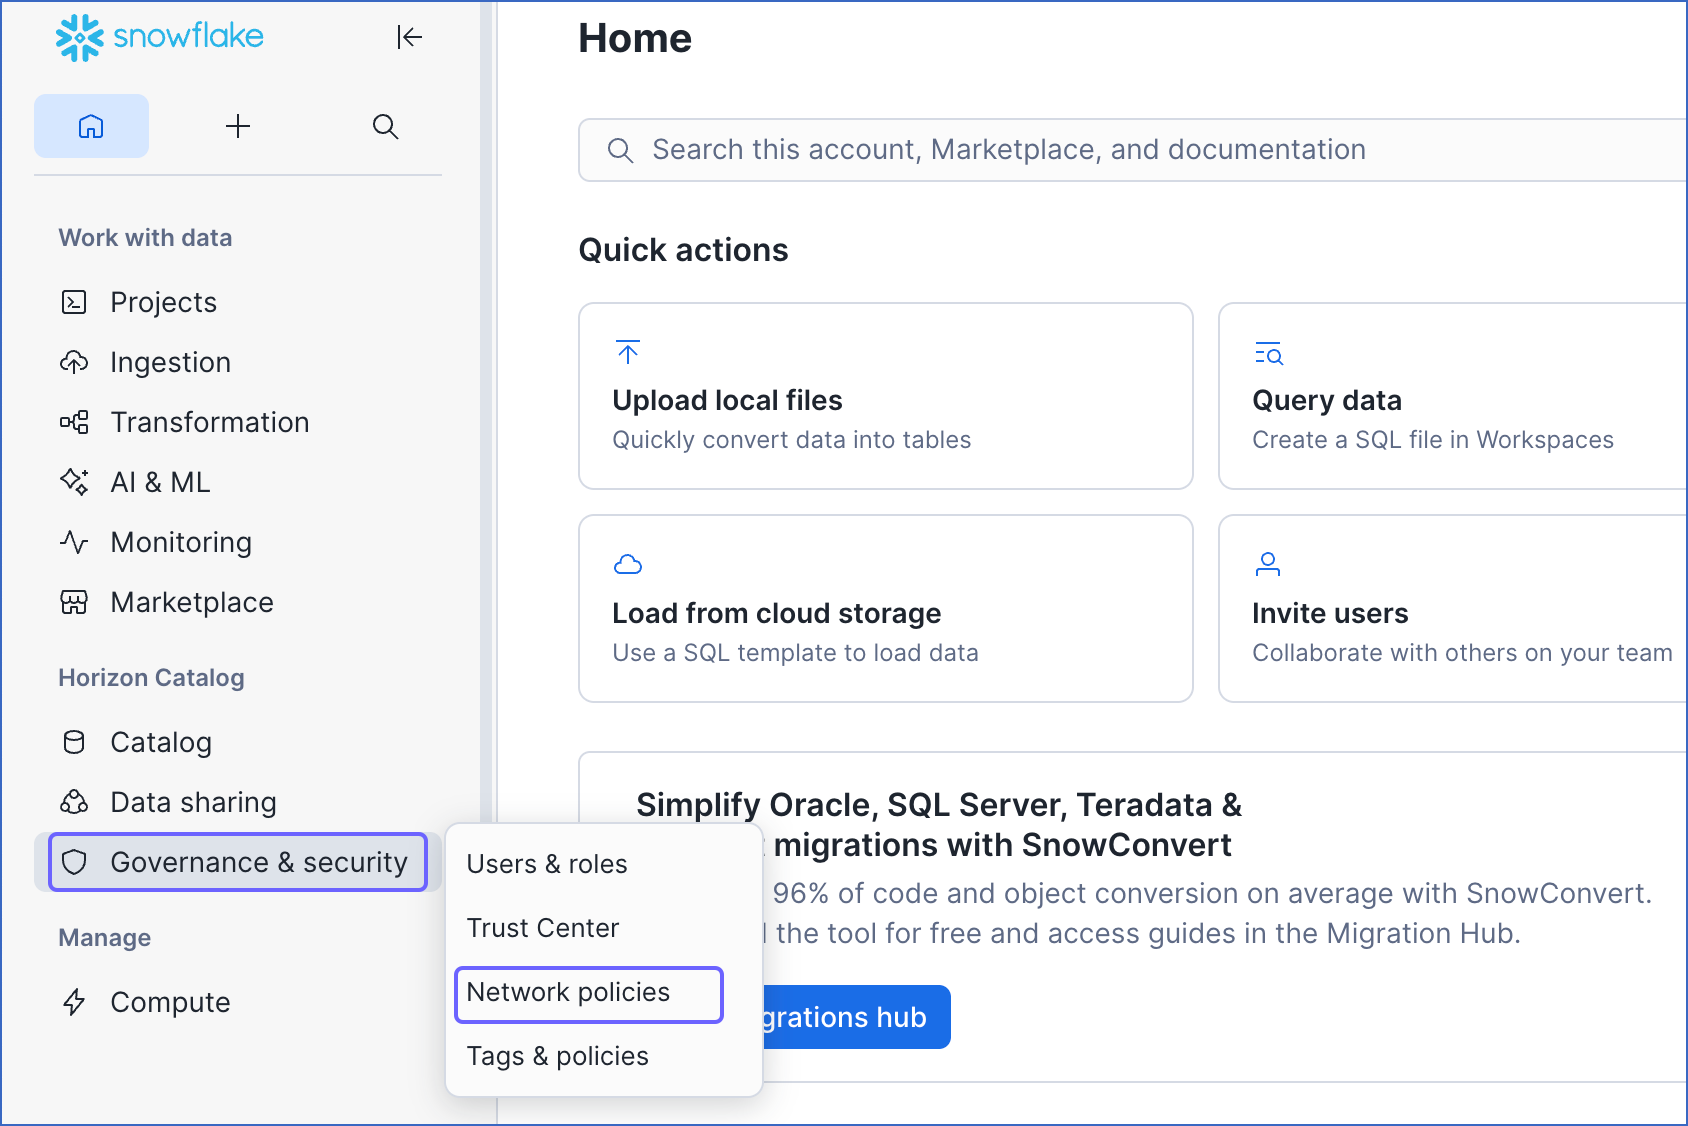
In the left navigation pane, hover over Governance & security, and then click Network policies.
-
On the Network policies page, click + Network Policy.
-
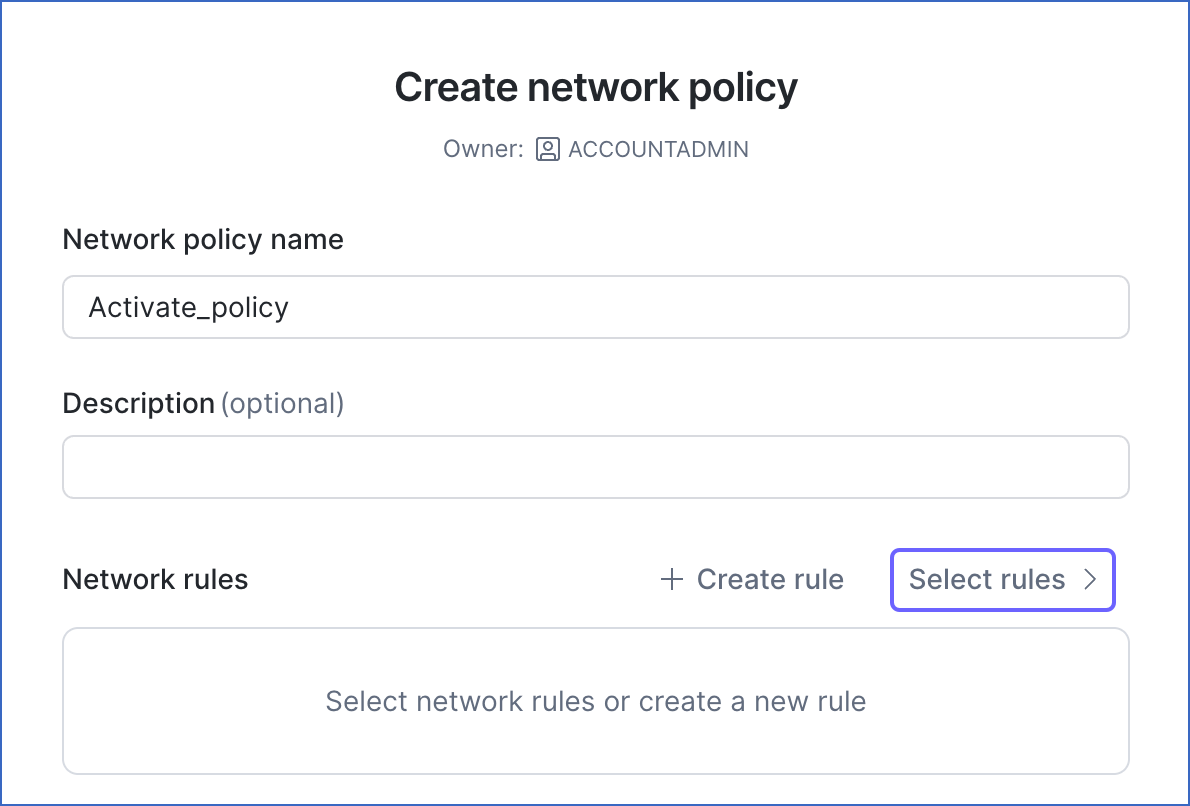
In the Create network policy window, specify a unique Network policy name. Read Identifier Requirements for the constraints that a policy name must meet.
-
In the Network rules section, do one of the following:
-
If you have already created a rule for the Hevo IP addresses, click Select rules, and then select that rule.
-
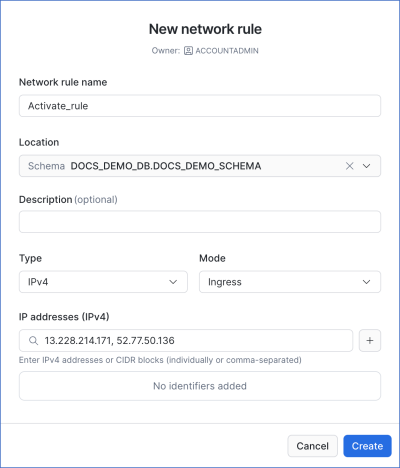
To add a rule for the Hevo IP addresses, click Create rule, and then do the following:
-
Specify a unique Network rule name.
-
In the Location section, select the database and the schema in which you want to create the rule.
-
Ensure that the Type is IPv4 and the Mode is Ingress.
-
In the IP addresses (IPv4) field, specify the Hevo IP addresses for your region. You can specify the addresses individually or as a comma-separated list.
-
Click Create.
-
-
-
Click Create.
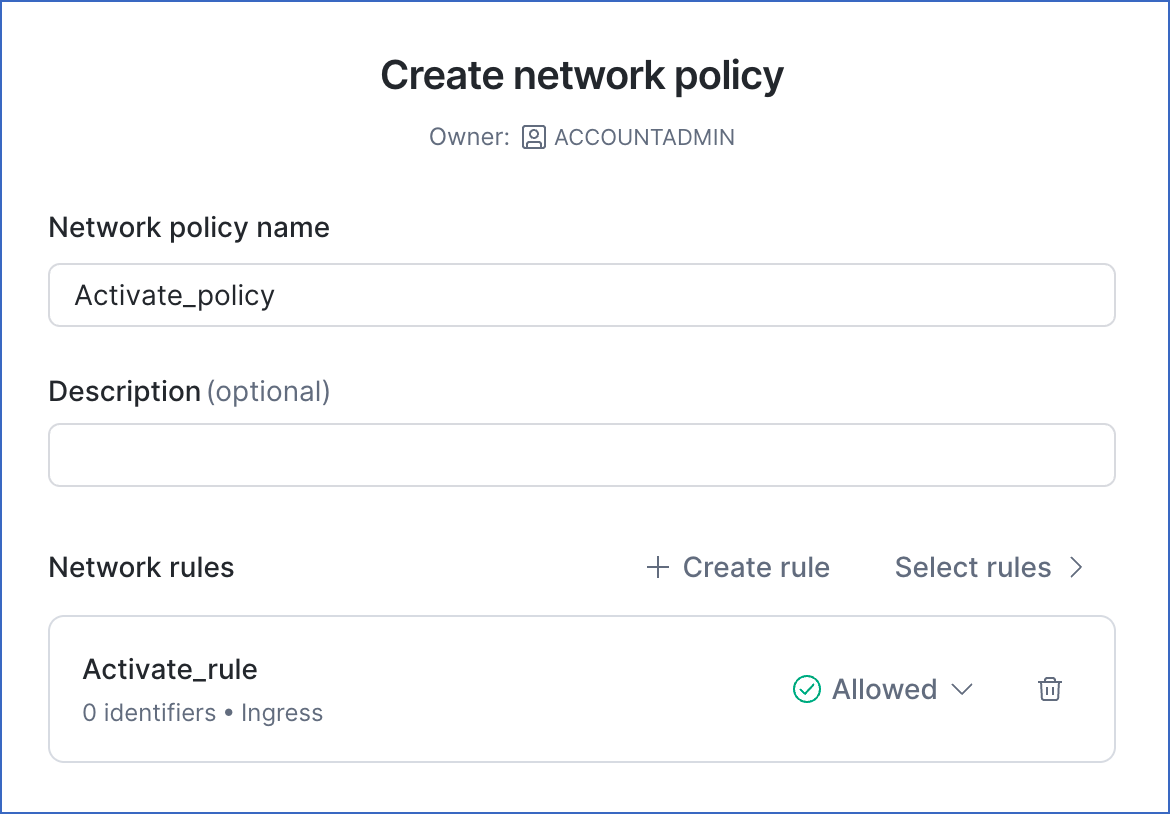
The new policy is displayed on the Network policies page with the Inactive status.
-
Click the Action Menu icon corresponding to your policy, and then click Activate On Account.
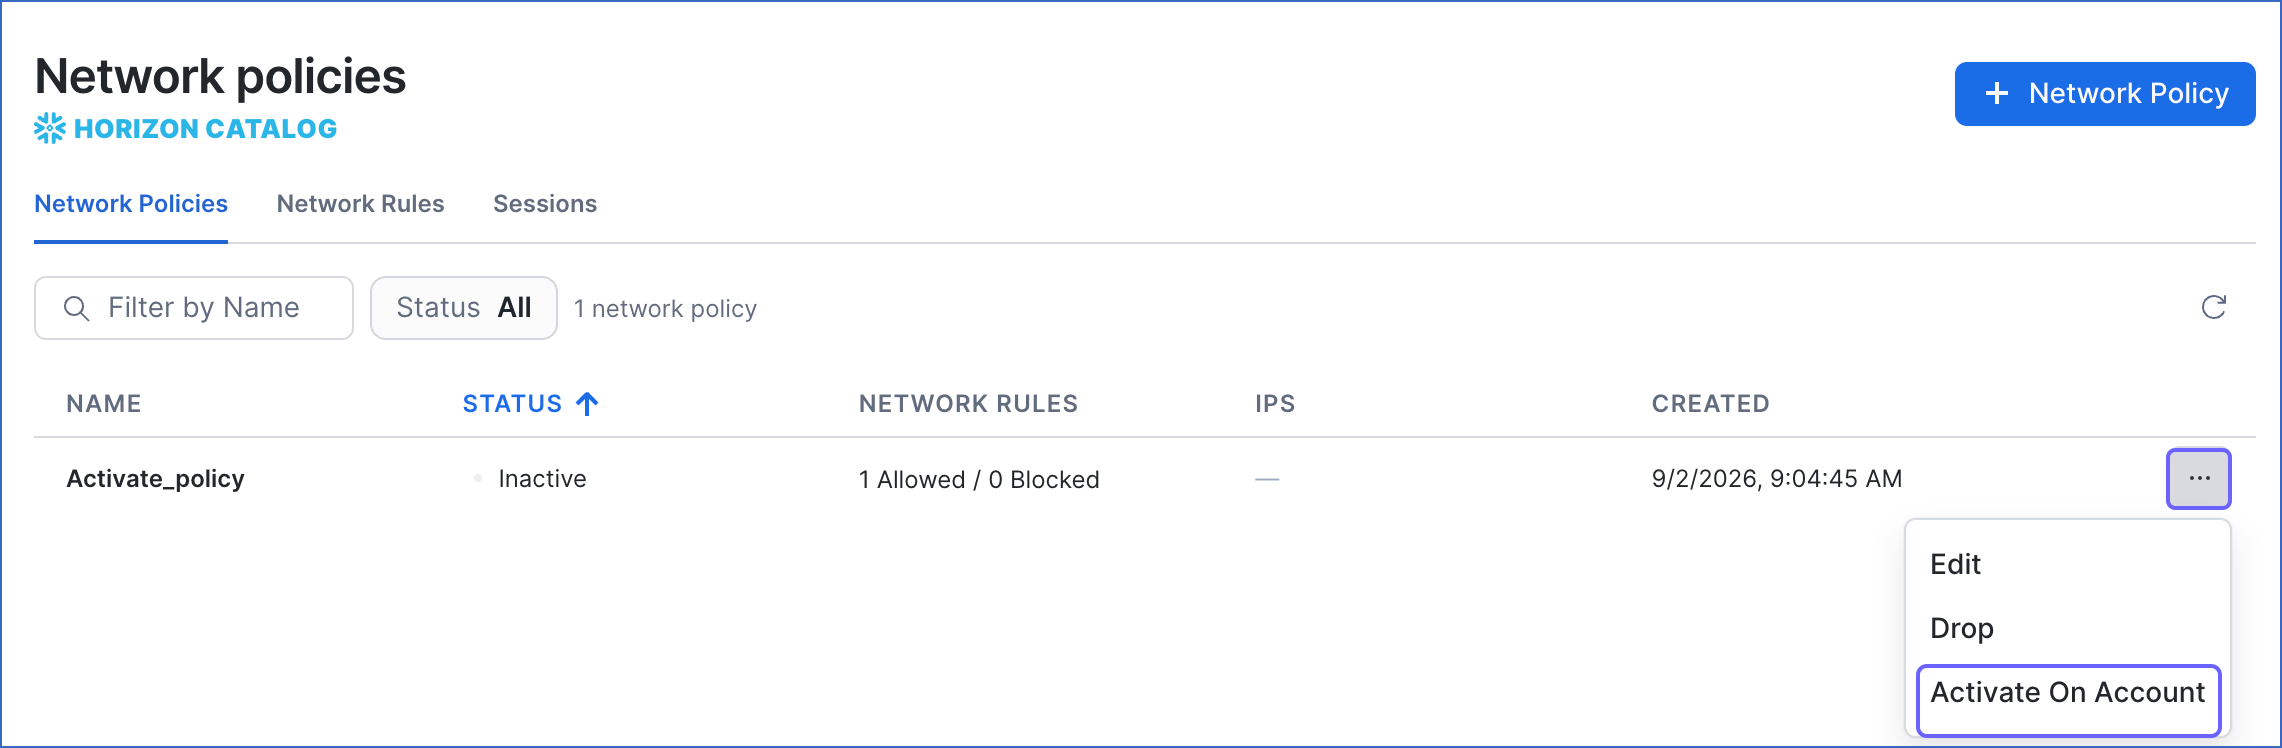
The Hevo IP addresses are allowlisted, and Activate can connect to your Snowflake account.
Modifying Snowflake Source Configuration
You can modify the configuration of your Snowflake Source after its creation. However, any configuration changes affect all the datasets built on that Source and all the Activations that use those datasets. If a Source shows the Failed status, its credentials are no longer valid, and every Activation that depends on it fails until the credentials are corrected.
Perform the following steps to modify the configuration of your Snowflake Source in Activate:
-
In the Navigation Bar, click Activate.
-
On the Activate page, click the Sources tab.
-
Click the Source you want to modify to open it in the Detailed View.
-
In the Source Header, click Edit.

-
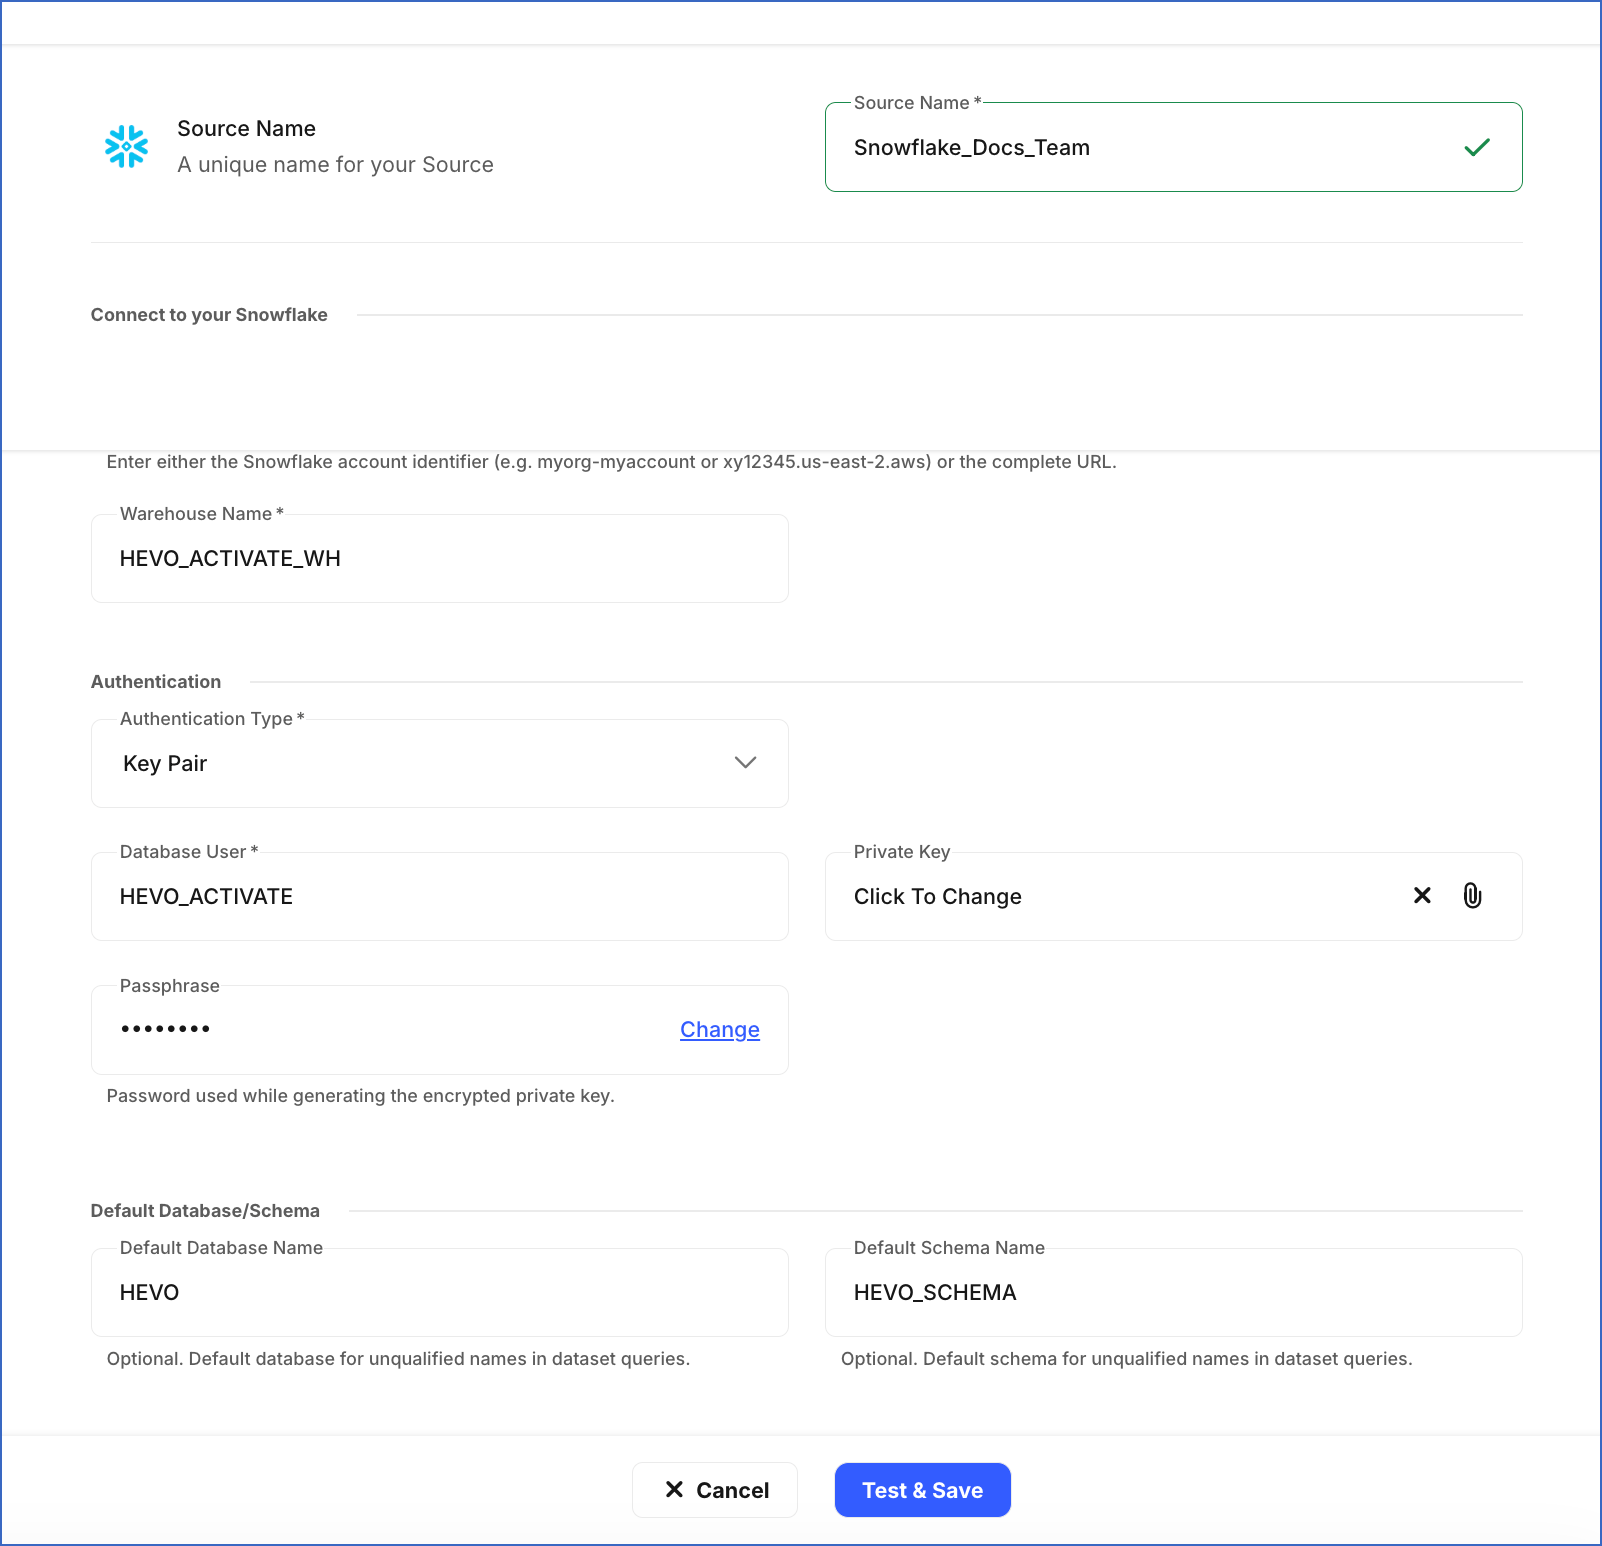
On the <Your Source Name> page, you can do the following:
-
Specify a new name for your Source, not exceeding 255 characters.
-
In the Connect to your Snowflake section, you can update the Account Identifier/URL and the Warehouse Name.
-
In the Authentication section, you can modify your Authentication Type and update the necessary fields based on the selected type:
-
Key Pair:
-
Database User: Specify a different Snowflake user. Ensure that the public key corresponding to the uploaded private key is assigned to that user.
-
Private Key: Click the attach (
) icon to upload a different private key file. -
Passphrase: Click Change to clear the field. If you uploaded an encrypted private key, provide the password used to generate it; otherwise, leave the field blank.
-
-
Access Credentials:
-
Database User: Specify a different Snowflake user.
-
Database Password: Click Change to update the password for the user configured in your Source.
-
-
-
In the Default Database/Schema section, you can update the Default Database Name and the Default Schema Name.
-
-
Click Test & Save.
-
In the confirmation dialog, click Yes, Go ahead.
A notification is displayed to confirm that the Source has been updated successfully.
Source Considerations
-
Snowflake treats unquoted identifiers as uppercase. If your database, schema, or table names were created with quotes and mixed case, refer to them in the same quoted form in your dataset queries.
-
The warehouse you select provides the compute for your dataset queries. If a query takes longer to run than the sync interval of an Activation using it, consider increasing the warehouse size.
Revision History
Refer to the following table for the list of key updates made to this page:
| Date | Release | Description of Change |
|---|---|---|
| Sep-22-2026 | NA | New document. |