Familiarizing with the Transformations UI (Edge)
On This Page
Edge Pipeline is now available for Public Review. You can explore and evaluate its features and share your feedback.
When you click Transformations in the Navigation Bar, the Transformations List View is displayed. On this page, you can view the list of Transformation projects created by you or your team, sort the results using data controls, and click any project to open it in the Detailed View.
The following sections highlight the main elements of the Transformations List View and the Detailed View:
Transformations List View
Refer to the image and descriptions below to familiarize yourself with the components of the Transformations List View.

The following table describes each of these components:
| Page Component | Title | Description |
|---|---|---|
| 1 | Search Bar | Searches for Transformation projects created by you or your team using the partial or complete project name. |
| 2 | Data Controls | Controls the data that is displayed. The Data Controls, from left to right, are: - Newest First: Sort and display the Transformation projects based on the criterion selected from the drop-down. The available options are Newest First (default) and Oldest First. - Refresh: Allows you to view the newly created projects that are not visible in the UI yet. |
| 3 | Page Controls | Displays the range of projects currently shown out of the total. Each page displays up to 20 rows. Use the arrow icons to navigate between pages. |
| 4 | Transformation Settings | Opens the Transformation Settings slide-in page, where you can connect, disconnect, and manage your GitHub account. |
| 5 | + Create Transformation | Creates a Transformation project. |
| 6 | Asset List | Displays the list of projects created by you or your team. This list can be refined using the Search Bar or Data Controls. |
| 7 | Transformation Summary | Provides a brief summary of an existing Transformation project. This includes: - Transformation ID: The sequential number assigned to the project at the time of creation. - Transformation Name: The name of the project. - Repository: The name of the linked GitHub repository. - Created At: The date and time the project was created. - Created By: The email address of the user who created the project. - Edit: Click to rename the project. Read Renaming a Transformation Project for detailed steps. - Delete: Click to permanently delete the project. Read Deleting a Transformation Project for detailed steps. |
Transformations Detailed View
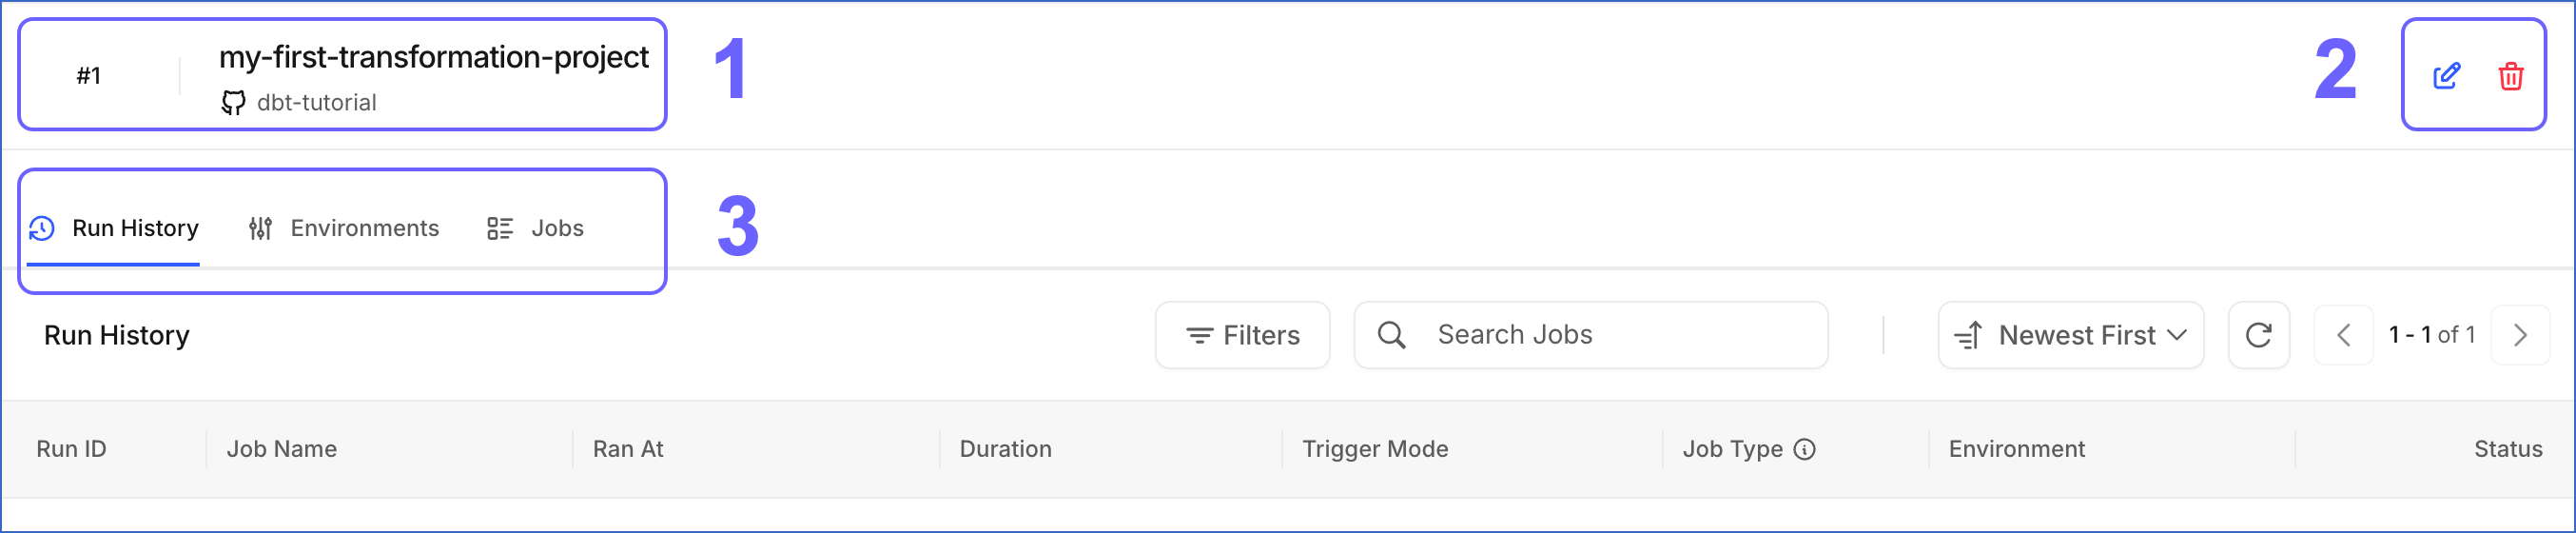
Click anywhere in a Transformation Summary row to open the project in the Detailed View. The following image highlights the main components displayed and the actions you can perform on the page:
The following table describes each of these components:
| Page Component | Title | Description |
|---|---|---|
| 1 | Project Header | Displays the project’s serial number, name, and linked GitHub repository. |
| 2 | Project Actions | Displays the actions you can perform on the project: - Edit: Click to rename the project. - Delete: Click to permanently delete the project. |
| 3 | Tool Bar | Provides access to the following tabs: - Run History: Displays the list of all job runs for the project. This tab is displayed by default when the project is opened in the Detailed View. - Environments: Displays the list of environments configured for the project. - Jobs: Displays the list of jobs created for the project. |
Run History Tab
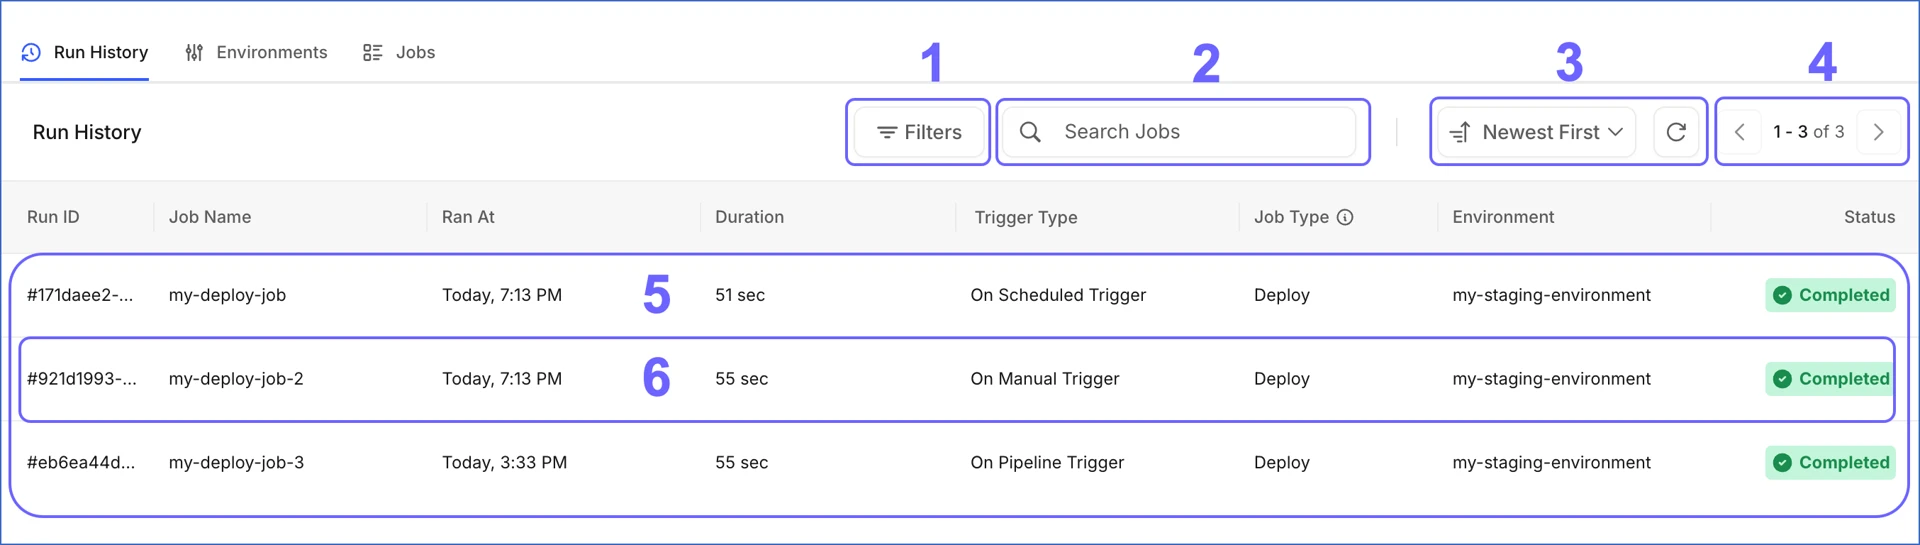
The Run History tab displays the list of all job runs for the Transformation project. The following image highlights the main components displayed and the actions you can perform in this tab:
The following table describes each of these components:
| Page Component | Title | Description |
|---|---|---|
| 1 | Filters | Filters the run history based on the following criteria: - Status: The outcome of the run, such as Queued, Running, Completed, Skipped, Failed, or Canceled. - Trigger Type: The mode used to trigger the run, such as On Scheduled, On Demand, or On Merge. - Source Branch: The Git branch from which the code was pulled. - Environment: The environment in which the run executed. - Ran At: The date range in which the runs were executed. |
| 2 | Search Bar | Searches for runs for a particular job using the partial or complete name of the job. |
| 3 | Data Controls | Controls the data that is displayed. The Data Controls, from left to right, are: - Newest First: Sort and display runs based on the criterion selected from the drop-down. The other available Data Control options are: - Oldest First - Latest End Time - Earliest End Time - Status A → Z - Status Z → A - Trigger Type A → Z - Trigger Type Z → A - Refresh: Allows you to view the latest runs that are not visible in the UI yet. |
| 4 | Page Controls | Displays the range of runs currently shown out of the total. Each page displays up to 20 rows. Use the arrow icons to navigate between pages. |
| 5 | Asset List | Displays the list of all job runs for the project. |
| 6 | Run Summary | Provides a brief summary of each run. This includes: - Run ID: The ID assigned to the run. - Job Name: The name of the job that triggered the run. - Ran At: The date and time at which the job was executed. - Duration: The total time taken to complete the run. - Trigger Type: The mode used to trigger the run. - Job Type: The type of the job, either Deploy, Continuous Integration (CI), or Merge. - Environment: The environment in which the run executed. - Status: The current status of the run. |
Environments Tab
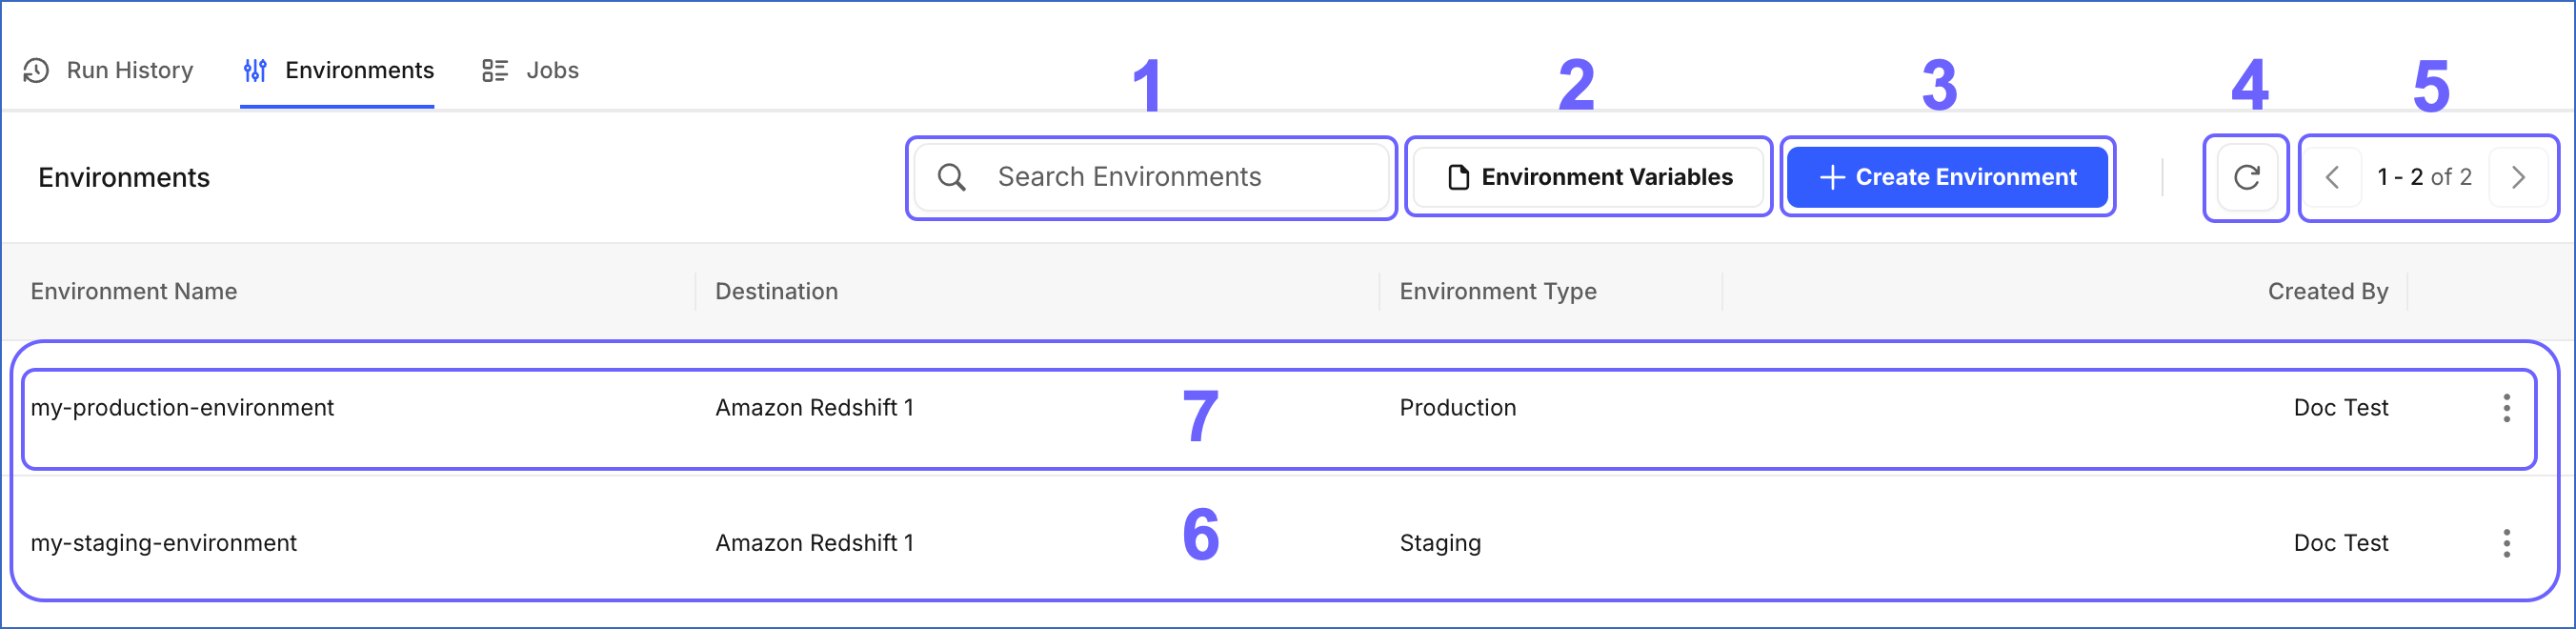
The Environments tab displays the list of environments configured for the Transformation project. The following image highlights the main components displayed and the actions you can perform in this tab:
The following table describes each of these components:
| Page Component | Title | Description |
|---|---|---|
| 1 | Search Bar | Searches for environments using the partial or complete name of the environment. |
| 2 | Environment Variables | Opens the Define Environment Variables slide-in page, where you can add, modify, or delete environment variables for your Transformation project. |
| 3 | + Create Environment | Creates an environment for the Transformation project. |
| 4 | Refresh | Allows you to view newly created environments that are not visible in the UI yet. |
| 5 | Page Controls | Displays the range of environments currently shown out of the total. Each page displays up to 20 rows. Use the arrow icons to navigate between pages. |
| 6 | Asset List | Displays the list of environments configured for the project. |
| 7 | Environment Summary | Provides a brief summary of each environment. This includes: - Environment Name: The name of the environment. - Destination: The Destination linked to the environment. - Environment Type: The type of the environment, either Staging or Production. - Created By: The email address of the user who created the environment. - Actions: Click to perform the following actions: - Edit Environment: Modify the environment settings. Read Modifying an Environment for detailed steps. - Delete: Permanently delete the environment. Read Deleting an Environment for detailed steps. |
Jobs Tab
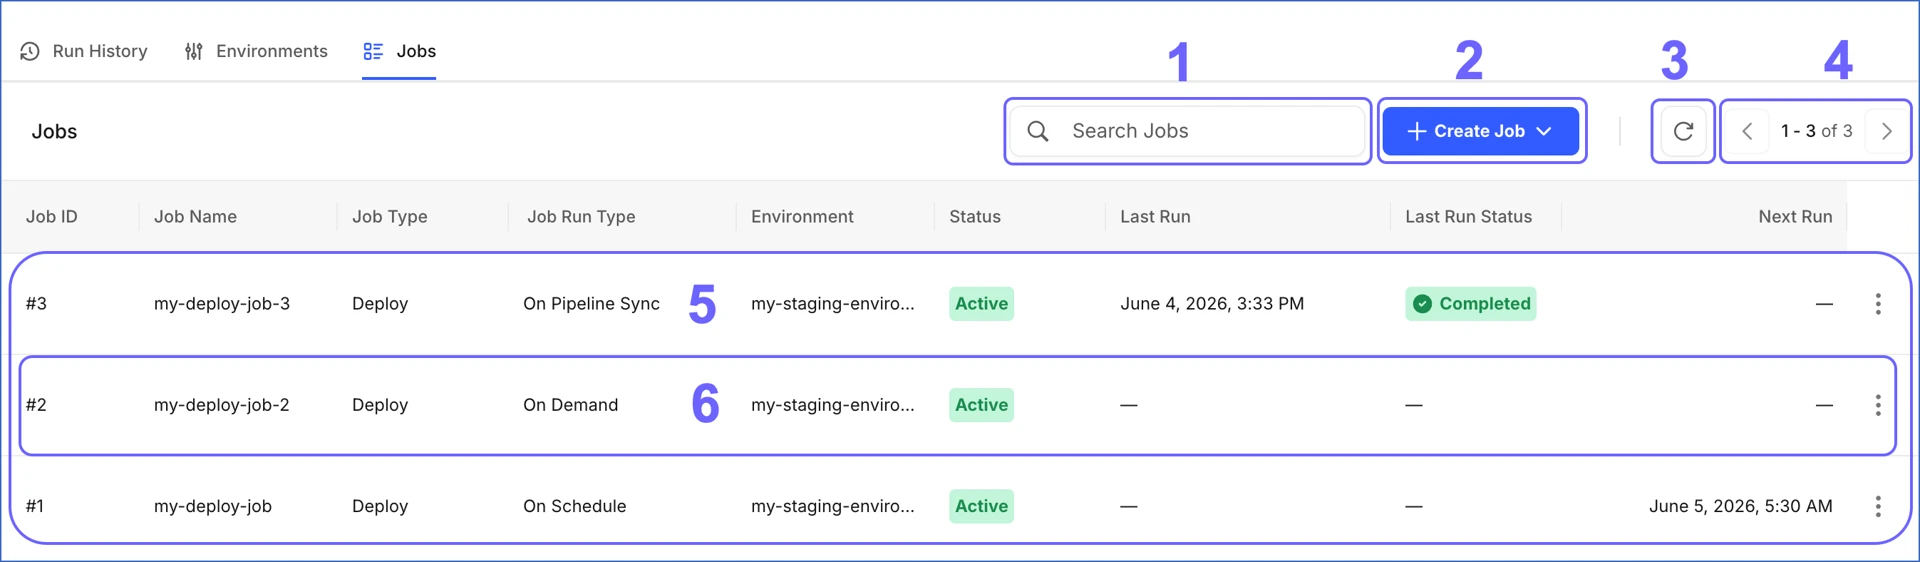
The Jobs tab displays the list of jobs created for the Transformation project. The following image highlights the main components displayed and the actions you can perform in this tab:
The following table describes each of these components:
| Page Component | Title | Description |
|---|---|---|
| 1 | Search Bar | Searches for jobs using the partial or complete name of the job. |
| 2 | + Create Job | Creates a job for the project. Click the drop-down to choose the type of job you want to create. Read Working with Jobs to know more about the available job types and how to create them. |
| 3 | Refresh | Allows you to view newly created jobs that are not visible in the UI yet. |
| 4 | Page Controls | Displays the range of jobs currently shown out of the total. Each page displays up to 20 rows. Use the arrow icons to navigate between pages. |
| 5 | Asset List | Displays the list of jobs created for the project. |
| 6 | Job Summary | Provides a brief summary of each job. This includes: - Job ID: The sequential number assigned to the job at the time of creation. - Job Name: The name of the job. - Job Type: The type of the job, either Deploy, Continuous Integration (CI), or Merge. - Job Run Type: The trigger type of the job run, such as Scheduled, On Demand, or On Merge. - Environment: The environment in which the job runs. - Status: The current status of the job. - Last Run: The date and time of the most recent run. - Last Run Status: The status of the most recent run. - Next Run: The date and time of the next scheduled run. This field displays a value only for jobs configured with a scheduled trigger. - Actions: Click to perform the following actions: - Edit Job: Modify the job configuration. Read Modifying a Job for detailed steps. - Disable Job: Temporarily stop the job from running. By default, any run in progress completes before the job is disabled. You can also choose to stop active runs immediately. Read Disabling a Job for detailed steps. - Delete: Permanently delete the job. Read Deleting a Job for detailed steps. |
Revision History
Refer to the following table for the list of key updates made to this page:
| Date | Release | Description of Change |
|---|---|---|
| Jul-01-2026 | NA | New document. |