On This Page
This Destination is currently available for Early Access. Please contact your Hevo account executive or the Support team to enable it for your team. Alternatively, request for early access to try out one or more such features.
Databricks is a cloud-based data and AI platform that provides lakehouse capabilities for storing, processing, and analyzing data. Databricks supports Delta Lake and provides SQL warehouses and other compute resources for querying and processing data.
Hevo connects to a Databricks SQL warehouse or all-purpose cluster and loads your data into tables in the catalog and schema configured for the Destination. Your workspace can be hosted on Amazon Web Services (AWS), Microsoft Azure, or Google Cloud Platform (GCP). The connection settings are the same for all three, and only the workspace URL differs.
Databricks supports the following data governance models:
-
Unity Catalog: The recommended data governance solution, and the default for new workspaces. Unity Catalog provides centralized governance for data across workspaces in an account. Tables use a three-level naming format, catalog.schema.table. When configuring the Destination, you must specify the catalog where Hevo will create the tables.
-
Hive Metastore: The legacy data governance solution. The metastore is associated with a workspace, and tables use a two-level naming format, schema.table. You do not specify a catalog when configuring the Destination. Hevo uses the built-in hive_metastore catalog. Databricks recommends Unity Catalog instead, and Hive Metastore is not available if legacy access is turned off for your account or workspace.
Note: Databricks accounts created after December 18, 2025 do not have access to certain legacy features, including the Hive Metastore. These accounts use Unity Catalog instead.
Prerequisites
-
An active AWS, Azure, or GCP account is available.
-
A Databricks workspace is created in your cloud service account.
-
A SQL warehouse or an all-purpose cluster is running in your Databricks workspace.
-
The workspace URL and the HTTP path of your SQL warehouse or cluster are available.
-
The catalog type used by your workspace is available. For Unity Catalog, you also need the catalog name.
-
Hevo is assigned the USE CATALOG and CREATE SCHEMA privileges on the catalog.
-
Hevo is assigned the USE SCHEMA, CREATE TABLE, MODIFY, and SELECT privileges on the current and future schemas in the catalog.
-
Hevo is assigned the Can use permission on the SQL warehouse, or the Can Restart permission on the all-purpose cluster.
-
A Databricks personal access token is available.
-
The workspace allows connections from the Hevo IP addresses of your region, if the IP access list feature is enabled for your workspace.
Note: You must have the workspace administrator role to create an IP access list.
(Optional) Create a Databricks Workspace
Note: If you already have a Databricks workspace that you want to connect to Hevo, skip to the Create a SQL Warehouse or an All-purpose Cluster section.
A workspace is a Databricks deployment in your cloud service account. This is the environment where you and your team access your data, run queries, and manage the resources that Databricks provides. Databricks assigns a unique URL to each workspace, and you use this URL to log in and to connect applications such as Hevo.
Perform the following steps to create a workspace:
-
Log in to your Databricks account console.
-
Create the workspace for your cloud provider. Read the AWS, Azure, or GCP documentation for the steps.
You are assigned the workspace administrator role on the workspace that you create. This role is required to create a SQL warehouse or a cluster, grant privileges on a catalog, and create an IP access list.
-
Add the team members who need access to the workspace, and assign them the privileges to create and manage a SQL warehouse or a cluster. Read Manage users for the steps.
Use this workspace to create the SQL warehouse or cluster that Hevo connects to.
Create a SQL Warehouse or an All-purpose Cluster
Hevo runs all its queries on a SQL warehouse or an all-purpose cluster in your workspace. You need only one of them for Hevo to load your data.
Create one of the following in your workspace:
-
SQL warehouse: A resource dedicated to running SQL queries, which is the only workload that Hevo needs. A serverless warehouse starts in a few seconds and stops automatically after the idle time that you set. Select this option if you are creating a new resource for Hevo.
-
All-purpose cluster: A resource that supports other workloads, such as notebooks and Apache Spark jobs, in addition to SQL queries. A cluster takes a few minutes to start from a stopped state. Select this option if your team already uses a cluster that you want Hevo to connect to.
Create a SQL warehouse
-
Log in to your Databricks workspace.
-
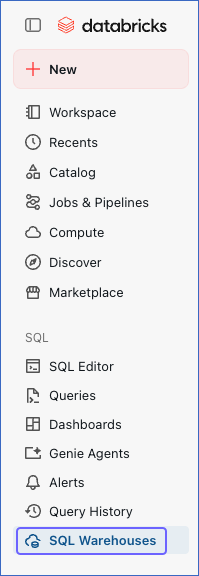
In the left navigation pane, under SQL, click SQL Warehouses.
-
On the Compute page, click Create SQL warehouse.

-
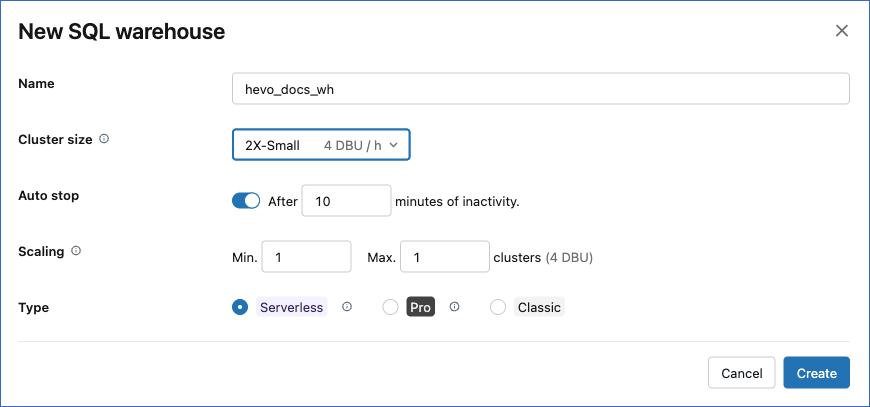
In the New SQL warehouse dialog, specify the following:
-
Name: A unique name for your warehouse. For example, hevo_docs_wh.
-
Cluster size: The size of the warehouse. A 2X-Small warehouse is suitable for most Hevo workloads. The dialog displays the cost of the selected size in Databricks Units per hour (DBU/h).
-
Auto stop: The idle time after which the warehouse stops.
-
Type: The warehouse type. Serverless warehouses start in a few seconds, while Pro and Classic warehouses take a few minutes.
-
-
Click Create.
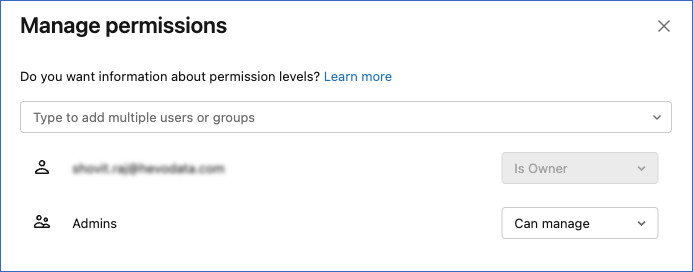
Databricks creates the warehouse, starts it, and displays the Manage permissions dialog. You are assigned as the owner of the warehouse that you create.
Create an all-purpose cluster
-
Log in to your Databricks workspace.
-
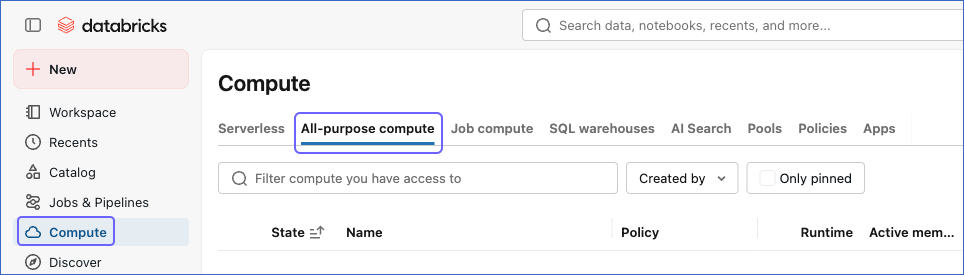
In the left navigation pane, click Compute, and then click the All-purpose compute tab. Databricks labels an all-purpose cluster as all-purpose compute in its user interface.
-
On the Compute page, click Create compute.

-
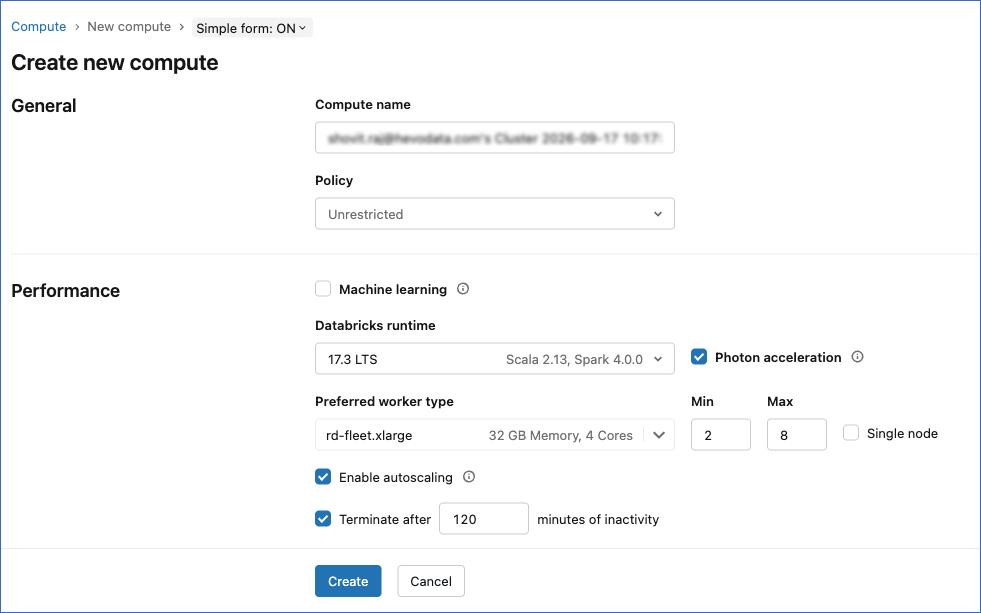
On the Create new compute page, specify the following:
-
Compute name: A unique name for your cluster. For example, hevo_docs_cluster.
-
Policy: The set of rules that limits the configuration settings available to you. Default value: Unrestricted.
-
Machine learning: Select this check box to use a Databricks runtime that includes machine learning libraries. Hevo does not use these libraries.
-
Databricks runtime: The runtime version for the cluster. Select a Long Term Support (LTS) version.
-
Photon acceleration: Select this check box to use Photon, the Databricks query engine that accelerates SQL workloads.
-
Preferred worker type: The type of worker node, which determines the memory and the number of cores available to the cluster.
-
Min and Max: The lowest and the highest number of worker nodes that Databricks runs. These fields apply only when Enable autoscaling is selected.
-
Single node: Select this check box to create a cluster with a driver node and no worker nodes. This is the smallest configuration, and it is suitable for the SQL queries that Hevo runs.
-
Enable autoscaling: Select this check box to allow Databricks to add and remove worker nodes based on the load.
-
Terminate after: The idle time after which the cluster stops.
-
-
Click Create.
Databricks creates the cluster and starts it. You are assigned as the owner of the cluster that you create.
Once your SQL warehouse or cluster is running, obtain its connection settings to use while configuring your Databricks Destination.
Obtain your Workspace URL and HTTP Path
Hevo needs the workspace URL and the HTTP path of the SQL warehouse or cluster that you created in the Create a SQL Warehouse or an All-purpose Cluster section. Both values are available in the connection details. The workspace URL is the URL that you use to access your Databricks workspace, while the server hostname and the HTTP path are the connection details of the specific SQL warehouse or all-purpose cluster that Hevo uses.
Obtain the SQL warehouse details
-
Log in to your Databricks workspace.
-
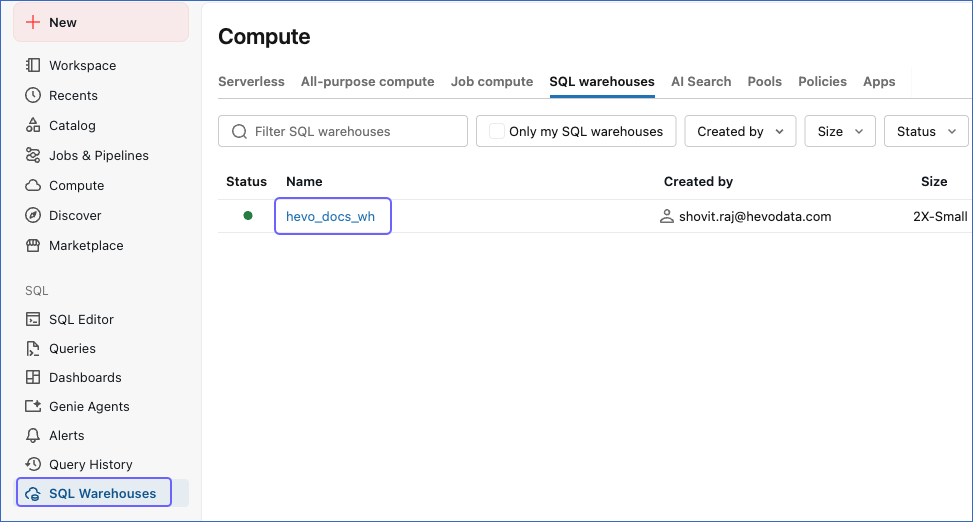
In the left navigation pane, under SQL, click SQL Warehouses, and then click the name of your warehouse.
-
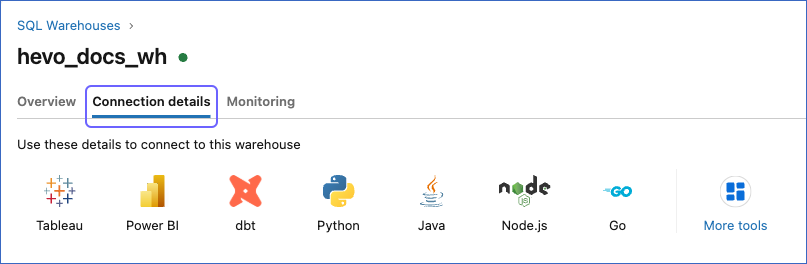
Click the Connection details tab.
-
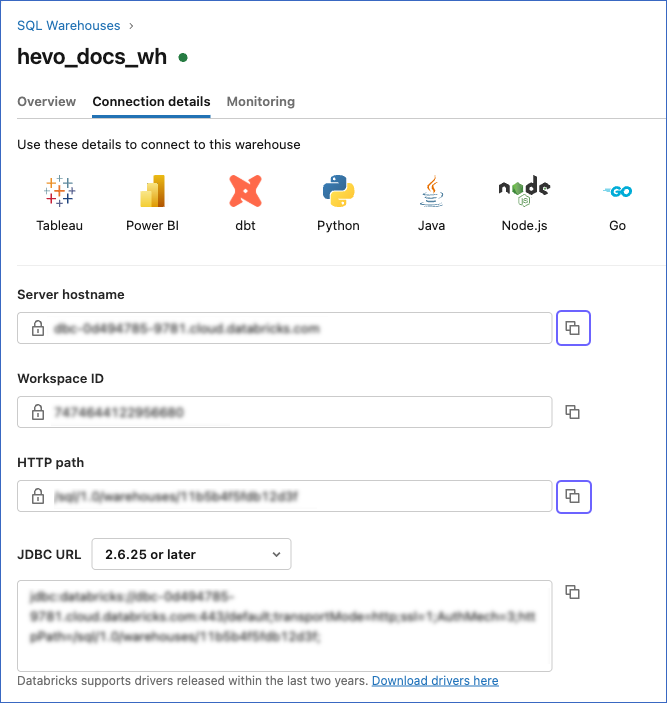
Copy the Server hostname and the HTTP path values, and save them securely like any other password.
-
The workspace URL is the server hostname prefixed with https://. For example, if the server hostname is dbc-xxxxxxxx-xxxx.cloud.databricks.com, the workspace URL is https://dbc-xxxxxxxx-xxxx.cloud.databricks.com.
-
The HTTP path of a SQL warehouse is in the format /sql/1.0/warehouses/<warehouse ID>. Hevo also accepts the older /sql/1.0/endpoints/<warehouse ID> form.
-
Obtain the cluster details
-
Log in to your Databricks workspace.
-
In the left navigation pane, click Compute, and then click the name of your cluster.

-
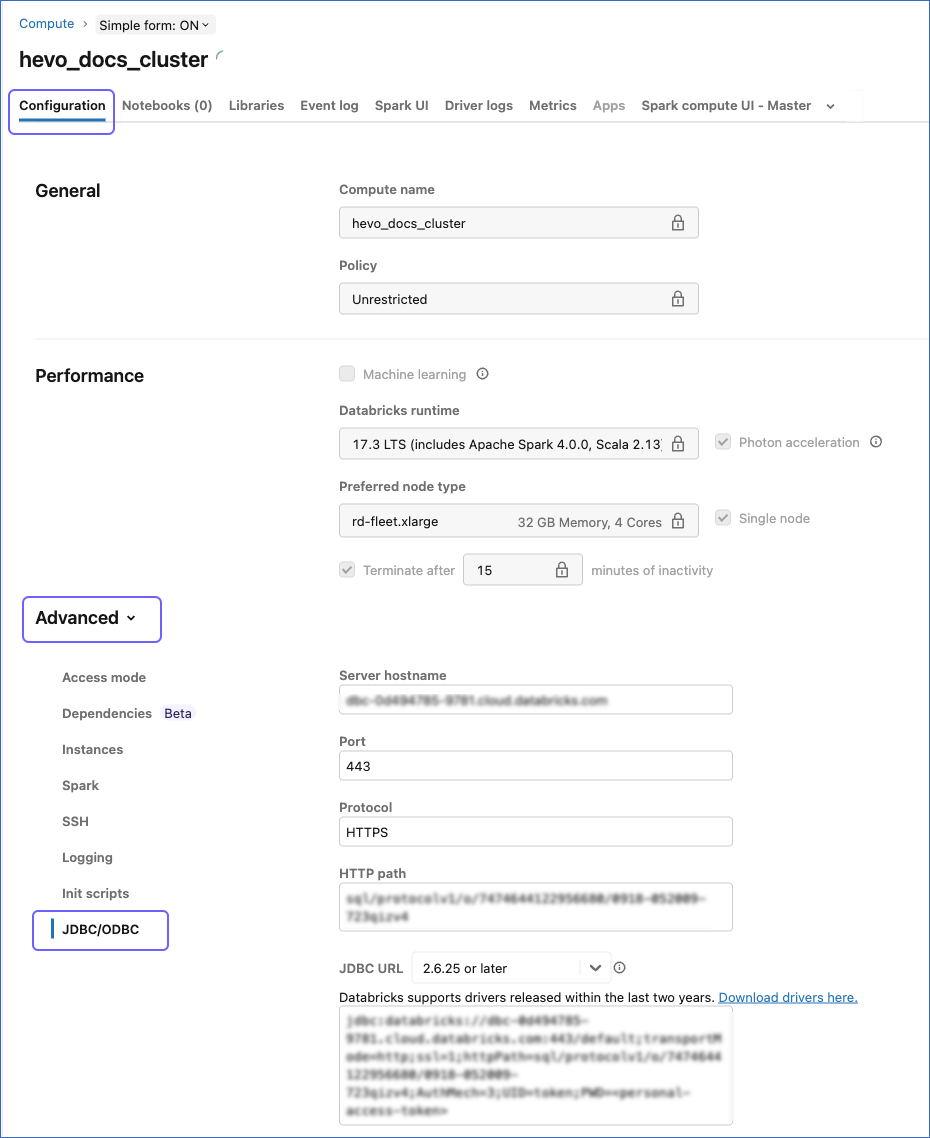
In the Configuration tab, expand the Advanced section, and click JDBC/ODBC.
-
Copy the Server hostname and the HTTP path values, and save them securely like any other password.
-
The workspace URL is the server hostname prefixed with https://. For example, if the server hostname is dbc-xxxxxxxx-xxxx.cloud.databricks.com, the workspace URL is https://dbc-xxxxxxxx-xxxx.cloud.databricks.com.
-
The HTTP path of a cluster is in the format sql/protocolv1/o/<workspace ID>/<cluster ID>. Databricks displays this value without a leading slash.
-
Use these as the Workspace URL and HTTP Path while configuring your Databricks Destination.
Identify your Catalog Type and Catalog Name
The catalog type determines the naming format for the tables that Hevo creates. Unity Catalog is the default for new workspaces, and the legacy Hive Metastore is not available if legacy access is turned off for your account or workspace.
Note: Databricks does not provide access to the Hive Metastore in the accounts created after December 18, 2025.
Perform the following steps to identify your catalog type and catalog name:
-
Log in to your Databricks workspace.
-
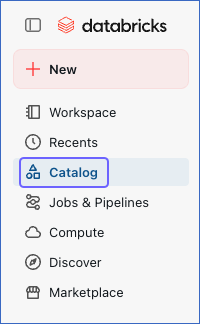
In the left navigation pane, click Catalog.
-
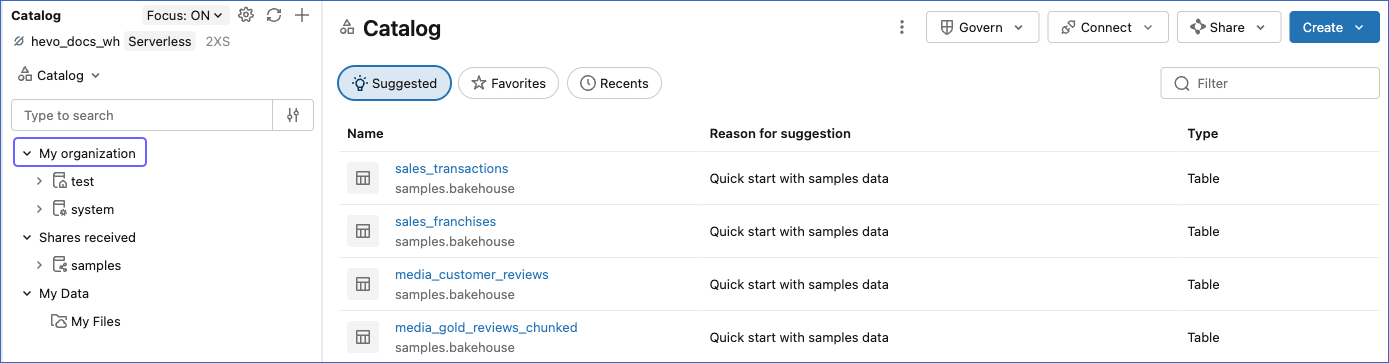
In the Catalog pane, check the catalogs listed under My organization:
-
If you see one or more named catalogs, your workspace uses Unity Catalog. Copy the name of the catalog that you want Hevo to load data into. For example, test.
-
If you see a catalog named hive_metastore, the legacy Hive Metastore is available in your workspace. The catalog name is not required while configuring your Destination, and Hevo addresses your tables through the hive_metastore catalog.
-
Use these as the Catalog Type and Catalog Name while configuring your Databricks Destination.
Grant Privileges to the Databricks User
Hevo does not need a workspace administrator to connect to your Databricks workspace. Hevo connects as the Databricks user that owns the personal access token you provide, and that user needs only the privileges required to create a schema, create the tables in that schema, add columns to those tables, and read and write rows.
Grant the Can use permission on a SQL warehouse, or the Can Restart permission on an all-purpose cluster. The Can use permission includes the ability to start a stopped SQL warehouse, so no further permission is needed for it. An all-purpose cluster requires the Can Restart permission to be started. In a Unity Catalog workspace, also grant the privileges on the catalog. A Hive Metastore workspace has no catalog-level privileges to grant.
Grant the permission on a SQL warehouse
Perform the following steps to grant the Can use permission:
-
Log in to your Databricks workspace.
-
In the left navigation pane, under SQL, click SQL Warehouses, and then click the name of your warehouse.
-
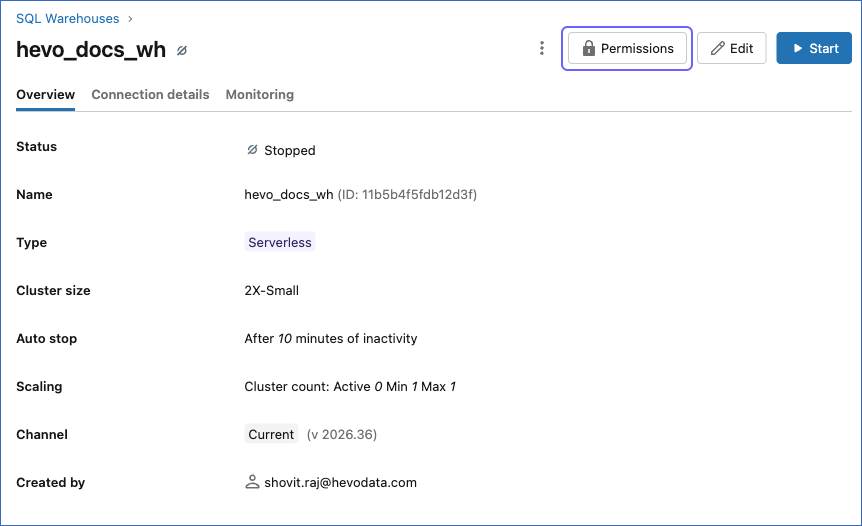
Click Permissions.
-
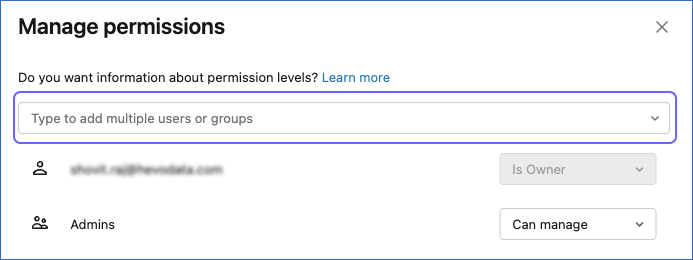
In the Manage permissions dialog, click the Type to add multiple users or groups field, and select the Databricks user that Hevo connects as.
-
Select Can use in the permission list, and then click Add.
Your Databricks user can now run queries on this SQL warehouse.
Grant the permission on an all-purpose cluster
Perform the following steps to grant the Can Restart permission:
-
Log in to your Databricks workspace.
-
In the left navigation pane, click Compute, and then click the name of your cluster.
-
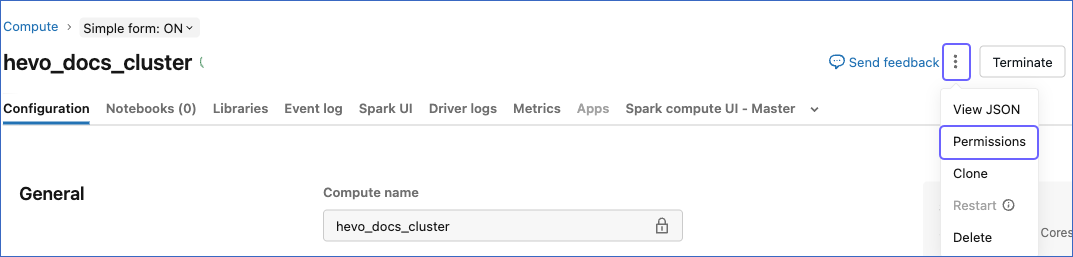
Click the More icon in the top right corner, and then click Permissions.
-
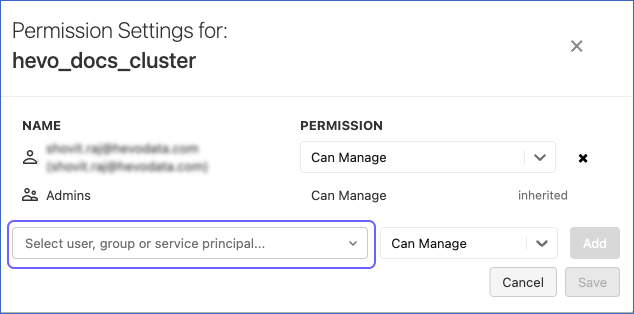
In the Permission Settings dialog, click the Select user, group or service principal field, and select the Databricks user that Hevo connects as.
-
Select Can Restart in the permission list, click Add, and then click Save.
Note: The Can Restart permission allows the user to start, restart, and terminate the compute, and also includes the Can Attach To permission.
Your Databricks user can now start this cluster and run queries on it.
Grant the privileges on the catalog
Note: This section is applicable only if your workspace uses Unity Catalog.
Perform the following steps to grant the privileges on the catalog:
-
Log in to your Databricks workspace as a user with the MANAGE privilege on the catalog.
Note: A workspace administrator holds this privilege. If you do not have it, ask your administrator to run the script for you.
-
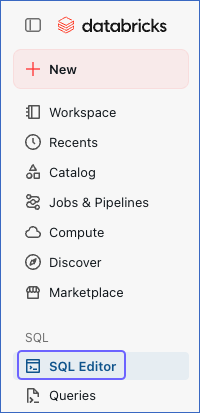
In the left navigation pane, under SQL, click SQL Editor.
-
Copy the following script into the editor, and replace the sample values with your own:
-- Replace "main" with the name of the catalog that Hevo loads data into -- Replace "hevo_user@example.com" with the Databricks user that owns the token GRANT USE CATALOG, CREATE SCHEMA ON CATALOG `main` TO `hevo_user@example.com`; -- Grant access to the schemas that Hevo creates and loads data into GRANT USE SCHEMA, CREATE TABLE, MODIFY, SELECT ON CATALOG `main` TO `hevo_user@example.com`;Note: All the privileges are granted on the catalog. In Unity Catalog, a privilege granted on a catalog applies to all the current and future schemas and tables in it. Hence, you do not need to grant them again for the schemas and tables that Hevo creates later.
-
Select your SQL warehouse or cluster in the compute list at the top of the editor.
-
Click Run all to run the script.

Your Databricks user can now create the schemas and tables that Hevo loads your data into.
Once the privileges are granted, create the personal access token that Hevo authenticates with.
Create a Databricks Personal Access Token
A personal access token (PAT) authenticates Hevo to your workspace. The token inherits the privileges of the user who creates it, so create it as the user that you granted the privileges to in the Grant Privileges to the Databricks User section.
Note: Databricks classifies personal access tokens as a legacy authentication method and recommends OAuth where supported. This procedure uses a PAT because it is the authentication method supported by this Hevo Destination configuration.
Perform the following steps to create a personal access token:
-
Log in to your Databricks workspace.
-
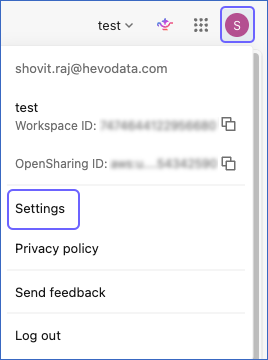
Click your profile icon in the top right corner, and then click Settings.
-
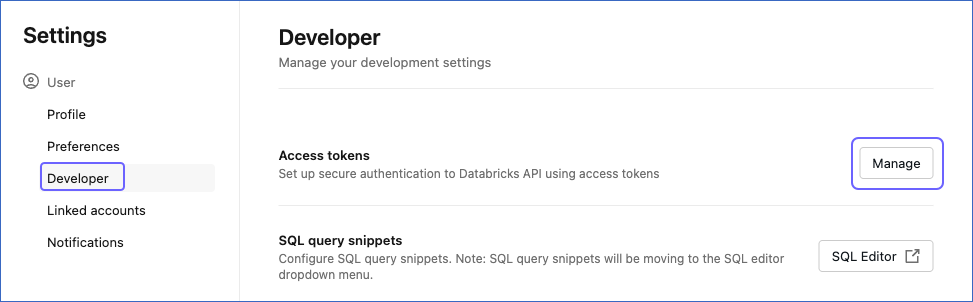
In the User section, click Developer, and then click Manage next to Access tokens.
-
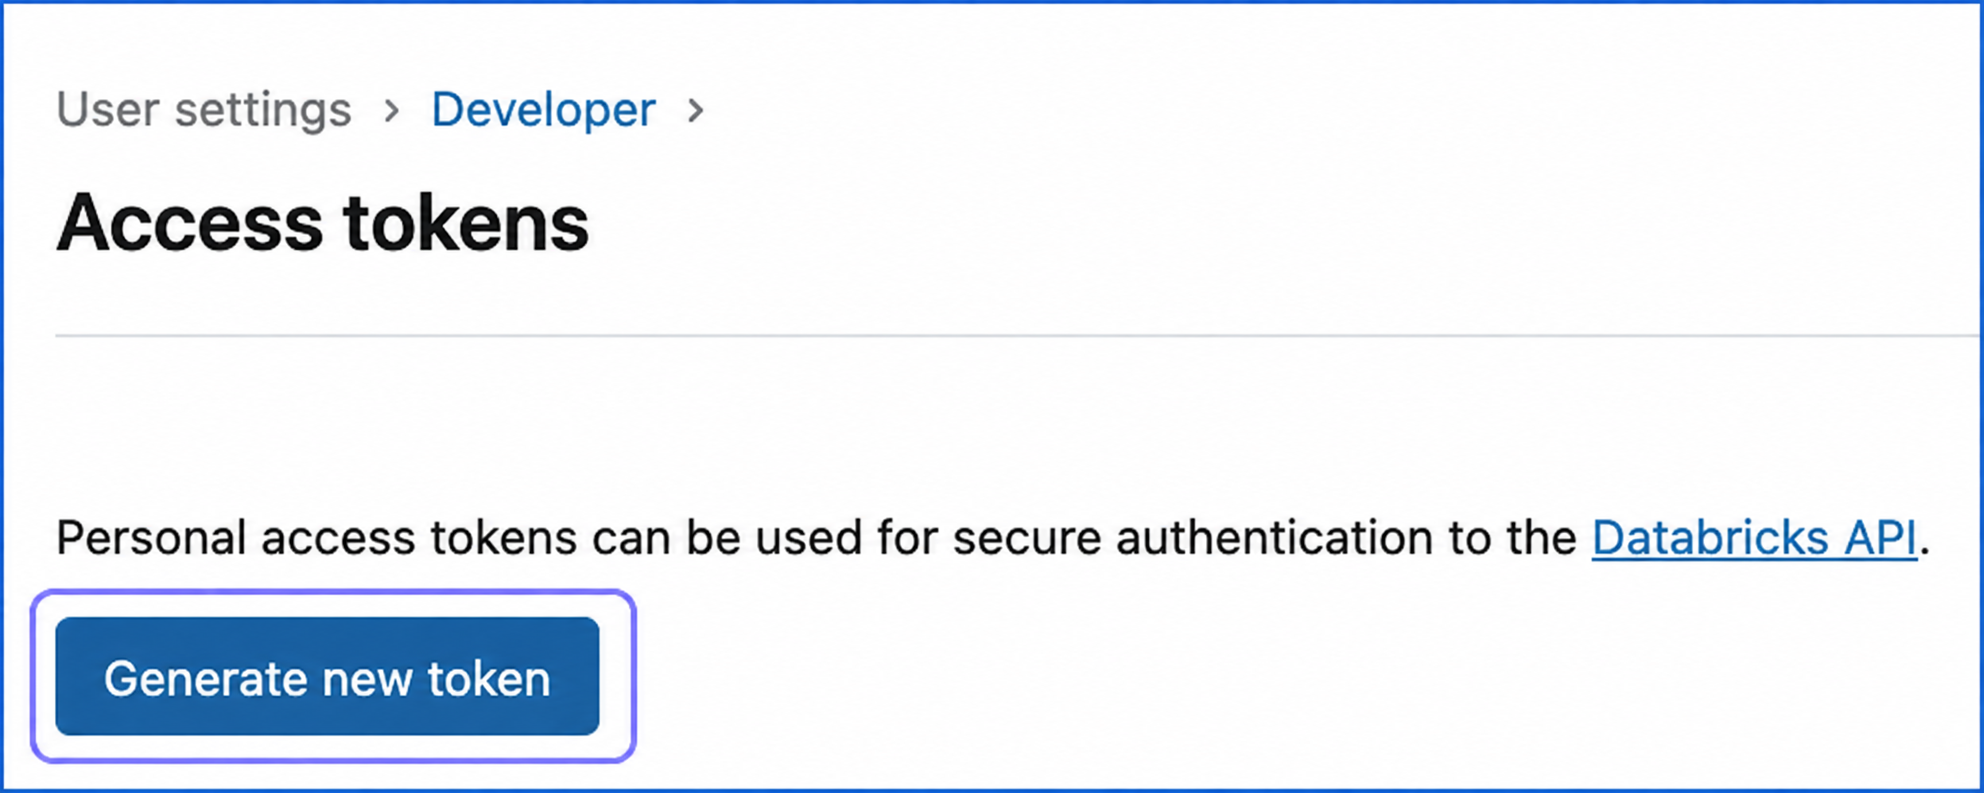
Click Generate new token.
-
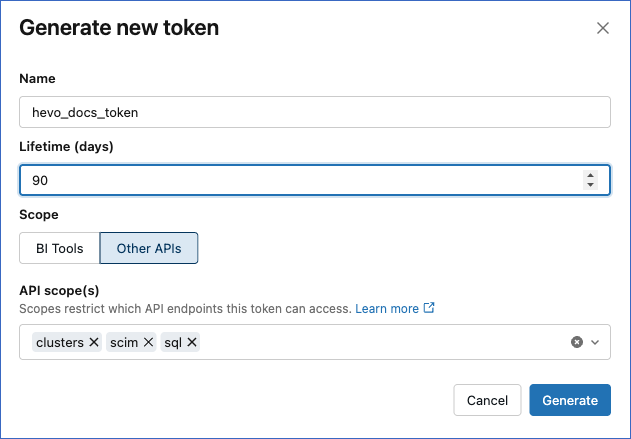
In the Generate new token dialog, specify the following:
-
Name: A name that identifies the token. For example, hevo_docs_token.
-
Lifetime (days): The number of days after which the token expires. Note this date, as your Pipelines stop loading data once the token expires and you must replace it in your Destination configuration.
-
Scope: Select Other APIs. Hevo uses the SQL and cluster endpoints of the Databricks API, which the BI Tools scope does not cover.
-
API scope(s): Select clusters, scim, and sql.
Note: The Scope and API scope(s) fields are not present in every workspace. If your workspace does not display them, the token is created with access to all the endpoints and no action is needed.
-
-
Click Generate.
-
Copy the token and save it securely like any other password.
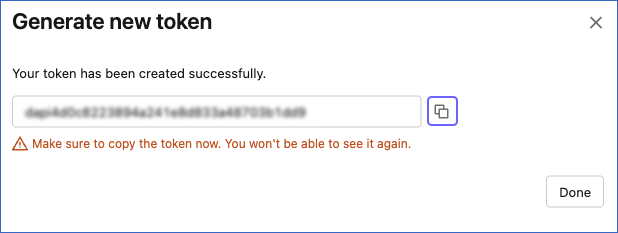
Note: The token is displayed only once for security reasons. Once you close the Generate new token dialog, it cannot be retrieved. Never share this credential via email or with unauthorized individuals. If the token is lost, you must generate a new token and modify the Destination configuration with the new token.
Use this as the Personal Access Token while configuring your Databricks Destination.
(Optional) Allow Connections from the Hevo IP Addresses
Databricks lets you restrict the addresses that can reach your workspace with the IP access list feature. If this feature is enabled for your workspace, Hevo cannot connect until you add the Hevo IP addresses of your region to an allow list.
Note:
-
If the IP access list feature is not enabled for your workspace, skip to the Configure Databricks as a Destination section.
-
You must have the workspace administrator role to create an IP access list.
Databricks provides a command-line interface and a REST API for configuring the IP access lists of a workspace. To add the Hevo IP addresses, call the Create access list API with the POST method from any API client, such as Postman or a Terminal window. Use the personal access token that you created in the Create a Databricks Personal Access Token section as the Bearer token for making the API call. Specify the following in the JSON request body:
-
label: A string value to identify the access list. For example, HEVO. -
list_type: A string value to identify the type of list created. This parameter can take one of the following values:-
ALLOW: Add the specified IP addresses to the access list.
-
BLOCK: Remove the specified IP addresses from the access list, or block connections from them.
-
-
ip_addresses: A JSON array of IP addresses and CIDR ranges, given as string values. Use the Hevo IP addresses of your region and their CIDR ranges in this parameter.
The base path for the API endpoint is https://<deployment name>.cloud.databricks.com/api/2.0. For example, if the deployment name is dbc-westeros, the URL to call the Create access list API is https://dbc-westeros.cloud.databricks.com/api/2.0/ip-access-lists.
The following example adds an access list to allow the Hevo IP addresses for the Asia region:
curl -X POST -n \
    -H "Authorization: Bearer <your personal access token>"
    -H "Content-Type: application/json"
    -H "Accept: application/json"
        https://<deployment-name>.cloud.databricks.com/api/2.0/ip-access-lists
        -d '{
          "label": "HEVO",
          "list_type": "ALLOW",
          "ip_addresses": [
              "13.228.214.171/32",
              "52.77.50.136/32"
            ]
          }'
Note: Replace the placeholder values in the command above with your own. For example, <deployment-name> with dbc-westeros.
Configure Databricks as a Destination
Perform the following steps to configure Databricks as a Destination using the credentials and connection settings you have gathered so far:
-
Click Destinations in the Navigation Bar.
-
Click the Edge tab in the Destinations List View and click + Create Edge Destination.
-
On the Create Destination page, click Databricks.
-
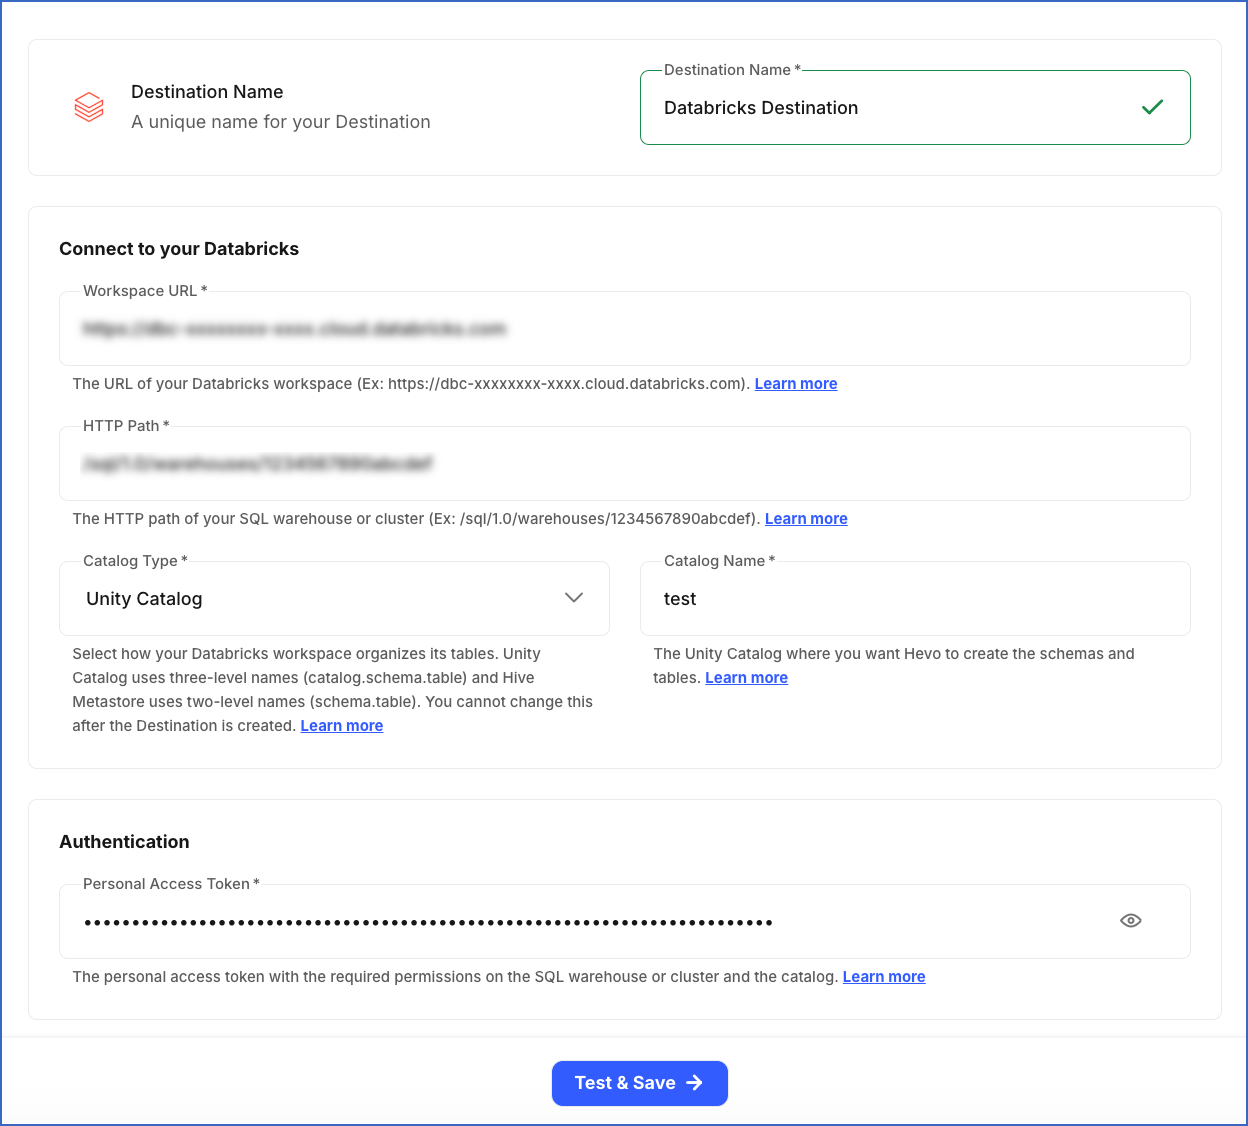
In the screen that appears, specify the following:
-
Destination Name: A unique name for your Destination, not exceeding 255 characters. For example, Databricks Destination.
-
In the Connect to your Databricks section:
-
Workspace URL: The URL of your Databricks workspace that you obtained in the Obtain your Workspace URL and HTTP Path section. For example, https://dbc-xxxxxxxx-xxxx.cloud.databricks.com.
-
HTTP Path: The HTTP path of the SQL warehouse or the cluster that Hevo connects to that you obtained in the Obtain your Workspace URL and HTTP Path section.
-
Catalog Type: The data governance solution used by your workspace that you identified in the Identify your Catalog Type and Catalog Name section. This field cannot be changed once the Destination is created.
-
Unity Catalog: Hevo addresses your tables with three-level names in the format catalog.schema.table.
-
Hive Metastore (legacy): Hevo addresses your tables with two-level names in the format schema.table.
-
-
Catalog Name: The catalog that Hevo creates the schemas and tables in that you identified in the Identify your Catalog Type and Catalog Name section. This field is displayed only when the Catalog Type is Unity Catalog.
-
-
In the Authentication section:
- Personal Access Token: The token that you created in the Create a Databricks Personal Access Token section.
-
-
Click Test & Save to test the connection to your Databricks workspace.
Once the test is successful, Hevo creates your Databricks Destination. You can use this Destination while creating your Pipeline to start moving data into your Databricks workspace.
Additional Information
Read the detailed Hevo documentation for the following related topics:
Modifying Databricks Destination Configuration
You can modify some settings of your Databricks Destination after its creation. However, any configuration changes will affect all the Pipelines using that Destination.
To modify the configuration of your Databricks Destination:
-
In the detailed view of your Destination, do one of the following:
-
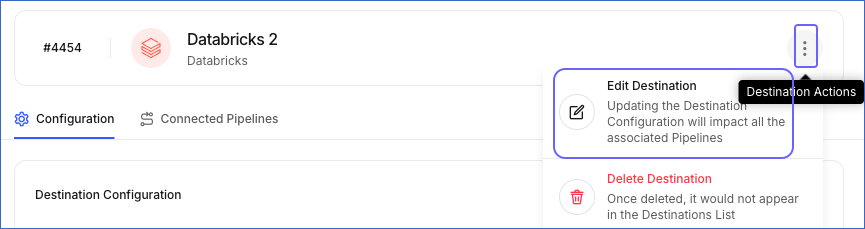
Click the Destination Actions icon, and then click Edit Destination.
-
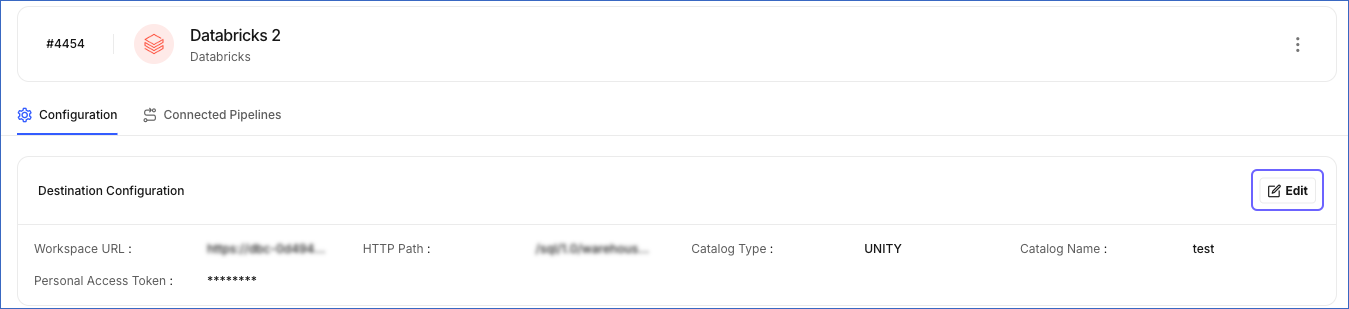
In the Destination Configuration section, click Edit.
-
-
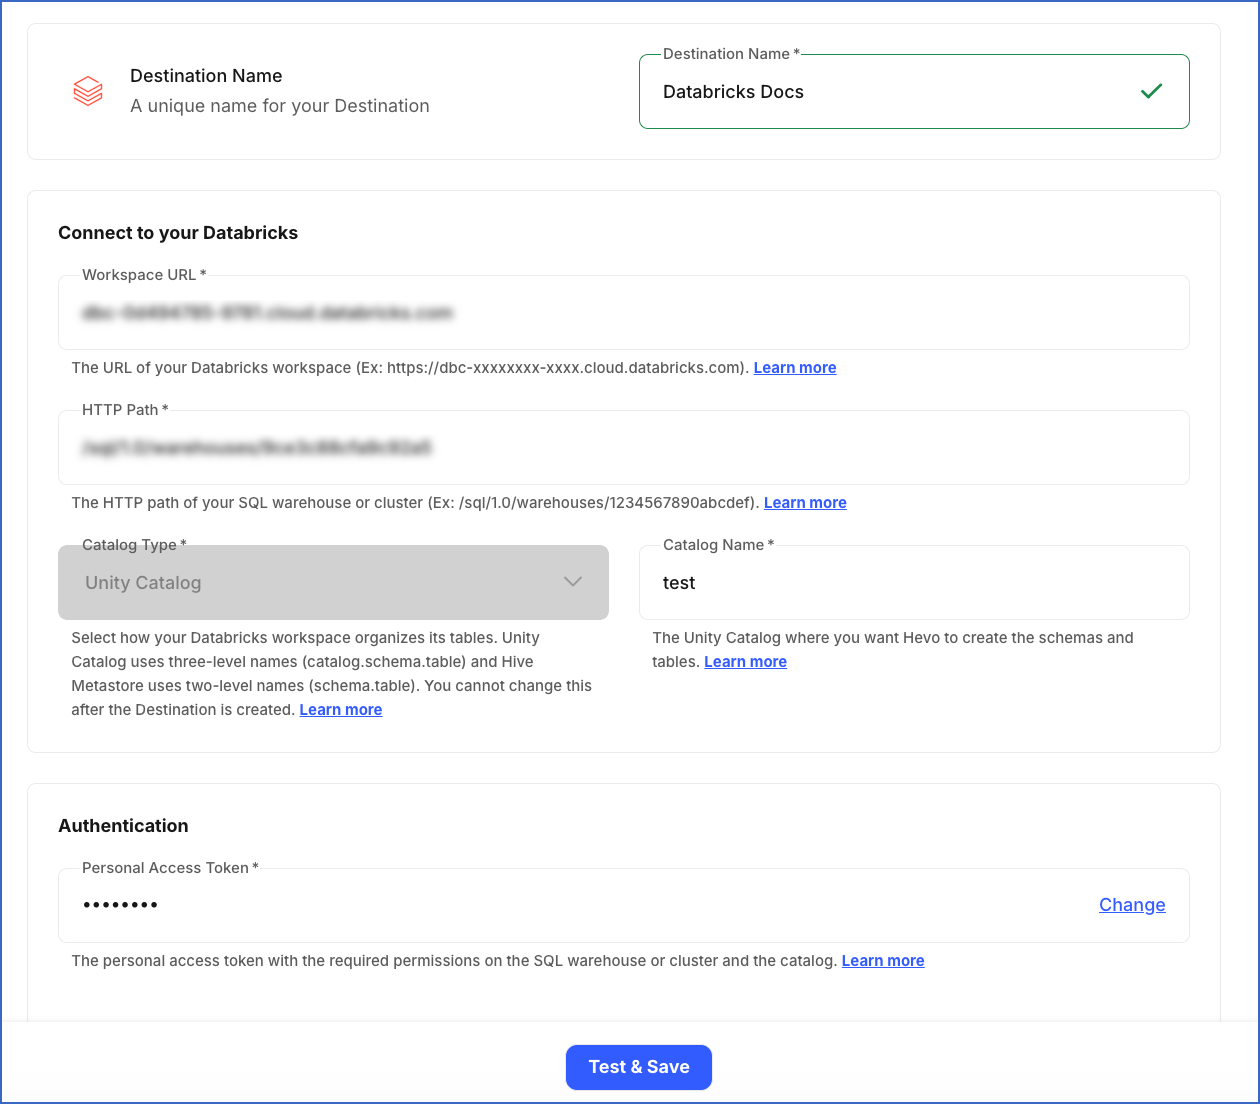
On the Edit Destination page:
-
You can specify a new name for your Destination, not exceeding 255 characters.
-
In the Connect to your Databricks section, you can update the Workspace URL, the HTTP Path, and the Catalog Name.
The Catalog Type cannot be changed, as Hevo identifies your existing Destination tables using the naming format of the catalog type that you selected.
-
In the Authentication section, click Change next to the Personal Access Token field to clear it, and then enter your new token. Do this whenever you replace an expired token in Databricks.
-
-
Click Test & Save to check the connection to your Databricks Destination and then save the modified configuration.
Data Type Evolution in Databricks Destinations
Hevo has a standardized data system that defines unified internal data types, referred to as Hevo data types. During the data ingestion phase, the Source data types are mapped to the Hevo data types, which are then transformed into the Destination-specific data types during the data loading phase. A mapping is then generated to evolve the schema of the Destination tables.
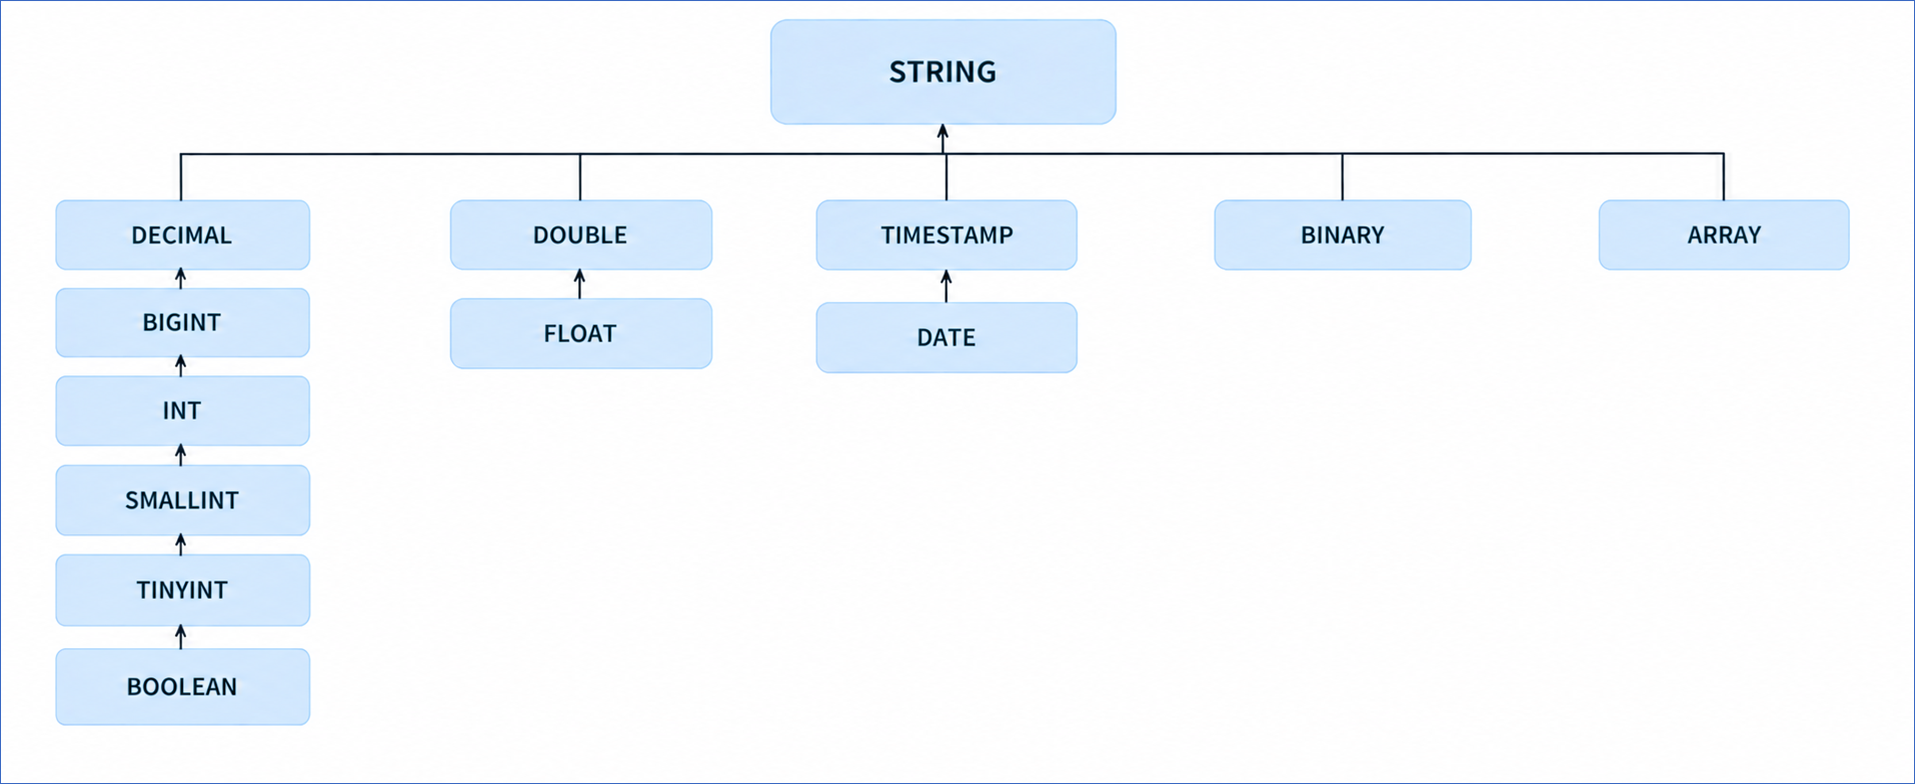
The following image illustrates the data type hierarchy applied to Databricks Destination tables:
Data Type Mapping
The following table shows the mapping between Hevo data types and Databricks data types:
| Hevo Data Type | Databricks Data Type |
|---|---|
| BOOLEAN | BOOLEAN |
| BYTEARRAY | BINARY |
| - BYTE - SHORT - INTEGER |
INT |
| LONG | BIGINT |
| DATE | DATE |
| - DATETIME - DATETIME_TZ |
TIMESTAMP |
| DECIMAL | - DECIMAL - STRING |
| FLOAT | FLOAT |
| DOUBLE | DOUBLE |
| - ARRAY - GEOGRAPHY - JSON - STRUCT - TIME - TIMETZ - VARCHAR - XML |
STRING |
Note: Databricks does not have a standalone JSON data type. Hence, Hevo writes the JSON, STRUCT, and ARRAY values to your Destination tables as their JSON representation in a STRING column.
Handling the Decimal data type
Hevo maps a DECIMAL value with a fixed precision (P) and scale (S) to the Databricks DECIMAL data type, as DECIMAL(P,S). If the Source does not provide the precision or the scale, Hevo cannot determine an exact DECIMAL(P,S) definition and maps the value to STRING instead to prevent data loss.
Handling of Unsupported Data Types
Hevo does not directly map the Source data types to the following Databricks data types:
-
ARRAY
-
MAP
-
STRUCT
-
VARIANT
-
Any other data type not shown in the data type hierarchy above.
Destination Considerations
-
Hevo loads the DATETIME and DATETIME_TZ values into the Databricks TIMESTAMP columns in Coordinated Universal Time (UTC). Databricks converts such a value to your session time zone when you query it. Due to this, you may observe a time difference if your session uses a time zone other than UTC. For example, a Source value
2026-09-18 10:00:00is displayed as2026-09-18 15:30:00in a session that uses India Standard Time (UTC+5:30). -
Databricks does not allow a table or column name longer than 255 characters. Additionally, a Hive Metastore workspace allows a table name of up to 128 characters only. Hevo validates your table and column names against these limits instead of shortening them, so ensure that your Source object and field names remain within the limit that applies to your catalog type.
-
When creating the schema, table, and column names in Databricks, Hevo replaces any character other than an underscore, a letter, or a digit with an underscore. Due to this, two Source fields can have the same column name. For example, the Source fields order-id and order_id are created with the same column name, order_id. In this case, Hevo loads data only for the first field and skips the second one.
-
Databricks retains the small data files created during loading, along with the files that the older table versions reference. The OPTIMIZE command combines the small files, and the VACUUM command removes the unreferenced ones. Hevo does not run these commands on your Destination tables, so in a Hive Metastore workspace, you can run them periodically to maintain query performance and free up storage. In a Unity Catalog workspace, Databricks maintains the tables that Hevo creates through predictive optimization. Ensure that this feature is enabled for your account.
Revision History
Refer to the following table for the list of key updates made to this page:
| Date | Release | Description of Change |
|---|---|---|
| Sep-24-2026 | NA | New document. |